# STranslate text-selection translation and OCR with QCode: Windows 11 walkthrough
Follow the 13 steps below and you will have STranslate, the text-selection translator, installed on Windows 11 — with QCode turning whatever English you select into Chinese straight away.
**Short answer**: In STranslate, open `Settings → Services → Text translation`, add an `OpenAI` service, put `https://api.qcode.cc/openai/v1/chat/completions` in `Endpoint`, a QCode key starting with `cr_` in `API key`, and `gpt-6.2-sol` as the model; click `Validate` and wait for the green `Validation succeeded`. After that, select English text and press `Alt + D` to translate it.
| Item | Fill in |
|---|---|
| Endpoint address | `https://api.qcode.cc/openai/v1/chat/completions` |
| API mode | `Chat Completions` |
| Key | `cr_xxxxxxxx` |
| Model | `gpt-6.2-sol` |
Checked on 2026-11-22 · STranslate 2.0.12 · Windows 11
- **Applies to**: Windows 10 / 11 (64-bit)
- **Software version**: STranslate 2.0.12
- **Screenshots updated**: 2026-11
- **Time needed**: 10 minutes
- **You will need**: a QCode API key starting with `cr_`; the ability to open `stranslate.zggsong.com`
- The PC runs Windows 10 / 11 (64-bit) and has internet access; the installer needs about 60 MB of disk space
- You have already registered at QCode.cc and copied the API key starting with `cr_` from the [Dashboard](https://qcode.cc/en/dashboard). No account yet? [Sign up for QCode](https://qcode.cc/en/auth/sign-up?utm_source=docs.qcode.cc&utm_medium=tut_before&utm_campaign=knowledge_base&src=docs-ide-stranslate-before) first, pick a plan on the [pricing page](https://qcode.cc/en/pricing?utm_source=docs.qcode.cc&utm_medium=tut_before&utm_campaign=knowledge_base&src=docs-ide-stranslate-before), then create the key in the [Dashboard](https://qcode.cc/en/dashboard).
- The browser can open `stranslate.zggsong.com` and `github.com` (the installer lives on the GitHub release page)
- The system already has the .NET 10 Desktop Runtime; if it does not, the download still works — the first launch shows an English prompt, just install it as the prompt says
## Download and install
STranslate is an open-source Windows text-selection translator that needs no login: select some text, press the hotkey, and the translation pops up; it also does screenshot translation and OCR (text recognition). The official site offers two Windows files — beginners should take the installer:
- `STranslate-win-Setup.exe`: the installer, installed by a double-click into `C:\Users\{username}\AppData\Local\STranslate`, with the configuration kept in `C:\Users\{username}\AppData\Roaming\STranslate`;
- `STranslate-win-Portable.zip`: the portable build, unzip it into a folder and run it, with the configuration written to `PortableConfig` inside the program folder.
There are only two official entry points: the website (the `下载 STranslate` (Download STranslate) button on the first screen) and the official release page . The official installation notes are at . If a launch warns that the runtime is missing, install the .NET 10 Desktop Runtime as prompted; the download page is .
Networks differ between regions, so pick your region first:
**Other regions (including Europe, North America, Japan)**
- Open directly and download `STranslate-win-Setup.exe` (the installer) from the latest release.
- You can also reach the same page through the `下载 STranslate` (Download STranslate) button on **stranslate.zggsong.com**.
- If you prefer the portable build, download `STranslate-win-Portable.zip`, unzip it into any folder and double-click the `STranslate.exe` inside.
- Command-line users can use Scoop: run `scoop bucket add extras` first, then `scoop install extras/stranslate`.
**Mainland China**
- Open the official site **stranslate.zggsong.com** and click `下载 STranslate` (Download STranslate) on the first screen; it jumps to the GitHub release page.
- The GitHub page is sometimes slow or will not open; try again a little later, or download `STranslate-win-Setup.exe` directly from the Assets list on the release page.
- If a window titled `You must install .NET Desktop Runtime to run this application.` appears at launch, click `Download it now` and follow the guide to install **.NET 10 Desktop Runtime** (the Desktop Runtime, not the ASP.NET Runtime), then open STranslate again.
- The installer is about 60 MB; double-click it once it has downloaded, and do not run it from inside the browser.
## Follow the screenshots: Windows, one step at a time
The 13 steps below each do one thing. The screenshots show a Chinese interface: the orange numbers on the images match the ①②③ in the text one to one — when the text says ①, click the spot marked ① in the picture.
### Open the official site and click `下载 STranslate` (Download STranslate)
Type `stranslate.zggsong.com` in the browser address bar to open the official site. The blue button in the middle of the first screen is the `下载 STranslate` (Download STranslate) button that ① points at — click it.
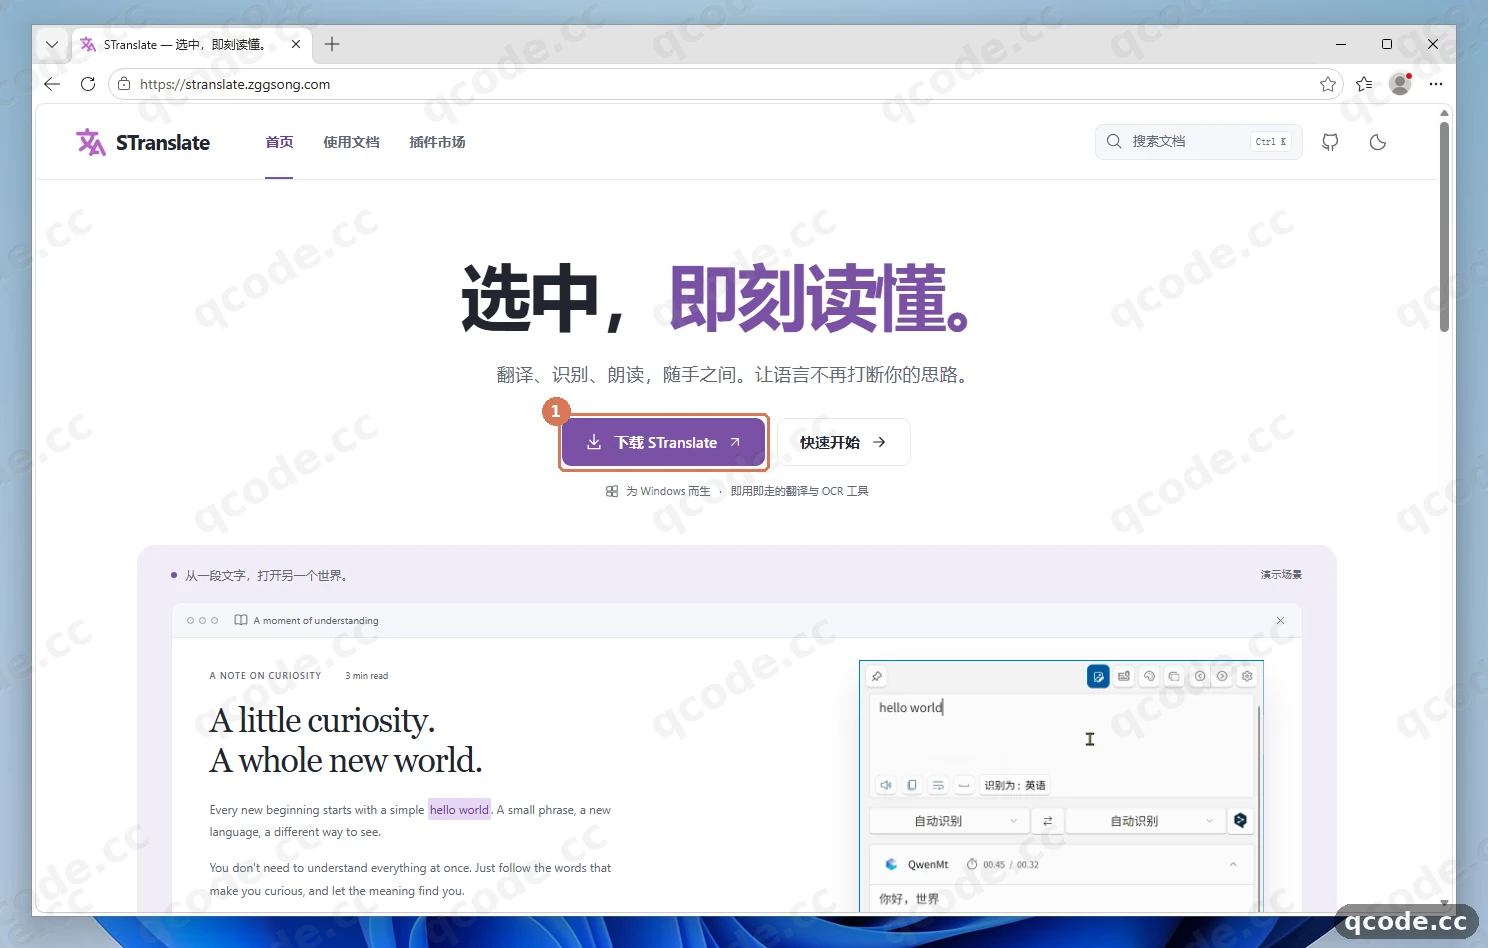
Done right you will see: a new browser tab opens, the address bar reads `github.com/STranslate/STranslate/releases`, and the page lists the installation files of the latest release.
### Recognise the two Windows files the official notes describe
The official installation notes put both Windows files on one page: ① is the `前往下载` (Go to download) button, which jumps to the release page; ② is the installer `STranslate-win-Setup.exe`, the one beginners should use; ③ is the portable `STranslate-win-Portable.zip`, which runs after unzipping and writes nothing to the registry.
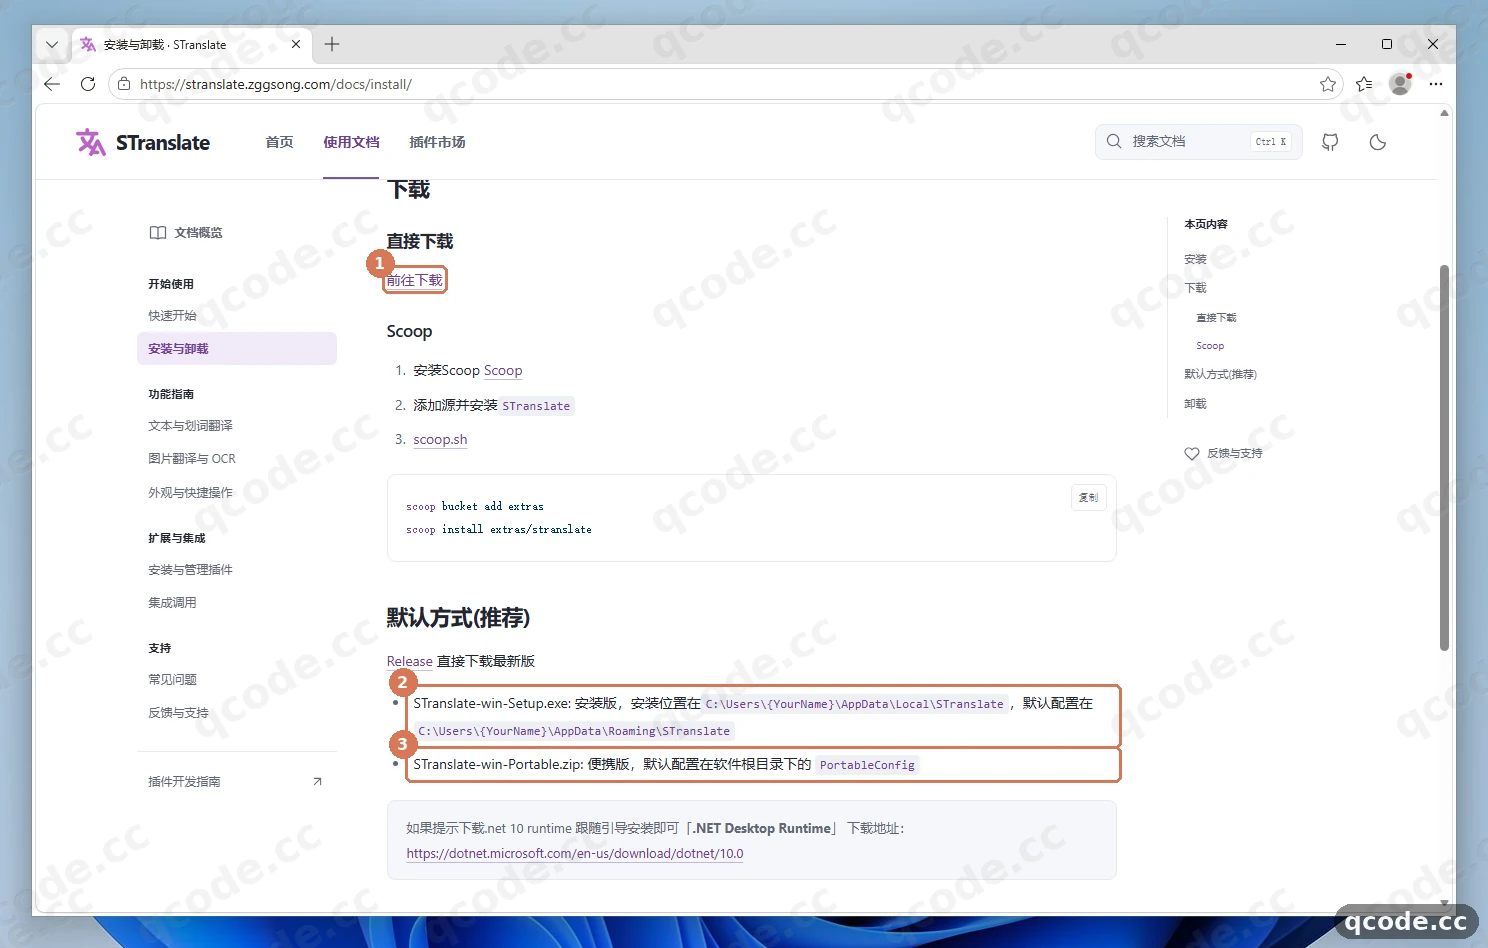
Done right you will see: the name `STranslate-win-Setup.exe` is easy to find on the page, and after clicking `前往下载` (Go to download) the same file name also appears on the GitHub page.
### Double-click to install, then pick language and theme on wizard page 1
Double-click the `STranslate-win-Setup.exe` you downloaded. No installer wizard appears; it finishes in a few seconds and opens by itself into the `欢迎使用 STranslate` (Welcome to STranslate) wizard (5 pages in total). Page 1 has ① `语言` (Language) and ② `颜色主题` (Colour theme); leave both at the defaults `系统` (System) and `跟随系统` (Follow system), then click ③ `下一个` (Next).
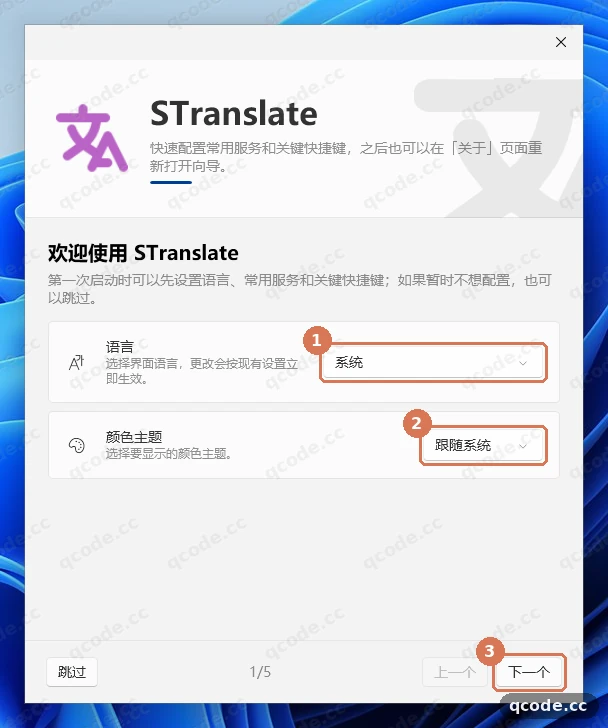
Done right you will see: the window title is `欢迎使用 STranslate` (Welcome to STranslate), the bottom reads `1/5`, and clicking `下一个` (Next) turns to page 2.
**Stuck? After the double-click only a small English window appears, with no wizard**
That window says `You must install .NET Desktop Runtime to run this application.`, which means the PC is missing the .NET 10 Desktop Runtime. Click `Download it now` in that window, follow the guide to install the 64-bit version of the **.NET 10 Desktop Runtime** (not the ASP.NET Runtime), then double-click STranslate again and the welcome wizard appears as it should.
### Check the hotkeys and click `完成` (Finish)
The three pages in between need nothing but `下一个` (Next); keep going until page 5/5, `快捷键` (Shortcuts). ① is `Alt + D` for text-selection translation, which this tutorial relies on at the end; ② is `Alt + S` for screenshot translation. Once you have confirmed neither combination is taken by another program, click ③ `完成` (Finish).
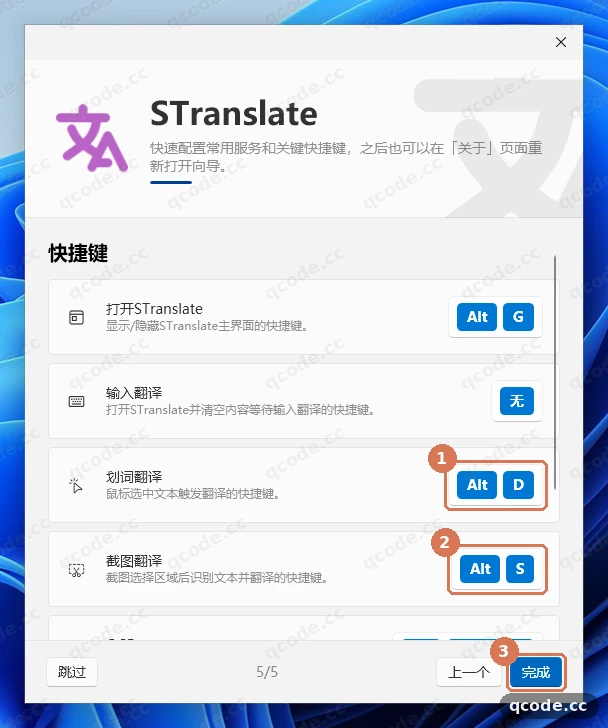
Done right you will see: the wizard closes and the STranslate main translation window pops up in the middle of the screen.
### Open the settings
The main window is small and the toolbar sits at the top. Click the gear icon circled by ① to open the separate `设置` (Settings) window; remember that you can also open it at any time with `Ctrl + ,`.
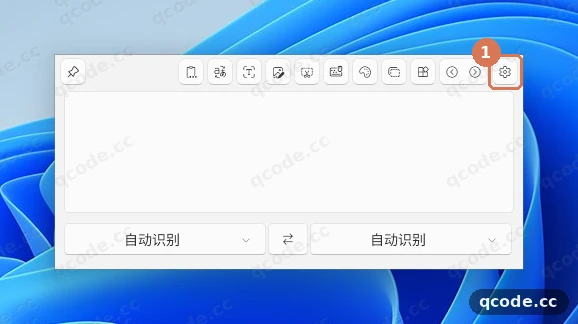
Done right you will see: a large window titled `设置` (Settings) appears on screen, with a column of navigation on the left.
### Learn the two entries you need in Settings
In the left-hand navigation of Settings this tutorial uses only two places: ① is `文本翻译` (Text translation) under `服务` (Services), where every translation service is added; ② is `插件` (Plugins), where you confirm the OpenAI plugin is installed.
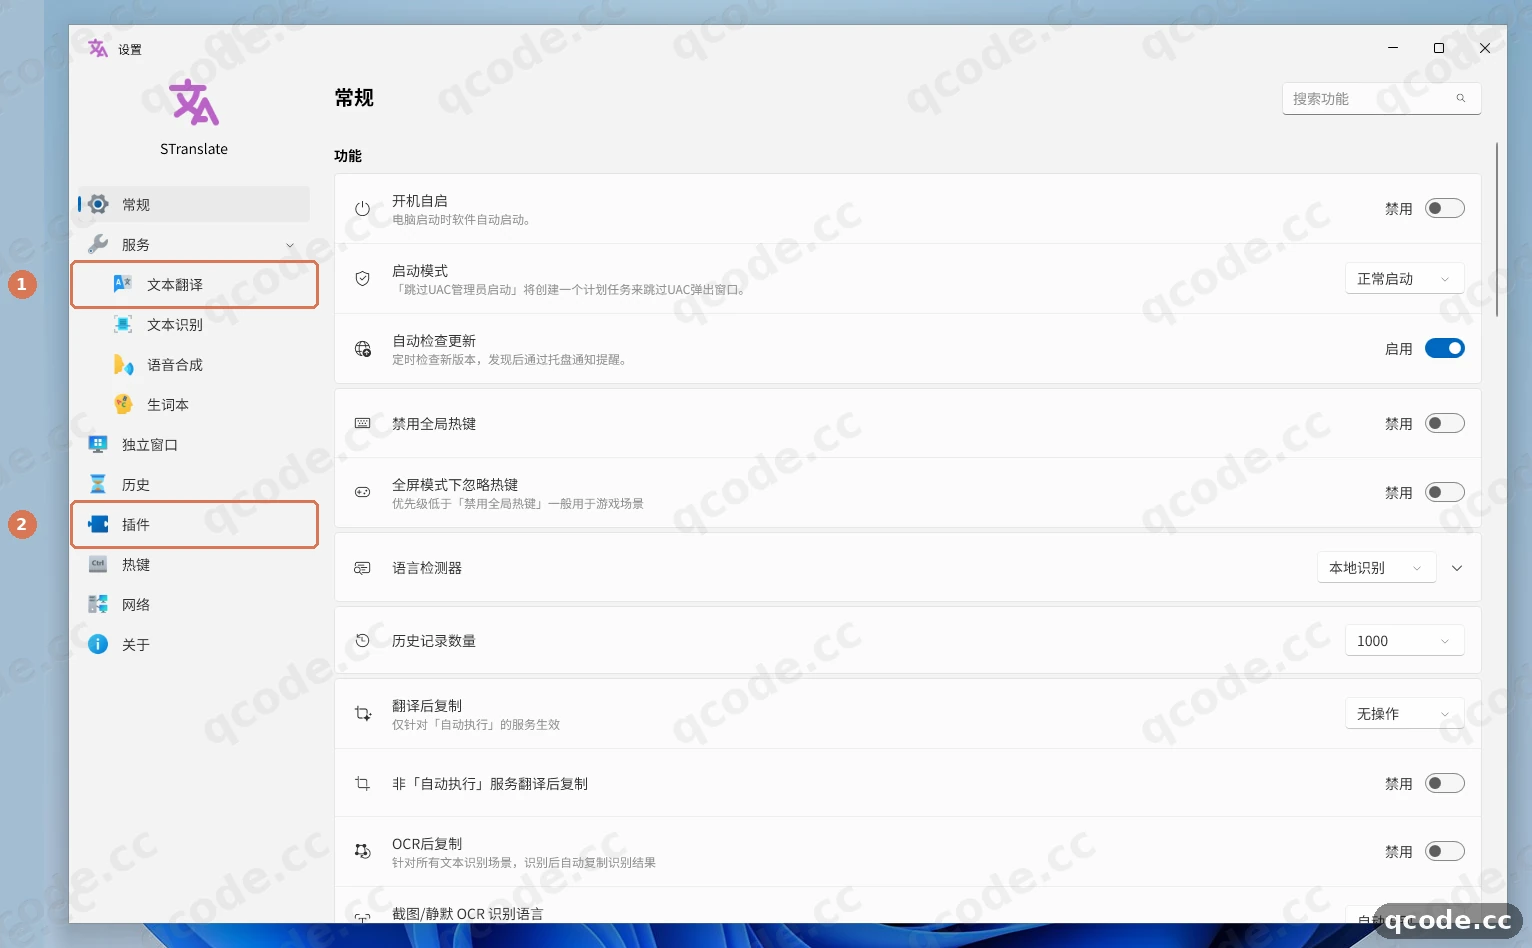
Done right you will see: the expanded `服务` (Services) group on the left, with `文本翻译` (Text translation), `文本识别` (Text recognition), `语音合成` (Speech synthesis) and `生词本` (Vocabulary book) under it, then `插件` (Plugins) and `关于` (About) below.
### Confirm the OpenAI plugin is already installed
Click `插件` (Plugins) on the left. The official OpenAI translation plugin ships with the installer, so there is nothing extra to download: ① is `OpenAI` in the list, subtitled `适用于 STranslate 的 OpenAI 官方插件` (the official OpenAI plugin for STranslate). At the top right, ② is `市场` (Market), which holds third-party extensions — not needed this time.
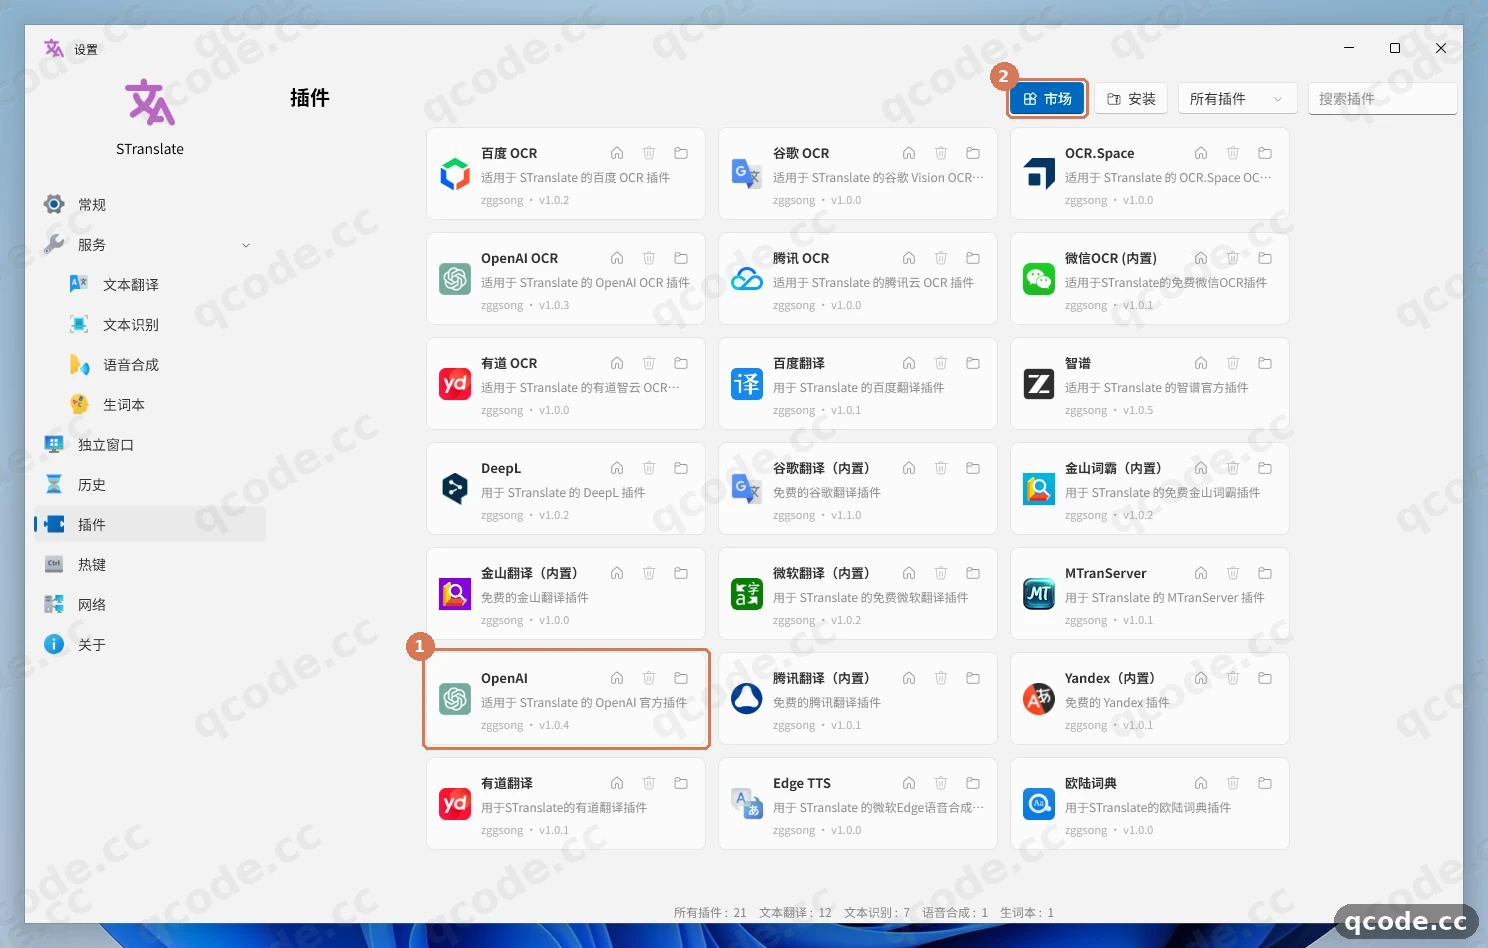
Done right you will see: both `OpenAI` and `OpenAI OCR` in the list, with nothing to download and no need to restart the app.
### Add an OpenAI translation service
Click `服务 → 文本翻译` (Services → Text translation) on the left; the list on the right is empty at this point. Click ① `+ 添加` (+ Add) at the bottom left, select the `OpenAI` card in the `预装` (Preinstalled) group of the `添加翻译服务` (Add translation service) window that appears, then click ② `添加` (Add).
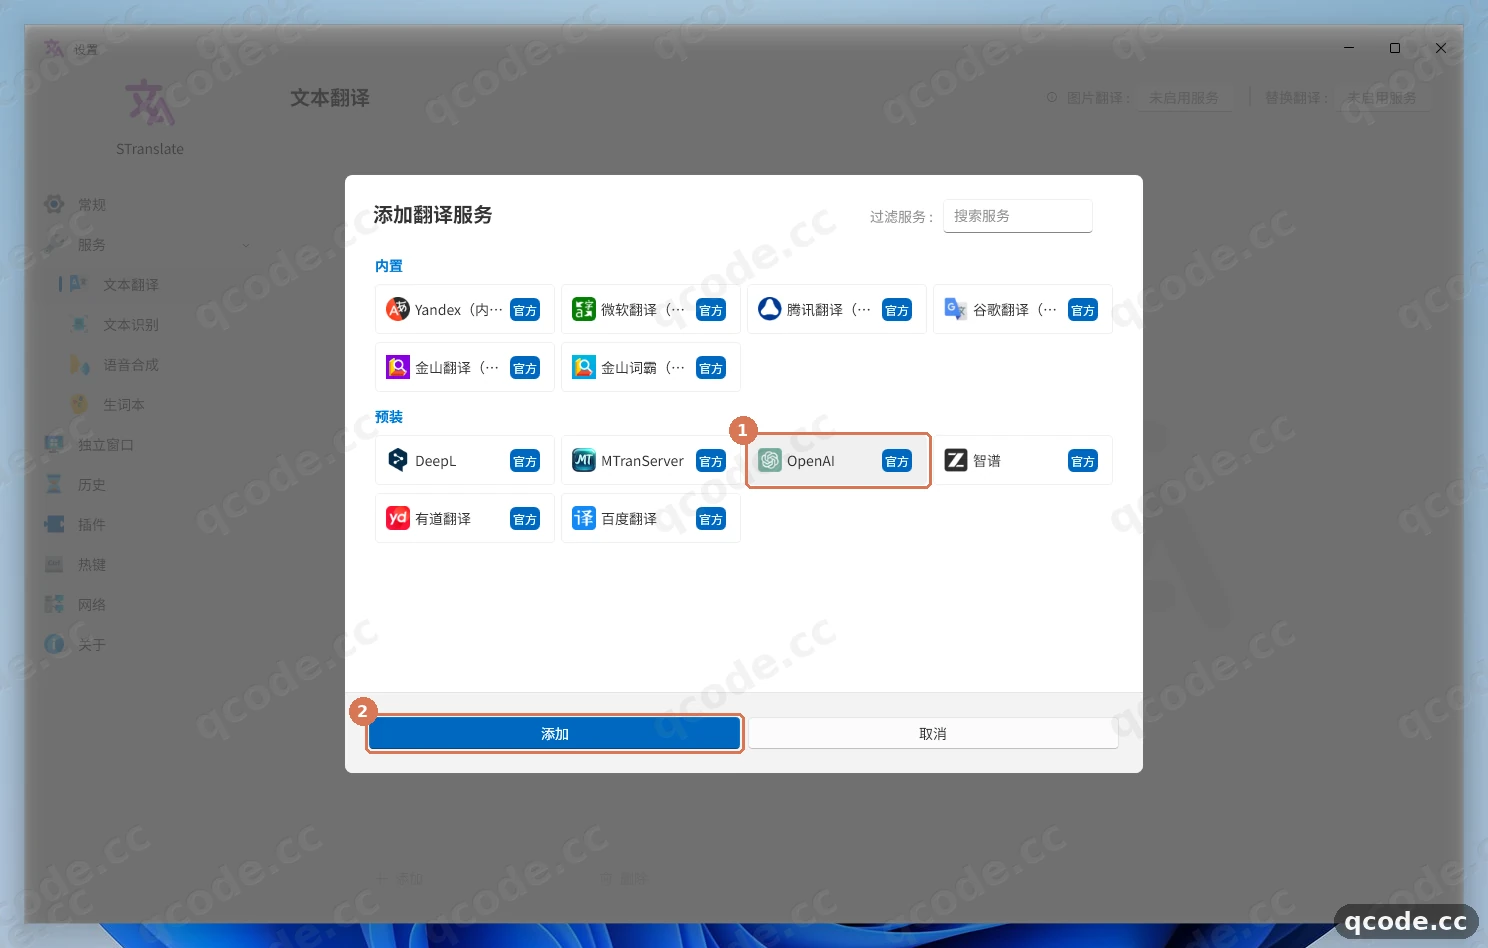
Done right you will see: the OpenAI configuration form on the right, listing `API 模式` (API mode), `接口` (Endpoint), `密钥` (API key) and `请选择模型` (Select a model) from top to bottom.
### Turn the switch on and fill in endpoint, key and model
The switch to the right of the `OpenAI` card on the left is off by default — click ① to turn it on; unless it is on, translation never uses this service. On the right, leave ② `API 模式` (API mode) at `Chat Completions` and do not pick `Responses`. Next, paste the full address `https://api.qcode.cc/openai/v1/chat/completions` into the `接口` (Endpoint) box, paste the QCode key starting with `cr_` into the `密钥` (API key) box (masked in the screenshot), and finally click ③ `请选择模型` (Select a model), type `gpt-6.2-sol` and press Enter.
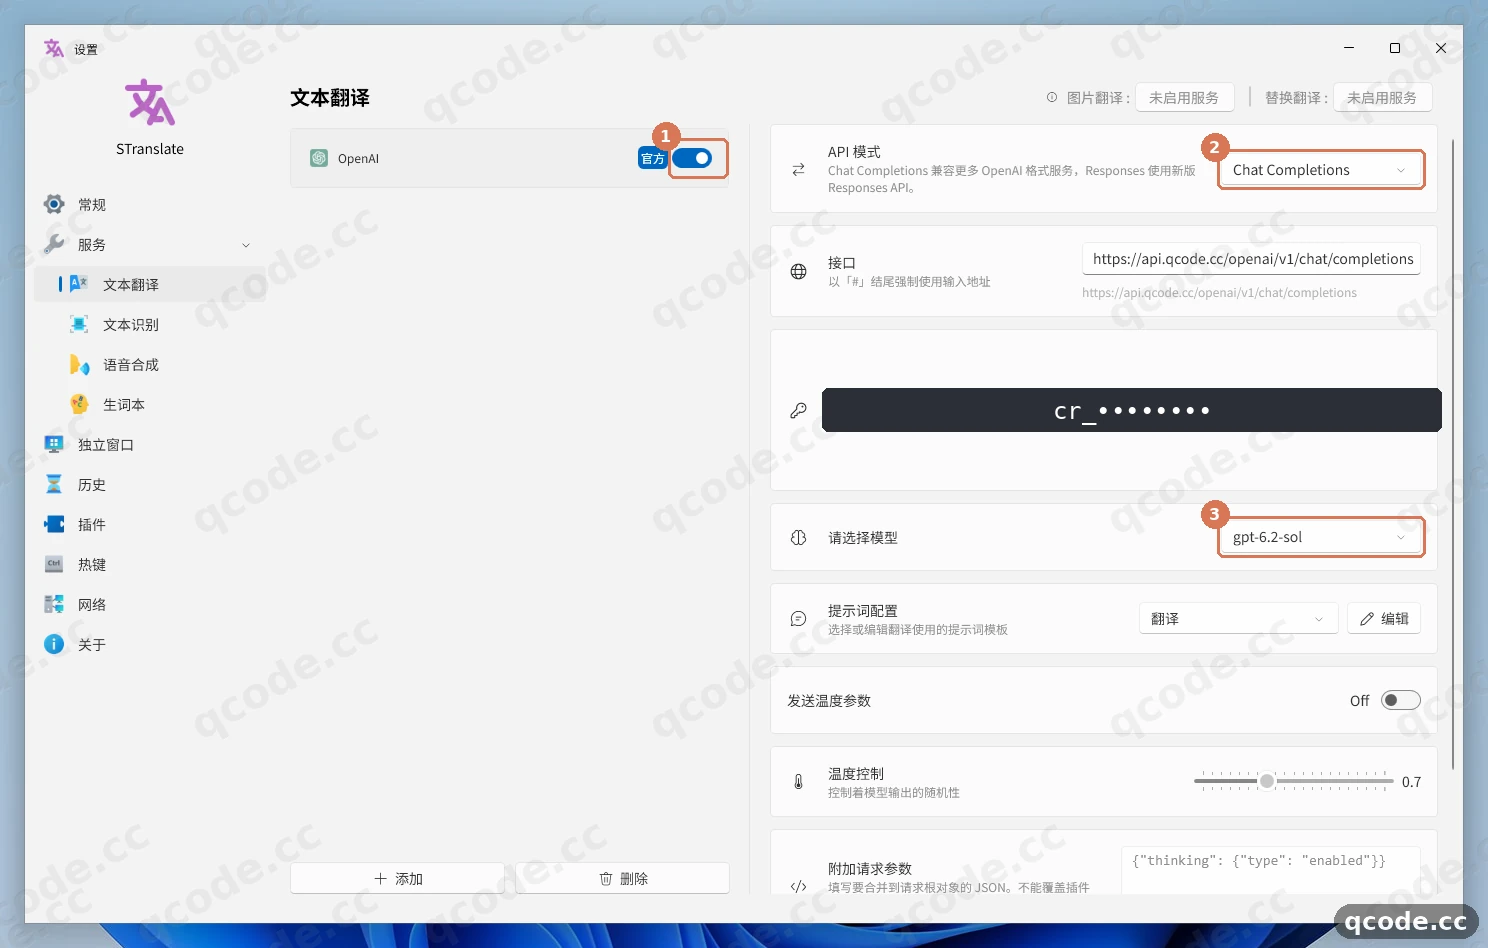
Done right you will see: the switch on the left is on, and the `接口` (Endpoint), `密钥` (API key) and `请选择模型` (Select a model) boxes hold the full address, a long key starting with `cr_`, and `gpt-6.2-sol` respectively.
**Need an API key?**
If you do not have a QCode account yet, [Sign up for QCode](https://qcode.cc/en/auth/sign-up?utm_source=docs.qcode.cc&utm_medium=tut_key_step&utm_campaign=knowledge_base&src=docs-ide-stranslate-key) first. If you prefer to pay by usage, buy a [Pay-as-you-go Pack](https://qcode.cc/en/pay-as-you-go?utm_source=docs.qcode.cc&utm_medium=tut_key_step&utm_campaign=knowledge_base&src=docs-ide-stranslate-key) first, then create the key in the [Dashboard](https://qcode.cc/en/dashboard). Copy the whole string that starts with `cr_` and paste it into the `密钥` (API key) box. You can pay by credit/debit card (Visa / Mastercard), Apple Pay / Google Pay, or cryptocurrency — see [Payment methods](/docs/reference/payment-methods).
### Check the final address shown under the endpoint
The address the plugin actually requests is displayed live just below the `接口` (Endpoint) box, in a line of small grey text. ① is the endpoint input box itself, ② is the final address underneath it, which must be exactly `https://api.qcode.cc/openai/v1/chat/completions`.
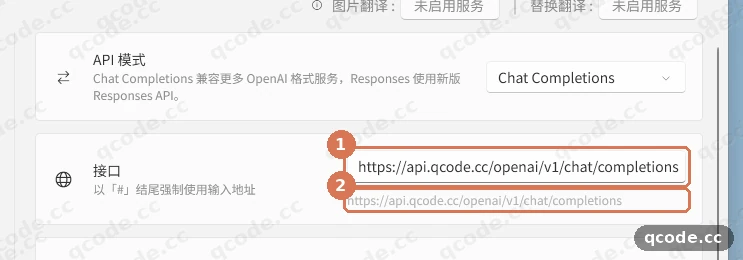
Done right you will see: the grey text matches the address you entered exactly — with no extra `/v1` layer at the end, and not stopping at `/v1` either.
**Stuck? The address in the grey text is cut short**
That means `/chat/completions` is missing from `接口` (Endpoint). The plugin only appends `/v1/chat/completions` by itself when the endpoint path is `/` or `/v1`; every other address is used as written, so a QCode address with the `/openai` prefix has to be written out in full. After fixing it, click another input box so the grey text refreshes, and check it again.
### Click `校验` (Validate) to confirm the connection
Scroll the configuration area on the right all the way down to ① the `校验` (Validate) button; the card is described as `测试 API 连接和配置是否正确` (test whether the API connection and configuration are correct). Click it, wait a second or two, and ② the green `验证成功` (Validation succeeded) appears to the right of the button.
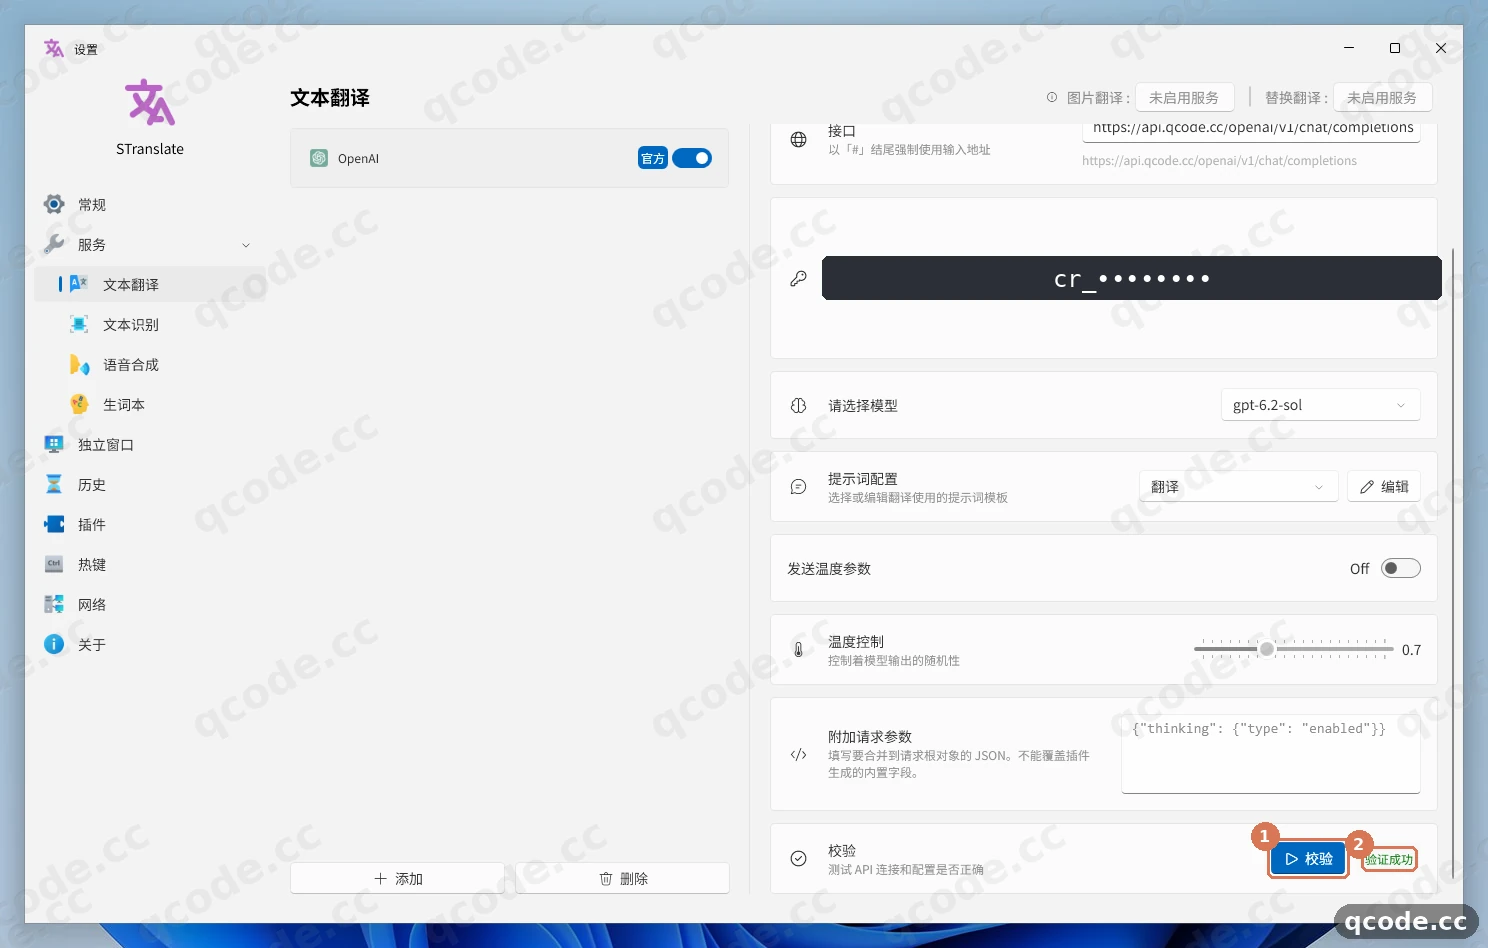
Done right you will see: the green `验证成功` (Validation succeeded) to the right of the button, not red error text.
**Stuck? After clicking it shows 401 or 404**
First check that the grey text under `接口` (Endpoint) is the complete address, then check the `密钥` (API key) box for extra spaces, quotes or Chinese punctuation. Fix it and click `校验` (Validate) once more. The exact causes of both cases are covered in `常见报错` (Common errors) below.
### Select English text and press Alt + D to see the translation
Open Notepad, type any English sentence (or paste a paragraph), select it with the mouse and press `Alt + D`. The STranslate window pops up in the middle of the screen: ① is the source text echoed in the window, ② is the `OpenAI` service card, and right below the card is the Chinese translation returned by QCode.
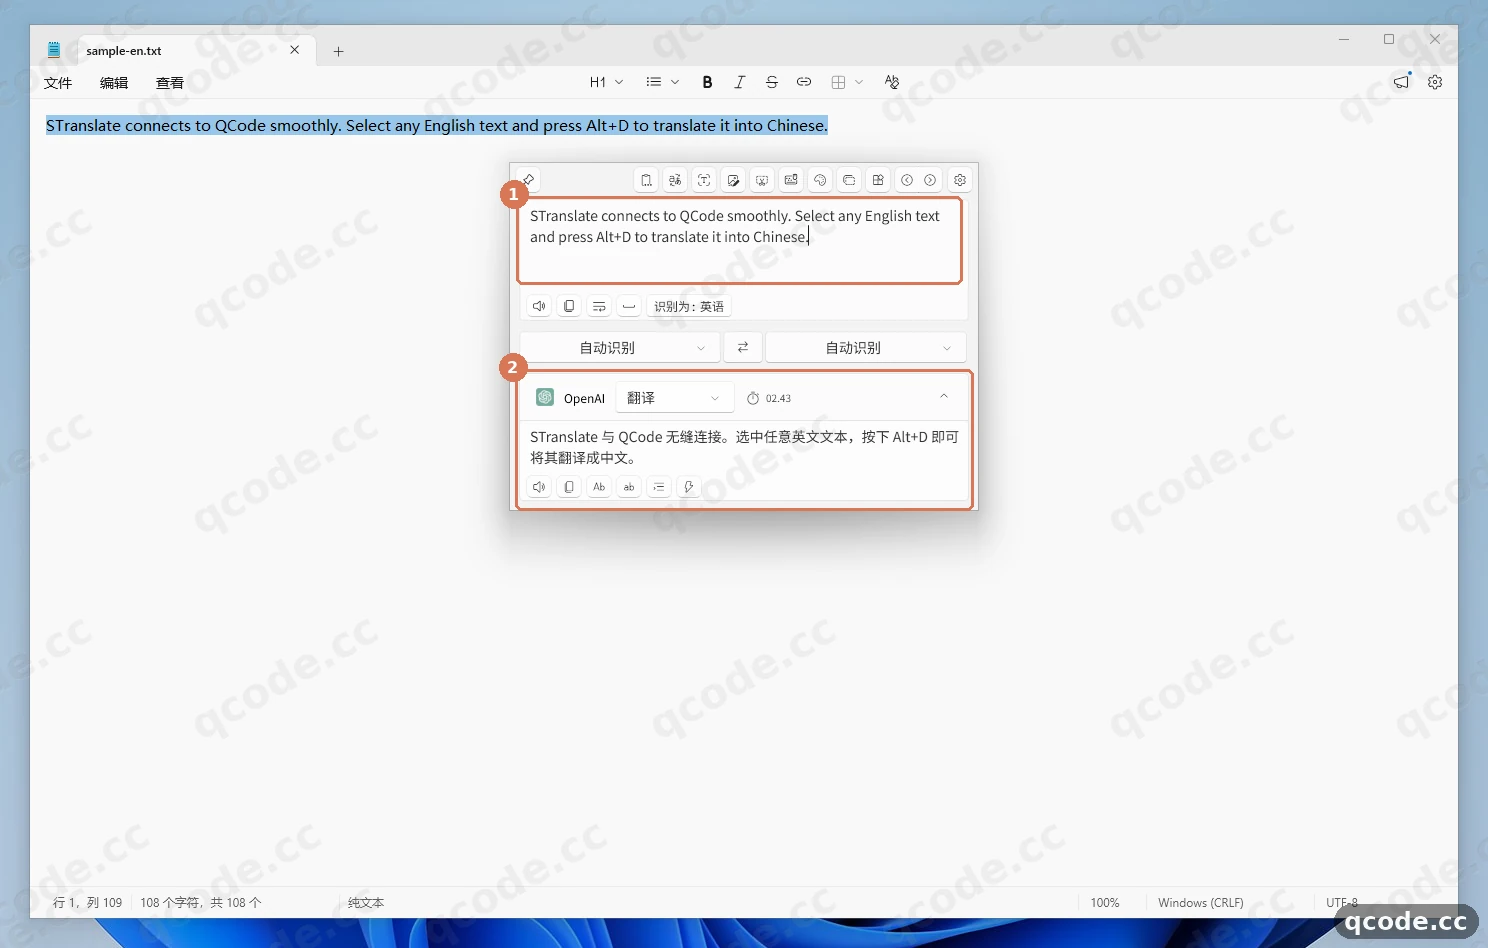
Done right you will see: the English you just selected in the window, the time this request took on the `OpenAI` card, and a smooth Chinese passage below it.
**Stuck? Pressing the hotkey does nothing**
First confirm STranslate is still running in the background (its icon sits in the notification area at the bottom right of the taskbar). If it is running and still no window appears, `Alt + D` is most likely taken by another program: change the combination in `设置` (Settings), or click `关于 → 向导` (About → Wizard) to review the shortcuts page again.
### Check the version on the About page
Go back to `设置` (Settings) and click `关于` (About), the last item in the left-hand list. ① is the current version number, `2.0.12`; to see the welcome wizard again later, click ② `向导` (Wizard) and those 5 pages reopen.
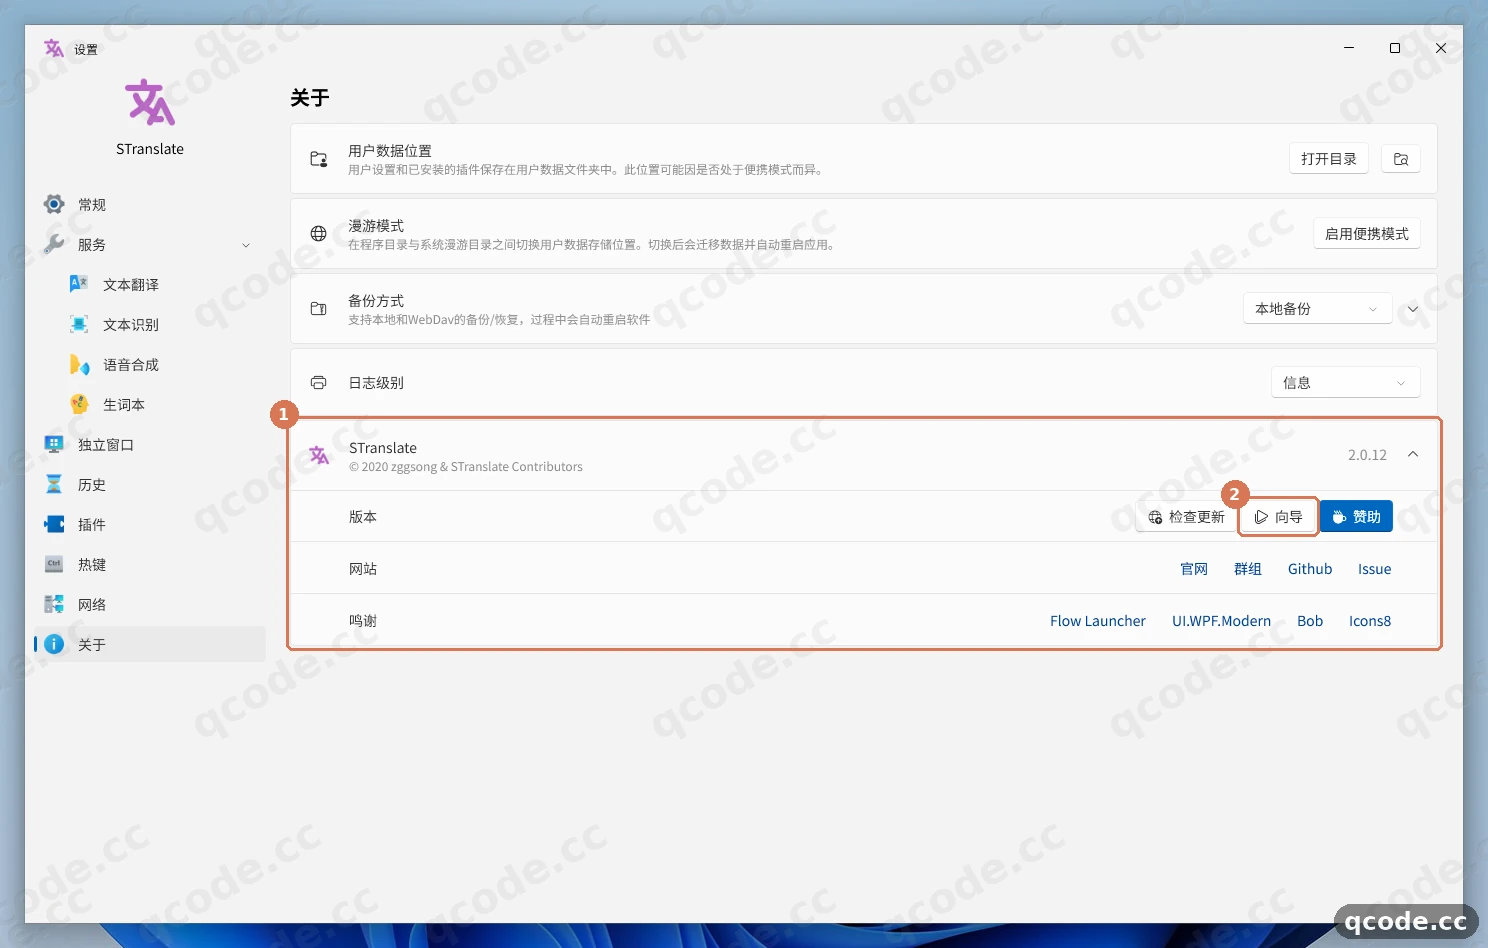
Done right you will see: the About page shows the app name `STranslate` and the version number `2.0.12`, with three buttons beside it: `检查更新` (Check for updates), `向导` (Wizard) and `赞助` (Sponsor).
## Verify it works
When all four of these line up, STranslate is firmly connected to QCode:
- The grey text under `接口` (Endpoint) is `https://api.qcode.cc/openai/v1/chat/completions`, with no extra layer and no missing part;
- Clicking `校验` (Validate) gives the green `验证成功` (Validation succeeded), not `401` or `404`;
- Selecting English text in Notepad and pressing `Alt + D` shows a Chinese translation in the window;
- Closing STranslate and reopening it from the desktop icon leaves `OpenAI` under `服务 → 文本翻译` (Services → Text translation) still switched on, with the key and model still in place.
### All done
You can now select any English text on Windows 11 and press `Alt + D` to read the Chinese translation; the endpoint, key and model are stored, so there is nothing to retype. From here you can:
- [Endpoints and API formats](/docs/getting-started/endpoints-and-api-paths)
- [Chinese model access](/docs/usage/cn-models)
- [Tool compatibility overview](/docs/ide/tool-compatibility)
- [Troubleshooting](/docs/reference/troubleshooting)
- Next: compare the plans on the [pricing page](https://qcode.cc/en/pricing?utm_source=docs.qcode.cc&utm_medium=tut_done&utm_campaign=knowledge_base&src=docs-ide-stranslate-done)
- Go back to your [Dashboard](https://qcode.cc/en/dashboard) to check usage and balance
## Common errors
| Error message | Why | What to do |
|---|---|---|
| `You must install .NET Desktop Runtime to run this application.` | The PC does not have the .NET 10 Desktop Runtime, so STranslate cannot start | Click `Download it now` in the window and install the 64-bit .NET 10 Desktop Runtime (Desktop Runtime, not ASP.NET Runtime); then open STranslate again |
| `ERR_CONNECTION_TIMED_OUT` | The connection timed out while opening the GitHub release page, so the installer will not download | Click `下载 STranslate` (Download STranslate) on the official site again a bit later; once installed, fill `接口` (Endpoint) with the full address as in this tutorial and click `校验` (Validate) to confirm QCode is reachable |
| `404` | `接口` (Endpoint) only goes as far as `https://api.qcode.cc/openai/v1`, and the plugin requests it as written instead of appending `/chat/completions` | Change `接口` (Endpoint) to the full path `https://api.qcode.cc/openai/v1/chat/completions`, then check that the grey text below matches |
| `401` | The key contains spaces, quotes or Chinese punctuation, or a few characters were lost when copying | Go back to the [Dashboard](https://qcode.cc/en/dashboard), copy the whole string starting with `cr_` again, paste it into the `密钥` (API key) box, strip leading and trailing spaces, and click `校验` (Validate) |
## FAQ
### What happens when my key expires?
Two cases: a **personal plan** key cannot be renewed when it expires — you have to open a plan again and use a new key, and then overwrite the old value in the `密钥` (API key) box as in step 9; for a **pay-as-you-go pack**, buy another pack after the key expires and the same key starts working again, with no configuration change.
### Does STranslate need an account or a sign-in?
No. It runs entirely locally and requires no OpenAI, Microsoft or any other third-party account; the only thing you fill in is the QCode `cr_` key.
### Can screenshot translation and OCR also go through QCode?
Yes. Besides `OpenAI`, the `插件` (Plugins) page also lists `OpenAI OCR`, and the service tree on the left has `文本识别` (Text recognition). The fields are the same as for text-selection translation: the full path `https://api.qcode.cc/openai/v1/chat/completions` in `接口` (Endpoint), the same `cr_` key in `密钥` (API key), and `gpt-6.2-sol` as the model. The screenshots on this page cover text-selection translation; fill the OCR part with the same fields.
### Do I have to use gpt-6.2-sol?
Start with it: it translates quickly and returns clean Chinese. If you want something stronger, `gpt-6.2-astra` is available, but everyday text-selection translation does not need it.
### Translation is slow and keeps spinning — what can I do?
First confirm that `接口` (Endpoint) holds the full address and that the model is `gpt-6.2-sol`. If the network route to `api.qcode.cc` is unstable, switch the domain to the Asia or North America node under `其他接入点` (Other ingress points) below and keep the path unchanged.
## Field reference
These are the fields in the OpenAI plugin; just fill them in as shown:
| Field | What to enter | Notes |
|---|---|---|
| API mode | `Chat Completions` | The other option, `Responses`, is a different API; choose `Chat Completions` for QCode |
| Endpoint | `https://api.qcode.cc/openai/v1/chat/completions` | The full path is required; the grey text below the box shows the final request address live |
| Key | `cr_xxxxxxxx` | Your QCode API key, starting with `cr_` |
| Select a model | `gpt-6.2-sol` | You can type the model name and press Enter |
| Prompt config | `翻译` (Translate) | The default is fine |
| Send temperature parameter | `Off` | The default is fine |
| Temperature control | `0.7` | The default is fine |
| Extra request parameters | leave empty | No extra parameters needed |
## Why the address must be written in full
The plugin looks at the path in `接口` (Endpoint) first: only when the path is `/` or `/v1` does it append `/v1/chat/completions`; every other path is used as the request address exactly as written. QCode addresses carry the `/openai` prefix, which counts as an "other path", so you have to write `https://api.qcode.cc/openai/v1/chat/completions` out yourself.
If the grey text ever shows up shortened, add a `#` to the end of the address and save: the plugin strips the `#` and requests the complete address in front of it.
## Other ingress points
The three ingress domains have exactly the same capabilities and share one key — only the network routing differs. The path stays the same; only the domain changes:
| Node | OpenAI-compatible (enter this full address in STranslate) | Anthropic-compatible |
|---|---|---|
| Global | `https://api.qcode.cc/openai/v1/chat/completions` | `https://api.qcode.cc/api` |
| Asia | `https://asia.qcode.cc/openai/v1/chat/completions` | `https://asia.qcode.cc/api` |
| North America / Europe | `https://us.qcode.cc/openai/v1/chat/completions` | `https://us.qcode.cc/api` |
`asia.qcode.cc` and `us.qcode.cc` are optional ingress points; switch to them when a direct connection to `api.qcode.cc` is slow.
## About models
The OpenAI translation plugin in STranslate speaks the OpenAI-compatible protocol, so you can enter the model name directly:
| Purpose | Recommended model | Notes |
|---|---|---|
| Text-selection translation (default) | `gpt-6.2-sol` | Fast responses and clean output; this tutorial uses it |
| Higher end | `gpt-6.2-astra` | More reliable on long sentences and terminology-heavy paragraphs, at a higher cost |
| Tools that support the Anthropic protocol | `claude-opus-5-5` | Uses `https://api.qcode.cc/api`; `claude-haiku-5-5` works for lightweight cases |
Note: the Anthropic-compatible address `https://api.qcode.cc/api` is of no use in STranslate's OpenAI plugin — the plugin needs the OpenAI-compatible path in the first row above.
## Installer vs portable
| Item | Installer `STranslate-win-Setup.exe` | Portable `STranslate-win-Portable.zip` |
|---|---|---|
| Installation | Double-click and it installs itself, creating a desktop shortcut | Unzip into any folder and double-click the `STranslate.exe` inside |
| Program location | `C:\Users\{username}\AppData\Local\STranslate` | The folder you unzipped |
| Config location | `C:\Users\{username}\AppData\Roaming\STranslate` | `PortableConfig` inside the program folder |
| Uninstall | Uninstall from `设置 → 应用` (Settings → Apps) | Delete the folder |
| Best for | Beginners, long-term use | Frequent PC changes, carrying your config along |
The installer installs for the current user and normally raises no administrator prompt; both builds work without signing in. There is no Microsoft Store version and no winget package; besides the direct download, only Scoop is supported (`scoop bucket add extras`, then `scoop install extras/stranslate`).
## Related docs
- [Endpoints and API formats](/docs/getting-started/endpoints-and-api-paths) — the protocol-to-address mapping table
- [Chinese model access](/docs/usage/cn-models) — Chinese models available on the OpenAI-compatible endpoint
- [Tool compatibility overview](/docs/ide/tool-compatibility) — which other tools work with QCode
- [Troubleshooting](/docs/reference/troubleshooting) — the general order for diagnosing connection problems