CC Switch Setup
Use the CC Switch desktop app to connect QCode.cc to Claude Code and Codex CLI in one click, and switch between multiple providers/accounts instantly
CC Switch Setup
CC Switch is a cross-platform desktop application (Windows / macOS / Linux) that provides a unified visual interface for managing API provider configurations across CLI tools such as Claude Code, Codex, Gemini CLI, OpenCode, and OpenClaw. This guide shows how to add QCode.cc as a custom provider in CC Switch, how to switch between multiple providers/accounts with one click, and covers common use cases and troubleshooting.
Why Use CC Switch
- No manual config editing: Visual forms replace
settings.json/config.toml - One-click provider switching: Switch between qcode.cc, official Anthropic, and local proxies instantly
- Claude + Codex ecosystem: Manage both Claude Code and Codex CLI configurations in a single app
- Multi-account / multi-plan management: Save several configs for the same provider (e.g. a work key and a personal key) and switch anytime
- System tray shortcuts: Switch providers from the tray menu without opening the main window
At its core, CC Switch is a "config profile switcher" — it writes each provider config into the standard config file of the corresponding CLI, overwriting on activate and swapping back when you switch. Understanding this prevents the misconception that multiple providers are active at once.
Prerequisites
- Claude Code CLI or Codex CLI installed
- A QCode.cc API Key (starts with
cr_), available from the dashboard - The same key works across multiple protocol endpoints (Anthropic, OpenAI, Gemini, etc.) — see Endpoints & API Formats
Install CC Switch
Download the installer for your platform from GitHub Releases:
| Platform | Package |
|---|---|
| Windows 10+ | CC-Switch-v{ver}-Windows.msi or portable .zip |
| macOS 12+ | .dmg package; or brew tap farion1231/ccswitch && brew install --cask cc-switch |
| Linux | .deb / .rpm / .AppImage; Arch: paru -S cc-switch-bin |
Exact install steps and signing prompts per platform follow the project README.
Configure Claude Provider (for Claude Code)
Launch CC Switch → switch to the Claude tab on the left → click Add Provider in the top right → select Custom → fill in the fields as shown:
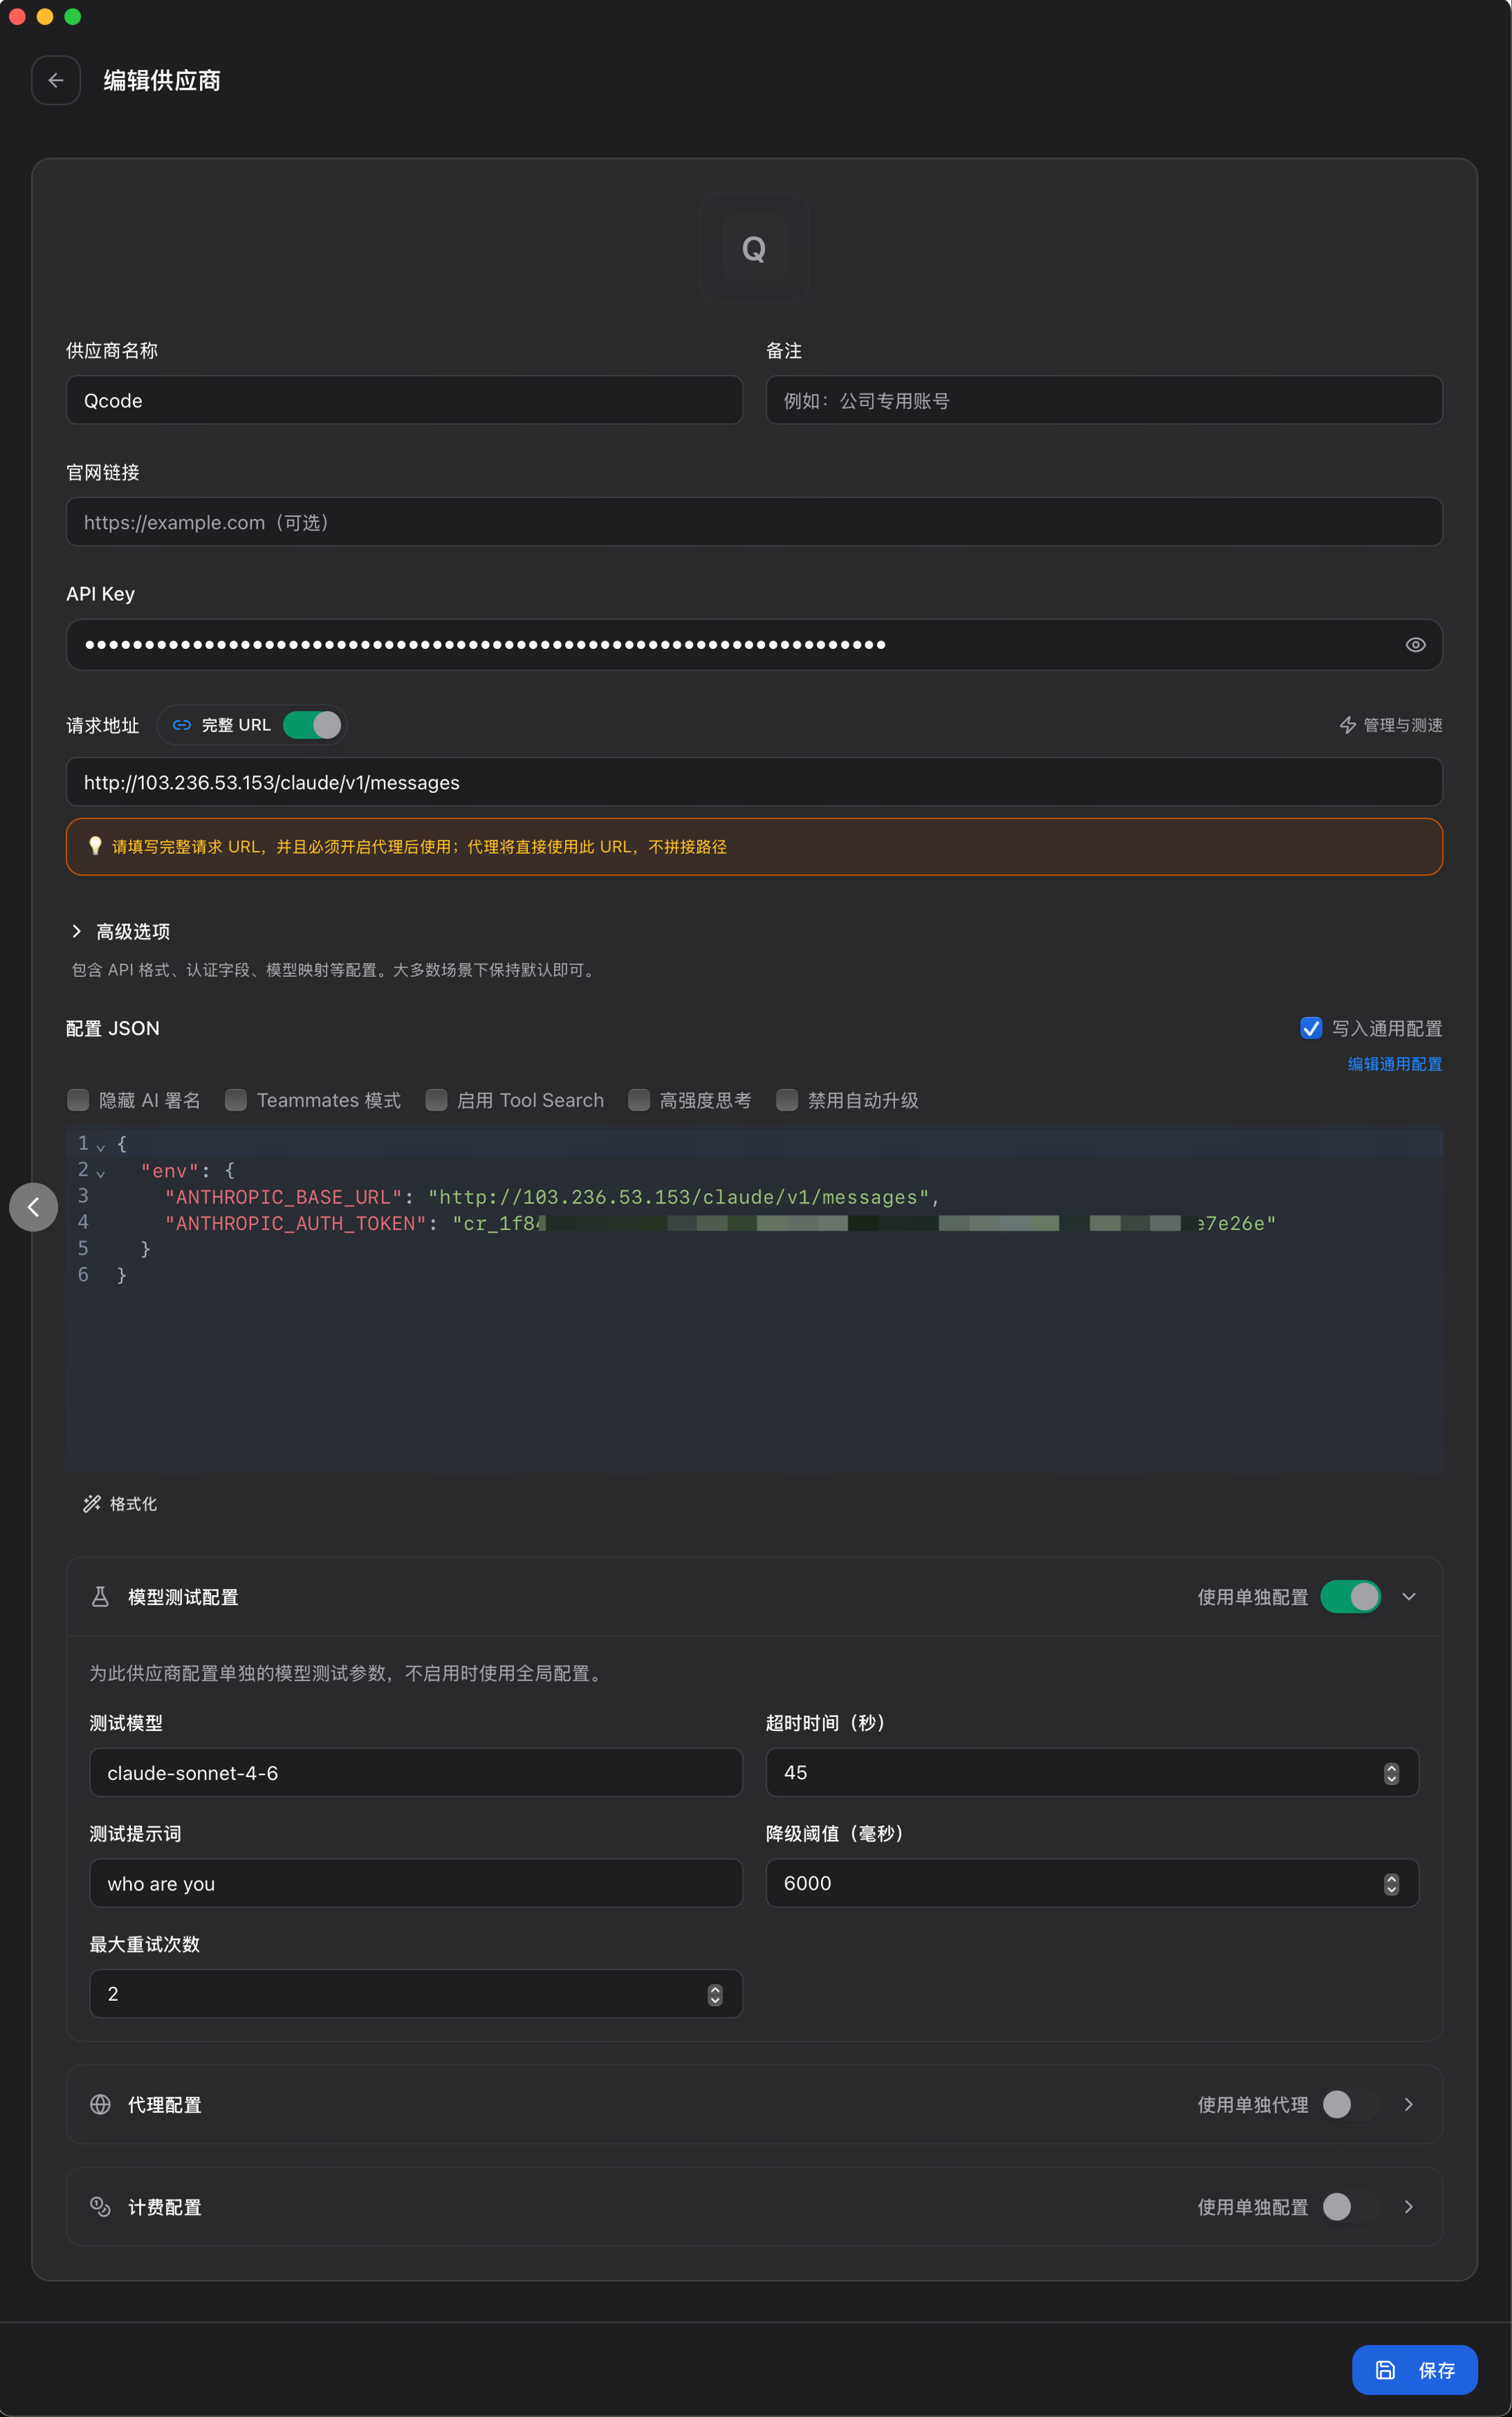
| Field | Value |
|---|---|
| Provider Name | QCode.cc |
| ANTHROPIC_BASE_URL | https://api.qcode.cc/api |
| ANTHROPIC_AUTH_TOKEN | Your QCode.cc API Key (starts with cr_) |
Why
asia.qcode.cc? It's QCode.cc's Hong Kong node with the lowest latency for mainland China users; switch back toapi.qcode.cc(global Route 53) if it's unstable. The same key works across all four domains:api/asia/us/eu.
After saving, click Activate to set it as the current Claude provider. CC Switch will automatically write ANTHROPIC_BASE_URL and ANTHROPIC_AUTH_TOKEN to ~/.claude/settings.json. Run claude in your terminal to verify the connection.
Choosing a Default Model
QCode.cc offers a full lineup from flagship to lightweight models. Switch in Claude Code with /model, or specify directly in config:
| Model | Pricing (input / output, per 1M tokens) | Context | Best for |
|---|---|---|---|
claude-opus-4-8 |
$5 / $25 | 1M | Flagship; complex reasoning and large refactors |
claude-sonnet-4-6 |
$3 / $15 | 1M | Everyday coding workhorse, great value |
claude-haiku-4-5 |
$1 / $5 | 200K | Fast Q&A, batched small tasks |
The flagship tier also includes claude-opus-4-7 (1M). The full lineup (including GPT and Gemini) is on Models & Pricing.
Configure Codex Provider (for Codex CLI)
Switch to the Codex tab → Add Provider → Custom → fill in the fields as shown:
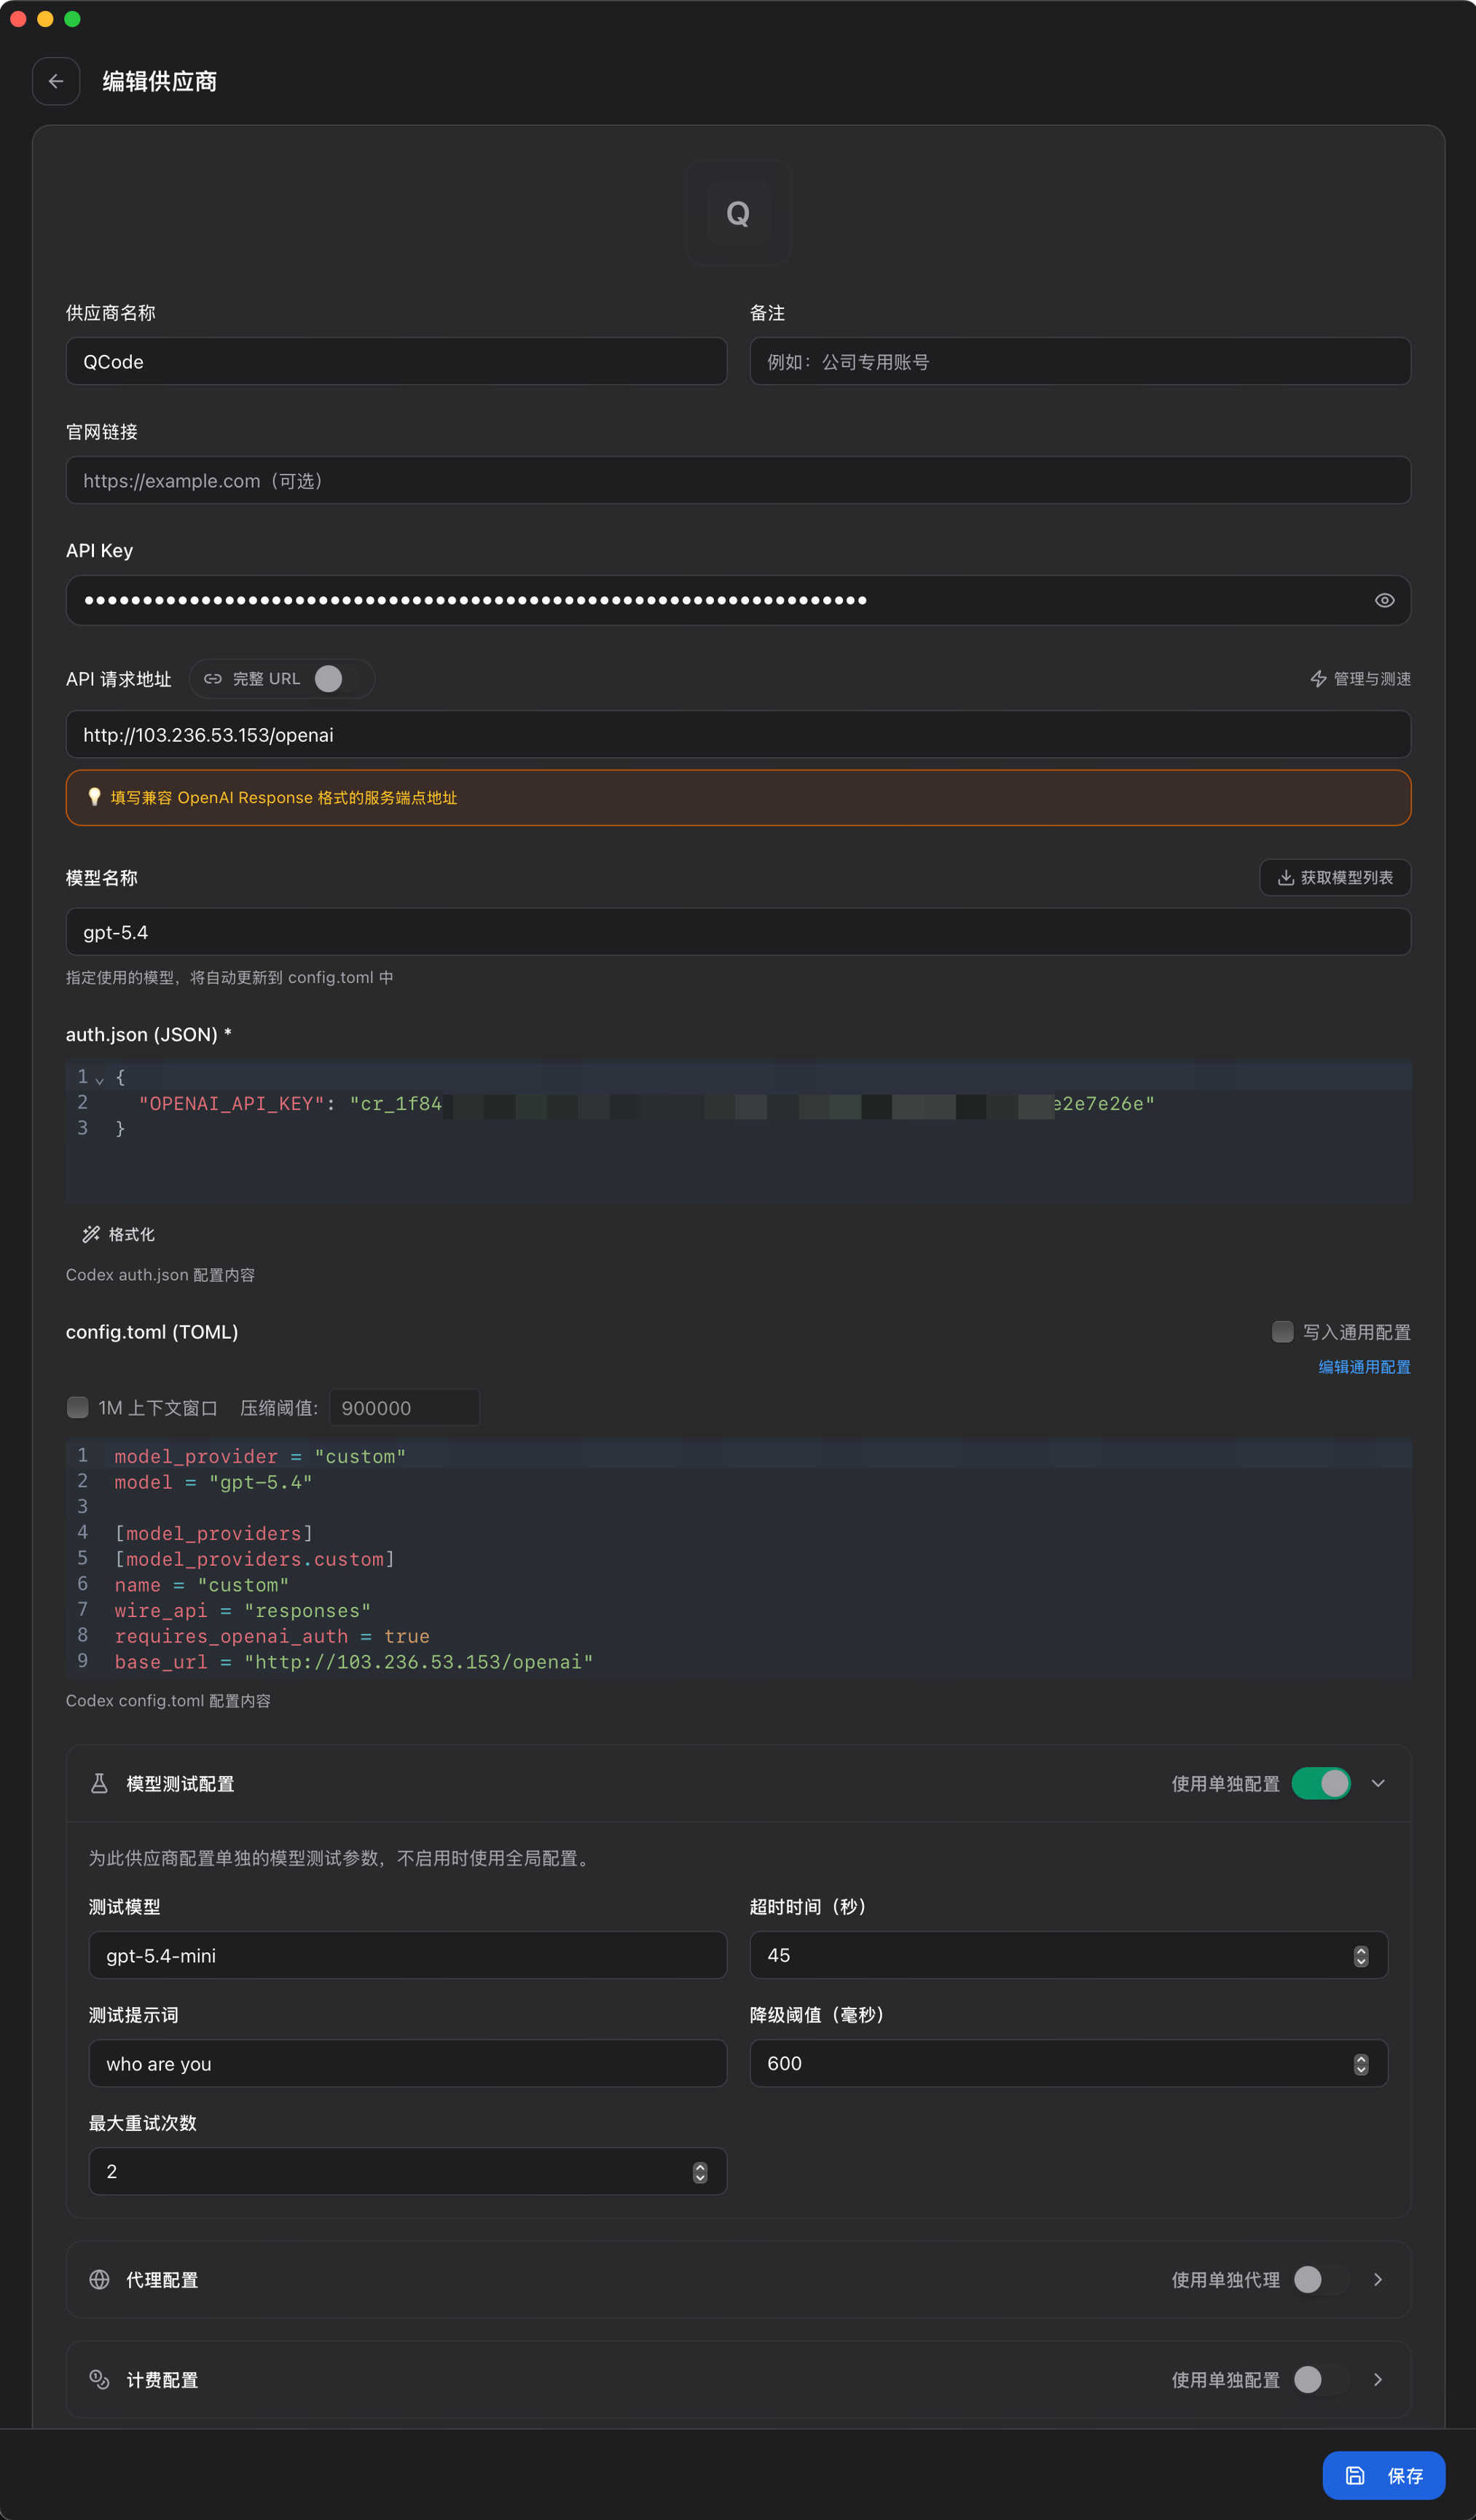
| Field | Value |
|---|---|
| Provider Name | qcode (lowercase recommended, used as the TOML key) |
| Base URL | https://api.qcode.cc/openai |
| API Key | Your QCode.cc API Key |
| Default Model | gpt-5.6-terra (for programming) or gpt-5.4 (general purpose) |
CC Switch generates the equivalent ~/.codex/config.toml and ~/.codex/auth.json:
model_provider = "qcode"
model = "gpt-5.6-terra"
model_reasoning_effort = "high"
disable_response_storage = true

[model_providers.qcode]
name = "qcode"
base_url = "https://api.qcode.cc/openai"
wire_api = "responses"
requires_openai_auth = true
Save and activate, then run codex to verify the connection. The current Codex CLI version is 0.142.0. GPT model options: gpt-5.6-terra / gpt-5.6-sol / gpt-5.6-luna / gpt-5.5 / gpt-5.4 / gpt-5.6-mini (rates and context: qcode.cc/models).
Switching Between Multiple Providers/Accounts
The core value of CC Switch is switching. A common setup:
- Under the Claude tab, save several providers, e.g.
QCode.cc(primary),QCode.cc (asia)(mainland node),Anthropic Official(backup). - To switch, click Activate next to the target provider — CC Switch rewrites the corresponding
ANTHROPIC_BASE_URL/ANTHROPIC_AUTH_TOKENinto~/.claude/settings.json. - Restart Claude Code (or open a new terminal) for the new config to take effect — a running
claudesession does not hot-reload new environment variables. - Codex works the same way: switching the active item under the Codex tab rewrites
~/.codex/config.toml.
Tray shortcut: CC Switch stays in the system tray; right-click the tray icon to switch directly between saved providers without opening the main window. Exact menu items depend on your app version.
Multi-account / Multi-plan Example
Save two configs for the same QCode.cc account, each with a different API Key:
| Provider Name | Base URL | API Key | Purpose |
|---|---|---|---|
QCode.cc (work) |
https://api.qcode.cc/api |
Work key | Team / billable account |
QCode.cc (personal) |
https://api.qcode.cc/api |
Personal key | Personal projects |
Switching the active provider seamlessly moves between the two quotas without mixing billing.
Use Cases
- Unstable network in China: Use
asia.qcode.ccas primary, and one-click switch to the globalapi.qcode.ccwhen it jitters. - Comparing providers: Run the same task through QCode.cc and official Anthropic to compare responses and cost.
- Team / personal separation: Use different keys to separate work and personal usage for easy accounting.
- Claude + Codex together: Manage both Claude Code and Codex CLI in one app, pointed at the Anthropic-protocol and OpenAI-protocol endpoints respectively.
Advanced Claude Code Features (Still Work via QCode)
CC Switch only switches providers; Claude Code's own capabilities are unaffected. After connecting to QCode, the following features work as usual (running on whatever model Claude Code is configured with):
Vision Input: Understand Requirements from Screenshots / Diagrams
Claude Code can feed images to vision-capable models: paste (Ctrl+V), drag-drop, or reference an image file path in your prompt. Common uses:
- Build UI from a mockup / screenshot
- Debug from an error screenshot
- Read architecture diagrams and charts
Vision-capable models via QCode include Claude Opus 4.8 / Sonnet 4.6 and GPT-5.x.
Note: this is image input (understanding), not image generation. To have a model generate images, use the
gpt-image-2model — see gpt-image-2 Image Generation.
Dynamic Workflows (Background Sub-agent Orchestration)
Include the keyword ultracode in your prompt (or simply ask to "run a workflow") to trigger Claude Code's dynamic workflows: it orchestrates tens to hundreds of background sub-agents in parallel, ideal for codebase-wide review, migration, and research. Agents keep running in the background while you continue working; view runs with the /workflows command. This capability runs on whatever model Claude Code is configured with — so it works when Claude Code points at QCode. Further reading: Subagents.
Headless Mode / Automation Output
In scripts and CI, run once with -p and specify an output format:
# Structured JSON (incl. result / total_cost_usd / usage / session_id), parse with jq
claude -p "Summarize test coverage in this repo" --output-format json | jq '.result'

# Newline-delimited streaming JSON events, good for real-time pipes
claude -p "Review src/ for security risks" --output-format stream-json
More pipe and CI usage in Automation & CI/CD.
About Gemini / Antigravity
CC Switch's visual list includes Gemini CLI, but note: Google has retired Gemini CLI (EOL 2026-06-18 for Pro/free tiers; enterprise paid keys are unaffected), succeeded by the Google Antigravity CLI (available since 2026-05-19). To use Gemini-family models via QCode, switch to Antigravity:
- Edit
~/.config/antigravity/config.toml - Set
base_urltohttps://api.qcode.cc/openai/v1, supply your QCode API Key, and pick a model - Antigravity is new and evolving — exact config keys should follow the official docs
Gemini models on QCode are gemini-2.5-pro and gemini-3.5-flash (Gemini family is billed at 2x).
Fallback Endpoints
If the primary endpoint is unreachable, switch to an alternative (the same key works everywhere):
| Endpoint | Claude Base URL | Codex Base URL |
|---|---|---|
| International | https://api.qcode.cc/api |
https://api.qcode.cc/openai |
| Asia (recommended for CN) | https://asia.qcode.cc/api |
https://asia.qcode.cc/openai |
| US | https://us.qcode.cc/api |
https://us.qcode.cc/openai |
| Europe | https://eu.qcode.cc/api |
https://eu.qcode.cc/openai |
Self-check: hitting the path of a Base URL directly returns
401— that's expected, it means the path is correct and only auth is missing.
Shared Quota
The Claude and Codex providers in CC Switch share the same QCode.cc API Key and draw from the same subscription quota (see Billing). Adding two providers does not double-bill you. If you created multiple providers with different keys, each key is billed independently.
Practical Tips
- Name with suffixes: Add suffixes like
(asia)/(work)to provider names so tray switching is unambiguous at a glance. - Restart the CLI after switching: Environment variables are read at process startup; after switching providers, open a new terminal or restart
claude/codex. - No trailing slash: No Base URL may end with
/, or it may produce an incorrect path. - Keep keys separate: CC Switch stores keys independently per provider; remember to update each one when you rotate keys.
- Back up your config: If you hand-edited
~/.claude/settings.json, activating will overwrite your edits — back it up first.
FAQ
The "Activate" button is grayed out after saving
Make sure there is no trailing / at the end of ANTHROPIC_BASE_URL / Base URL. CC Switch is sensitive to trailing slashes.
401 Unauthorized error
- Confirm the API Key starts with
cr_and has no leading or trailing spaces - Check that the key is valid at qcode.cc/dashboard
- If Claude returns 401 but Codex works (or vice versa), the key in one of the providers was entered incorrectly — CC Switch stores keys independently per provider
Switching providers had no effect
Switching only rewrites the config file; a running claude / codex process does not hot-reload. Open a new terminal or restart the CLI and try again.
Codex spins indefinitely on startup
Check that base_url in config.toml ends with /openai (not /openai/v1). The wire_api = "responses" field must also be present.
Can I use Claude and Codex at the same time?
Yes. CC Switch writes Claude config to ~/.claude/ and Codex config to ~/.codex/. The two configurations are completely independent. Run claude and codex in separate terminals as needed.
I hand-edited settings.json — will activating lose it?
Yes. On activate, CC Switch overwrites the corresponding fields in ~/.claude/settings.json with that provider's values. Put custom content in the CC Switch provider config, or back up before activating.
Next Steps
- Claude Code Tutorial — Master the core Claude Code workflow
- Codex Tutorial — Go deeper with Codex CLI
- VS Code Integration — Use Claude Code directly in your editor
- Subagents — Orchestrate background agents with dynamic workflows
- Automation & CI/CD — Headless mode and script integration
- Billing — Understand plans and quota
Don't have a QCode.cc API Key yet? Head to qcode.cc/pricing to pick a plan — one key drives both Claude Code and Codex CLI inside CC Switch.