Chatbox Claude API Setup with QCode (Windows, Screenshots)
Connect Chatbox to QCode on Windows in 20 steps and 21 screenshots: the download, installer, Claude API Host, API key, model ID and your first reply.
Need an API key? Sign up →Endpoints & base URLs →
On This Page
- Download and install Chatbox
- Open the download page
- Check that the download finished
- Choose who the installation is for
- Keep the default folder
- Wait for the progress bar
- Start Chatbox
- Skip the welcome screen
- Open Settings → Model Provider
- Open the custom provider form
- Pick the Claude API mode
- Name the provider
- Fill in the Claude API Host
- Paste your API key
- Add the model ID
- Check the connection
- Pick the model in the chat window
- Send your first message
- Ask a follow-up
- Verify it works
- Common errors
- FAQ
- Optional: use GPT models as well
- Provider types and QCode addresses
- Models you can use
- Key settings explained
- Known limitations
- Related docs
Short answer: In Chatbox, open Settings → Model Provider, add a custom provider with API Mode Claude API Compatible, put https://api.qcode.cc/api/v1 in API Host, paste your cr_ key, and add the model ID claude-sonnet-5.
| Item | Fill in |
|---|---|
| Claude API Host | https://api.qcode.cc/api/v1 |
| API Path | /messages |
| OpenAI API Host | https://api.qcode.cc/openai/v1 |
| API Key | cr_xxxxxxxx |
| Model ID | claude-sonnet-5 |
Checked on 2026-11-21 · Chatbox 1.24.6 · Windows 11
Follow the screenshots below on a Windows PC and you end up with QCode added as a provider in Chatbox, a Claude model selected in the chat window, and an answer on screen. No Chatbox account is needed at any point.
Before the first screenshot, check that you have these:
- A Windows 10 or 11 PC, 64-bit, that can open websites
- About 1 GB of free disk space; the installer runs under your own user account and needs no administrator password
- A QCode API key copied from your dashboard (
cr_xxxxxxxx); the key is the only thing you cannot skip. No account yet? Sign up first, pick a plan on the pricing page, then create the key in your Dashboard. - No Chatbox account: the welcome screen has a
Skip guidebutton, and everything is configured locally
Download and install Chatbox
Chatbox ships one installer for Windows. Pick the row that matches where you are:
Open chatboxai.app/en/download. Under Desktop App, the Windows row says 64-bit; click its Download button. You get Chatbox-1.24.6-Setup.exe, about 230 MiB.
If the page will not open, use GitHub Releases (github.com/chatboxai/chatbox/releases): open the Downloads section and click Windows (x64). The newest release there is v1.24.4, older than the installer on the site, so prefer the download page.
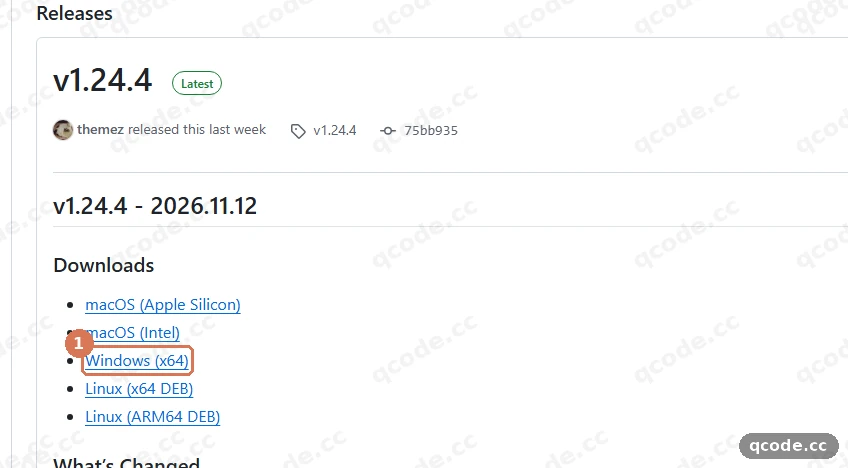
Open chatboxai.app/zh/download and click Download in the row that says 64-bit under Windows. The file is called Chatbox-1.24.6-Setup.exe and is about 230 MiB. The international site (chatboxai.app/en/download) serves the same installer, so use it if the Chinese page is slow.
Open the download page
Go to chatboxai.app/en/download. Under Desktop App, ① the Windows row says 64-bit, and ② Download is the button on its right. Click ②.
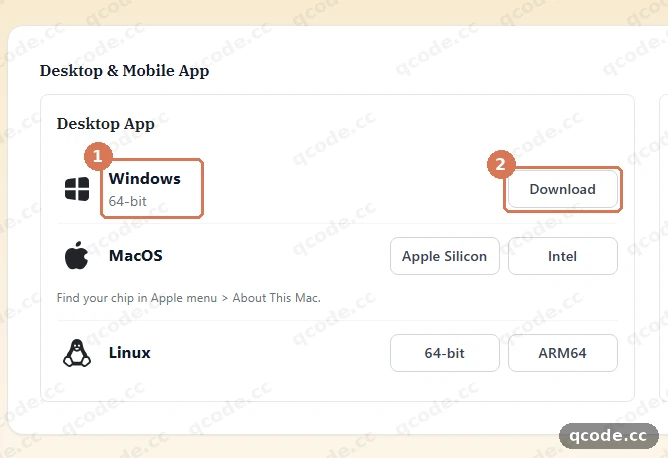
Done right you will see: your browser starts downloading a file called Chatbox-1.24.6-Setup.exe, about 230 MiB. The version number in the name will change over time.
Check that the download finished
Open the Downloads panel of your browser. ① shows the finished installer with its full size.
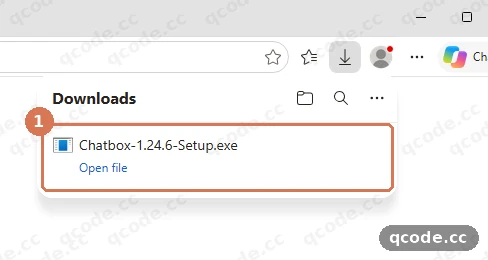
Done right you will see: ① one completed entry named Chatbox-1.24.6-Setup.exe with no progress bar. An entry ending in .crdownload is still downloading — wait for it to turn into the .exe name.
Choose who the installation is for
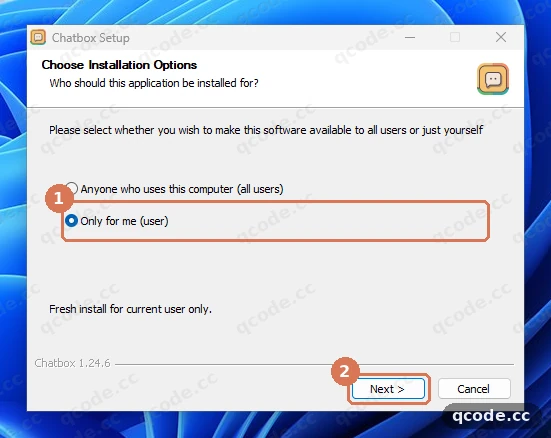
Double-click the downloaded file. On the first screen of the wizard, choose ① Only for me (user), then click ② Next >.
Stuck? Windows asks for an administrator password
With Only for me (user) selected the installer writes into your own AppData folder and needs no administrator rights. If a password prompt appears, cancel it and start the installer again — the first screen must show Only for me (user) selected.
Done right you will see: ① Only for me (user) ticked, and the wizard moves on to Choose Install Location.
Keep the default folder
The second screen shows where the app will live, by default under your own AppData folder. Leave it alone and click ① Install.
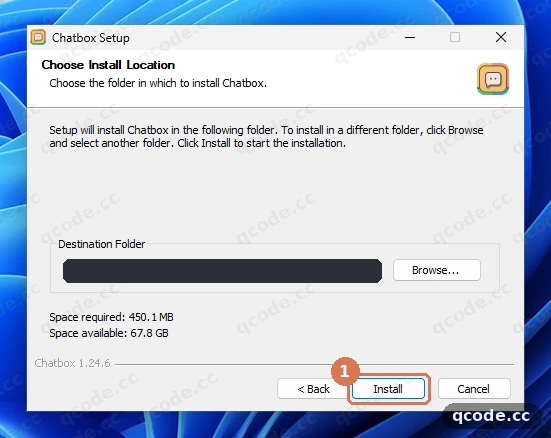
Done right you will see: the button is gone and the window switches to Please wait while Chatbox is being installed.
Wait for the progress bar
Nothing to click here. The bar fills up in about 20 seconds on a normal PC.
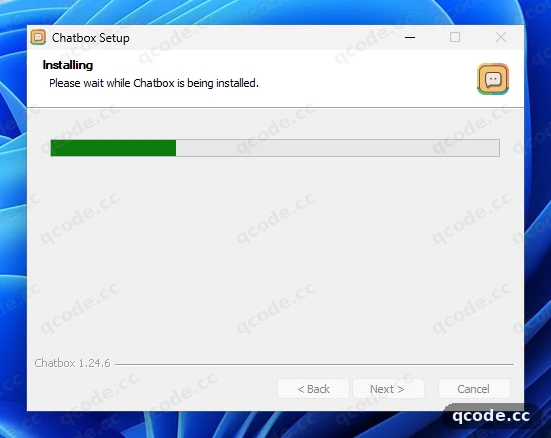
Done right you will see: the bar reaches the end and the window moves on by itself to Completing Chatbox Setup.
Start Chatbox
On the last screen, keep Run Chatbox ticked and click ① Finish.
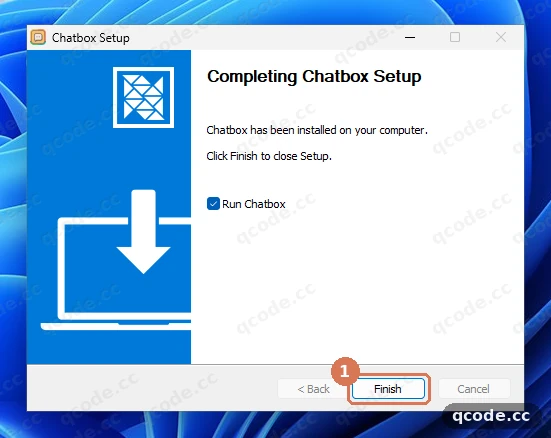
Done right you will see: the wizard closes and the Chatbox window opens by itself.
Skip the welcome screen
The first start opens a welcome screen. You do not need an account: leave ① I'm new to this alone and click ② Skip guide on the right.
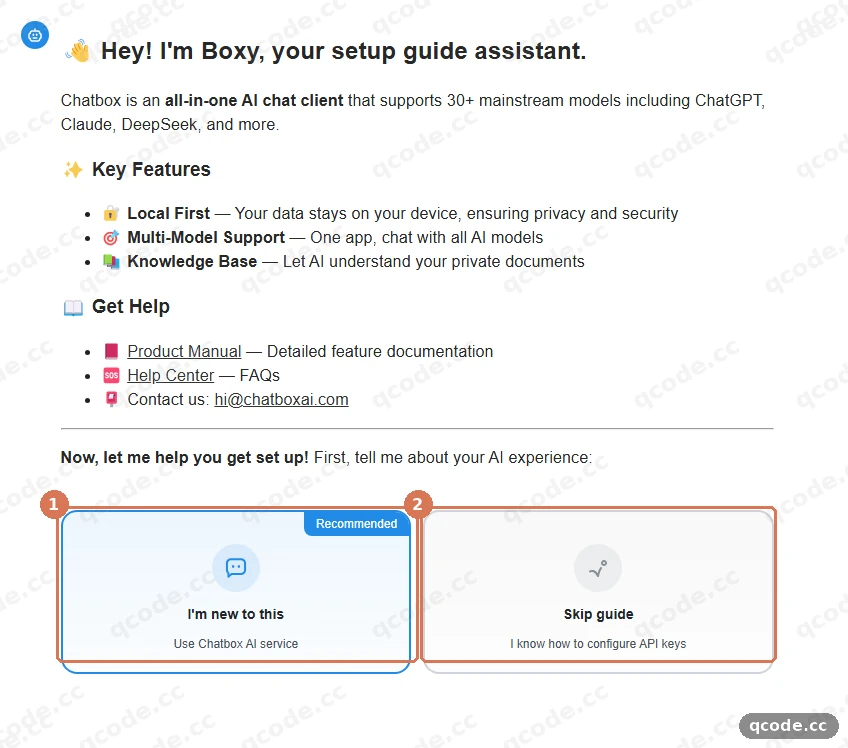
Stuck? There is no “Skip guide” on the welcome screen
Make sure you installed 1.24.6 or newer: the welcome screen has two cards at the bottom, I'm new to this and Skip guide. If you see neither, the installer has not finished — go back to the last installer screen and click Finish.
Done right you will see: the welcome screen closes and the main window appears — a conversation list on the left, a message box at the bottom, and no sign-in prompt.
Open Settings → Model Provider
Click Settings at the bottom left of the main window. In the left column of the settings page click ① Model Provider; the provider list opens. The button for your own provider is the last row: ② + Add.
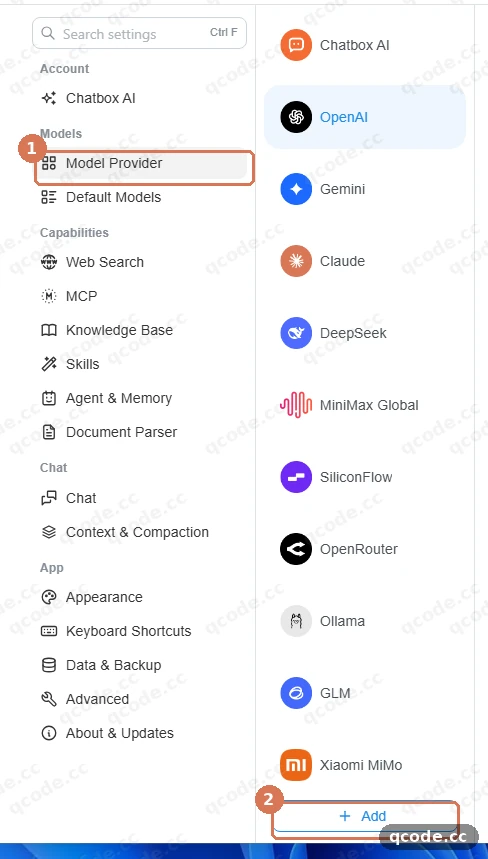
Stuck? There is no “Model Provider” in the left column
In Chatbox 1.24.6 the entry sits in the left column of Settings. If you cannot find it, make sure you are in Settings and not inside a conversation: click Settings at the bottom left of the main window first, then look down the left column for the page that lists providers such as OpenAI, Claude and Gemini.
Done right you will see: ① Model Provider highlighted in the left column, a list of providers in the middle, and ② + Add as the last row of that list.
Open the custom provider form
Click + Add. A catalog of known providers opens; type custom into its search box, then click ① Add Custom Provider.
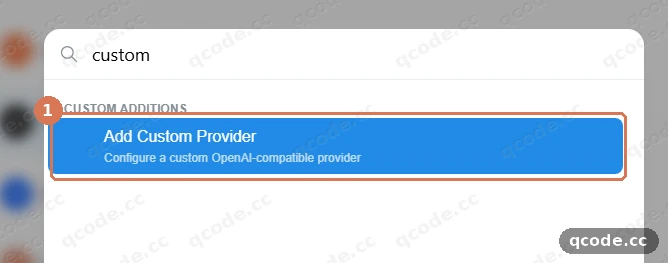
Done right you will see: a dialog titled Add provider with two fields, Name and API Mode.
Pick the Claude API mode
Open the ① API Mode list and choose Claude API Compatible. This tells Chatbox to speak the Claude protocol; the address fields in the next steps depend on it.
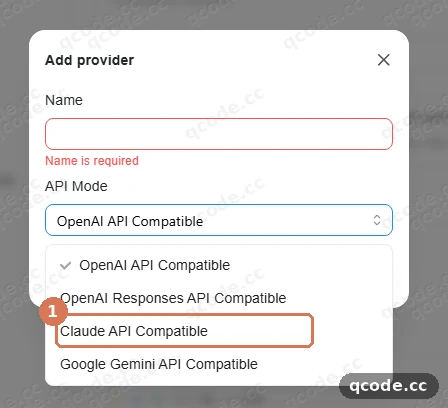
Done right you will see: ① the API Mode field now reads Claude API Compatible.
Name the provider
Type QCode Claude into ① Name. Leave ② API Mode on Claude API Compatible, then click Add.
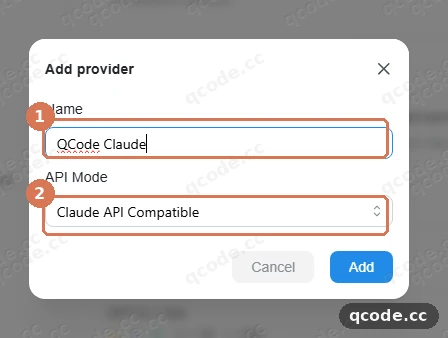
Done right you will see: the dialog closes and the new provider page opens with API Host, API Path and Preview fields.
Fill in the Claude API Host
In ① API Host type https://api.qcode.cc/api/v1. Leave API Path on /messages. Chatbox joins the two by itself: ② Preview should read https://api.qcode.cc/api/v1/messages.
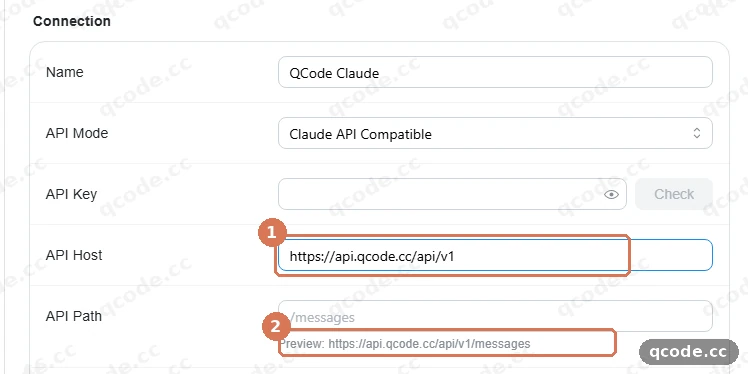
Stuck? Preview reads /api/messages, without /v1
Chatbox appends only /messages to a custom Claude host — it does not add /v1 the way it does for api.anthropic.com, and it does not add /v1 the way Cherry Studio does. Put the version segment into the Host field: https://api.qcode.cc/api/v1. The general QCode Anthropic base URL https://api.qcode.cc/api is for clients whose SDK appends /v1/messages itself.
Done right you will see: ① ends with /api/v1, and ② reads https://api.qcode.cc/api/v1/messages.
Paste your API key
Click the API Key field and paste the key you copied from your QCode dashboard. The field only shows dots — that is normal, the key is stored as you typed it.
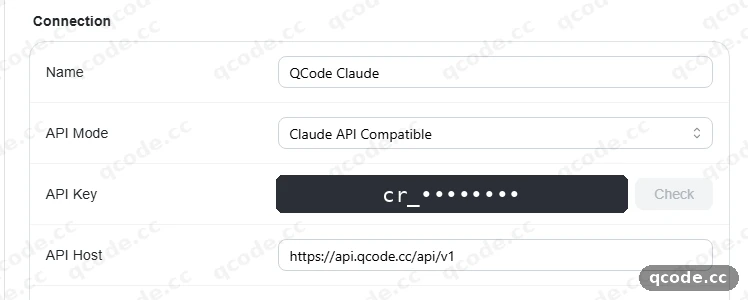
Need an API Key?
If you do not have a QCode account yet, Sign up first. If you do not want a monthly plan, buy a pack from the Pay-as-you-go Packs page to get started, then create your key in the Dashboard. Copy the string that starts with cr_. You can pay by credit/debit card (Visa / Mastercard), Apple Pay / Google Pay, or cryptocurrency — see Payment methods.
Done right you will see: a row of dots in the field and no grey placeholder text. If the field stays empty, click inside it once, wait a second, then paste again — with no extra space before or after the key.
Add the model ID
Click + New. In the Edit Model window type ① claude-sonnet-5 into Model ID, then click ② Save. Chatbox does not fetch QCode's model list, so the ID is typed by hand.
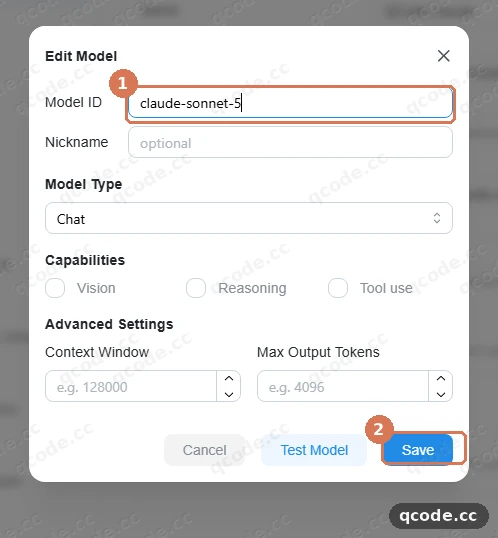
Stuck? The model list stays empty after a refresh
A custom Claude-compatible provider in Chatbox does not pull a model list, so nothing arrives automatically. Add the ID by hand, for example claude-sonnet-5, claude-opus-5-5 or claude-haiku-5-5; every ID you can use is listed on qcode.cc/models. Copy the ID exactly, with hyphens.
Done right you will see: claude-sonnet-5 becomes a row in the model list of the QCode Claude provider.
Check the connection
Click Check. When it asks which model to test, pick claude-sonnet-5. ① Model Test Results then reports Connection successful, with text, vision and tool use all ticked.
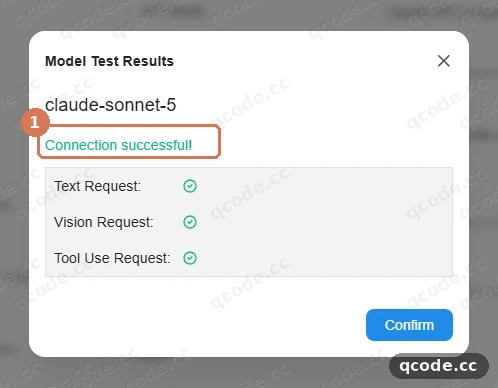
Stuck? Check fails with an error
First check the two fields: API Host must be https://api.qcode.cc/api/v1 and the API Key field must show dots. Then click Check again — a single network hiccup is the usual cause. If the message mentions the model, confirm the model ID is exactly claude-sonnet-5.
Done right you will see: ① Connection successful in green, and a tick next to each of text, vision and tool use.
Pick the model in the chat window
Close Settings and start a new conversation. Open the model picker at the bottom right, switch the list to More Providers (BYOK), open ① QCode Claude and click ② claude-sonnet-5.
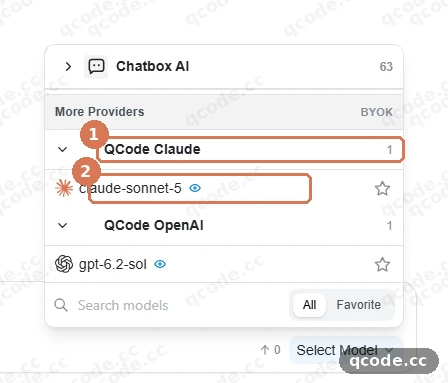
Done right you will see: the model picker at the bottom right now shows claude-sonnet-5 instead of one of Chatbox's own models.
Send your first message
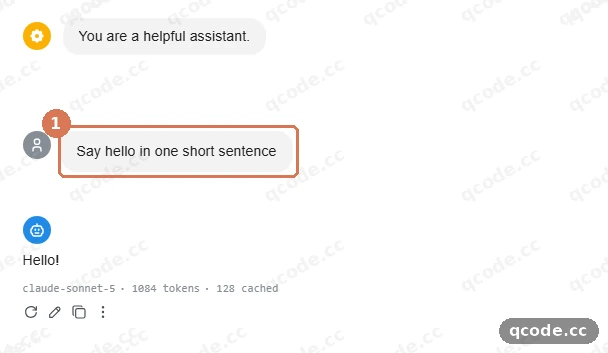
Click the message box, type Say hello in one short sentence and press Enter. ① is your message in the conversation.
Stuck? The reply is a red error instead of text
Open the model picker and confirm the model is claude-sonnet-5 under QCode Claude, not a GPT model under the OpenAI provider. Claude models only answer through the Claude API Compatible provider with https://api.qcode.cc/api/v1.
Done right you will see: ① your message in the conversation, a short answer such as Hello! under it, and a small line below the answer with claude-sonnet-5 and the token counts.
Ask a follow-up
Type Was that last sentence your own answer just now? and press Enter. ① is the follow-up; ② is the model's answer to it.
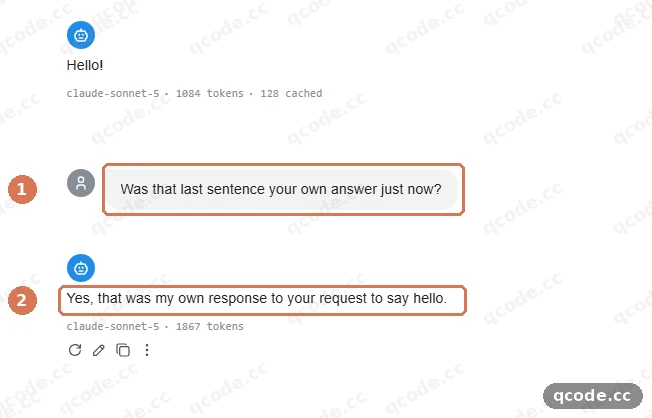
Done right you will see: the model refers back to what it said in the previous turn, so the conversation keeps its context.
Verify it works
Your setup is complete when all four of these are true:
- In
Settings → Model Providerthere is a provider namedQCode Claude, itsAPI ModeisClaude API Compatible, and itsAPI Hostishttps://api.qcode.cc/api/v1. - The
Previewline on that provider readshttps://api.qcode.cc/api/v1/messages, and the key field shows a row of dots. - The provider's
CheckreportsConnection successfulforclaude-sonnet-5. - A message you type in a new chat gets a normal answer, with
claude-sonnet-5and the token counts under the reply.
If you want to see the requests themselves, open probe.qcode.cc, paste the same key and check the traffic that arrives at QCode.
All done
You have QCode wired into Chatbox and Claude answering in the chat window. From here you can:
- Compare the plans on the pricing page and pick the one that suits long-term use
- Go back to your Dashboard to check usage and balance
- Endpoints and API paths
- Chinese models
- Troubleshooting
Common errors
| Error message | Why | What to do |
|---|---|---|
Fetch uses /models while API Path is /v1/chat/completions |
The version segment is missing from API Host, so the model-list request goes to the wrong path |
Put the version in the Host: https://api.qcode.cc/openai/v1, and keep API Path on /chat/completions |
API Error: Error from Custom Claude: TypeError: Load failed (api.example.com) |
The request never left the app: the host in the message could not be reached, either because the address is wrong or because the network blocked it | Check the split: API Host https://api.qcode.cc/api/v1 and API Path /messages; Preview must read https://api.qcode.cc/api/v1/messages. If it still fails, turn on Improve Network Compatibility |
API Error: Error from Claude: TypeError: Failed to fetch(192.168.1.206:8080) |
The request is blocked inside the app before it leaves the device, usually because of a WebView network restriction | On a custom provider turn on Improve Network Compatibility, then confirm API Host is https://api.qcode.cc/api/v1 |
API Error: Error from Custom OpenAl: Network Error: Failed to fetch (api.firefllyai.chat) |
The same network restriction on a custom provider; the host in the message is the one that was configured, not QCode's | Turn on Improve Network Compatibility for the custom provider, then check that API Host is https://api.qcode.cc/openai/v1 |
FAQ
Do I need a Chatbox account?
No. Chatbox is a local client: click Skip guide on the welcome screen, enter the QCode address and key, and you are ready. Nothing in this tutorial needs a sign-in.
Why does the Claude API Host end in /v1?
Because Chatbox does not add it. A custom Claude host gets only /messages appended, so https://api.qcode.cc/api would turn into https://api.qcode.cc/api/messages and return 404. QCode's general Anthropic base URL https://api.qcode.cc/api is meant for clients whose SDK appends /v1/messages itself — Cherry Studio works that way, Chatbox does not.
Why is the model list empty?
A custom provider in Chatbox does not pull a model list, so nothing appears automatically. Add each model ID by hand with + New, for example claude-sonnet-5, claude-opus-5-5 or claude-haiku-5-5; the full list is on qcode.cc/models. Copy the ID exactly, with hyphens.
Can I use GPT models in the same app?
Yes. Add a second provider with API Mode OpenAI API Compatible, API Host https://api.qcode.cc/openai/v1, the same cr_ key, and the model ID gpt-6.2-sol. The optional section below walks through it. Switch models with the model picker; each provider keeps its own model list.
My key expired — can I renew it?
It depends on where the key came from. A key from a monthly personal plan cannot be renewed once it has expired: open a new plan and create a new key in the Dashboard, then paste the new cr_ value into the API Key field. A key from a Pay-as-you-go Pack comes back when you buy another pack — it is the same key, so nothing changes in Chatbox.
Does Chatbox support Gemini through QCode?
No. QCode does not offer Gemini models. Use a Claude model through Claude API Compatible, or GPT and Chinese models through OpenAI API Compatible.
Optional: use GPT models as well
QCode serves GPT and Chinese models through the OpenAI protocol. A Chatbox provider speaks one protocol, so this is a second provider with the same key. Skip this section if Claude is all you need.
Add an OpenAI-compatible provider
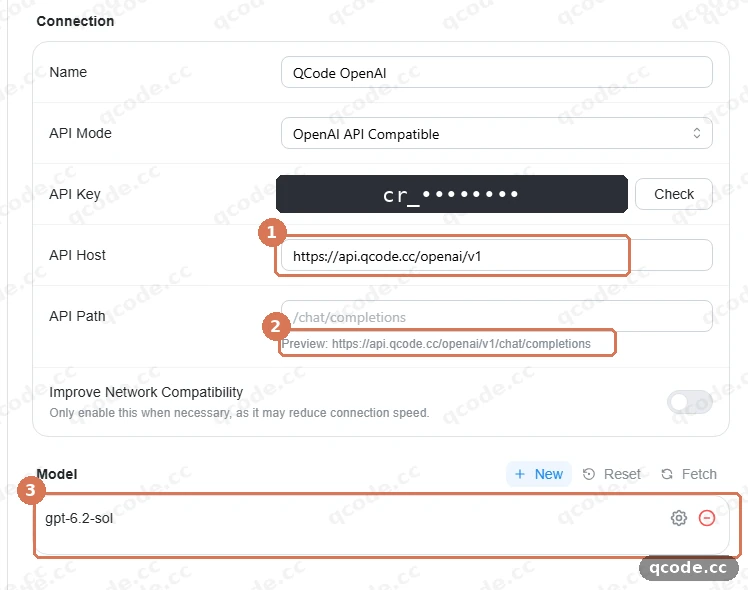
Open Settings → Model Provider again and click + Add, then Add Custom Provider. Name it QCode OpenAI, set API Mode to OpenAI API Compatible, and put https://api.qcode.cc/openai/v1 into ① API Host — again with the version segment, because this mode does not add it either. ② Preview should read https://api.qcode.cc/openai/v1/chat/completions. Paste the same key, then add the model ID gpt-6.2-sol; ③ shows it in the model list.
Stuck? Claude models do not answer here
The OpenAI-compatible provider cannot serve Claude models. Keep Claude on the QCode Claude provider with https://api.qcode.cc/api/v1, and use this second provider only for GPT and Chinese models.
Done right you will see: ① ends with /openai/v1, ② ends with /openai/v1/chat/completions, and ③ lists gpt-6.2-sol in the model list of QCode OpenAI.
Check the GPT connection
Click Check, pick gpt-6.2-sol when asked, and wait for ① Model Test Results.
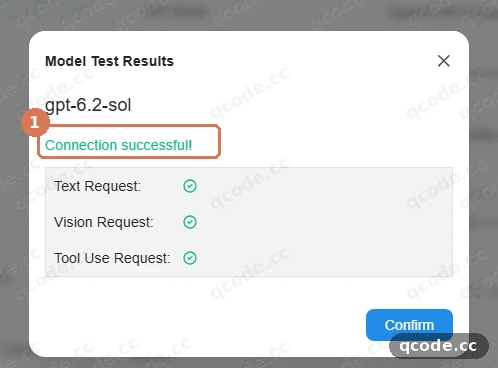
Done right you will see: ① Connection successful for gpt-6.2-sol, so the same key works on both providers.
Provider types and QCode addresses
Chatbox decides the protocol by API Mode, then appends API Path to API Host. Map it like this:
| API Mode | API Host you enter | API Path | Preview shows | Models that work |
|---|---|---|---|---|
Claude API Compatible |
https://api.qcode.cc/api/v1 |
/messages |
https://api.qcode.cc/api/v1/messages |
Claude; Chinese models also answer on this endpoint |
OpenAI API Compatible |
https://api.qcode.cc/openai/v1 |
/chat/completions |
https://api.qcode.cc/openai/v1/chat/completions |
GPT and Chinese models — not Claude |
Google Gemini API Compatible |
QCode does not offer Gemini | — | — | none |
- Two more access points:
asia.qcode.ccandus.qcode.ccaccept the same paths and the same keys — replaceapi.qcode.ccand leave the rest alone, including/api/v1or/openai/v1. Try them if the default host is slow from your network. - The
/v1segment belongs in the Host. Chatbox adds only the Path, so both QCode hosts above end in the version segment. This is the one place where Chatbox differs from clients such as Cherry Studio, whose SDK appends/v1/messagesto the general QCode Anthropic base URLhttps://api.qcode.cc/api. Previewis the fastest check. It shows the exact URL Chatbox will call; if it reads/api/messagesor/openai/chat/completions, the version segment is missing from the Host.
Models you can use
- Claude — through
Claude API Compatible, e.g.claude-sonnet-5,claude-opus-5-5,claude-haiku-5-5 - GPT — through
OpenAI API Compatible, e.g.gpt-6.2-sol,gpt-6.1-terra - Chinese models — through
OpenAI API Compatible, e.g.glm-5.3,kimi-k3,deepseek-v4-pro - Gemini — not offered by QCode; there is no QCode address for Chatbox's Gemini mode
Every model ID is added by hand with + New and can be edited later. The current list is on qcode.cc/models.
Key settings explained
| Setting | What it does |
|---|---|
Name |
Only a label for you; QCode Claude is enough. It is the group name in the model picker |
API Mode |
Decides the protocol and the path Chatbox appends. The wrong mode shows up as a 404 or as Claude models refusing to answer |
API Host |
The address up to and including the version segment: https://api.qcode.cc/api/v1 or https://api.qcode.cc/openai/v1 |
API Path |
The last part Chatbox adds: /messages for Claude, /chat/completions for OpenAI |
Preview |
Read-only line showing the full URL built from Host and Path |
API Key |
Your QCode key starting with cr_, stored locally and shown as dots |
Model ID |
The exact model name, typed by hand in the Edit Model window |
Check |
Sends one test request with a model you pick and reports Model Test Results |
Known limitations
- No automatic
/v1for custom Claude hosts. Chatbox rewriteshttps://api.anthropic.comto add/v1, but a custom host is used as typed; only/messagesis appended. That is why QCode's Claude host here ishttps://api.qcode.cc/api/v1, not the generalhttps://api.qcode.cc/api. - No automatic model list. A custom provider in Chatbox does not pull a model list, so every model ID is typed by hand; refreshing does not populate the list.
- One protocol per provider. Claude needs the
Claude API Compatibleprovider, GPT and Chinese models needOpenAI API Compatible; the same key works on both. - Button names differ between versions. Chatbox 1.24.6 (English) says
Model Provider,+ Add,Add Custom ProviderandCheck; older builds may word these differently.
Related docs
- Endpoints and API paths
- Tool compatibility overview
- Chinese models
- Subscriptions vs API keys vs QCode keys
- Troubleshooting
Get started with QCode
One API key for Claude Code, Codex and more — billed per token, per-model prices on qcode.cc/models