Codex desktop app with QCode: Windows 11 walkthrough, one screenshot per step, no ChatGPT account
Follow 15 steps and 14 screenshots to install Codex desktop 26.1117.4957.0 from Microsoft Store on Windows 11, use the one-line script to write your QCode cr_ key into config.toml and auth.json, and send your first message without a ChatGPT account.
Need an API key? Sign up →Endpoints & base URLs →
On This Page
- Download and install
- Follow the screenshots: Windows, one step at a time
- Open the ChatGPT page in Microsoft Store
- Click Get to start the install
- Open it once, but do not sign in
- Know the fallback entry, not needed this time
- Open PowerShell and paste the one-line command
- Choose the ingress domain: just press Enter
- Paste the QCode key
- Choose 1) Codex 桌面版 App (Codex desktop app)
- Choose the default model gpt-6.2-sol
- Confirm the config was written
- Read the final summary
- Quit the app completely
- Open it again and skip the survey
- Switch the mode to Codex
- Send your first sentence and get a reply
- Verify it works
- Common errors
- FAQ
- Write the config manually (without the one-line script)
- Connection overview
Short answer: In Windows PowerShell, paste irm https://qcode.cc/install/codex.ps1 | iex, paste your cr_ key when asked, choose 1) Codex 桌面版 App (Codex desktop app), and the script writes base_url = "https://api.qcode.cc/openai" plus the key into %USERPROFILE%\.codex\. Quit the app completely from the tray and open it again, switch the top-left mode to Codex, and you are ready to go.
| Item | Fill in |
|---|---|
Endpoint address (base_url) |
https://api.qcode.cc/openai |
API protocol (wire_api) |
responses |
| Default model | gpt-6.2-sol |
| Config file | %USERPROFILE%\.codex\config.toml |
| Key file | %USERPROFILE%\.codex\auth.json |
Checked on 2026-11-22 · ChatGPT (Codex desktop) 26.1117.4957.0 · Windows 11
Follow the screenshots below and about ten minutes later your Windows PC has the Codex desktop app installed and connected to QCode — open the app, switch the top-left mode to Codex, and you can chat right away.
Using Codex desktop through QCode needs only one QCode API key, no ChatGPT account: you do not fill in the sign-in page in the app, and the auth.json written by the one-line script makes it disappear. The desktop app and Codex CLI share the same %USERPROFILE%\.codex\config.toml, so after changing the config always quit completely from the tray and open the app again.
- The PC runs Windows 11 or Windows 10 (both 64-bit) and can open Microsoft Store and Windows PowerShell
- You have already copied your QCode API key, which starts with
cr_. No account yet? Sign up first, pick a plan on the pricing page, then create the key in the Dashboard. - The PC can reach
qcode.cc,api.qcode.ccand Microsoft Store; if the download does not work, see the region notes under Download and install below - Set aside 10 uninterrupted minutes; only the Store install raises one User Account Control prompt — click Yes
Download and install
The Codex desktop app has no separate Codex installer: in Microsoft Store it is called ChatGPT (publisher OpenAI), and once installed you switch it to Codex mode inside the app. It does not require Node.js and does not need WSL.
The only regional difference is which download entry point opens; the setup inside the app is identical everywhere. Pick your region first:
- Both Microsoft Store and the official direct package work: search for ChatGPT in the Store, or open
https://apps.microsoft.com/detail/9plm9xgg6vksin a browser and click获取(Get). - To skip the Store, download the official package
ChatGPT-x64.msix(ChatGPT-arm64.msixon ARM machines) and double-click it to install. - The one-line script goes through
qcode.cc, which is normally reachable directly.
- Prefer Microsoft Store: open
https://apps.microsoft.com/detail/9plm9xgg6vksin a browser, or typems-windows-store://pdp/?productid=9PLM9XGG6VKSin the Run dialog, then click获取(Get) — no Microsoft account needed. - If the Store page will not open or keeps spinning, use the official direct package https://persistent.oaistatic.com/codex-app-prod/ChatGPT-x64.msix (
ChatGPT-arm64.msixon ARM machines). Double-click it and App Installer takes over; one UAC prompt may appear. - The one-line script goes through
qcode.cc, which is normally reachable directly.
- The download channels are the same as Europe / Japan: the ChatGPT product page in Microsoft Store, or the official package
ChatGPT-x64.msix. - If Microsoft Store will not open, use the official package; App Installer takes over after a double-click.
- The one-line script goes through
qcode.cc, which is normally reachable directly.
- Microsoft Store usually works; if it will not open, install the official package
ChatGPT-x64.msix(ChatGPT-arm64.msixon ARM machines) by double-clicking it. - If neither the Store nor the package opens, try another network; the setup afterwards is unaffected.
- The one-line script goes through
qcode.cc, which is normally reachable directly.
Follow the screenshots: Windows, one step at a time
The 15 steps below each do one thing. The orange numbers on the screenshots (①, ②, ③) match the numbers in the text one to one — when you see a number, look at the same spot in the picture.
Open the ChatGPT page in Microsoft Store
Open https://apps.microsoft.com/detail/9plm9xgg6vks in a browser. Check ①: the app name is ChatGPT, the publisher is OpenAI, and the button reads 获取 (Get).
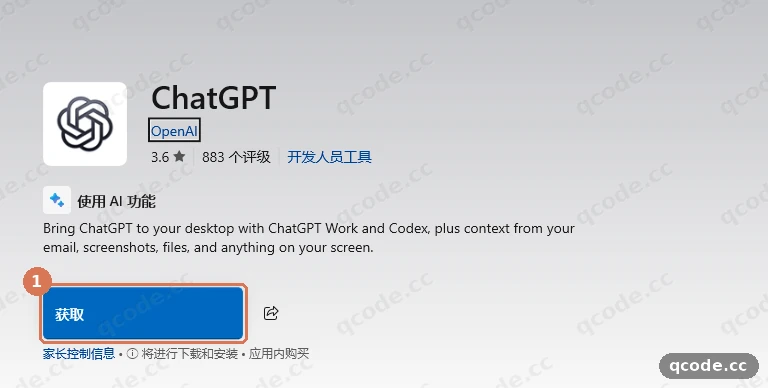
Done right you will see: the ChatGPT icon and name at the top of the page, and 获取 (Get) as the button on the right. If it reads 打开 (Open), the app is already installed on this PC — skip straight to step 3.
Click Get to start the install
Click 获取 (Get) at ①. Windows raises a User Account Control prompt; confirm the publisher is Microsoft Windows, click Yes, then wait for the download — the package is about 759 MB.
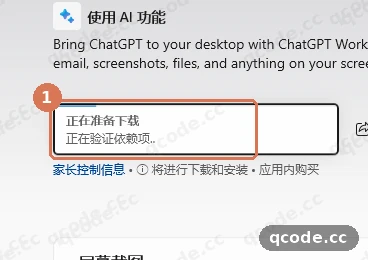
Done right you will see: the button changes to 正在下载 / 正在安装 (Downloading / Installing) and then to 打开 (Open), and ChatGPT can be found in the Start menu.
Stuck? Clicking Get does nothing, or the Store shows an error
Close the Store window, open the product page again and retry; if that still fails, use the official package ChatGPT-x64.msix from Download and install, double-click it and click 安装 (Install). After it finishes, search ChatGPT in the Start menu to open it.
Open it once, but do not sign in
Open ChatGPT from the Start menu (the first launch may ask for one more UAC confirmation). The first screen is the English sign-in page Sign in to ChatGPT: ① is Continue to sign in, ② is Sign in another way.
This page has no Skip, and do not click any sign-in button yet — the next step writes the configuration with the one-line script, and once that is done the page will not appear again.
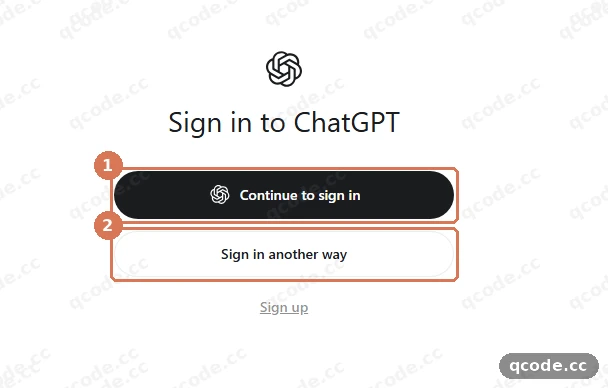
Done right you will see: a card with only sign-in buttons, titled Sign in to ChatGPT, and no skip option and no Skip anywhere on the page.
Know the fallback entry, not needed this time
If auth.json ever fails to take effect and the app asks you to sign in again, click Sign in another way on the sign-in page: ① is the OpenAI API Key entry, where you can paste the cr_ key directly (Amazon Bedrock is listed below it).
This tutorial uses the one-line script, so just take a look here — no signing in.
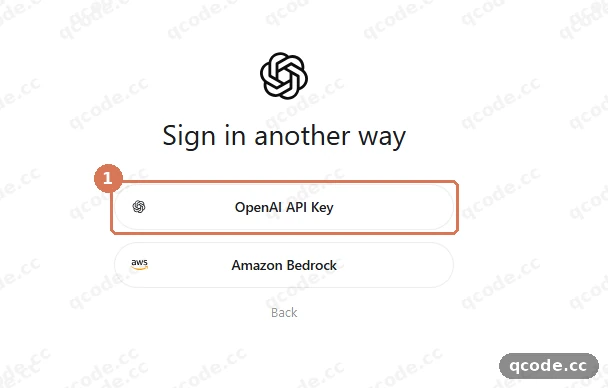
Done right you will see: OpenAI API Key as the first item on the page, and Back at the bottom to return to the sign-in page.
Open PowerShell and paste the one-line command
Click the Start menu, type Windows PowerShell (or Terminal) to open it, paste the command below and press Enter:
irm https://qcode.cc/install/codex.ps1 | iex
① is the command you just ran; ② is the script version v2026.11.21.1 on the second line of the banner (the number changes with updates); ③ is the latency test for the three ingress domains that runs next.
On a system whose display language is not Chinese, or after setting $env:QCODE_LANG="en", the script prints its prompts in English; the key order is exactly the same.
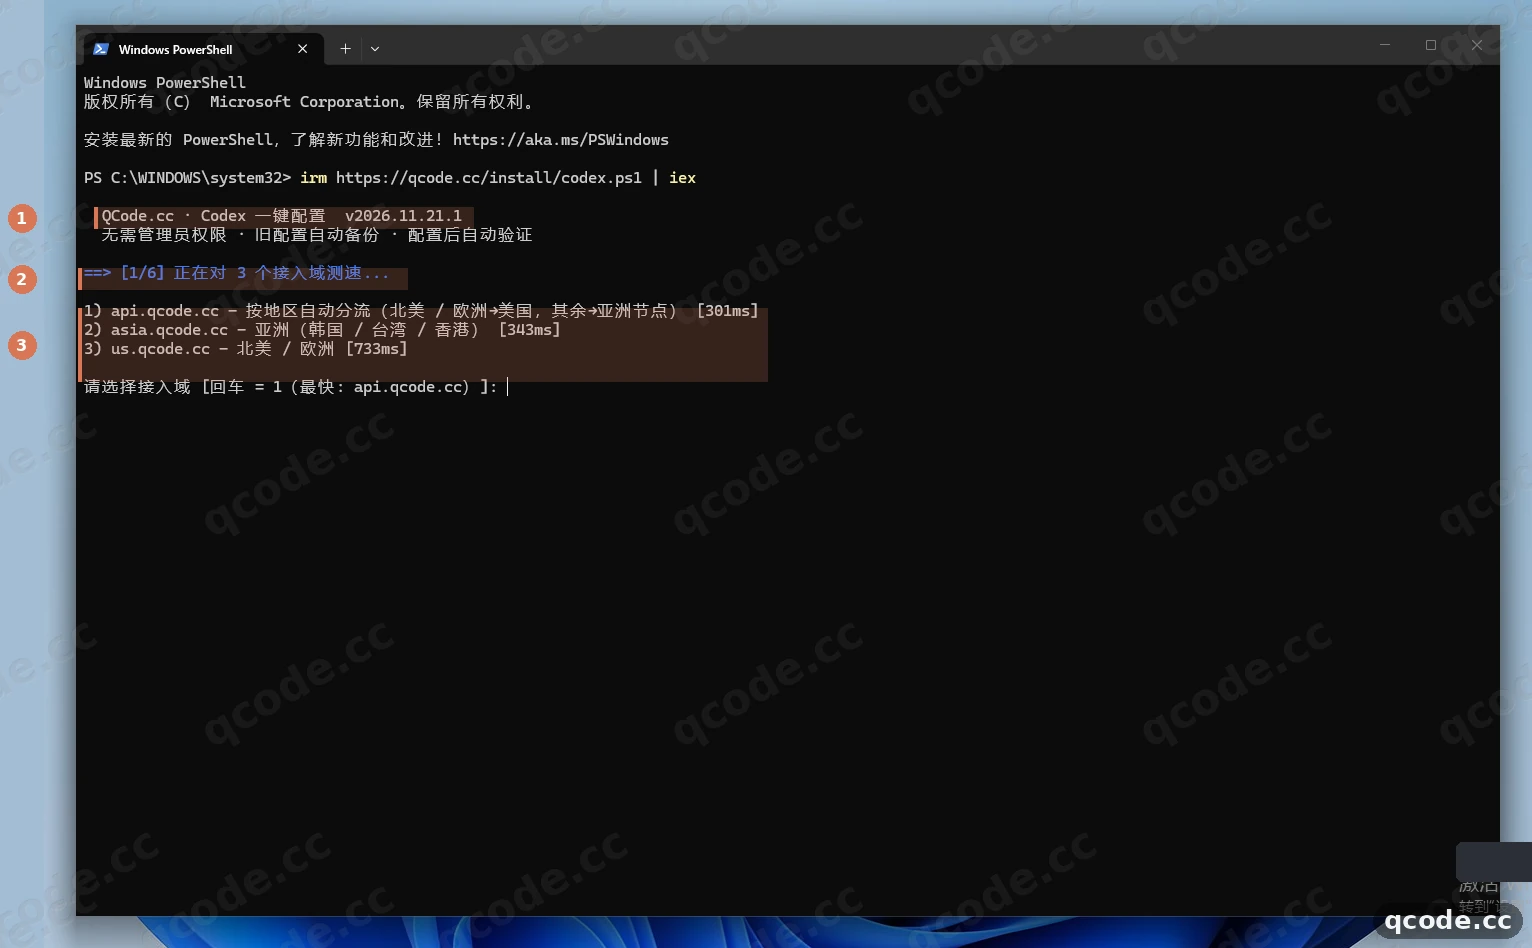
Done right you will see: the QCode.cc · Codex 一键配置 (QCode.cc · Codex one-line setup) banner, a version line v2026.11.21.1, then [1/6] and three latency lines.
Stuck? It says irm is not recognized as an internal or external command
You opened Command Prompt (CMD), which does not understand irm. Close that window, open Windows PowerShell or Terminal again and paste the command once more.
Choose the ingress domain: just press Enter
Press Enter at the ① prompt to accept the fastest one in the square brackets (here api.qcode.cc). After Enter, ② echoes base_url=https://api.qcode.cc/openai — stop at /openai, with no /v1 and no trailing slash.
asia.qcode.cc and us.qcode.cc are the other two ingress points; all three point at the same QCode account, and pressing Enter takes the fastest one, so you do not have to choose.
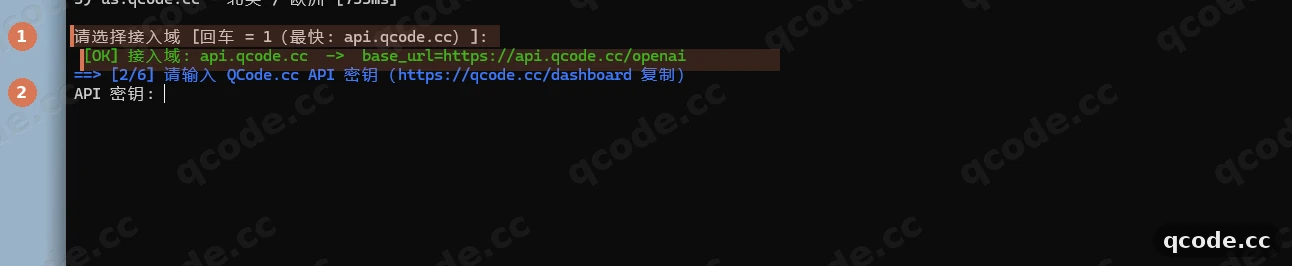
Done right you will see: a line 接入域: api.qcode.cc -> base_url=https://api.qcode.cc/openai (Ingress domain: api.qcode.cc), immediately followed by [2/6] asking for the key.
Paste the QCode key
Copy the string that starts with cr_ from the Dashboard, go back to the window, paste it after ① API 密钥: (API key:) and press Enter.
Nothing is echoed while you type, so no characters appear on screen; after Enter, ② shows only 已读取密钥: cr_**** (Key read: cr_****) with the last four characters, which means the key was received and its format is right.
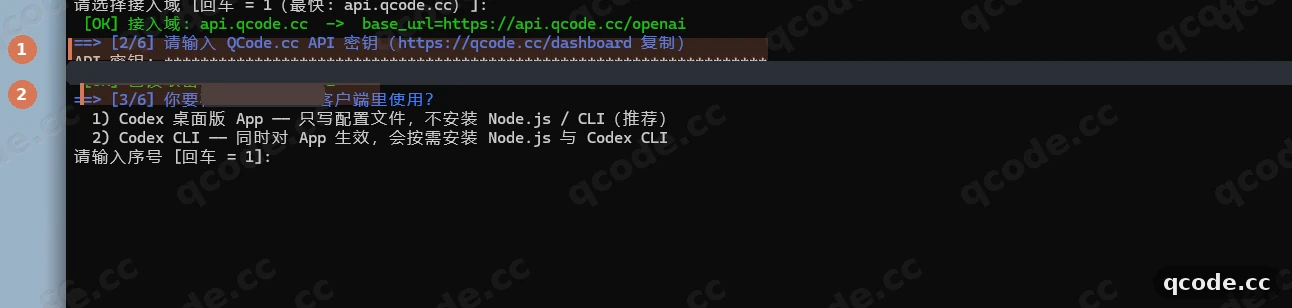
Done right you will see: a line 已读取密钥: cr_**** (Key read: cr_****) starting with cr_, then [3/6].
Need an API key?
If you do not have a QCode account yet, Sign up first. If you prefer to pay by usage, buy a Pay-as-you-go Pack first, then create the key in the Dashboard. Copy the whole string that starts with cr_ and paste it back above. You can pay by credit/debit card (Visa / Mastercard), Apple Pay / Google Pay, or cryptocurrency — see Payment methods.
Choose 1) Codex 桌面版 App (Codex desktop app)
① is the question line 你要在哪个 Codex 客户端里使用? (Which Codex client will you use?). Press Enter on ② 1) Codex 桌面版 App (Codex desktop app) — it is already the default, 1. This option only writes the config files; it installs neither Node.js nor the Codex CLI.
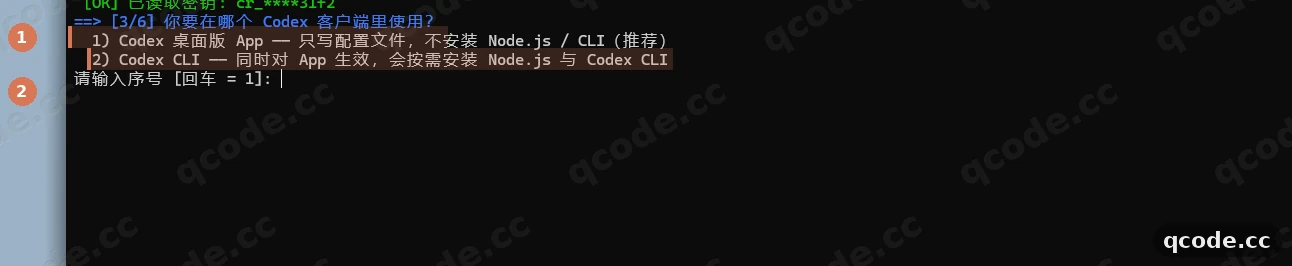
Done right you will see: two options — 1) Codex 桌面版 App (Codex desktop app) and 2) Codex CLI; after Enter it moves to [4/6] to fetch the model list.
Choose the default model gpt-6.2-sol
① is [4/6] fetching the list of available models. The first line ② is gpt-6.2-sol, marked <- 推荐 (recommended) — press Enter to take it.
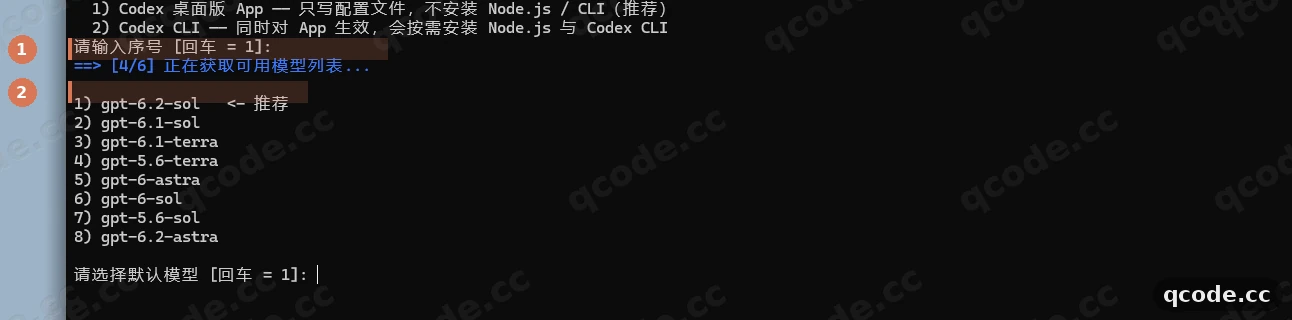
Done right you will see: a few lines starting with 1) 2), the first one gpt-6.2-sol followed by <- 推荐 (recommended).
Stuck? The list has no gpt-6.2-sol
The model list is fetched for the models this key can use. First check that you pasted a QCode cr_ key with no extra spaces; then run the script once more to fetch the list again. As long as the first line is marked <- 推荐 (recommended), just press Enter.
Confirm the config was written
① is [OK] 已写入 config.toml + auth.json (written to config.toml + auth.json); ② says the desktop app and the CLI share this config and it only takes effect after a complete quit and restart; ③ is a minimal request the script sends automatically — 接入验证通过 (access verified) means address, key and network all work end to end.
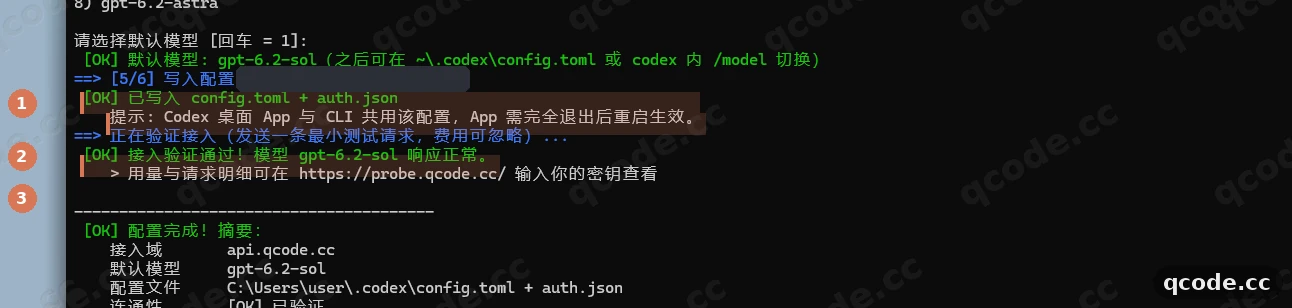
Done right you will see: 已写入 config.toml + auth.json (written to config.toml + auth.json), a line telling you to quit completely and restart, and 接入验证通过! 模型 gpt-6.2-sol 响应正常 (access verified, model gpt-6.2-sol responds normally).
Read the final summary
The summary has three lines: ① ingress domain (here api.qcode.cc), ② default model gpt-6.2-sol, ③ connectivity [OK] 已验证 (verified). The config file paths sit in the middle, pointing at C:\Users\<your username>\.codex.
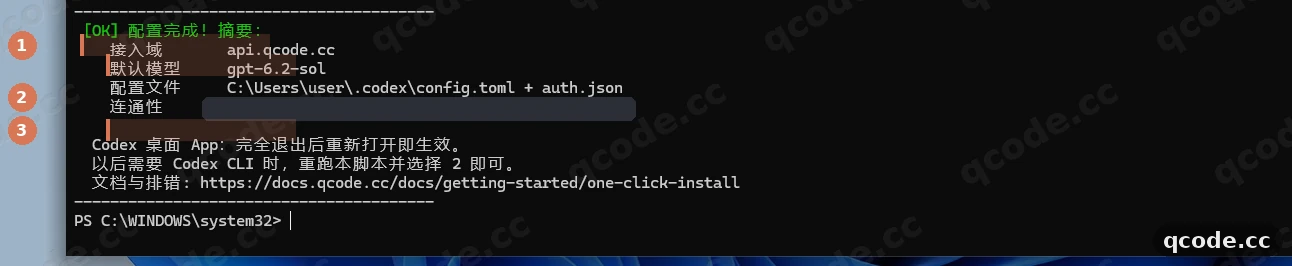
Done right you will see: three lines all carrying [OK], the ingress domain api.qcode.cc and the model gpt-6.2-sol.
Quit the app completely
Closing the window is not enough — the process is still running and the config will not be read again. Quit like this:
- Click
^at the bottom right of the taskbar to expand the hidden tray icons; - Right-click the
ChatGPTicon in there; - Click
Exit.
The sign-in page has no File menu, and Ctrl+Q does nothing there either — only Exit in the tray really ends the process.
Done right you will see: the ChatGPT icon disappears from the tray, and Task Manager no longer lists a ChatGPT process.
Stuck? No ChatGPT icon in the tray
The icon may be folded away: click ^ at the bottom right of the taskbar to expand the tray, then right-click. If the context menu only has New Chat / Send Feedback, you right-clicked the app button on the taskbar rather than the tray icon; try the small icon inside ^ instead.
Open it again and skip the survey
Open ChatGPT from the Start menu again. This time the sign-in page does not appear and you go straight to the survey What type of work do you do?: ① is the option Engineering, ② is Skip. Pick an option or just click ② Skip — it only affects interface suggestions, not the connection.
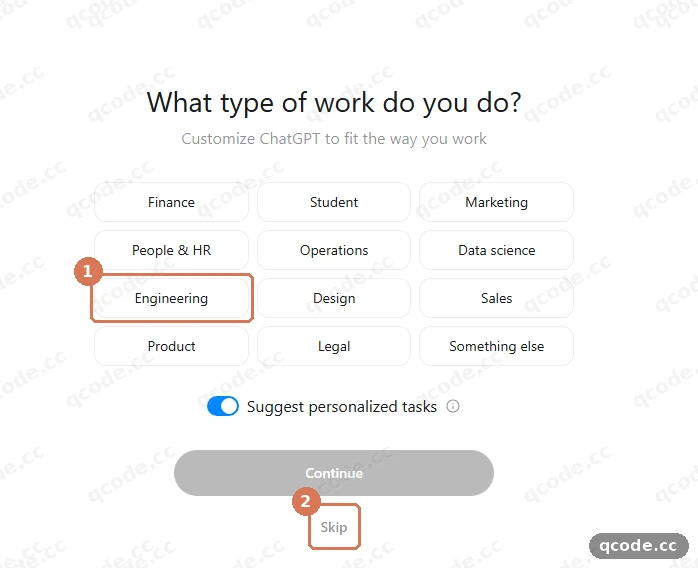
Done right you will see: a survey card, with no Sign in to ChatGPT; clicking Skip takes you to the main interface.
Stuck? It still shows Sign in to ChatGPT after reopening
The app did not read the key file. Check that %USERPROFILE%\.codex\auth.json exists and that its key name is OPENAI_API_KEY; then Exit from the tray once more and open the app again. If the sign-in page still appears, click Sign in another way → OpenAI API Key and paste the cr_ key there.
Switch the mode to Codex
The main interface starts in ChatGPT Work. Click the ① mode button at the top left and choose Codex from the menu. Once switched, the ② model pill at the bottom right shows 6.2 Sol High — that is gpt-6.2-sol from config.toml with high reasoning effort.
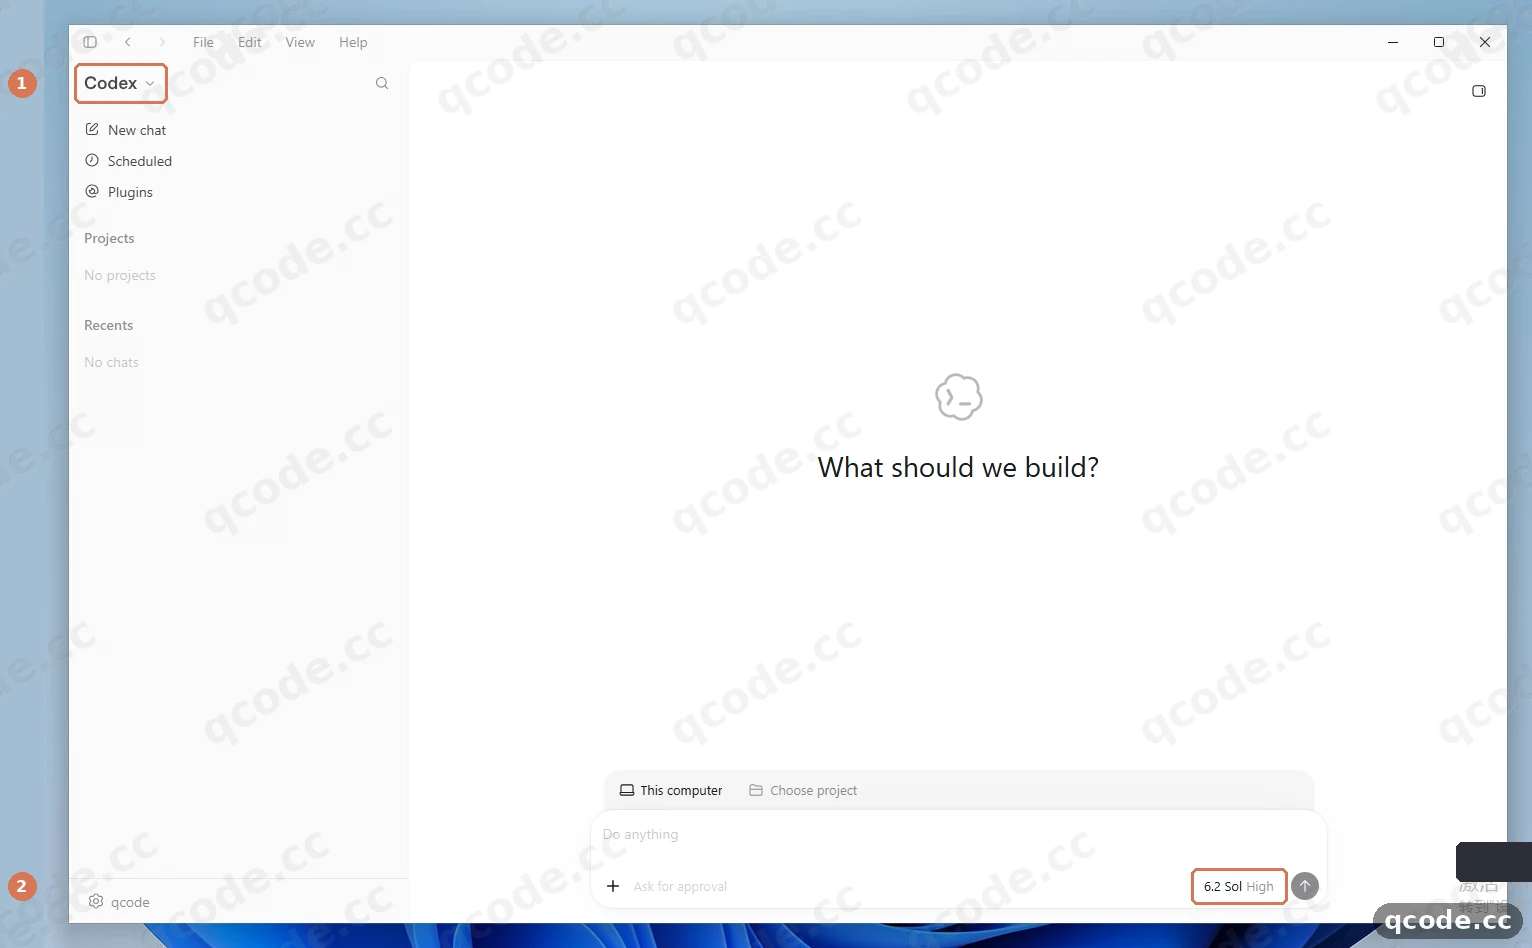
Done right you will see: the mode at the top left reads Codex, the heading in the middle is What should we build?, the input placeholder is Do anything, and the pill at the bottom right is 6.2 Sol High.
Stuck? The bottom right does not show 6.2 Sol High
config.toml did not take effect. Open %USERPROFILE%\.codex\config.toml in Notepad, check that the top level has model = "gpt-6.2-sol" and model_provider = "qcode", and that a [model_providers.qcode] section exists; save the file, then Exit from the tray and reopen the app.
Send your first sentence and get a reply
Type Say hello in one short sentence in the ③ input box (placeholder Do anything) and press Enter. A few seconds later ① is the message you sent, and ② below it is the model's reply.
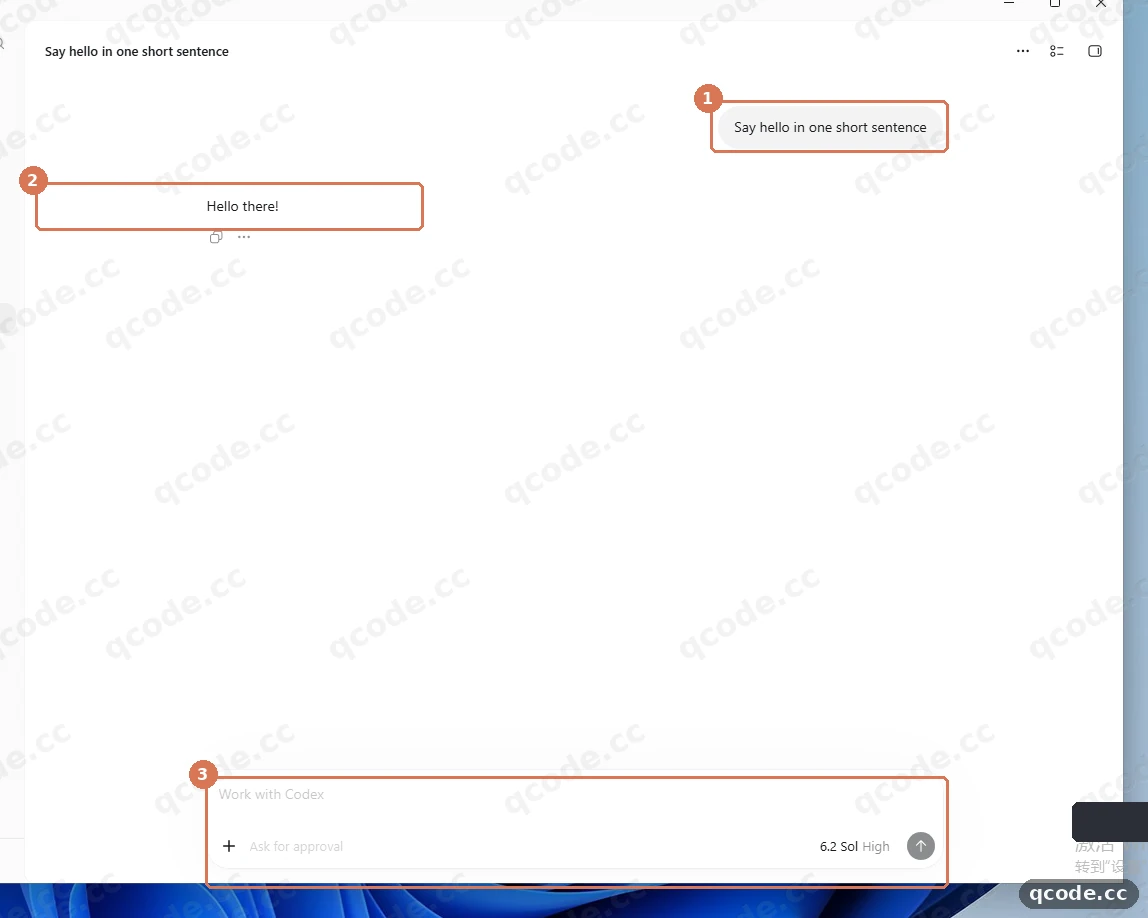
Done right you will see: your message on the right side of the conversation area, and a complete reply on the left a few seconds later — not an endless spinner and not a 401.
Verify it works
When all three of these are true, the app is installed and connected:
- Reopening the app no longer shows
Sign in to ChatGPT, and the top-left mode switches toCodex; - The model pill at the bottom right shows
6.2 Sol High, and a sentence you send gets a normal reply; - To double-check that requests really go through QCode: open probe.qcode.cc, enter the key, and you will see the request you just made, with the model name
gpt-6.2-sol.
All done
Your Windows PC now has the Codex desktop app installed and connected to QCode: from now on, open ChatGPT, switch to Codex mode, and let it write code and edit files. From here you can:
- Codex CLI tutorial
- Claude Code tutorial
- Codex vs Claude Code
- Endpoints and API formats
- Next: compare the plans on the pricing page and pick the one that suits long-term use
- Go back to your Dashboard to check usage and balance
Common errors
| Error message | Why | What to do |
|---|---|---|
Sign in to ChatGPT |
The app did not read auth.json at startup: the one-line script has not been run, or the config was changed but the window was only closed instead of quitting completely from the tray |
Right-click the ChatGPT tray icon → Exit, then reopen; if it still appears, check that OPENAI_API_KEY in %USERPROFILE%\.codex\auth.json is the key starting with cr_ |
ERROR: unexpected status 401 Unauthorized: {"error":"Missing API key"}, url: https://xxx/v1/responses |
config.toml is missing requires_openai_auth = true, or auth.json has no OPENAI_API_KEY, so the request carries no key |
Add requires_openai_auth = true to [model_providers.qcode] in config.toml, write auth.json as {"OPENAI_API_KEY": "cr_xxxxxxxx"}, save, then Exit from the tray and reopen |
404 route not supported: POST /chatgpt/v1/responses |
base_url points at ChatGPT's sign-in domain, or carries an extra /v1 or slash after /openai |
Set base_url back to https://api.qcode.cc/openai, save, then Exit from the tray and reopen |
Error loading config.toml: wire_api = "chat" is no longer supported. |
wire_api still says chat, while Codex supports only the Responses protocol |
Change wire_api to "responses", save and reopen the app |
Missing environment variable: OPENAI_API_KEY |
The env_key style is used but the variable is not present in the process that starts the app; or both requires_openai_auth and env_key are left in place |
For the desktop app use requires_openai_auth = true plus auth.json, and delete the env_key line — keep only one of the two styles |
模型提供商不匹配 |
The provider bound to the conversation history does not match the one in config.toml, typical when you signed in with an official account in the app first and switched to an API key later |
Start a new conversation; check that model_provider = "qcode" matches the [model_providers.qcode] table name, then Exit from the tray and reopen |
FAQ
Do I need a ChatGPT account to use it?
No. On first launch the app stops at Sign in to ChatGPT, but as long as you have run the one-line script above, %USERPROFILE%\.codex\auth.json already holds a cr_ key, and reopening the app skips the sign-in page and goes straight to the survey and main interface. Nothing in the process signs in to any vendor account.
How does the desktop app relate to Codex CLI?
They share the same %USERPROFILE%\.codex\config.toml and auth.json: the model, endpoint address and key the desktop app sees are exactly those of Codex CLI. When you pick 1) Codex 桌面版 App (Codex desktop app) in step 3 of the one-line script, it only writes config and installs neither Node.js nor the CLI; to use the command line later, run the script again and pick 2) Codex CLI — no need to re-enter the key. See the Codex CLI tutorial for command-line usage.
What if my config changes do not take effect?
The app reads the config only once, at startup. After changing config.toml or auth.json you must right-click ChatGPT in the tray at the bottom right of the taskbar → Exit, confirm the process has ended, and reopen the app; closing the window or pressing Ctrl+Q is not enough.
Does the desktop app need Node.js or WSL?
Neither. The desktop app is a native Windows app distributed through Microsoft Store, and choosing 1) Codex 桌面版 App (Codex desktop app) in the one-line script never touches Node.js and does not open WSL. Node.js is only needed to install Codex CLI.
Which model should I use?
| What you need | Recommended model | Why |
|---|---|---|
| Daily and complex coding workhorse | gpt-6.2-sol |
1.05M context / 128K output, balanced all round |
| Hardest multi-step agent work | gpt-6.2-astra |
The flagship one tier up, suited to cross-module architecture and long tasks |
| Light daily / batch tasks | gpt-6.1-terra / gpt-5.6-terra |
Lower cost, optimized for code scenarios |
| Previous-generation high-end model | gpt-6-astra |
Still usable; for new tasks switch to gpt-6.2-astra |
Changing the default model means editing the model line in config.toml, saving, then Exit from the tray and reopening. Note that gpt-6.2-* does not support model_reasoning_effort = "none".
What happens when my key expires?
Two cases:
- A personal plan key cannot be renewed when it expires — reopen a plan and use a new key.
- For a pay-as-you-go pack, buy another pack after the key expires and the same key starts working again.
After switching keys, remember to update OPENAI_API_KEY in auth.json, then Exit from the tray and reopen the app.
How is usage billed?
The desktop app, Codex CLI and Claude Code can share one QCode API key; billing is by actual token consumption, not by tool. When you let Codex iterate on its own for several rounds, a single task can consume more; check usage and balance in the Dashboard.
Write the config manually (without the one-line script)
The one-line script has already written both files for you. If you prefer to write them yourself, or want to compare the config on macOS, do the following. The desktop app and Codex CLI read the same config.
Create config.toml
On Windows (PowerShell) create the folder first:
mkdir $HOME\.codex
Then write this into %USERPROFILE%\.codex\config.toml:
model_provider = "qcode"
model = "gpt-6.2-sol"
model_reasoning_effort = "high"

[model_providers.qcode]
name = "qcode"
base_url = "https://api.qcode.cc/openai"
wire_api = "responses"
requires_openai_auth = true
Create auth.json
Write three lines into auth.json in the same folder; the key name must be OPENAI_API_KEY, with straight quotes and colons:
{
  "OPENAI_API_KEY": "cr_xxxxxxxx"
}
Replace cr_xxxxxxxx with your own key. When saving in Notepad, set the save type to 所有文件 (All Files) and name the file auth.json, otherwise it becomes auth.json.txt and the app cannot read it.
Environment variable alternative (pick one)
To pass the key through an environment variable instead, replace requires_openai_auth = true with env_key = "QCODE_API_KEY" and set that variable. Pick exactly one: when requires_openai_auth = true is present, Codex ignores env_key.
model_provider = "qcode"
model = "gpt-6.2-sol"
model_reasoning_effort = "high"

[model_providers.qcode]
name = "qcode"
base_url = "https://api.qcode.cc/openai"
wire_api = "responses"
env_key = "QCODE_API_KEY"
# Temporary (current session)
$env:QCODE_API_KEY = "cr_xxxxxxxx"

# Permanent (writes a user environment variable; reopen the app afterwards)
[System.Environment]::SetEnvironmentVariable("QCODE_API_KEY", "cr_xxxxxxxx", [System.EnvironmentVariableTarget]::User)
config.toml field reference
| Field | What it does |
|---|---|
model_provider |
Name of the model provider to use; here the custom qcode. The name is yours to choose as long as it matches [model_providers.<name>] |
model |
Default model, gpt-6.2-sol recommended; pick gpt-6.2-astra for the hardest tasks |
model_reasoning_effort |
Reasoning effort, supports low, medium, high, xhigh. gpt-6.2-* does not accept none; keep high or xhigh |
base_url |
QCode ingress address. For the desktop app write https://api.qcode.cc/openai, with no trailing /v1 and no trailing slash |
wire_api |
API protocol type; Codex currently supports only responses |
requires_openai_auth |
Use OpenAI-style auth, reading the key from OPENAI_API_KEY in auth.json. When set to true, Codex ignores env_key |
The one-line script also writes runtime settings such as review_model = "gpt-6.2-sol" and windows_wsl_setup_acknowledged = true; the desktop app does not need them, and you should not edit them by hand.
Available models
Through QCode you can choose from these Codex / GPT models:
| Model | Notes | Recommended for |
|---|---|---|
gpt-6.2-sol |
Main flagship, 1.05M context / 128K max output; rejects model_reasoning_effort = "none" |
First choice for daily and complex coding (recommended) |
gpt-6.2-astra |
Top flagship, 1.05M context / 128K max output; also rejects none |
Hardest multi-step agents and cross-module architecture |
gpt-6.1-terra |
GPT-6.1 mid-tier, 1.05M context | Daily coding / batch tasks |
gpt-5.6-terra |
GPT-5.6 flagship, optimized for code | Programming / Codex scenarios |
gpt-6-astra |
Previous-generation top tier | High-end capability; for new tasks switch to gpt-6.2-astra |
Connection overview
| Item | Details |
|---|---|
| Available models | GPT ✅ (Responses protocol) · Claude ❌ · Chinese models ❌ (the Responses protocol does not serve Chinese models) · Gemini ❌ (not offered by QCode) |
| Protocol and Base URL | Codex uses OpenAI Responses: in config.toml write base_url = "https://api.qcode.cc/openai" + wire_api = "responses" |
| Config location | On Windows %USERPROFILE%\.codex\ (config.toml + auth.json), shared by the desktop app and the CLI |
| Other ingress points | https://asia.qcode.cc/openai, https://us.qcode.cc/openai — the same account and keys as api.qcode.cc |
| Official docs | openai/codex |
Get started with QCode
One API key for Claude Code, Codex and more — billed per token, per-model prices on qcode.cc/models