FastGPT with QCode: Windows 11 walkthrough, one screenshot per step
Follow 11 steps and 11 screenshots to install FastGPT 4.17.4 on Windows 11 with Docker Desktop, add gpt-6.2-sol under System Models, fill in QCode's OpenAI-compatible address and your cr_ key, and get your first reply in a chat Agent.
Need an API key? Sign up →Endpoints & base URLs →
On This Page
- Download and install
- Follow the screenshots: one step at a time
- Download the Docker Desktop installer
- Download and run the FastGPT deployment script in the terminal
- Sign in to the root administrator account
- Open System Models
- Add the gpt-6.2-sol model and enable it
- Switch to the Model Channels tab
- Fill in the QCode channel
- Find the test button on the right of the channel
- Test model connectivity in bulk
- Create a chat Agent
- Send one sentence and check the reply
- Verify it works
- Common errors
- FAQ
- What happens when a key expires?
- Port 3000 is in use and the page will not open — what now?
- gpt-6.2-sol is missing from the 模型 (Model) dropdown — what now?
- Can I use Claude models too?
- How do I switch the interface language?
- Is FastGPT still there after a reboot?
- What if memory is short and the containers keep restarting?
- Connection overview
- Other endpoints
- Available models
- Advanced: model mapping and custom request URL
- Related docs
Follow the 11 steps below and you will get FastGPT running on your own Windows 11 PC, set QCode up as a model channel, and then chat normally and build knowledge-base Q&A in a chat Agent.
Short answer: In FastGPT go to Admin → System Models (管理员 → 系统模型). Under Model Config (模型配置), add the model gpt-6.2-sol and enable it; then under Model Channels (模型渠道) add a channel whose protocol type is OpenAI, set the proxy address to https://api.qcode.cc/openai/v1, and paste the string that starts with cr_ as the API key.
| Item | Fill in |
|---|---|
| Protocol type | OpenAI |
| Proxy address (Base URL) | https://api.qcode.cc/openai/v1 |
| API key | cr_xxxxxxxx |
| Model ID | gpt-6.2-sol |
| Channel name | QCode |
Checked on 2026-11-22 · FastGPT 4.17.4 · Windows 11
- The PC runs Windows 10 / 11 (64-bit), virtualization is already enabled in the BIOS or UEFI, and there is at least 10 GiB of disk space available
- Docker Desktop is already installed or about to be (WSL 2 backend), and you can open Windows Terminal
- You have already copied your QCode API key starting with
cr_from the Dashboard. No account yet? Sign up for QCode first, pick a plan on the pricing page, then create the key in the Dashboard. - The PC can open docker.com, doc.fastgpt.cn and api.qcode.cc normally, and you have about 30 uninterrupted minutes
Download and install
FastGPT has no Windows desktop installer: it is a web service that runs in Docker. Install Docker Desktop, bring the service up with the official script, and open http://localhost:3000 in a browser — that is the FastGPT interface. So "installing" is really two things: install Docker Desktop first, then run FastGPT's official deployment script.
Note down the three official addresses first; you will need them when you compare the screenshots later:
- Docker Desktop download page: https://www.docker.com/products/docker-desktop/ (on Windows choose
Docker Desktop Installer.exe) - FastGPT official Docker deployment docs: https://doc.fastgpt.cn/self-host/deploy/docker
- FastGPT official one-line deployment script: https://doc.fastgpt.cn/deploy/install.sh (English mirror:
https://doc.fastgpt.io/deploy/install.sh)
When you install Docker Desktop, follow the wizard to the end; it needs administrator rights, and after it finishes restart the PC as prompted. On first launch accept the agreement and enable the WSL 2 backend. Then run the official deployment script in Windows Terminal: it asks in turn for the deployment version, the image source, the vector database, whether to generate credentials automatically, and the access address and port — beginners can just take the defaults all the way. When the script finishes it tells you to run docker compose pull and docker compose up -d; once the containers are up, open http://localhost:3000 in a browser and FastGPT is there.
Prepare the hardware to the official spec: 2 cores and 4 GiB minimum, 2 cores and 8 GiB recommended, and leave enough memory for Docker Desktop. The whole flow needs no OpenAI account: the FastGPT administrator account is created on your own PC during deployment.
Networks differ from region to region, so pick where you are first:
- Docker Desktop: just download the Windows installer from the official download page.
- FastGPT deployment script: keep the script's default image source; before it ends the script tells you to run
docker compose pullanddocker compose up -d, and following that brings the service up. - When done: open
http://localhost:3000in a browser and bookmark it; from then on start Docker Desktop first at every boot, then open the bookmark.
- Docker Desktop: open the official Docker Desktop download page and use "Download Docker Desktop" on the page to expand the Windows options and download the installer. If the download slows down, be patient — do not keep clicking, repeated downloads only make the file slower.
- FastGPT deployment script: the deployment script asks for an image source; choose the Mainland China mirror built into the script. If the first image pull fails, run the script once more — images that are already pulled are not downloaded again.
- Network prompts: if antivirus or the firewall asks whether to allow network access, choose allow, otherwise the containers will never finish starting.
Follow the screenshots: one step at a time
The 11 steps below each do one thing, and the screenshots show the Chinese interface. The orange numbers in the pictures match the ①②③ in the text one to one, so you cannot go wrong if you follow them.
Download the Docker Desktop installer
Install Docker Desktop first. Open the official Docker Desktop download page and click "Download Docker Desktop" at ①; once the menu expands, choose "Download for Windows – AMD64" at ②. If a cookie banner pops up at the bottom of the page, click "Reject All" or "Accept All Cookies" to close it first, then click the download button.
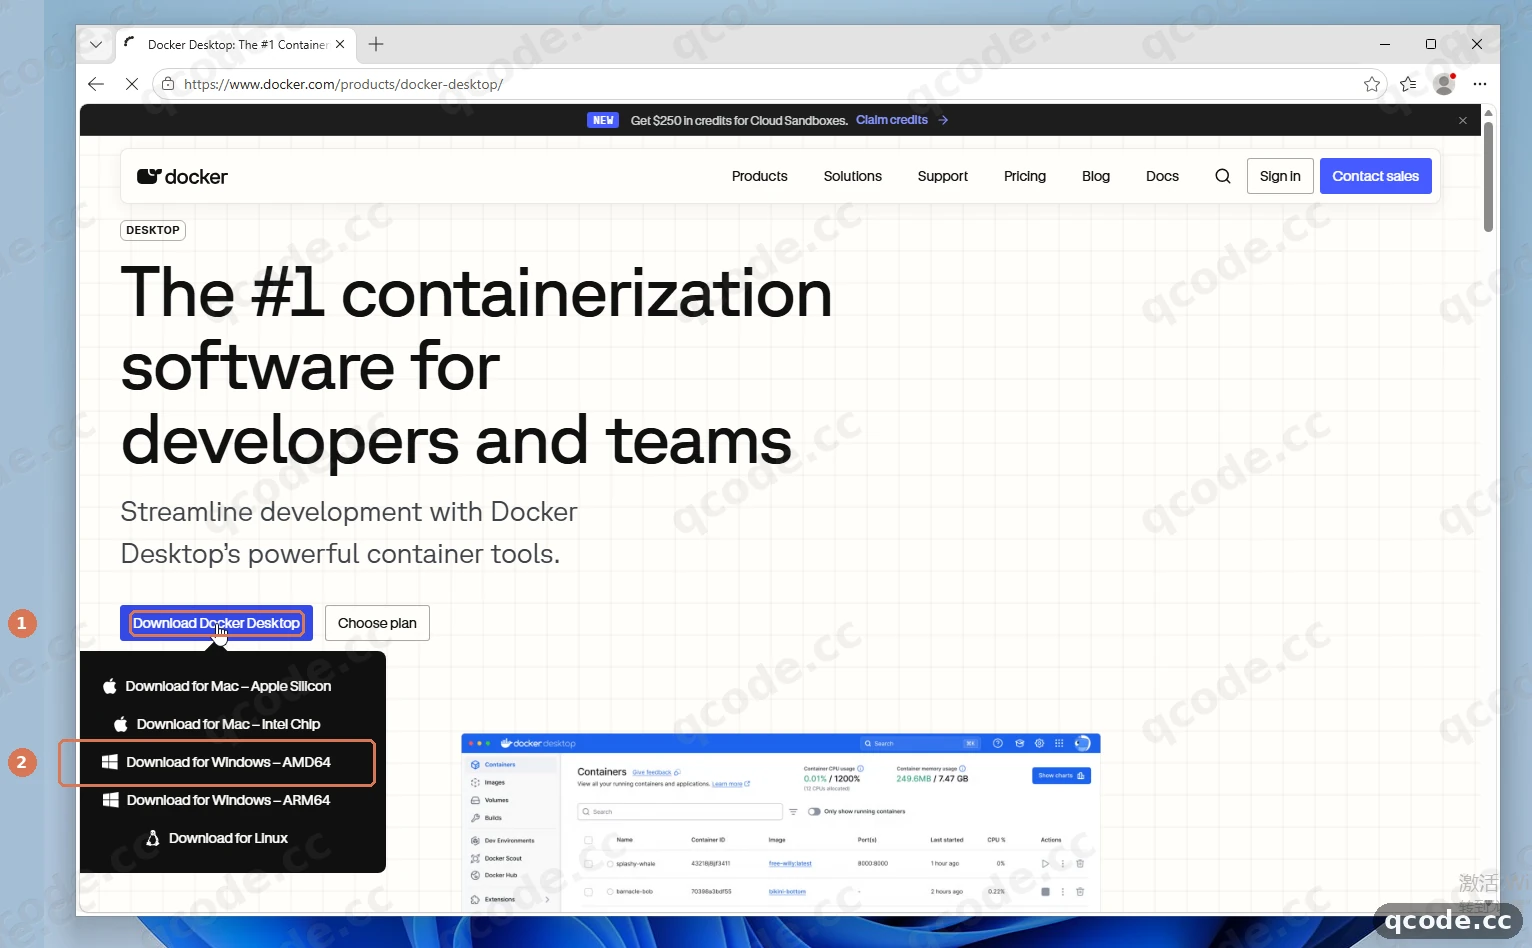
Done right you will see: the browser starts downloading an installer called Docker Desktop Installer.exe, and you can watch its progress in the download list.
Download and run the FastGPT deployment script in the terminal
After installing Docker Desktop by double-clicking it and restarting the PC, open Windows Terminal (PowerShell). Create a folder dedicated to FastGPT and run the download command at ① to pull the official deployment script install.sh locally; then at ② enter the WSL 2 environment and run bash install.sh, choose the version, image source and port as prompted, and the script creates the containers and starts the service.
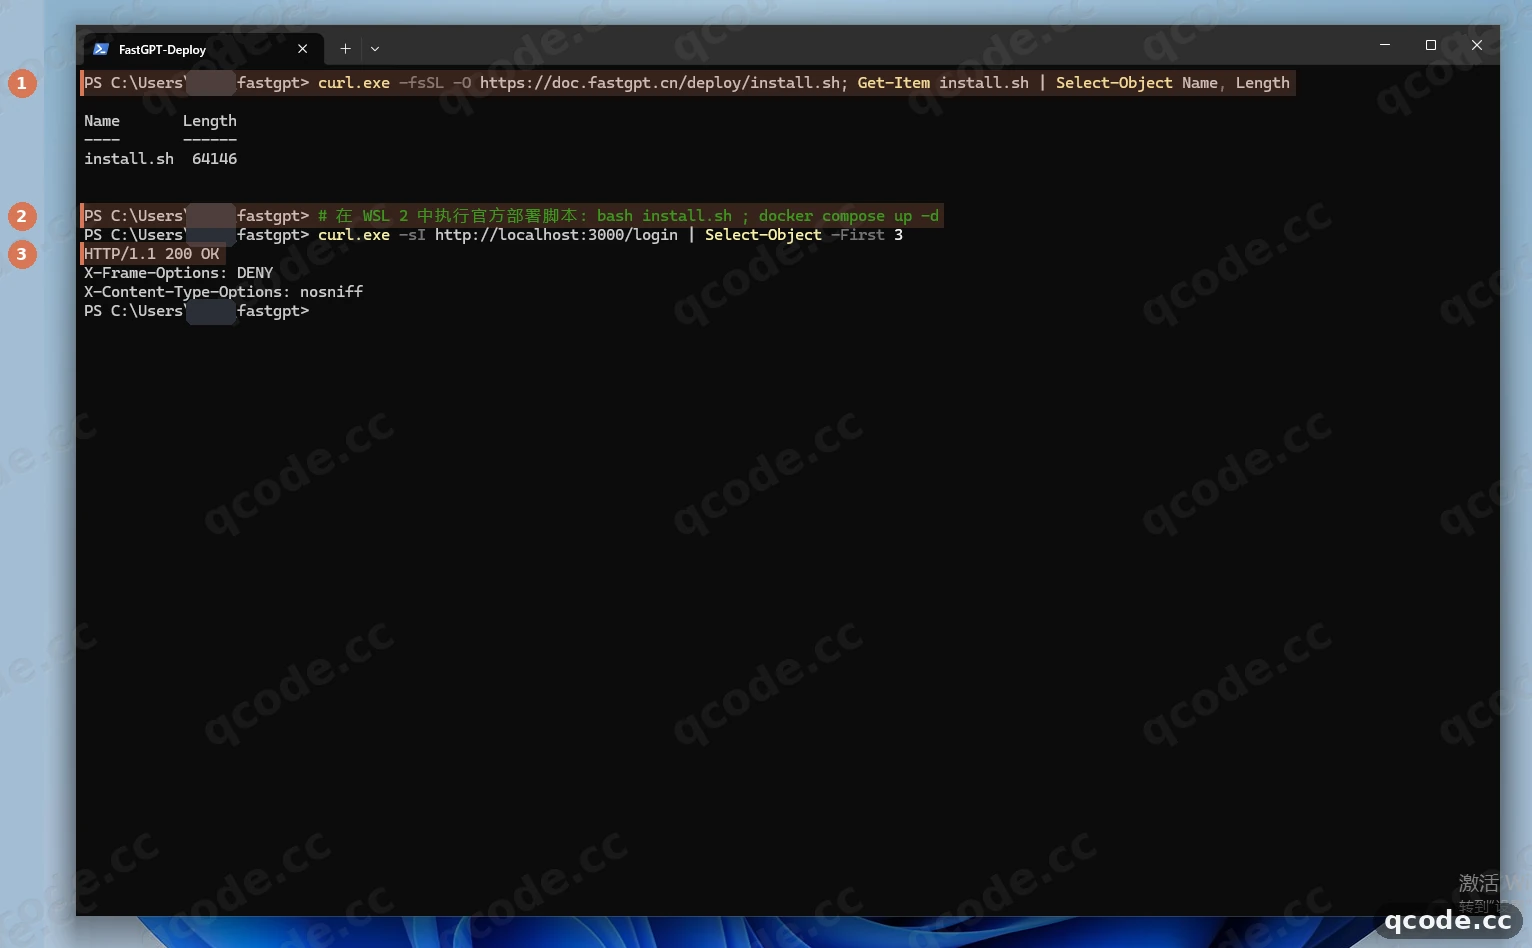
Done right you will see: the check command at ③ prints HTTP/1.1 200 OK, which means FastGPT is already running on port 3000.
Stuck? The script download fails or hangs
First make sure Docker Desktop is running and can run Linux containers, then run the download command again. If it says curl.exe cannot be found, open https://doc.fastgpt.cn/deploy/install.sh in a browser instead and save the content as install.sh in the same folder.
Sign in to the root administrator account
Open http://localhost:3000 in a browser and it redirects to the sign-in page at ①; if a cookie banner pops up at the bottom of the page, click 同意 (Accept) first. Then fill the root administrator account and password the deployment script generated for you into the "Username" and "Password" fields, and click 登录 (Sign in) at ②.
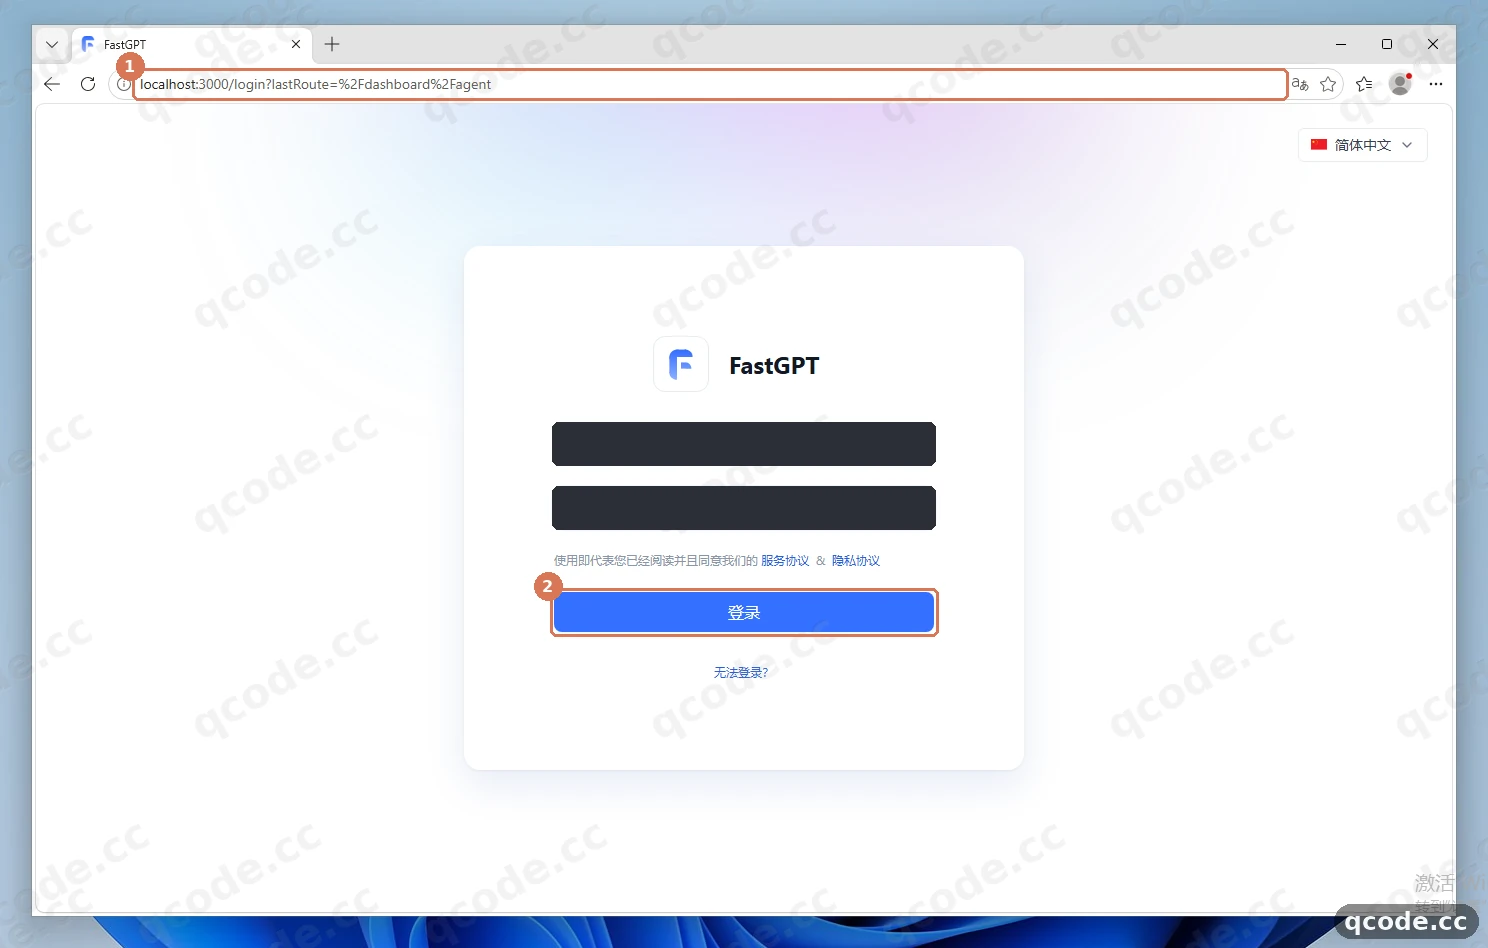
Done right you will see: the page jumps into the workspace, the main navigation on the left shows 门户 (Portal), 工作台 (Workbench), 知识库 (Knowledge Base), 账号 (Account) and 管理员 (Admin), and there is a blue avatar in the bottom left corner.
Stuck? You do not know the root password
At the end of its run the deployment script prints the default administrator account and password; scroll up a little in the terminal window from step 2 and you will see them. If you have already closed that window, open docker-compose.yml in the FastGPT deployment folder — the DEFAULT_ROOT_PSW entry there is the initial password.
Open System Models
After signing in, click 管理员 (Admin) at ① at the bottom of the main navigation bar on the far left, then click 系统模型 (System Models) at ② in the secondary sidebar that expands. A freshly deployed instance opens on the Model Config tab with an empty model list that says 暂无模型,请新增模型 (No models yet, please add one), so click 新增模型 (Add model) at ③ in the top right corner first.
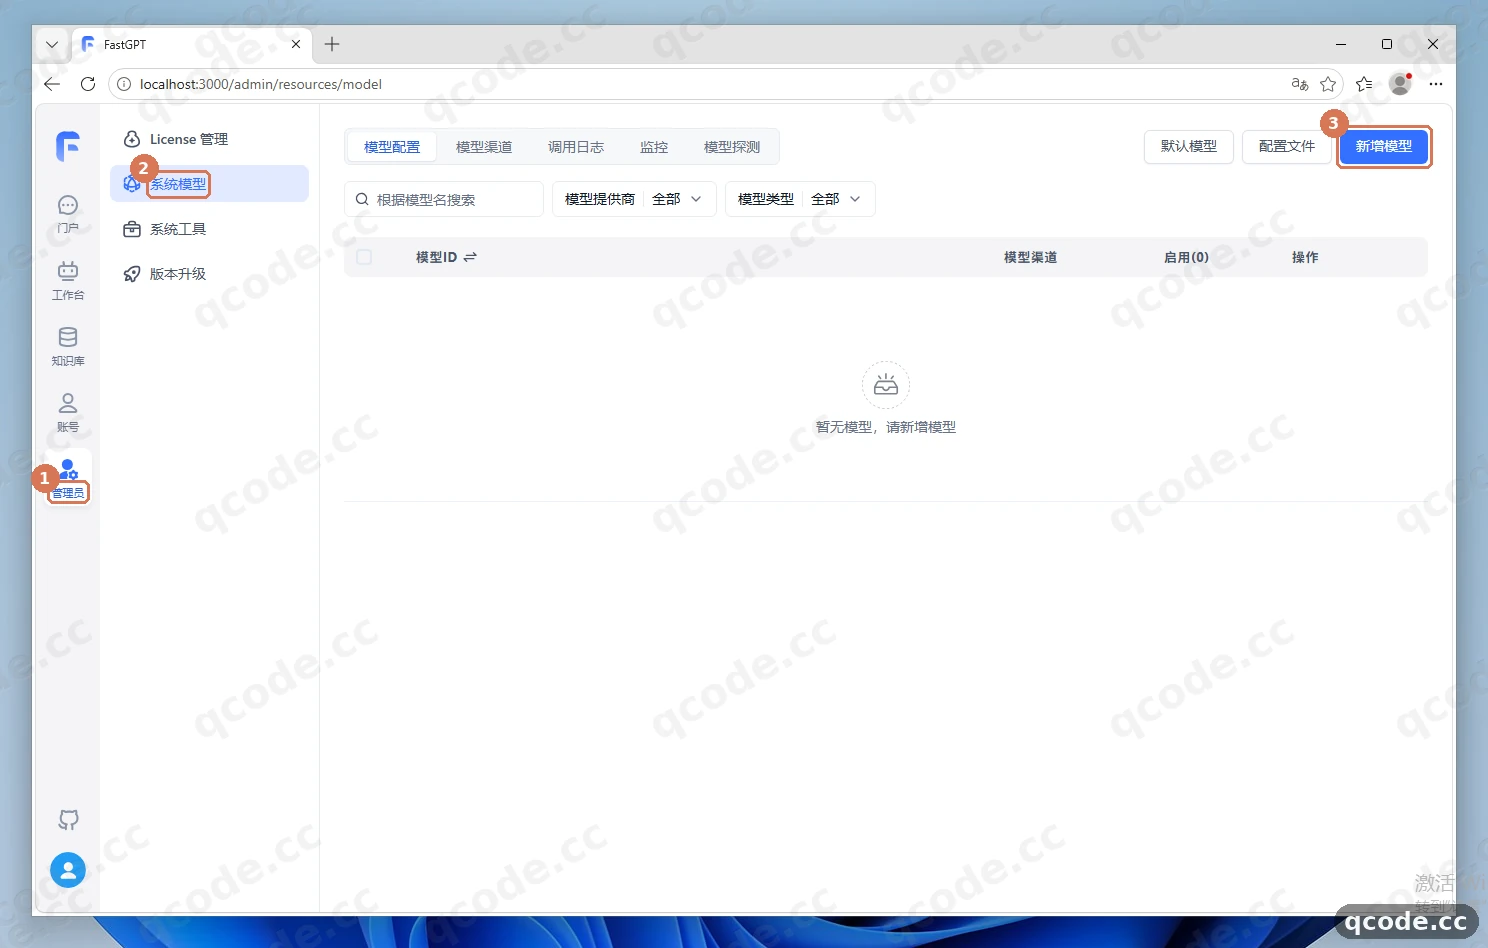
Done right you will see: the System Models page has two tabs at the top, 模型配置 (Model Config) and 模型渠道 (Model Channels), and the model list says 暂无模型,请新增模型 (No models yet, please add one).
Stuck? Admin is missing on the left
管理员 (Admin) sits at the very bottom of the main navigation bar and only appears when you are signed in with the root administrator account. If your left side only has 工作台 (Workbench), 知识库 (Knowledge Base) and 账号 (Account), you are not signed in as an administrator — sign out and sign in with the root account.
Add the gpt-6.2-sol model and enable it
After clicking Add model, choose 从空白新建 (Create from blank), keep the type as 语言模型(LLM) (Language model, LLM) and click 下一步 (Next). At ① fill both 模型ID (Model ID) and 别名 (Alias) with gpt-6.2-sol; at ② set 模型提供商 (Model provider) to OpenAI and turn on the 启用 (Enable) switch; finally click 确认 (Confirm) at ③.
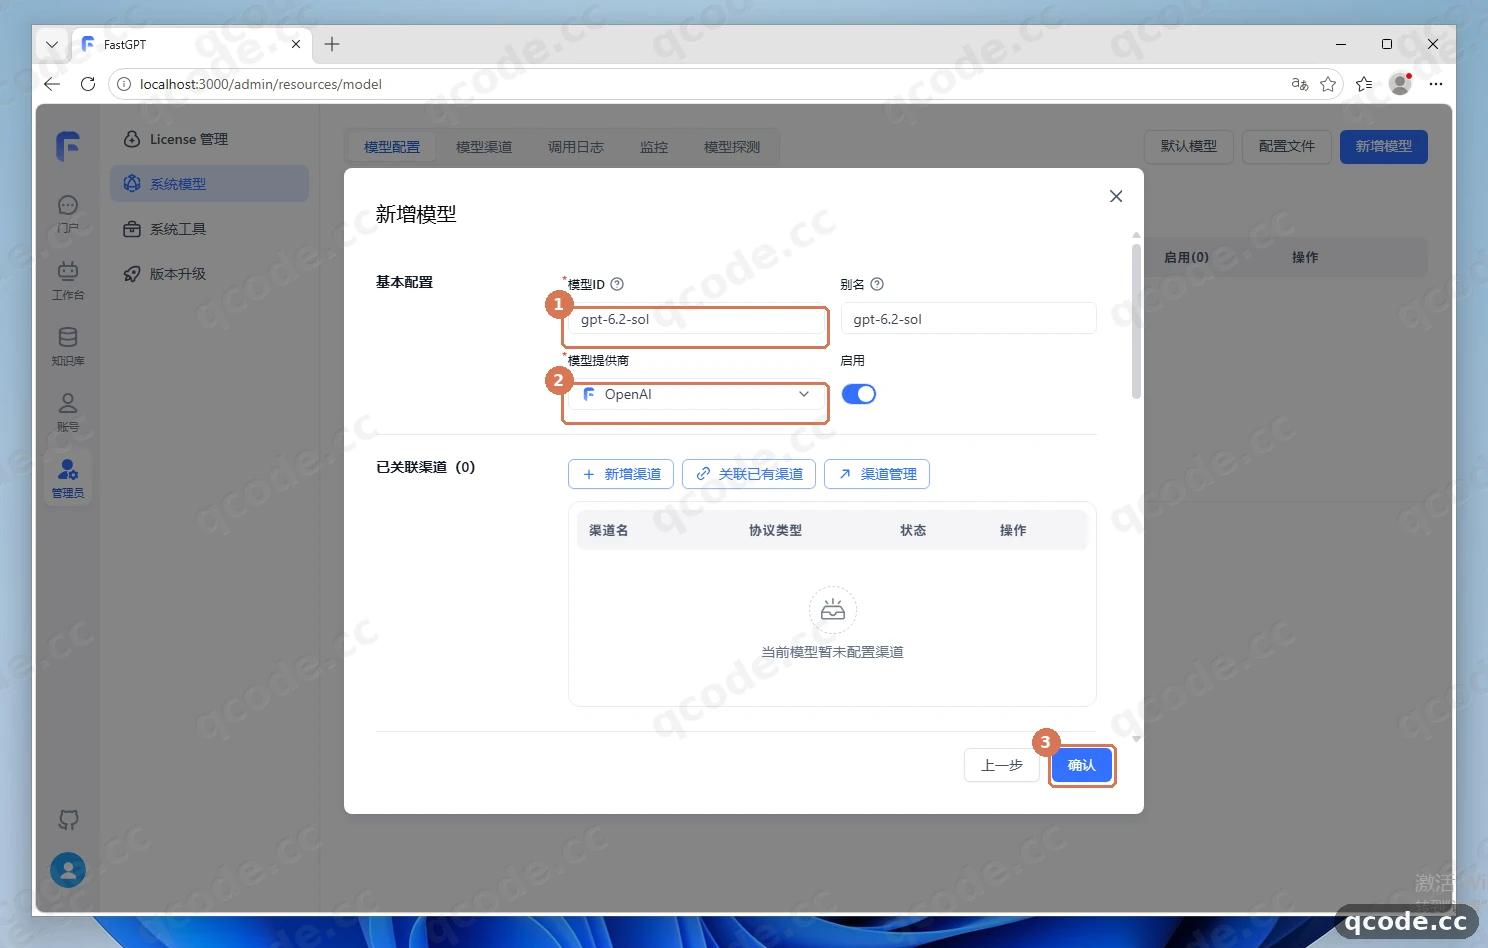
Done right you will see: back in the Model Config list a row gpt-6.2-sol appears (provider OpenAI), and the Enable switch on the far right is blue and on.
Stuck? What exactly goes into 模型ID (Model ID)
It must be exactly the model ID on the QCode side: gpt-6.2-sol, with the same case and the same hyphen — do not write GPT-6.2-Sol, and do not add spaces. The alias can be anything, but keeping it the same as the model ID makes it easier to tick later in the channel.
Switch to the Model Channels tab
Once the model is saved, click the 模型渠道 (Model Channels) tab at ① at the top of the System Models page, and after switching click 新增渠道 (Add channel) at ② in the top right corner.
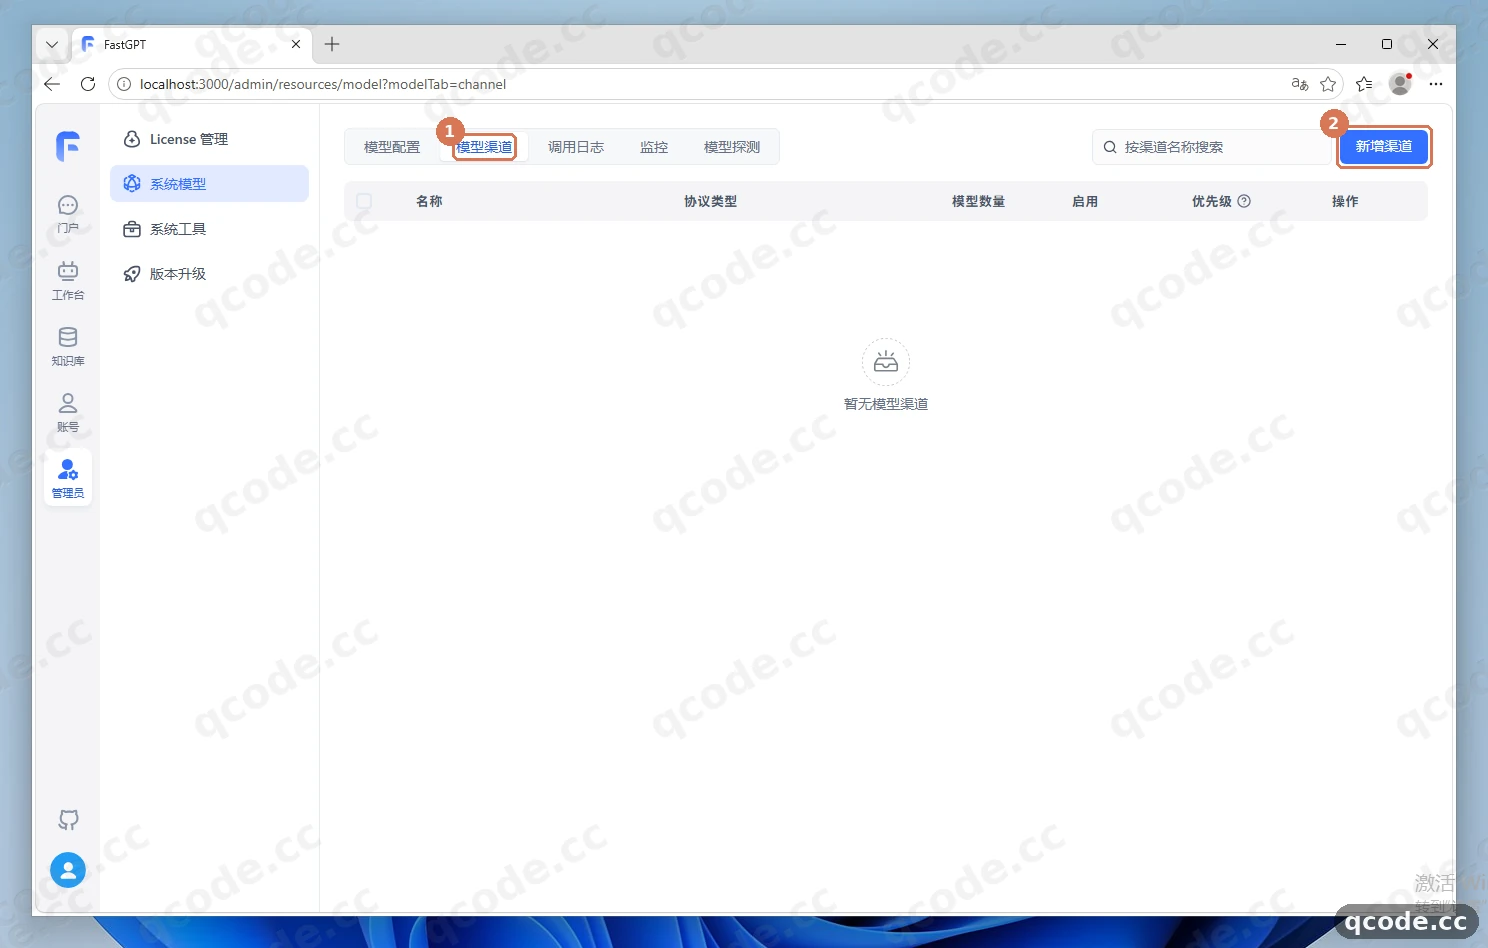
Done right you will see: the page switches to Model Channels, the list area is empty, and there is a blue Add channel button with white text in the top right corner.
Fill in the QCode channel
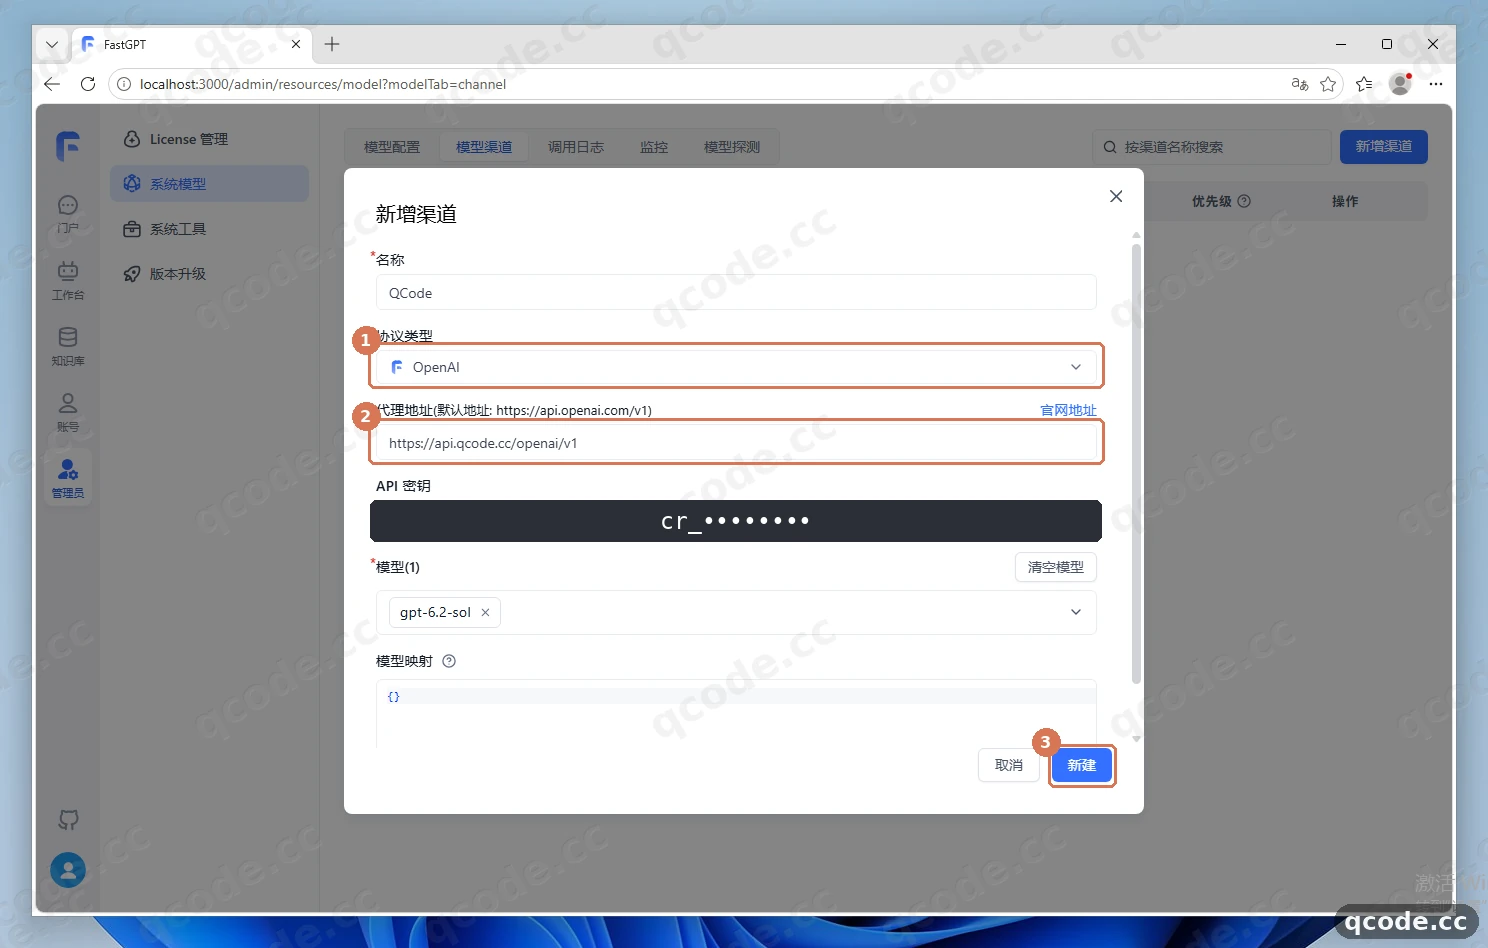
In the Add channel dialog, first at ① set 名称 (Name) to QCode and keep 协议类型 (Protocol type) as OpenAI; then at ② set 代理地址 (Proxy address) to https://api.qcode.cc/openai/v1. Next paste the key that starts with cr_ into API 密钥 (API key), tick gpt-6.2-sol in the 模型 (Model) dropdown, and finally click 新建 (Create) at ③.
Need an API key?
If you do not have a QCode account yet, Sign up for QCode first. If you prefer to pay by usage, buy a Pay-as-you-go Pack first, then create the key in the Dashboard. Copy the whole string that starts with cr_ and paste it into the API 密钥 (API key) field in the dialog. You can pay by credit/debit card (Visa / Mastercard), Apple Pay / Google Pay, or cryptocurrency — see Payment methods.
Done right you will see: after clicking Create the dialog closes and a row QCode appears in the Model Channels list with protocol type OpenAI, model count 1, and three icons in the actions column.
Find the test button on the right of the channel
① is the QCode channel row you just created; confirm that the 启用 (Enable) switch is on. To check whether it can reach QCode, click the paper-plane icon at ② — that is the channel test.
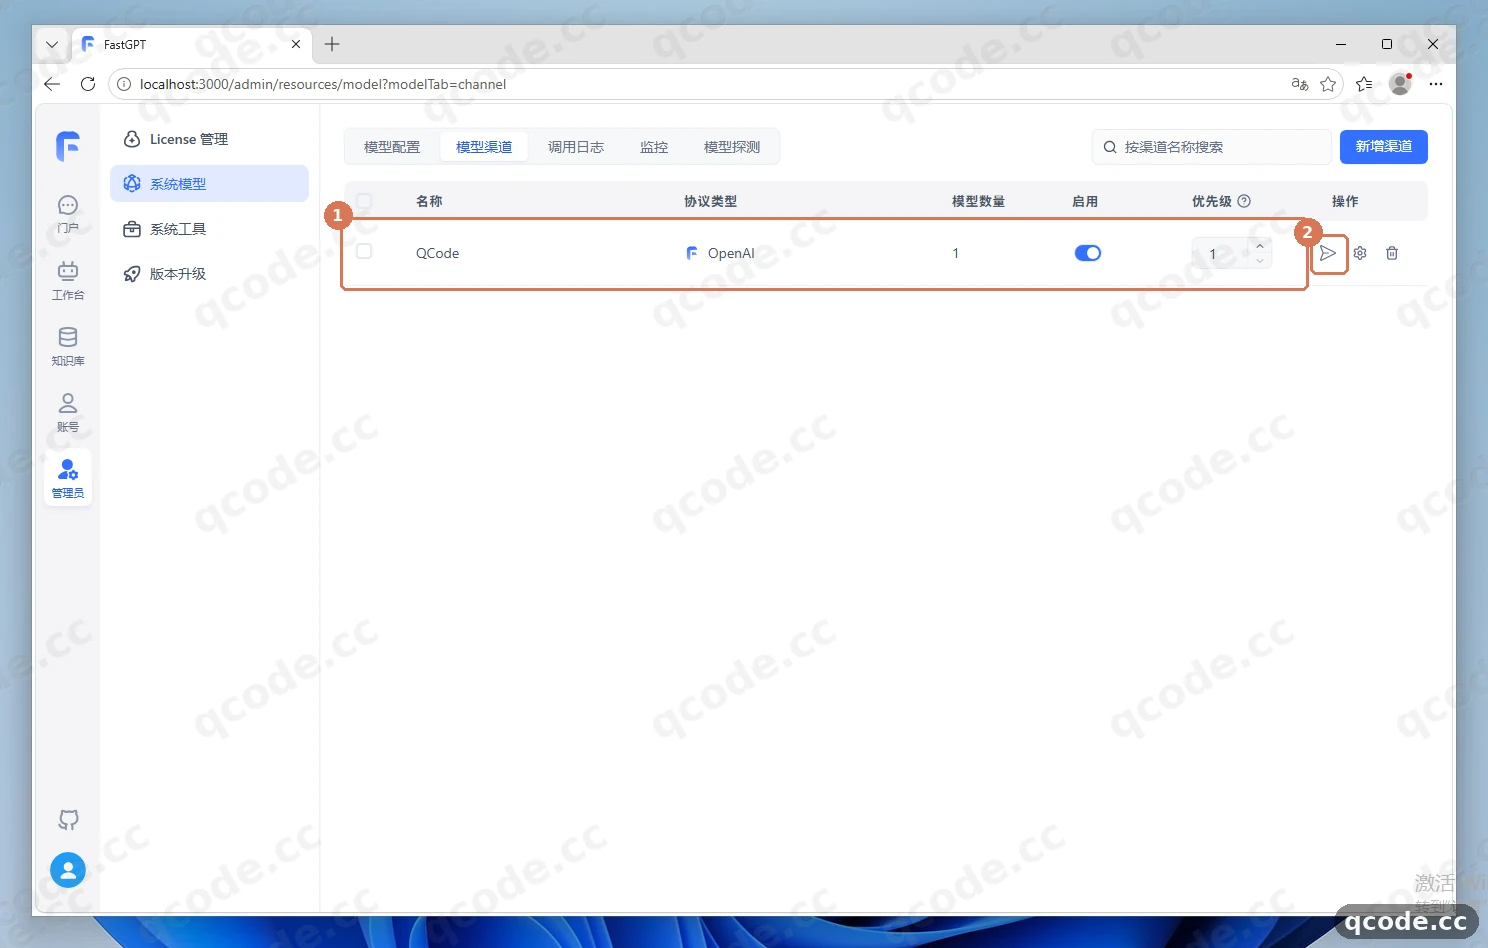
Done right you will see: no red error inside the channel row, a tooltip when you hover the paper-plane icon, and the Channel test dialog opens when you click it.
Test model connectivity in bulk
In the Channel test window that pops up, click 批量测试1个模型 (Bulk test 1 model) at ② and wait a few seconds. At ① you will see the test status of gpt-6.2-sol, which turns into a green 成功 (Success) with the 请求时长 (request duration) after it.
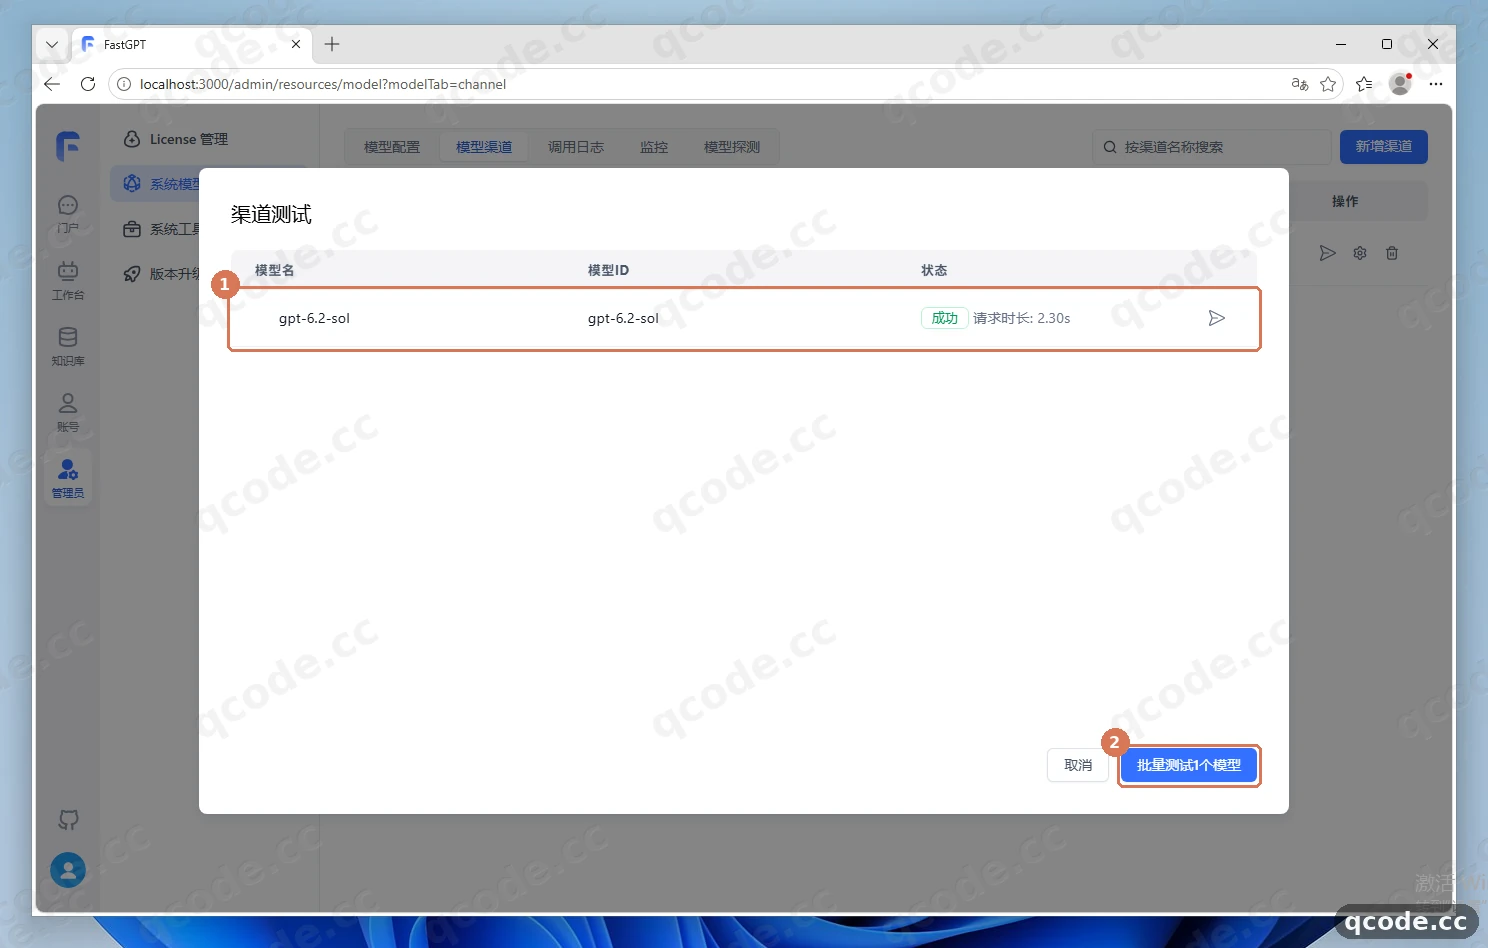
Done right you will see: the status column is a green Success, the request duration is a few seconds, and there is no red failure mark.
Stuck? The test keeps failing
Check three things in order: whether the key was copied completely from the dashboard and has no leading or trailing spaces; whether 代理地址 (Proxy address) is https://api.qcode.cc/openai/v1 with no extra /chat/completions at the end; and whether the model ID ticked in the 模型 (Model) dropdown is exactly the gpt-6.2-sol from Model Config. When all three match, click Bulk test 1 model once more.
Create a chat Agent
Click 取消 (Cancel) to close the test window, then click 工作台 (Workbench) in the main navigation on the left. In the middle of the empty workbench click 创建你的第一个 Agent (Create your first Agent), choose 对话 Agent (Chat Agent) as the type at ①, fill QCode 对话测试 (QCode chat test) into the name field at ②, and finally click 创建 (Create) at ③.
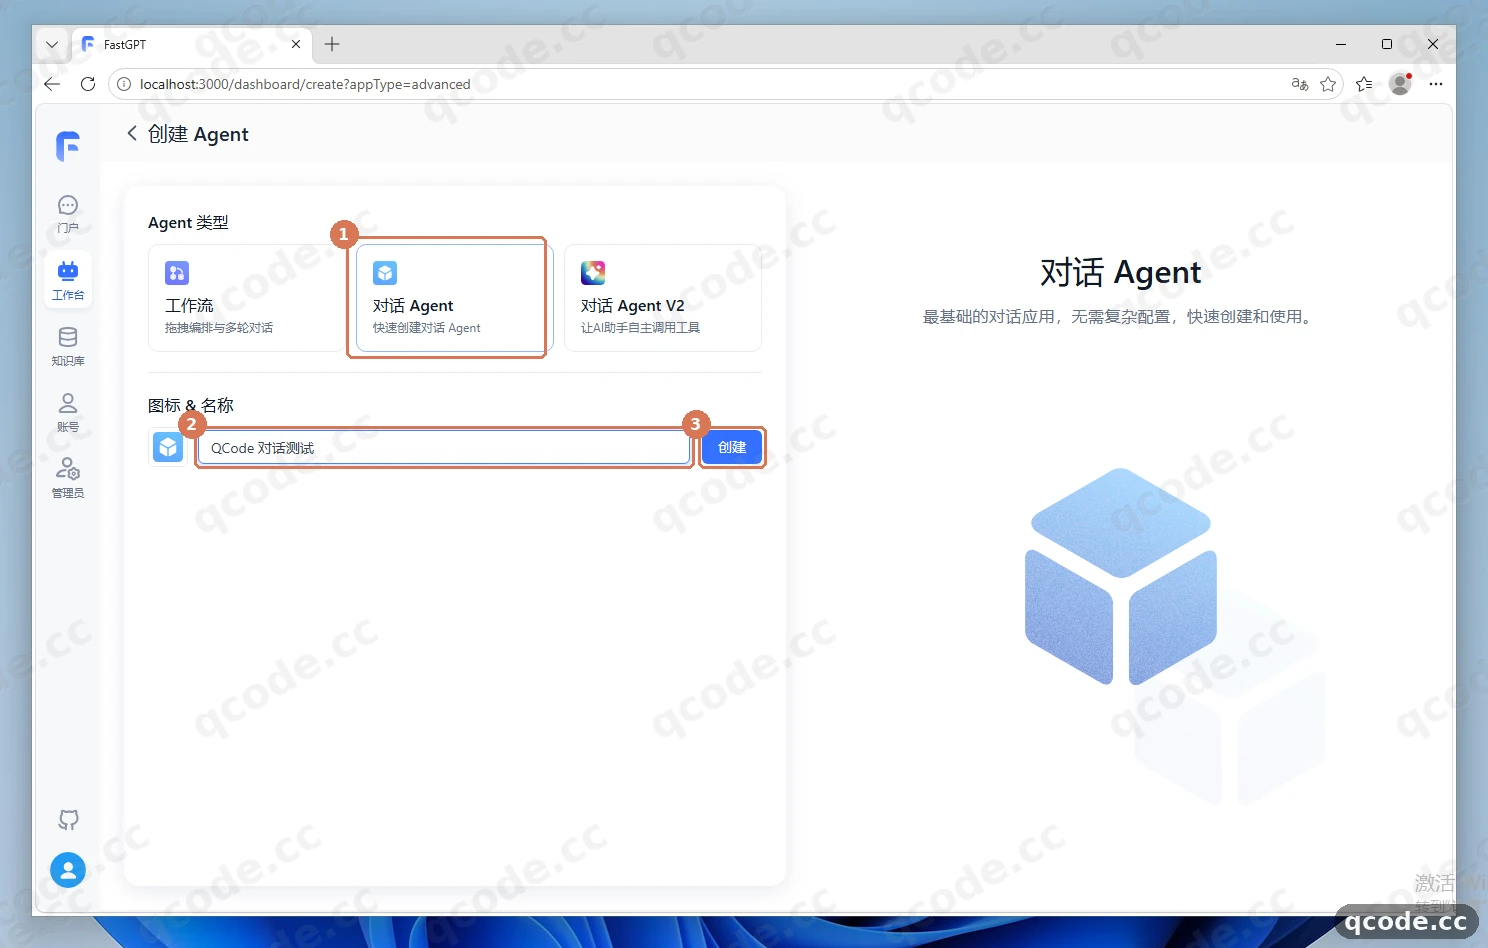
Done right you will see: the page goes straight into the app orchestration view, gpt-6.2-sol is already selected under AI 配置 → AI 模型 (AI config → AI model) on the left, and 调试预览 (Debug preview) is on the right.
Send one sentence and check the reply
At ① confirm that AI 模型 (AI model) is set to gpt-6.2-sol. Then send 你好,用一句话介绍你自己 (Hello, introduce yourself in one sentence) from the input box at the bottom of Debug preview on the right; after a few seconds a reply bubble in Chinese appears at ②.
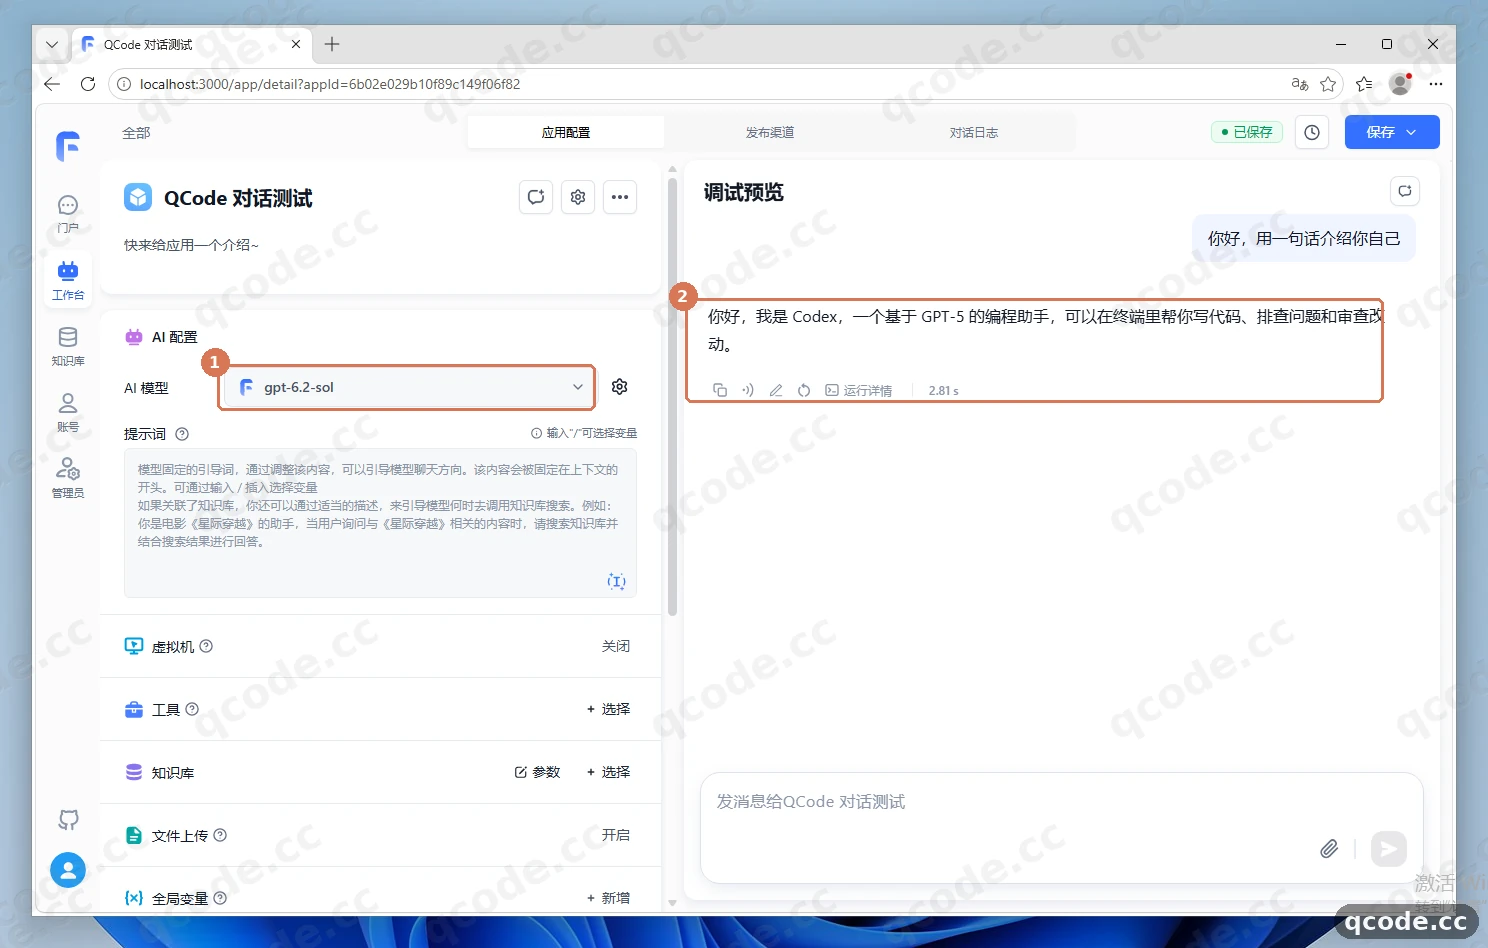
Done right you will see: a whole fluent Chinese answer appears on the right, the elapsed time is shown under the bubble, and 运行详情 (Run details) can be expanded.
Stuck? Nothing comes back, or it says the model is unavailable
Go back to Model Channels and click the paper plane once more to run the channel test, confirming that gpt-6.2-sol is still a green 成功 (Success); if the test fails it is almost always the key or the proxy address. Also make sure the model selected in this app is exactly the model ID in Model Config.
Verify it works
When all four of these are true, FastGPT is connected to QCode:
- The
QCoderow is visible in Model Channels and the test result shows a green 成功 (Success); gpt-6.2-solin Model Config is enabled;- A chat Agent with that model selected receives a normal Chinese reply, not
401,404or a missing model; - After quitting Docker Desktop, restarting it and running
docker compose up -d, the channel and model config are still there (the data lives in Docker volumes).
All done
You now have FastGPT running on Windows 11, connected through QCode's OpenAI-compatible endpoint. From here you can:
- Endpoints and API formats
- Chinese model access
- Billing
- Next: compare the plans on the pricing page
- Go back to your Dashboard to check usage and balance
Common errors
| Error message | Why | What to do |
|---|---|---|
401 |
The key was not pasted completely, has a trailing space or quote, or the key is no longer valid | Copy the whole string starting with cr_ from the dashboard again, paste it into API 密钥 (API key), click a blank area before saving; also confirm that 代理地址 (Proxy address) is https://api.qcode.cc/openai/v1 |
404 |
代理地址 (Proxy address) was filled with the complete request URL, with an extra /chat/completions, or /v1 is missing |
Put only https://api.qcode.cc/openai/v1 in the channel's Proxy address; only the 自定义请求地址 (Custom request URL) on an individual model page needs the full https://api.qcode.cc/openai/v1/chat/completions |
模型不存在 |
The model ticked in the channel does not match the model ID in Model Config, or that model is not enabled | In Model Config check that the model ID is exactly gpt-6.2-sol and turn on 启用 (Enable), then go back to Model Channels and tick that model again |
提示 WSL 2 未安装 |
Windows does not have WSL 2 yet, or Docker Desktop is not using the WSL 2 backend | Open PowerShell as administrator and run wsl --install, restart the PC, then check in the Docker Desktop settings that the WSL 2 backend is enabled |
暂无模型,请新增模型 |
A freshly deployed FastGPT has no preset models, so the 模型 (Model) dropdown in Model Channels is empty | First add gpt-6.2-sol in Model Config and enable it (steps 4 and 5 of this article), then go back to Model Channels, add the channel and tick it |
FAQ
What happens when a key expires?
Two cases:
- A personal plan key cannot be renewed when it expires — you can only reopen a plan and switch to a new key;
- For a pay-as-you-go pack, buy another pack after the key expires and the same key starts working again automatically.
After switching to a new key, open Model Channels, click the gear icon to edit the QCode row, replace the API 密钥 (API key), and click the paper plane once more to run the channel test.
Port 3000 is in use and the page will not open — what now?
The deployment script asks for the host port; if it is taken, choose another one (3001, for example) and after the script finishes open http://localhost:3001 in the browser instead. You can also close the program holding port 3000 in Task Manager and run docker compose up -d again.
gpt-6.2-sol is missing from the 模型 (Model) dropdown — what now?
That means the model is not in Model Config yet. First go to 管理员 → 系统模型 → 模型配置 (Admin → System Models → Model Config) and add it with 新增模型 → 从空白新建 (Add model → Create from blank); the model ID must be gpt-6.2-sol and it must be enabled. Then go back to Model Channels, reopen the add-channel dialog and the dropdown will list it.
Can I use Claude models too?
QCode's default recommendation for the Claude family is claude-opus-5-5; light workloads can use claude-haiku-5-5. They go through Anthropic-compatible endpoints, on a different address from the OpenAI-compatible one. The self-hosted FastGPT in this article uses the OpenAI-compatible protocol, which is why the main line here uses gpt-6.2-sol; the protocol-to-model mapping is documented in Endpoints and API formats.
How do I switch the interface language?
The sign-in page has a language dropdown at the top right where you can pick 简体中文 (Simplified Chinese) directly. Once signed in, switch it under 账号 → 语言与时区 (Account → Language and time zone) in the left main navigation.
Is FastGPT still there after a reboot?
Yes. The data lives in Docker volumes, so after a reboot start Docker Desktop first, run docker compose up -d in the deployment folder, then open http://localhost:3000 — models, channels and Agents are all still there.
What if memory is short and the containers keep restarting?
The official spec is 2 cores and 4 GiB minimum, 2 cores and 8 GiB recommended. Raise the memory limit in the Docker Desktop settings, close other memory-hungry containers and programs, and run docker compose up -d again.
Connection overview
| Item | Details |
|---|---|
| How to connect | 管理员 → 系统模型 → 模型渠道 → 新增渠道 (Admin → System Models → Model Channels → Add channel), protocol type OpenAI |
| Proxy address | https://api.qcode.cc/openai/v1 (without /chat/completions) |
| Recommended model | gpt-6.2-sol (the default recommendation under the OpenAI-compatible protocol) |
| Key format | starts with cr_, for example cr_xxxxxxxx |
| Where data lives | Docker volumes; the configuration survives container restarts |
Other endpoints
The three ingress domains serve the same business capabilities, only the network routing differs, and the same key works on all of them. By default use https://api.qcode.cc/openai/v1; if the default address is unstable from your network, change 代理地址 (Proxy address) to the Asia node https://asia.qcode.cc/openai/v1 or the North America node https://us.qcode.cc/openai/v1, then click the paper plane once more to rerun the channel test.
Available models
| Model | Model ID (enter it in Model Config) | Notes |
|---|---|---|
| GPT 6.2 Sol | gpt-6.2-sol |
Default recommendation; enough for chat and knowledge-base Q&A |
| GPT 6.2 Astra | gpt-6.2-astra |
Highest-tier fallback; steadier on complex reasoning, higher consumption |
| Claude Opus 5.5 | claude-opus-5-5 |
Default recommendation for the Claude family, on the Anthropic-compatible endpoint |
| Claude Haiku 5.5 | claude-haiku-5-5 |
Light Claude fallback; faster responses, lower consumption |
This article only uses gpt-6.2-sol on the main line; to switch models, first add the matching model ID in Model Config and enable it, then tick it in the channel. For the full list of Chinese model IDs see Chinese model access.
Advanced: model mapping and custom request URL
The channel dialog has two more fields; beginners can leave them empty and read this when they need it:
- 模型映射 (Model mapping), default
{}: maps a model name in FastGPT to a QCode model ID. You only fill it in when you want to call the same model under a different name inside the same channel, for example mappingmy-gpttogpt-6.2-sol. - 自定义请求地址 (Custom request URL): this is a per-model override and is not the same thing as the channel's 代理地址 (Proxy address). The channel's Proxy address takes only the Base URL (
https://api.qcode.cc/openai/v1); if you use an individual model's Custom request URL instead, it must be the full pathhttps://api.qcode.cc/openai/v1/chat/completions, with the key starting withcr_.
One sentence to remember the difference: the channel stops at /v1, the custom request URL must go all the way to /chat/completions.
Related docs
- Endpoints and API formats — the protocol × model family mapping
- Chinese model access — the list of Chinese model IDs
- Billing — how usage is counted
- Troubleshooting — checklist for connection problems
Get started with QCode
One API key for Claude Code, Codex and more — billed per token, per-model prices on qcode.cc/models