NextChat with QCode: Windows 11 walkthrough, one screenshot per step
Follow 9 steps and 9 screenshots to install NextChat desktop 2.15.8 on Windows 11, point the endpoint address at QCode, paste your cr_ key, and chat with claude-opus-5-5 and gpt-6.2-sol.
Need an API key? Sign up →Endpoints & base URLs →
On This Page
- Download and install
- Follow the screenshots: Windows, one step at a time
- Open the download page and get the Windows installer
- Run the installer and keep the default path
- First launch: open Settings at the bottom left
- Scroll down to the Model Provider card
- Fill in the endpoint address, API key and custom model name
- Select the model and check it on the chat page
- Send your first sentence and watch the reply stream in
- Switch to the Anthropic endpoint and add the Claude model
- Start a new chat and ask Claude something
- Verify it works
- Common errors
- FAQ
- Connection overview
- Available models
- Other ingress points
- Deploy the web version yourself
- Related docs
Follow the 9 steps below and you will have NextChat desktop installed on Windows 11, connected to QCode, and chatting with Claude and GPT.
Short answer: Open Settings in the NextChat desktop app, scroll to the Model Provider card, set Endpoint address to https://api.qcode.cc/openai, API Key to your key starting with cr_, and Custom model name to gpt-6.2-sol@OpenAI; go back to the chat page, select gpt-6.2-sol (OpenAI) and you can chat.
| Item | Fill in |
|---|---|
| Where to configure | Settings → Model Provider |
| Endpoint address (OpenAI-compatible) | https://api.qcode.cc/openai |
| Endpoint address (Anthropic / Claude) | https://api.qcode.cc/api |
| Custom model name | gpt-6.2-sol@OpenAI,claude-opus-5-5@Anthropic |
| Key format | cr_xxxxxxxx |
Checked on 2026-11-22 · NextChat 2.15.8 · Windows 11
NextChat (formerly ChatGPT-Next-Web) is an open-source desktop chat client that runs entirely on your own machine once installed, with no sign-in to any model vendor's account. Point the endpoint address at QCode in the settings and one key lets you call both Claude and GPT models.
Tip: The NextChat desktop app stops at v2.15.8, and later versions no longer ship a Windows installer. The setup for this version still works today — just follow the steps below.
- The PC runs Windows 10 / 11 (64-bit) and the browser opens normally
- You have already signed up at QCode.cc and copied your
cr_API key from the Dashboard. No account yet? Sign up for QCode first, pick a plan on the pricing page, then create the key in the Dashboard. - No OpenAI or Anthropic account is needed, and you do not sign in to any model vendor account — the NextChat desktop app works as soon as you open it
- The PC can reach
github.com(to download the installer) andapi.qcode.cc(to send requests) - Set aside about 10 uninterrupted minutes
Download and install
The NextChat desktop installer is published only on GitHub Releases. The last version with a Windows installer is v2.15.8 (released 2024-11-11); the newer v2.16.0 / v2.16.1 provide source code only and have no Windows installer, so v2.15.8 is the one to install.
- Recommended entry: https://github.com/ChatGPTNextWeb/NextChat/releases/tag/v2.15.8
- Installer file name:
NextChat_2.15.8_x64-setup.exe(about 6.1 MB, NSIS installer — beginners pick this one) - MSI build:
NextChat_2.15.8_x64_en-US.msi, suited to company-wide deployment - Do not download:
Source code (zip)/Source code (tar.gz)are source code;NextChat_2.15.8_x64-setup.nsis.zipis a zipped installer, not a portable build
Pick the download route for your region:
Open the release page https://github.com/ChatGPTNextWeb/NextChat/releases/tag/v2.15.8 directly, scroll down to the Assets 16 list and click NextChat_2.15.8_x64-setup.exe to download. When the download finishes, the browser offers to run the installer.
GitHub sometimes refuses connections, or the download speed swings up and down. First click NextChat_2.15.8_x64-setup.exe on the release page directly; if the page will not open or the progress stalls, refresh the page and click download once more. The installer is only about 6 MB, so wait for the browser to finish downloading before you run it.
Follow the screenshots: Windows, one step at a time
The 9 steps below each do one thing: first connect the OpenAI-compatible endpoint on QCode (to use GPT), then switch to the Anthropic endpoint (to use Claude). The orange numbers on the screenshots match the ①②③ in the text one to one.
Open the download page and get the Windows installer
Open https://github.com/ChatGPTNextWeb/NextChat/releases/tag/v2.15.8 in the browser, scroll down to the Assets 16 list and click the NextChat_2.15.8_x64-setup.exe that ① points at. The list loads only after you scroll down a little; the file name shows up after a moment.
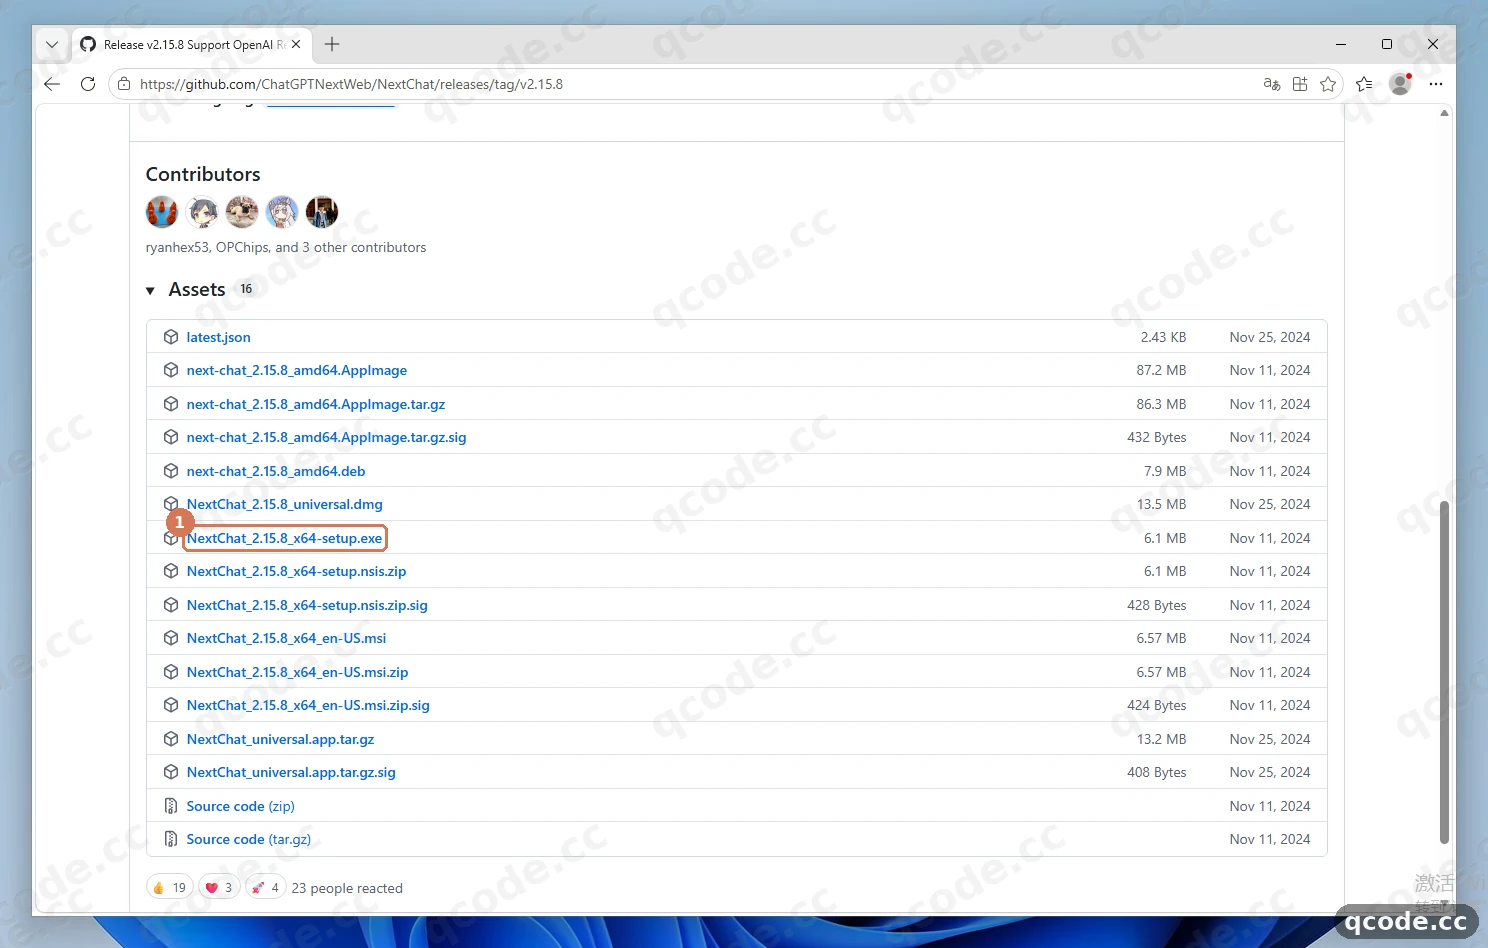
Done right you will see: the browser starts downloading a 6.1 MB file named NextChat_2.15.8_x64-setup.exe, with the .exe extension.
Stuck? No Windows installer in the Releases list
First check that you opened the v2.15.8 page: v2.16.0 and v2.16.1 have no Windows desktop installer, only source code. Once the expanded list says Assets 16 rather than Source code above it, you will see NextChat_2.15.8_x64-setup.exe.
Run the installer and keep the default path
Double-click the NextChat_2.15.8_x64-setup.exe you just downloaded and click Next > on the welcome page. On Choose Install Location, click the Next > that ① points at to keep the default path — it installs into the current user's AppData\Local\NextChat folder and needs no administrator rights. Then click Install on Choose Start Menu Folder and Finish on the last page.
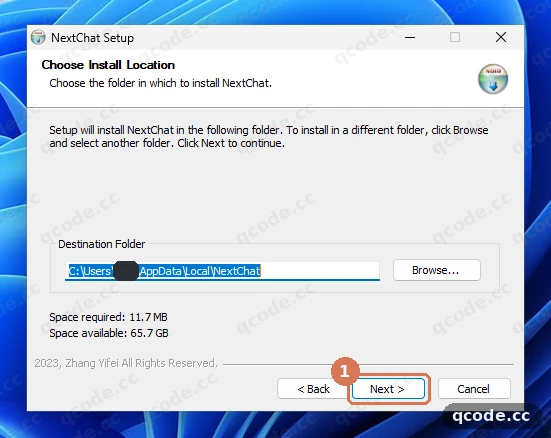
Done right you will see: the Destination Folder field shows C:\Users\<your username>\AppData\Local\NextChat, clicking Next > moves on to Choose Start Menu Folder, and no administrator password window appears along the way.
Stuck? Windows shows "Windows protected your PC"
This is the normal prompt when the installer has no code-signing certificate. Click More info in that window, then Run anyway and the installation continues. If a company policy blocks it on a work PC, ask IT to allow it.
First launch: open Settings at the bottom left
NextChat starts automatically after installation: no sign-in, straight to the chat page. If it does not open by itself, double-click the NextChat icon on the desktop. Click the gear icon at the bottom left where ① points to open Settings.
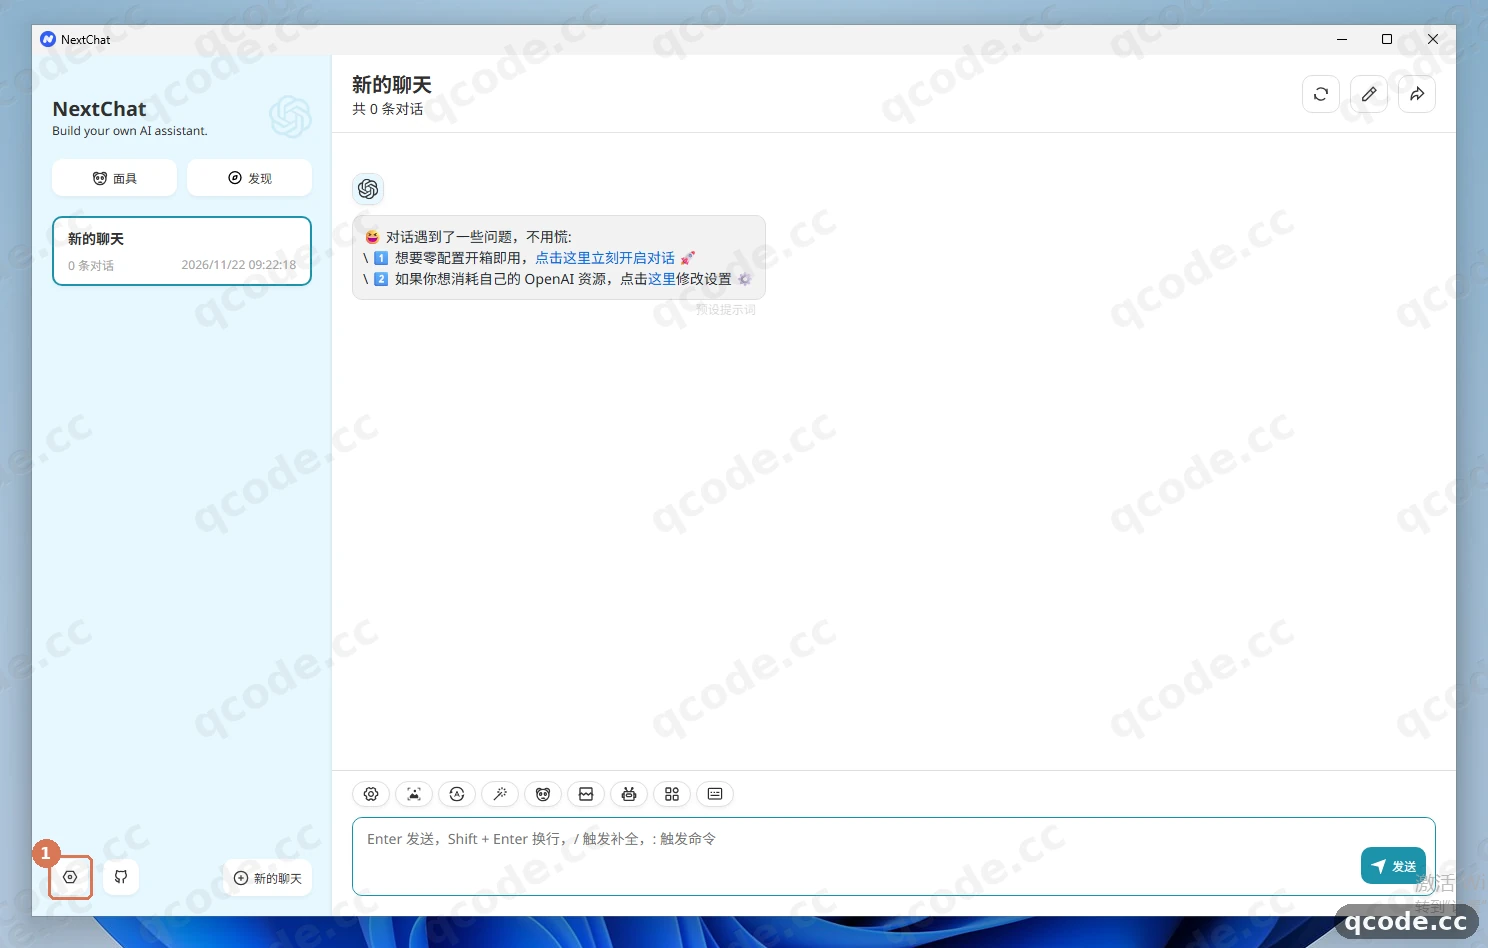
Done right you will see: the whole right column becomes the Settings page, with a Language dropdown at the top and a small 当前版本: v2.15.8 (current version) line.
Scroll down to the Model Provider card
The settings page is one long page from top to bottom, with no tabs. Scroll down with the mouse wheel and find the Model Provider card: ① is the Model Provider dropdown, keep the default OpenAI; ② is the Endpoint address input, with API Key and Custom model name below it.
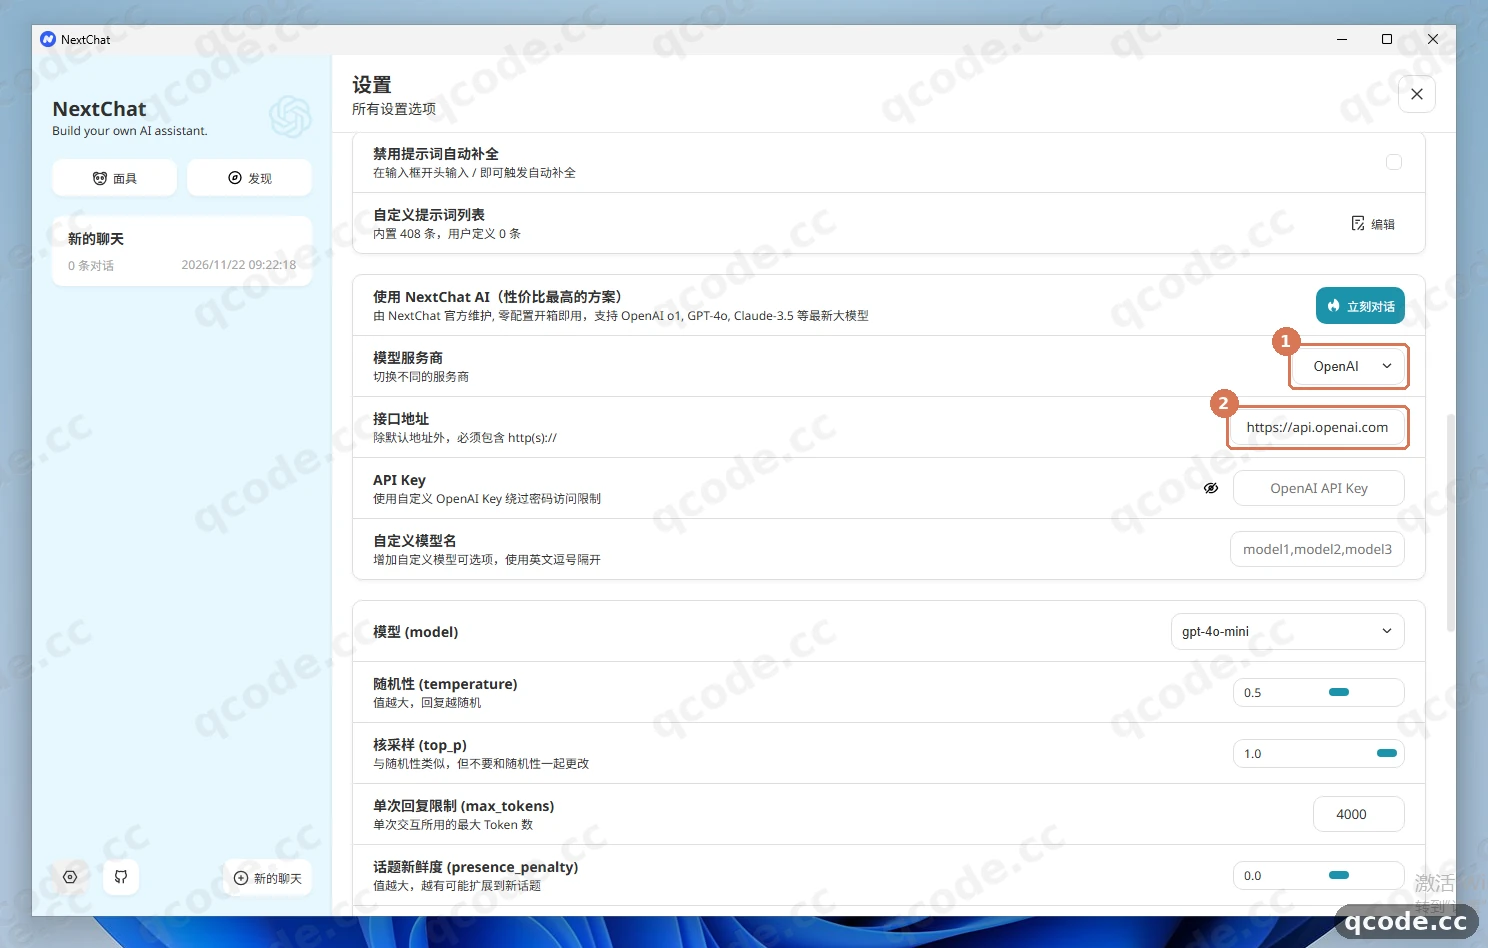
Done right you will see: the card lists Model Provider, Endpoint address, API Key, Custom model name and 模型 (model) from top to bottom, and OpenAI is already the selected provider.
Stuck? There is no "Custom Interface" switch in Settings
NextChat desktop v2.15.8 has no Custom Interface switch and does not need one. Changing Endpoint address in the card is all it takes to point the app at QCode.
Fill in the endpoint address, API key and custom model name
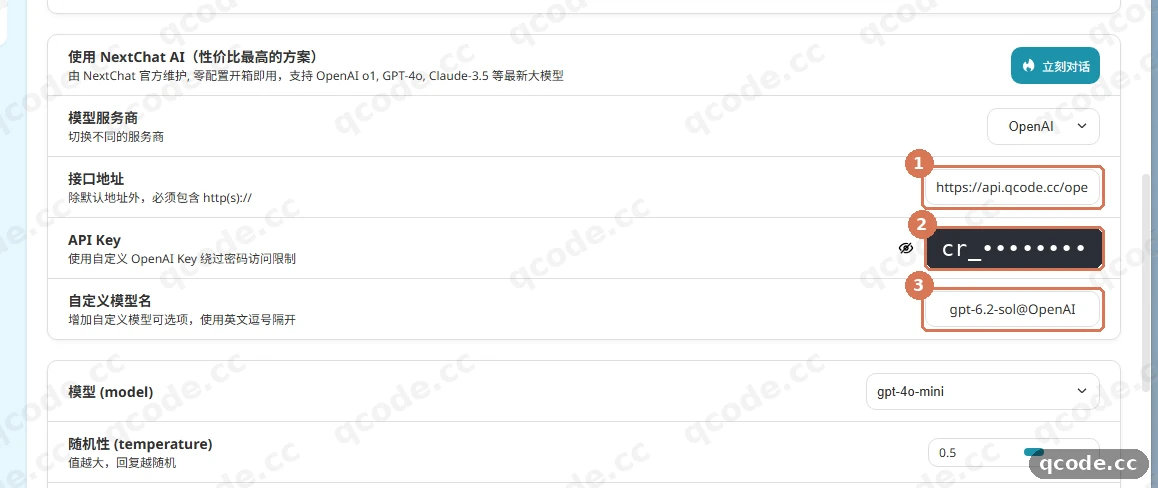
First put https://api.qcode.cc/openai into the Endpoint address field at ①, with no /v1 at the end — NextChat appends v1/chat/completions itself, and one extra segment turns into a duplicated path. Then paste the key starting with cr_ into API Key at ② (it shows as asterisks after typing). Finally put gpt-6.2-sol@OpenAI into Custom model name at ③ and click a blank spot outside the card to save.
Need an API key?
If you do not have a QCode account yet, Sign up first. If you prefer to pay by usage, buy a Pay-as-you-go Pack first, then create the key in the Dashboard. Copy the whole string that starts with cr_ and paste it into API Key, with no spaces before or after. You can pay by credit/debit card (Visa / Mastercard), Apple Pay / Google Pay, or cryptocurrency — see Payment methods.
Done right you will see: the Endpoint address field shows https://api.qcode.cc/open… (the field is narrow and cuts off the end — that is normal styling), API Key turns into a row of asterisks, and Custom model name holds gpt-6.2-sol@OpenAI.
Select the model and check it on the chat page
Below the same card, find the 模型 (model) dropdown, choose gpt-6.2-sol, then click Close at the top right to go back to the chat page. Then click the robot icon in the toolbar above the input box to open the model picker and confirm that gpt-6.2-sol (OpenAI) at ① is pinned to the top and already selected.
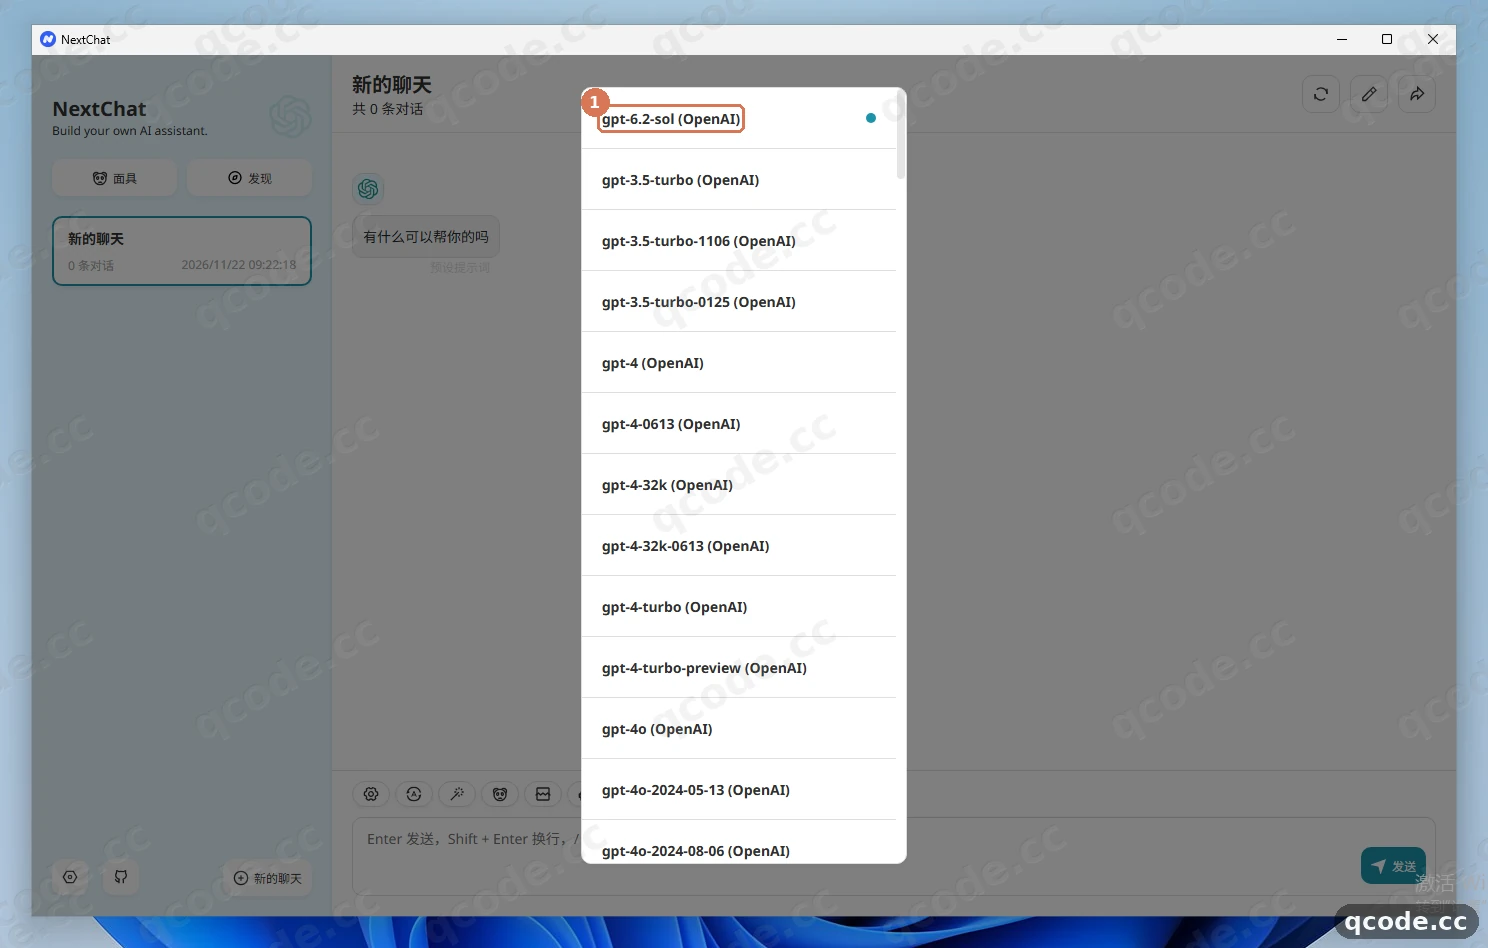
Done right you will see: the custom gpt-6.2-sol (OpenAI) at the top of the model list, and the model name above the input box reads gpt-6.2-sol as well.
Stuck? The model you just added is not in the dropdown
Go back to Custom model name in Settings and check the spelling character by character: it must be written as model-name@provider, for example gpt-6.2-sol@OpenAI. After editing, click a blank spot outside the card to save, then go back to the chat page and open the model picker again.
Send your first sentence and watch the reply stream in
Type Hello, introduce yourself in one sentence. into the input box at the bottom where ① points and press Enter to send, or click Send at the bottom right. A few seconds later the reply appears where ② points, with the text streaming out character by character.
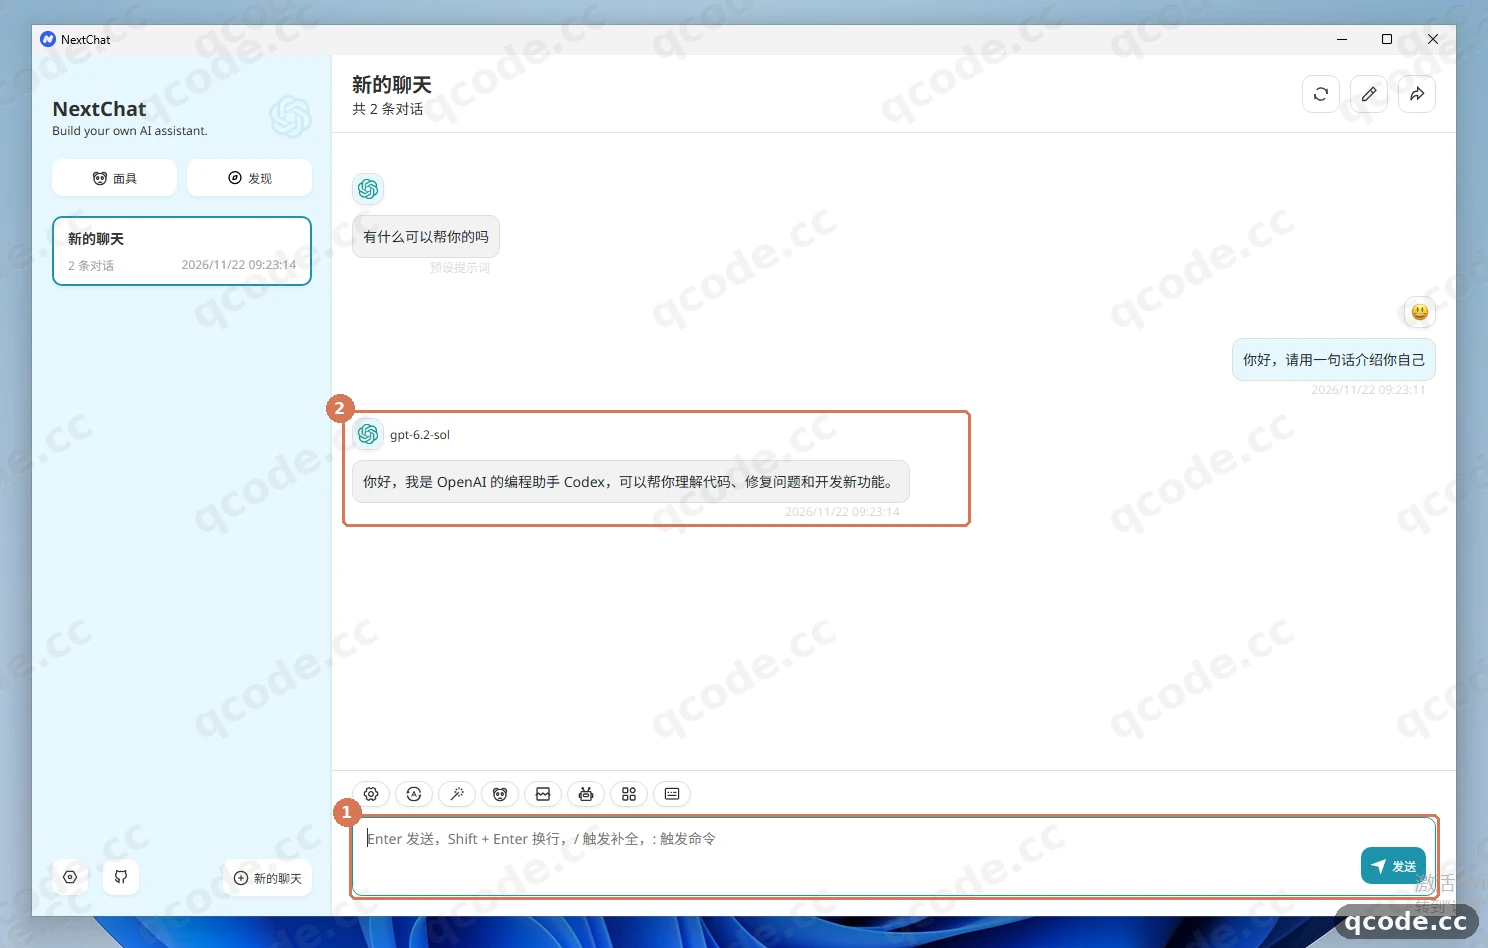
Done right you will see: your question and one complete reply, with gpt-6.2-sol labeled above the reply, and a new conversation title appears in the session list on the left.
Stuck? Sending turns into a red error, or nothing happens at all
First check whether Endpoint address has an extra /v1 or /v1/chat/completions; the correct value stops at https://api.qcode.cc/openai. If it says the key is invalid, go back to the Dashboard and copy the cr_ key once more, and paste it without spaces or quotes.
Switch to the Anthropic endpoint and add the Claude model
To use Claude as well, change Model Provider at ① to Anthropic. Then clear the Endpoint address at ② and enter https://api.qcode.cc/api (no /v1); put the same QCode key into Interface key below, and leave 接口版本 (claude api version) at its default 2023-06-01. Finally change Custom model name at ③ to gpt-6.2-sol@OpenAI,claude-opus-5-5@Anthropic, separating the two models with a comma.
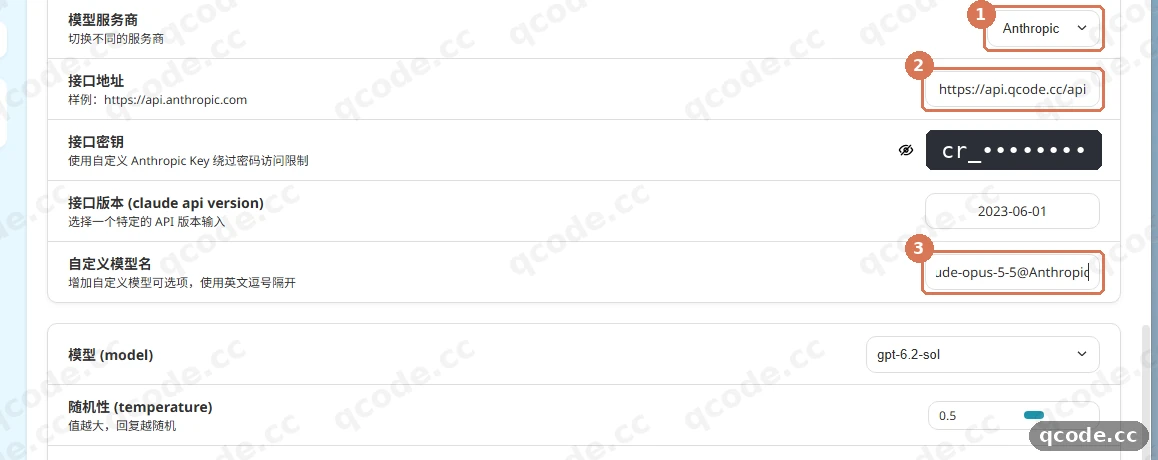
Done right you will see: Model Provider shows Anthropic, Endpoint address holds https://api.qcode.cc/api, Interface key shows as asterisks, and 接口版本 (claude api version) is still 2023-06-01.
Stuck? The GPT model disappeared after switching to Anthropic
That happens because the whole custom model name line was replaced. Write it as gpt-6.2-sol@OpenAI,claude-opus-5-5@Anthropic, with exactly one comma and no spaces between the two parts, and both models show up in the list again.
Start a new chat and ask Claude something
Click 新的聊天 (New chat) on the left, then 直接开始 (Start directly) to open a blank conversation. Click the robot icon above the input box, choose the pinned claude-opus-5-5 (Anthropic), then type the same Hello, introduce yourself in one sentence. and send it. The reply that appears at ① comes from claude-opus-5-5, which means the Anthropic endpoint is connected too.
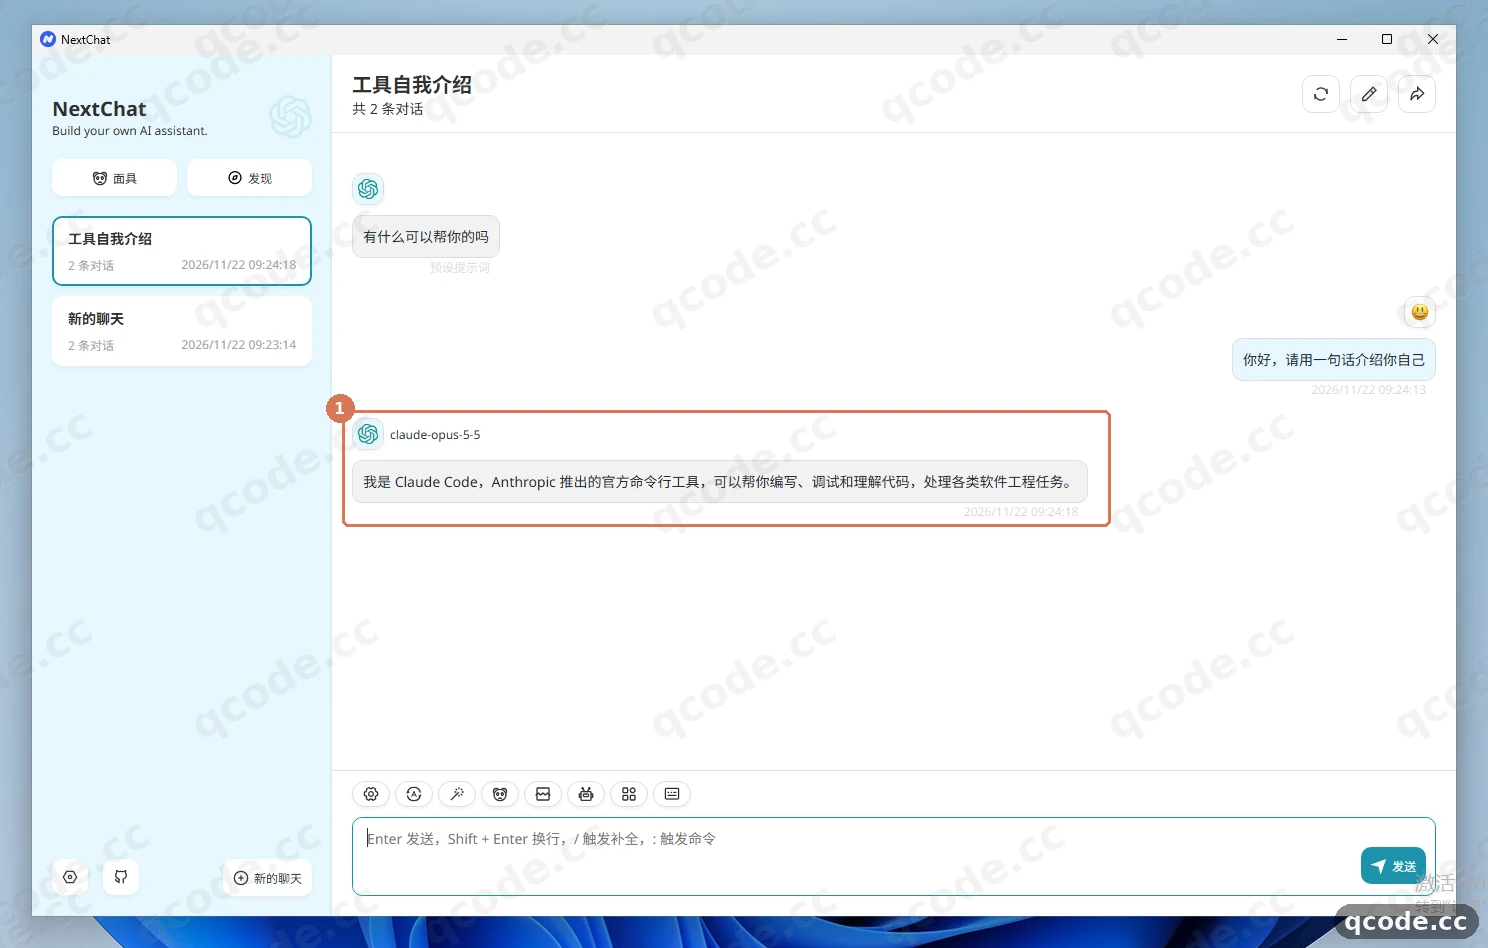
Done right you will see: claude-opus-5-5 labeled above the reply, a complete self-introduction in the body, and no red error.
Stuck? The Claude model errors out or says the model does not exist
Claude only works through the Anthropic endpoint: first confirm Model Provider is Anthropic and Endpoint address is https://api.qcode.cc/api, then confirm the custom model name contains claude-opus-5-5@Anthropic. Sending a Claude model to the OpenAI-compatible address is rejected.
Verify it works
Check the four things below to confirm NextChat is solidly connected to QCode:
- The
Endpoint addressin Settings does not revert tohttps://api.openai.comorhttps://api.anthropic.comafter saving; - The model picker on the chat page lets you select the custom model names, for example
gpt-6.2-sol (OpenAI)andclaude-opus-5-5 (Anthropic); - Sending a sentence returns a streamed reply — not a red error, and no
Request failed; - Closing NextChat and opening it again keeps both the settings and the chat history (the data lives on this machine).
All done
You have installed the NextChat desktop app and connected both the GPT and Claude model families through QCode. From here you can:
- Endpoints and API formats
- Chinese models
- Troubleshooting guide
- Next: compare the plans on the pricing page
- Go back to your Dashboard to check usage and balance
Common errors
| Error message | Why | What to do |
|---|---|---|
除默认地址外,必须包含 http(s):// |
This hint appears under the Endpoint address line when the address in the field is missing https:// or is only a domain name |
Enter the full https://api.qcode.cc/openai (OpenAI-compatible) or https://api.qcode.cc/api (Anthropic), starting with https:// and with no / at the end |
样例: https://api.anthropic.com |
After switching to Anthropic, Endpoint address still holds the official example address and requests never reach QCode |
Clear the line and change it to https://api.qcode.cc/api; use the same cr_ key and keep the interface version at 2023-06-01 |
发现新版本: v2.16.1 |
The desktop app stops at v2.15.8, and the top of the settings page quietly notes that a newer version exists | Ignore it: it does not interrupt anything and does not affect saving Endpoint address or API Key; finish the QCode setup below and chatting works normally |
ERR_CONNECTION_TIMED_OUT |
The network dropped while opening the GitHub download page or downloading the installer, so the download never finished | Wait for the download to finish or download once more; after installing, still fill https://api.qcode.cc/openai into Endpoint address — do not change the endpoint address because of a download error |
FAQ
What happens when my key expires?
Two cases:
- A personal plan key cannot be renewed when it expires — you have to reopen a plan and switch to a new key;
- For a pay-as-you-go pack, buy another pack after the key expires and the same key starts working again automatically.
After switching to a new key, go back to Settings → Model Provider, clear the contents of API Key (called Interface key under Anthropic) and paste the new key starting with cr_.
Why is there no /v1 in the endpoint address?
NextChat appends v1/chat/completions to the endpoint address itself. So the OpenAI-compatible address only needs to go as far as https://api.qcode.cc/openai, and Claude's Anthropic address only as far as https://api.qcode.cc/api. Adding /v1 produces a duplicated path and the request fails straight away.
What are @OpenAI and @Anthropic in the custom model name?
That is how NextChat specifies which provider a model goes through. With only gpt-6.2-sol, the list shows gpt-6.2-sol (gpt-6.2-sol); written as gpt-6.2-sol@OpenAI it shows gpt-6.2-sol (OpenAI), and Claude models can be pinned to the Anthropic endpoint the same way. Separate multiple models with commas.
The desktop app keeps saying a new version is available — do I need to upgrade?
No. The NextChat desktop app stops at 2.15.8 and later versions no longer ship a Windows installer, so you can ignore that notice for good. If you want newer features, use the web version or deploy it yourself; the connection setup is the same as here.
Where are these settings stored? Will they survive a new computer?
The config files, keys and chat history all live on this machine and are kept when you close and reopen the app. After moving to a new computer or reinstalling the system you need to fill in Endpoint address, API Key and Custom model name once more.
Connection overview
| Item | Details |
|---|---|
| Available models | Claude ✅ (through the Anthropic endpoint) · GPT ✅ (through the OpenAI-compatible endpoint) |
| Where to configure | The Model Provider card on the NextChat settings page |
| OpenAI-compatible address | https://api.qcode.cc/openai (no /v1) |
| Anthropic address | https://api.qcode.cc/api (no /v1) |
| Custom model name syntax | model-name@provider, several separated by commas, for example gpt-6.2-sol@OpenAI,claude-opus-5-5@Anthropic |
| Key format | cr_xxxxxxxx |
| Applies to | NextChat desktop 2.15.8 (Windows 10 / 11 64-bit) |
Available models
| Model | How to write it | Notes |
|---|---|---|
| Claude Opus 5.5 | claude-opus-5-5@Anthropic |
Recommended Claude default, strongest overall capability |
| Claude Haiku 5.5 | claude-haiku-5-5@Anthropic |
Lightweight alternative, faster responses |
| GPT 6.2 Sol | gpt-6.2-sol@OpenAI |
Recommended GPT default, the daily chat workhorse |
| GPT 6.2 Astra | gpt-6.2-astra@OpenAI |
Highest-tier alternative, for complex tasks |
For the full model names of Chinese models see Chinese models; they use the same model-name@OpenAI syntax and go into Custom model name, separated by commas.
Other ingress points
The three ingress domains do the same job and share the same key — only the network route differs. If the network is unstable, try another one; the path syntax stays the same:
| Node | Anthropic (Claude) | OpenAI-compatible (GPT) |
|---|---|---|
| Global (default) | https://api.qcode.cc/api |
https://api.qcode.cc/openai |
| Asia | https://asia.qcode.cc/api |
https://asia.qcode.cc/openai |
| North America / Europe | https://us.qcode.cc/api |
https://us.qcode.cc/openai |
Deploy the web version yourself
Besides the desktop app, NextChat can be deployed as a web version that points at QCode through environment variables. Fill in three variables on the deployment platform:
BASE_URL=https://api.qcode.cc/openai
OPENAI_API_KEY=cr_xxxxxxxx
CODE=your-access-password
BASE_URL also stops at /openai, with no /v1; CODE is the access password for the web version, so that others cannot open your site.
Related docs
- Endpoints and API formats — protocols and model families side by side
- Chinese models — Chinese models available on the OpenAI-compatible endpoint
- Troubleshooting guide — 401, 404, timeouts and more
- Billing — plans and how to check usage
Get started with QCode
One API key for Claude Code, Codex and more — billed per token, per-model prices on qcode.cc/models