SiYuan with QCode: Windows 11 walkthrough, one screenshot per step
Follow 13 steps and 13 screenshots to install SiYuan v3.8.11 on Windows 11, connect it to QCode inside the built-in AI settings, configure gpt-6.2-sol, and use AI writing plus agent chat.
Need an API key? Sign up →Endpoints & base URLs →
On This Page
- Download and install
- Follow the screenshots: Windows, one step at a time
- Download the SiYuan installer
- Run the setup wizard and finish the install
- First launch: choose a local workspace
- Open the 设置 (Settings) window
- Go to the 人工智能 (AI) settings page
- Click + 添加提供商 (+ Add provider)
- Choose the OpenAI preset card
- Fill in the QCode endpoint, API type and key
- Refresh the models, test the connection and save
- Confirm the provider switch and the default models
- Generate text with AI 编写 (AI writing) in the editor
- Chat in the sidebar 智能体 (Agent) and switch models
- Check the version under 设置 → 关于 (Settings → About) (optional)
- Verify it works
- Common errors
- FAQ
- Connection overview
- Advanced setup: Claude models and other ingress points
- Recommended models
- Related docs
Follow the 13 steps below and you will have SiYuan installed on Windows 11 with QCode connected inside the built-in 人工智能 (AI) settings — writing content with AI right in the note body, and talking to several models in the sidebar agent.
Short answer: In SiYuan v3.8.11, click the main menu at the top left → 设置 (Settings) → 人工智能 (AI) → + 添加提供商 (+ Add provider) → pick the OpenAI preset, set API 基础地址 (API base URL) to https://api.qcode.cc/openai/v1, change API 类型 (API type) from the default Responses to Chat Completions, paste your QCode key that starts with cr_ and configure gpt-6.2-sol, and the built-in AI 编写 (AI writing) and 智能体 (Agent) are ready to use.
| Item | Fill in |
|---|---|
| Where to configure | 设置 → 人工智能 → API 提供商 → OpenAI (Settings → AI → API providers → OpenAI) |
| API base URL | https://api.qcode.cc/openai/v1 |
| API type | Chat Completions |
| API Key | cr_xxxxxxxx |
| Recommended default model | gpt-6.2-sol |
Checked on 2026-11-22 · SiYuan v3.8.11 · Windows 11
SiYuan is a local-first personal knowledge management app with block references, backlinks and outline editing. The current version ships a built-in 人工智能 (AI) section and a sidebar 智能体 (Agent), so local use needs neither third-party plugins nor a SiYuan account or OpenAI account.
- The PC runs Windows 10 / 11 (64-bit; on an ARM64 machine pick the
win-arm64.exeinstaller instead) - You have already registered with QCode.cc and copied your API key, which starts with
cr_, from the Dashboard. No account yet? Sign up first, pick a plan on the pricing page, then create the key in the Dashboard. - The PC can reach
b3log.org(orgithub.com/ Microsoft Store) andapi.qcode.ccnormally - A plain local folder is ready to serve as the workspace (for example
C:\SiYuanWorkspace); do not pick a OneDrive, iCloud or Nutstore-style sync folder - Local notes and the built-in AI need no SiYuan account — just set aside about 10 minutes to follow the steps
Download and install
SiYuan offers two installation routes on Windows: the official standalone installer and Microsoft Store. The official channels are:
- Official download page: b3log.org/siyuan/download.html (with two direct entries,
x86_64 安装包(x86_64 installer) and微软商店(Microsoft Store)) - Microsoft Store: SiYuan page in Microsoft Store (the officially recommended desktop route, with one-click updates)
- GitHub Releases: siyuan-note/siyuan Releases (pick
siyuan-3.8.11-win.exeon a 64-bit PC andsiyuan-3.8.11-win-arm64.exeon ARM64; the version number in the file name changes with updates; do not download the.apk,.dmgorlinuxpackages)
Download speed varies a little by region, so pick yours first:
- Prefer installing from Microsoft Store; later updates are the least trouble this way.
- If you need an offline installer, download
siyuan-3.8.11-win.exefrom GitHub Releases or the official download page (on ARM64 picksiyuan-3.8.11-win-arm64.exe).
- Prefer the official download page b3log.org/siyuan/download.html and click
x86_64 安装包(x86_64 installer) to downloadsiyuan-3.8.11-win.exe(about 230 MB, fast on a direct connection). - You can also search for SiYuan in the Microsoft Store built into Windows and install it from there, which makes future one-click upgrades easy.
- The installer carries a valid digital signature and defaults to
仅为我安装(Install for me only), so normally no administrator prompt appears.
Follow the screenshots: Windows, one step at a time
The 13 steps below each do one thing. The orange numbers on the screenshots match the ①②③ in the text one to one.
Download the SiYuan installer
Open the official download page b3log.org/siyuan/download.html in a browser. Click the blue x86_64 安装包(升级需要再次下载) (x86_64 installer, download again to upgrade) button that ① points at in the middle of the page to download the Windows 64-bit installer (if you want automatic updates, click 微软商店(支持一键升级) (Microsoft Store, one-click upgrades) on the right instead).
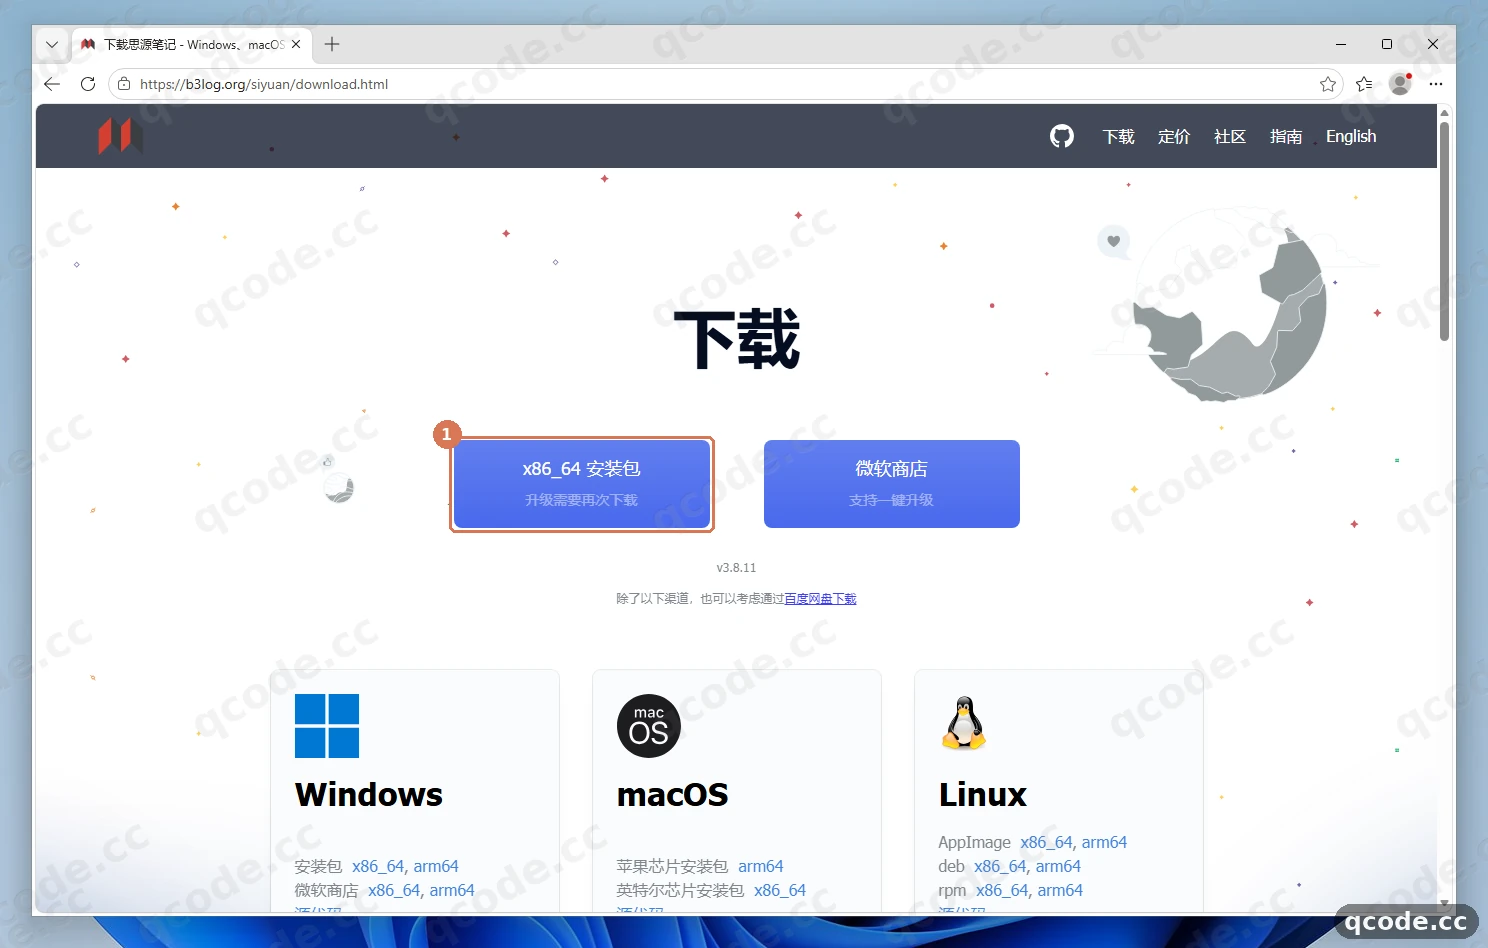
Done right you will see: the browser starts downloading siyuan-3.8.11-win.exe (about 230 MB), and once it finishes you can find it in the 下载 (Downloads) folder.
Run the setup wizard and finish the install
Double-click the siyuan-3.8.11-win.exe you just downloaded to start the setup wizard. On the license page click 我同意(I) (I agree), then on the options page keep the default 仅为我安装 (Install for me only, no administrator rights needed) and click 下一步(N) > (Next). On the 选定安装位置 (Choose install location) page, confirm the target folder path at ① is correct and click 安装(I) (Install) that ② points at in the bottom right; when it finishes, keep 运行 SiYuan(R) (Run SiYuan) ticked and click 完成(F) (Finish).
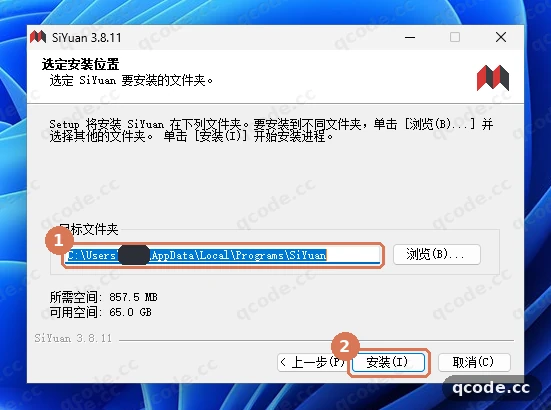
Done right you will see: the install progress bar completes and 正在完成 SiYuan 安装向导 (Completing the SiYuan Setup Wizard) appears; after you click 完成(F) (Finish) SiYuan starts by itself.
Stuck? A security prompt appears, or you want to change the install location
The official SiYuan installer carries a valid digital signature and normally does not trigger a block. If Windows shows Windows 已保护你的电脑 (Windows protected your PC), click 更多信息 (More info) and then 仍要运行 (Run anyway). Keep the install path in a default local directory rather than a sync folder such as OneDrive.
First launch: choose a local workspace
The first launch opens a full-page workspace guide. Click the 选择 (Select) button to the right of 工作空间 (Workspace) that ① points at, pick a purely local folder in the Windows 选择文件夹 (Select folder) dialog that opens (for example create and select C:\SiYuanWorkspace), then click 确定 (OK) in the sync-folder warning dialog and the main interface initialises.
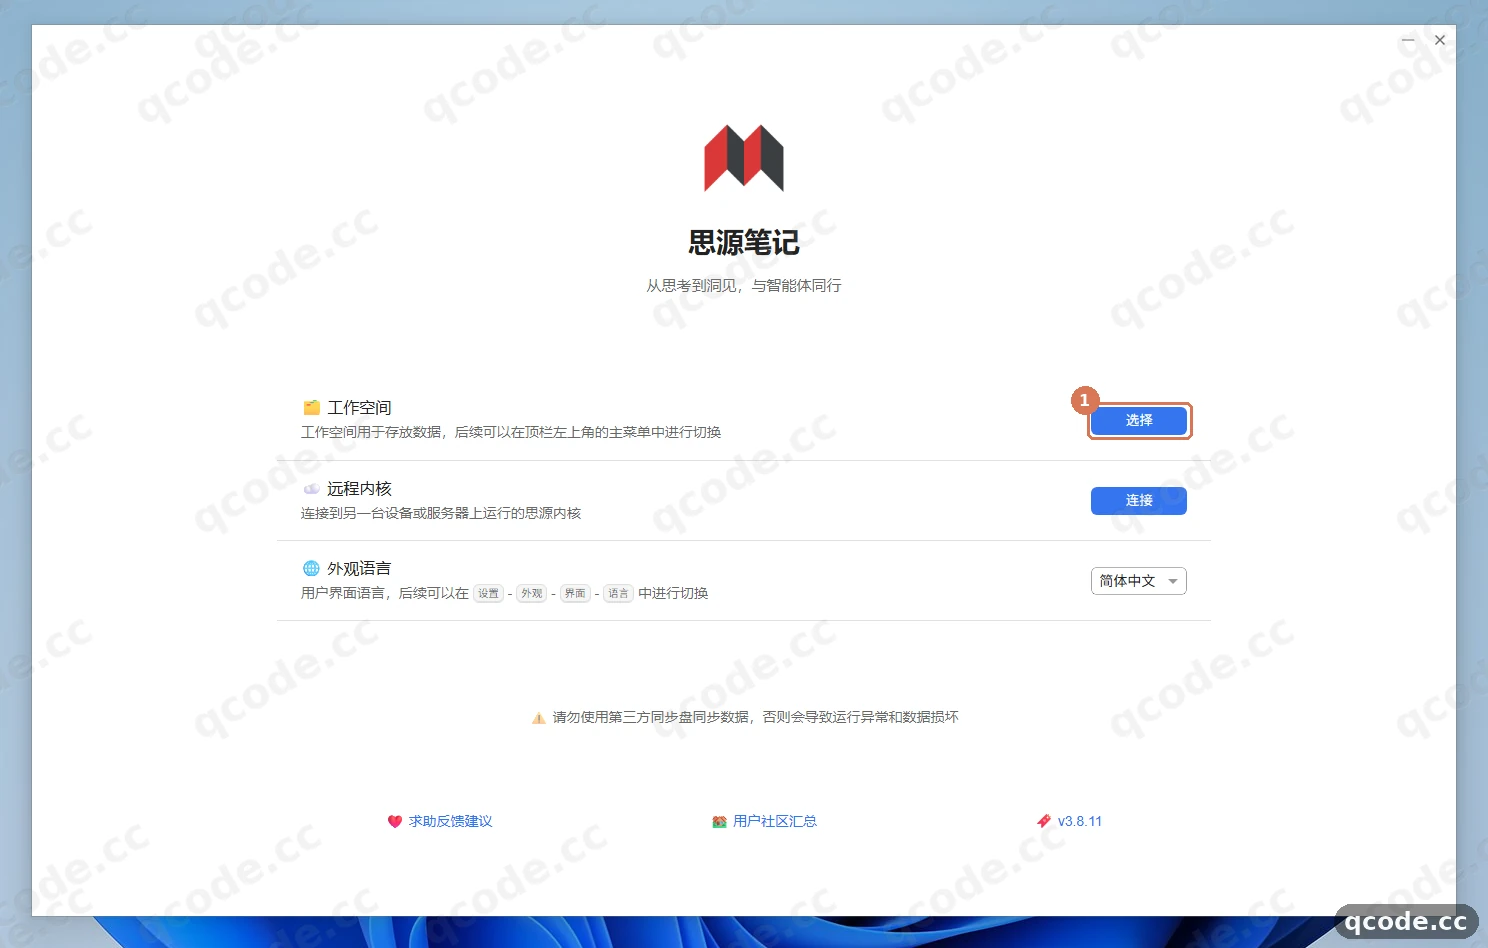
Done right you will see: after initialisation the SiYuan main interface appears, with the document tree on the left and the workspace name you just picked at the top left of the title bar. On this first entry, just close or click 忽略 (Ignore) on the firewall question, the Defender exclusion tip in the top right, or the 欢迎使用思源 (Welcome to SiYuan) pop-up in the bottom right, and carry on.
Stuck? Why can I not put the workspace in OneDrive or Nutstore?
SiYuan reads and writes its local database and index inside the workspace very frequently, and putting that into a third-party sync folder such as OneDrive, iCloud or Nutstore easily causes file-lock conflicts and data corruption. Always pick a plain local disk folder. To change the interface language, use 外观语言 (Appearance language) on the current guide page, or adjust it later under 设置 → 外观 → 界面 → 语言 (Settings → Appearance → Interface → Language).
Open the 设置 (Settings) window
In the main interface, click the main menu at the top left of the title bar that ① points at (it shows the current workspace name), then click 设置 (Settings) that ② points at in the drop-down menu (shortcut Alt+P — you can also just press Alt+P). SiYuan has built-in AI settings, so there is no need to install a third-party OpenAI plugin from the marketplace.
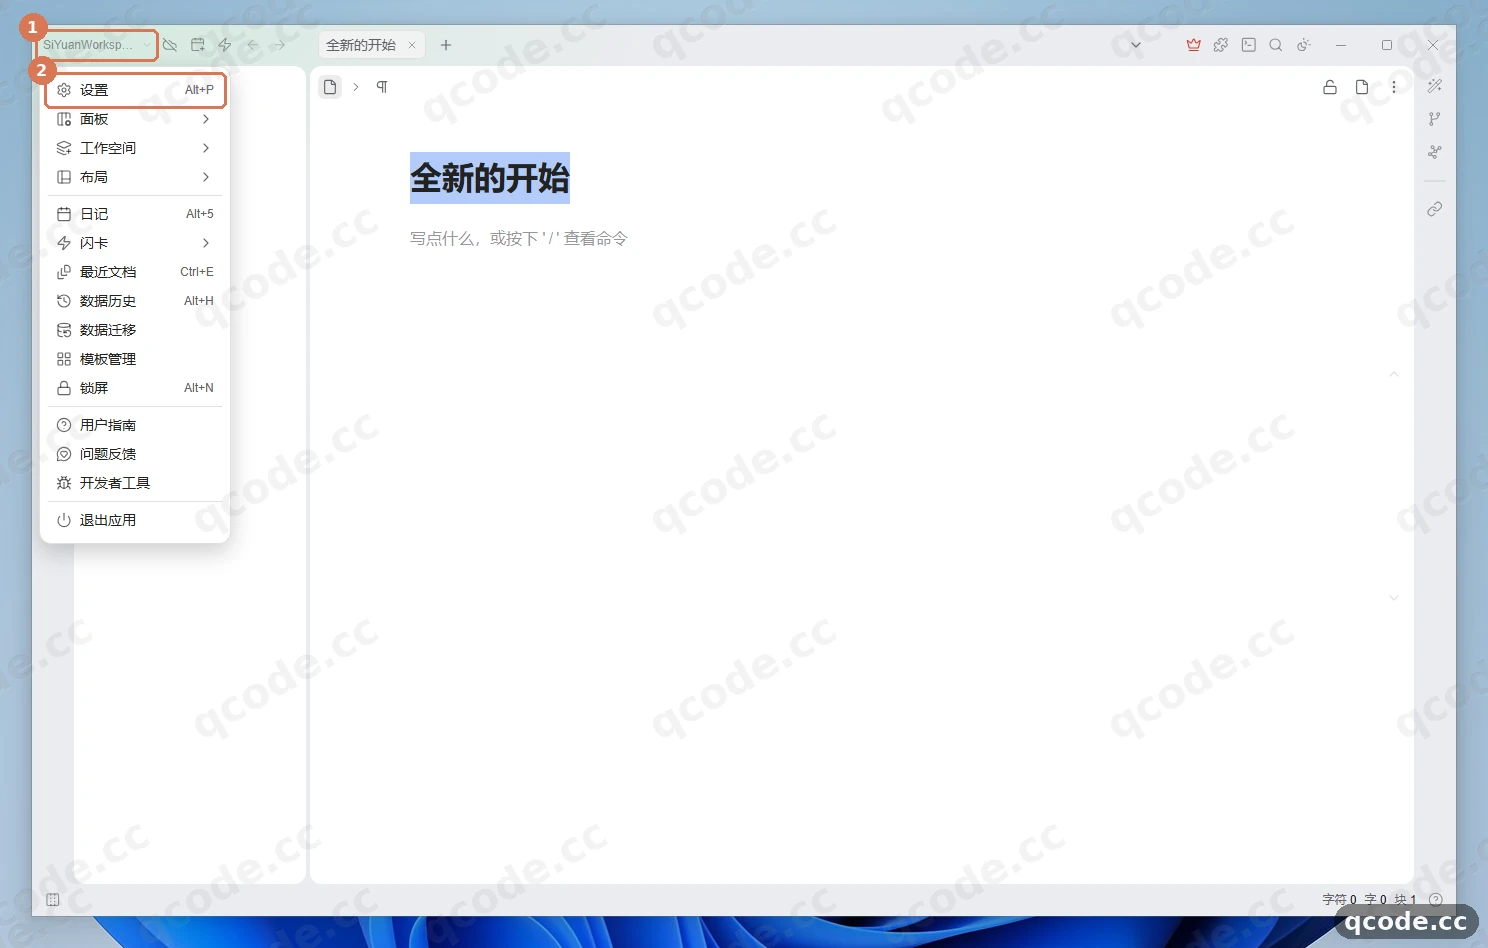
Done right you will see: a 设置 (Settings) window opens in the middle of the screen, with a whole column of Chinese settings categories on the left.
Go to the 人工智能 (AI) settings page
In the category list on the left of the 设置 (Settings) window, find and click 人工智能 (AI) that ① points at.
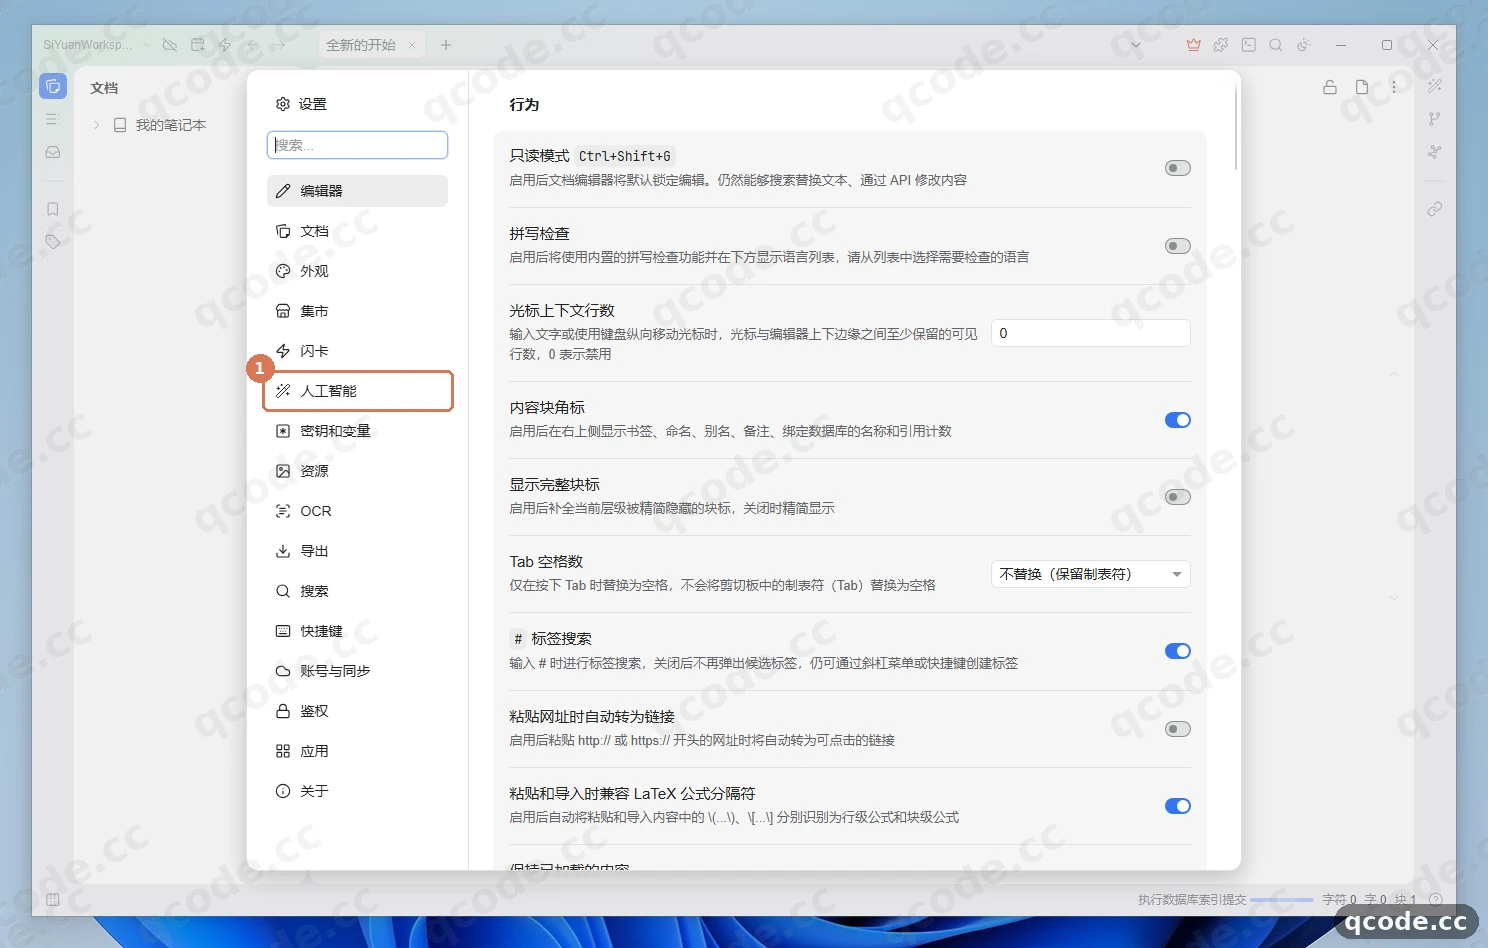
Done right you will see: the right-hand side switches to the 人工智能 (AI) settings page and an API 提供商 (API providers) section appears at the top.
Click + 添加提供商 (+ Add provider)
Confirm that 人工智能 (AI) at ① is selected on the left, then click the + 添加提供商 (+ Add provider) button that ② points at in the top right of the API 提供商 (API providers) section on the right.
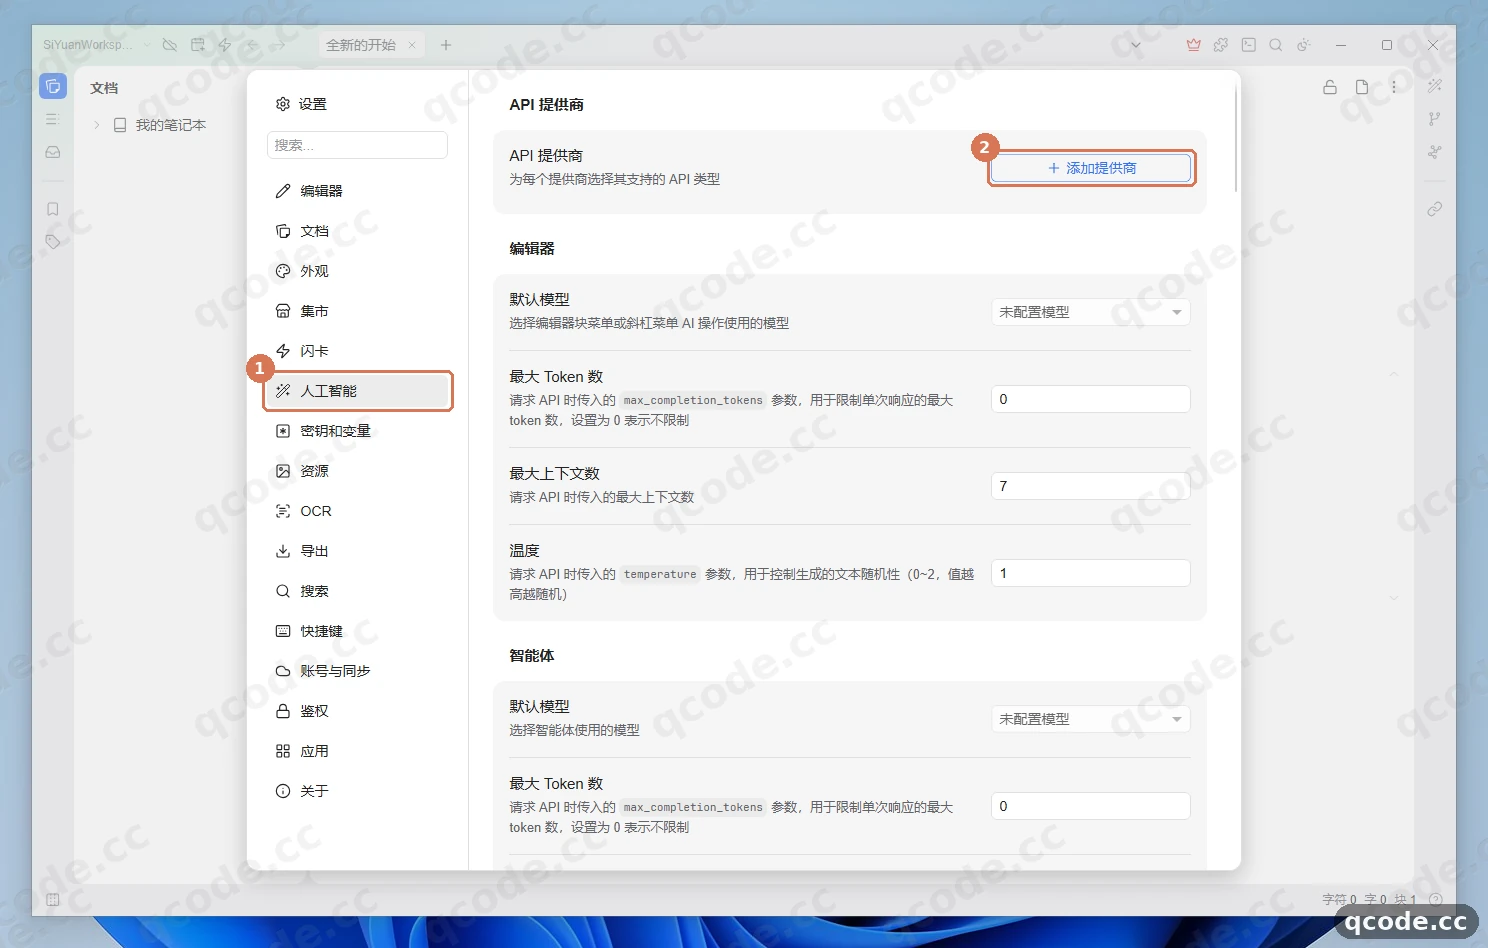
Done right you will see: the right-hand side switches to a list of preset cards headed 官方服务商 (Official providers).
Choose the OpenAI preset card
In the two-column 官方服务商 (Official providers) card list, click the OpenAI card that ① points at in the top left. Be sure to pick the OpenAI on the left labelled https://api.openai.com/v1, not the ChatGPT(ChatGPT 账户) (ChatGPT account) card on the right, which needs an account login.
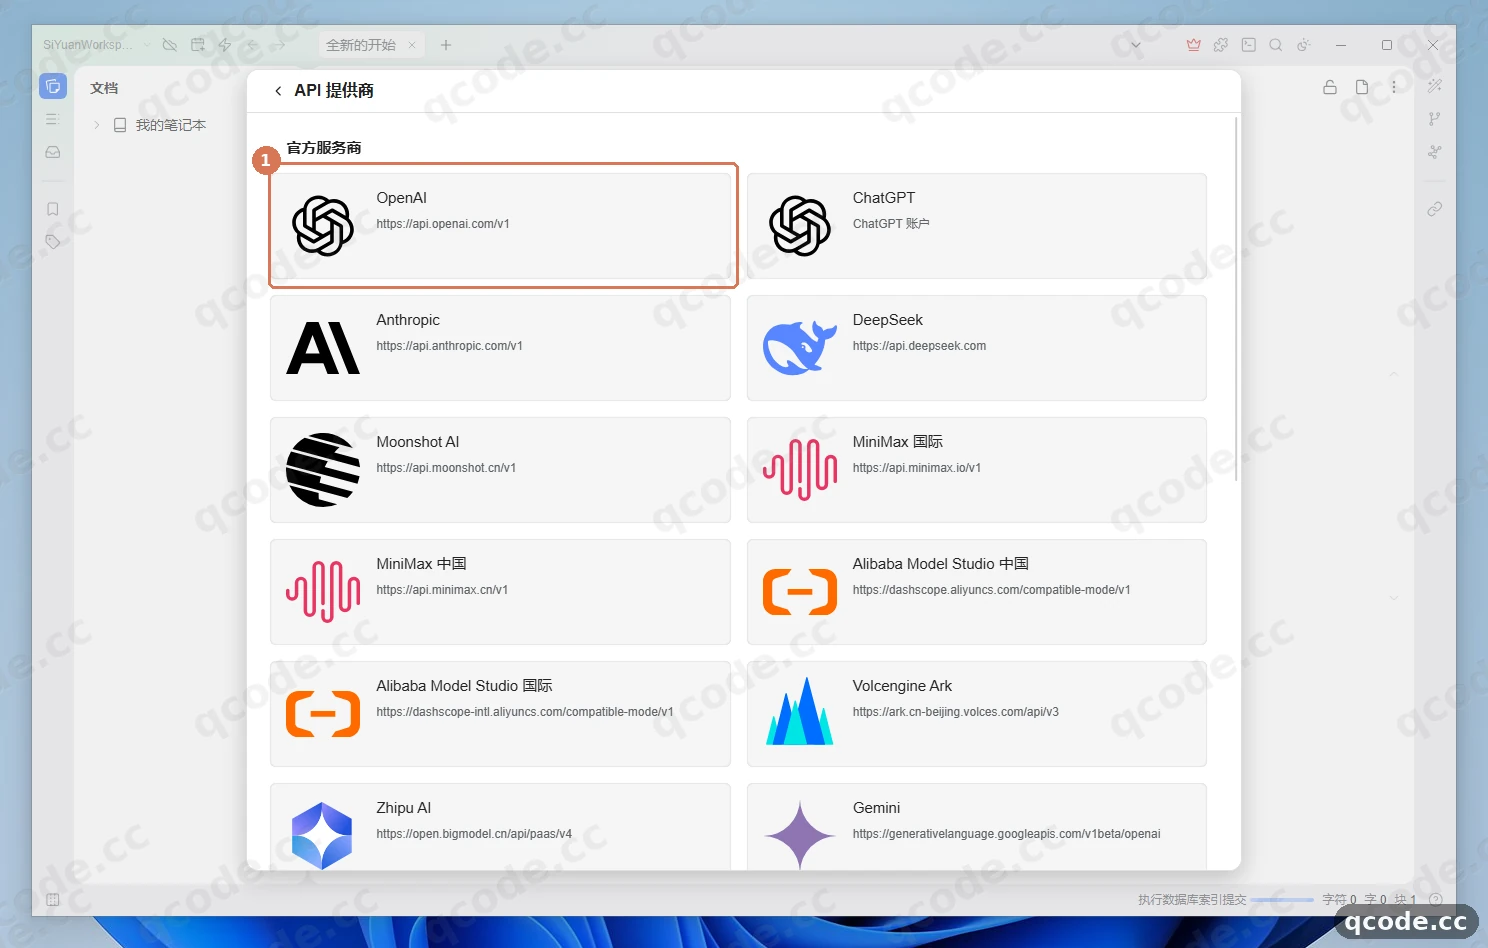
Done right you will see: the interface moves to the 添加提供商 (Add provider) detail form, listing 自定义显示名称 (Custom display name), API 基础地址 (API base URL), API 类型 (API type), 超时时间 (Timeout) and API Key in turn.
Fill in the QCode endpoint, API type and key
First change 自定义显示名称 (Custom display name) at the top from OpenAI to QCode (so it is easy to recognise), then fill in the three key parameters in the numbered order shown in the picture:
- ①
API 基础地址(API base URL): clear the default value and enterhttps://api.qcode.cc/openai/v1(do not add/chat/completionsor a trailing slash at the end); - ②
API 类型(API type): open the drop-down and be sure to change the defaultResponsestoChat Completions; - ③
API Key: paste the key starting withcr_that you copied in the QCode Dashboard (for examplecr_xxxxxxxx; click the little eye icon on the right to check you did not copy extra spaces).
Leave 超时时间 (Timeout) at the default 120; no change is needed.
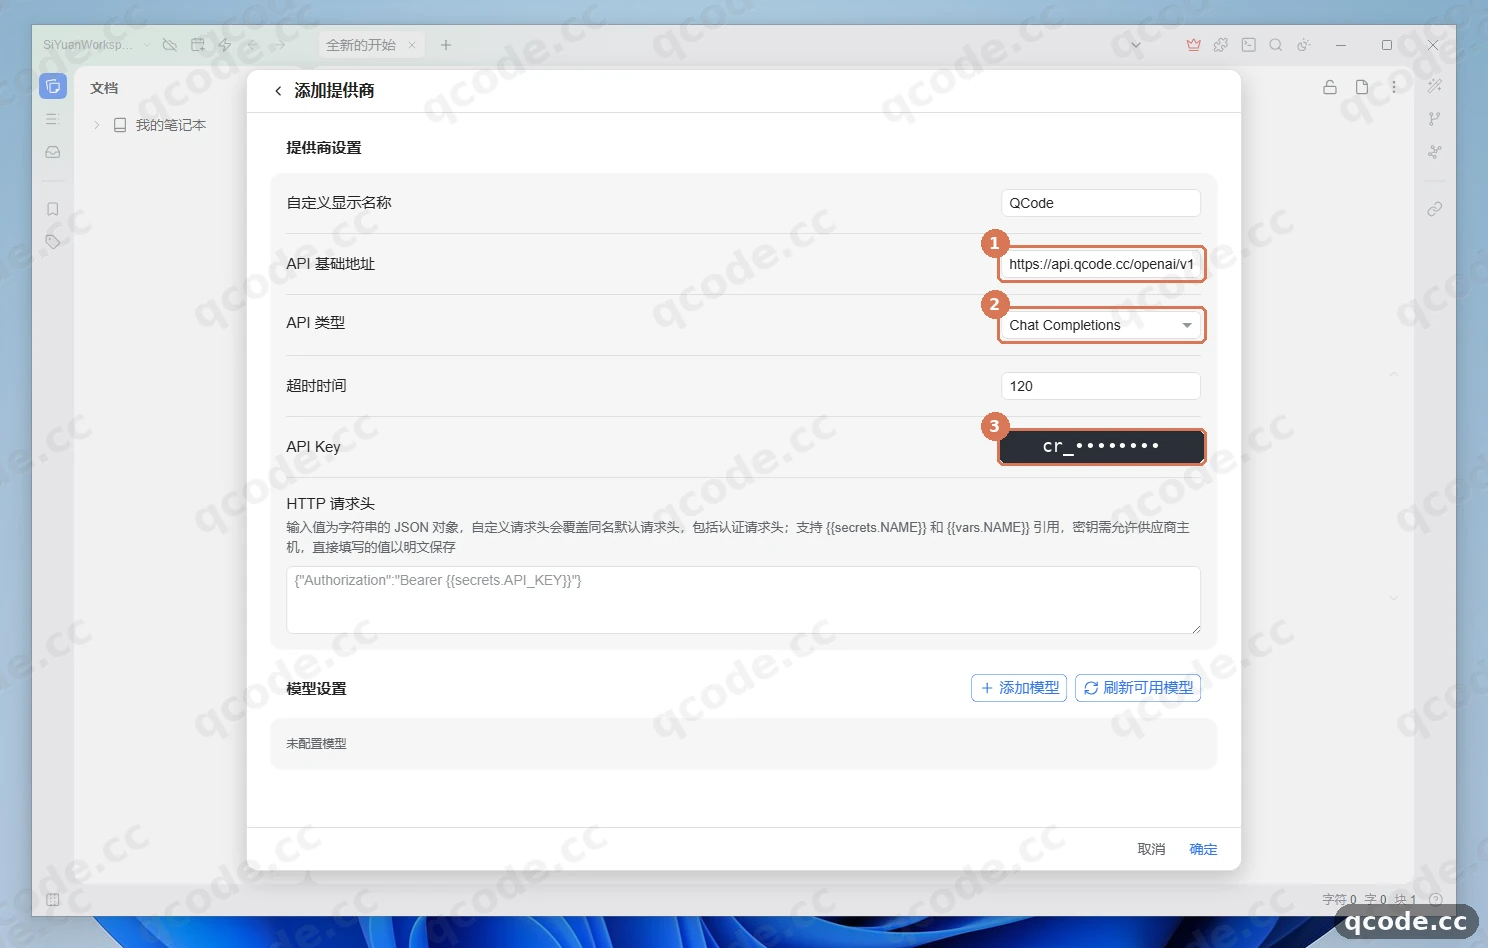
Done right you will see: API 基础地址 (API base URL) shows https://api.qcode.cc/openai/v1, API 类型 (API type) shows Chat Completions, and the API Key field is filled with masked dots.
Need an API key?
If you do not have a QCode account yet, Sign up first. If you prefer to pay by usage, buy a Pay-as-you-go Pack first, then create the key in the Dashboard. Copy the whole string that starts with cr_ and paste it into the API Key field above. You can pay by credit/debit card (Visa / Mastercard), Apple Pay / Google Pay, or cryptocurrency — see Payment methods.
Refresh the models, test the connection and save
Without leaving the window, scroll down to the 模型设置 (Model settings) section:
- Click
刷新可用模型(Refresh available models) that ① points at; SiYuan fetches the list of available models from QCode and adds a model row automatically; - In the
请输入或选择模型(Enter or select a model) field that ② points at, enter the recommendedgpt-6.2-sol(if you want a second, lightweight Chinese model, click+ 添加模型(+ Add model) next to it and fill indeepseek-v4.1-flashon the new row); - Click
测试连接(Test connection) on the right of the model row, and once the连接成功(Connection successful) toast appears in the top right, click确定(OK) that ③ points at in the bottom right to save the configuration.
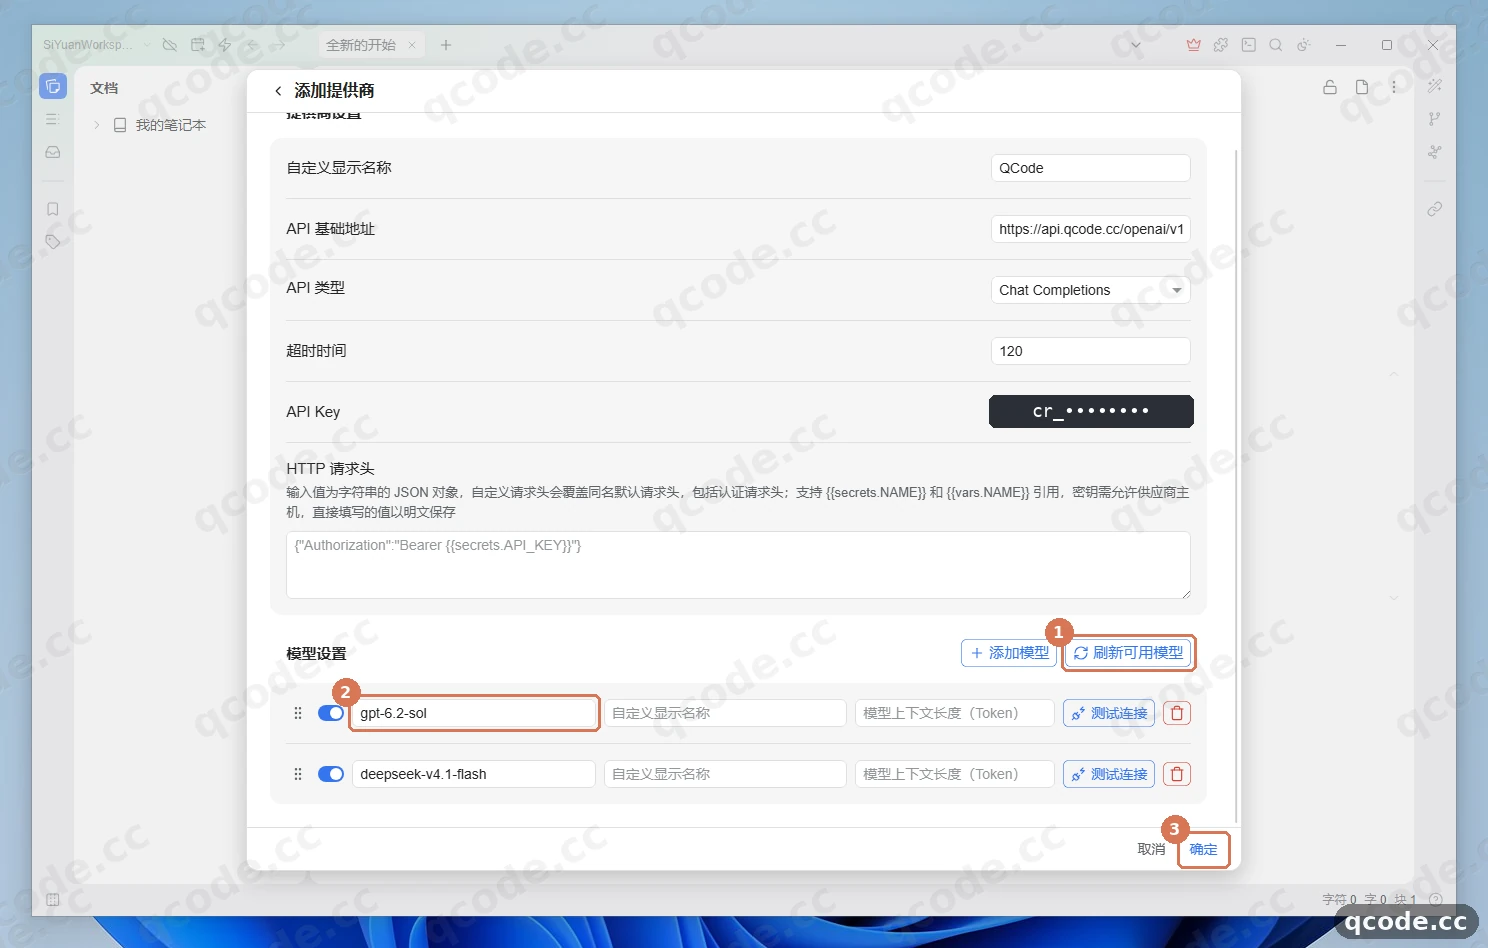
Done right you will see: after clicking 测试连接 (Test connection) the 连接成功 (Connection successful) toast appears in the top right, and clicking 确定 (OK) returns you to the 人工智能 (AI) settings page.
Stuck? Refresh available models fails or Test connection reports an error
Check three things in order: 1) whether API 类型 (API type) has been changed to Chat Completions (the default Responses will fail); 2) whether API 基础地址 (API base URL) is exactly https://api.qcode.cc/openai/v1; 3) whether the key has extra spaces or quotes around it. If fetching the model list fails temporarily, you can also just click + 添加模型 (+ Add model), type gpt-6.2-sol by hand and click 测试连接 (Test connection).
Confirm the provider switch and the default models
Back on the 人工智能 (AI) settings page after saving, check three things:
- The
启用(Enable) switch on the right of theQCodecard at ① is on, and the card showshttps://api.qcode.cc/openai/v1and the number of configured models below it; 编辑器 → 默认模型(Editor → Default model) at ② hasgpt-6.2-solselected;智能体 → 默认模型(Agent → Default model) at ③ also hasgpt-6.2-solselected.
If a default model is empty, or you want a different model you have already added, just open the drop-down and switch. Once everything checks out, press Esc to close the Settings window.
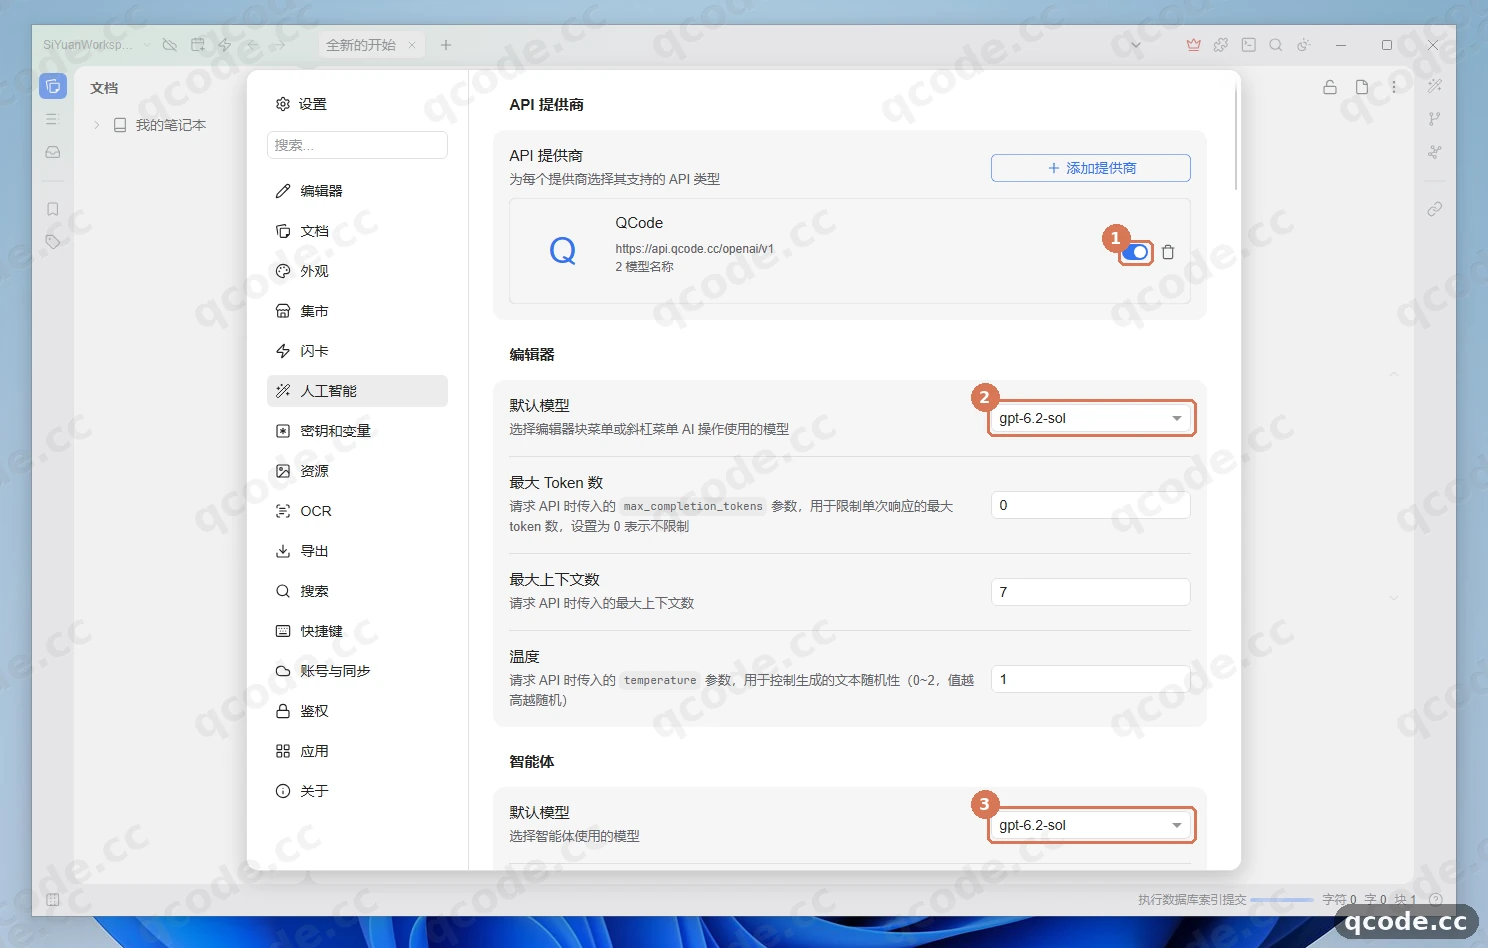
Done right you will see: the QCode card switch is lit, and both the 编辑器 (Editor) and 智能体 (Agent) default models show gpt-6.2-sol.
Generate text with AI 编写 (AI writing) in the editor
Go back to any note, type / on an empty line to bring up the slash command menu, and choose AI 编写 (AI writing). Type what you want in the dialog that appears (for example, ask it to summarise a topic in two sentences) and click 确定 (OK). A few seconds later a preview card appears inline in the note: ① marks that the result comes from gpt-6.2-sol, and clicking 在原位置插入 (Insert in place) that ② points at in the bottom right writes the content straight into the document.
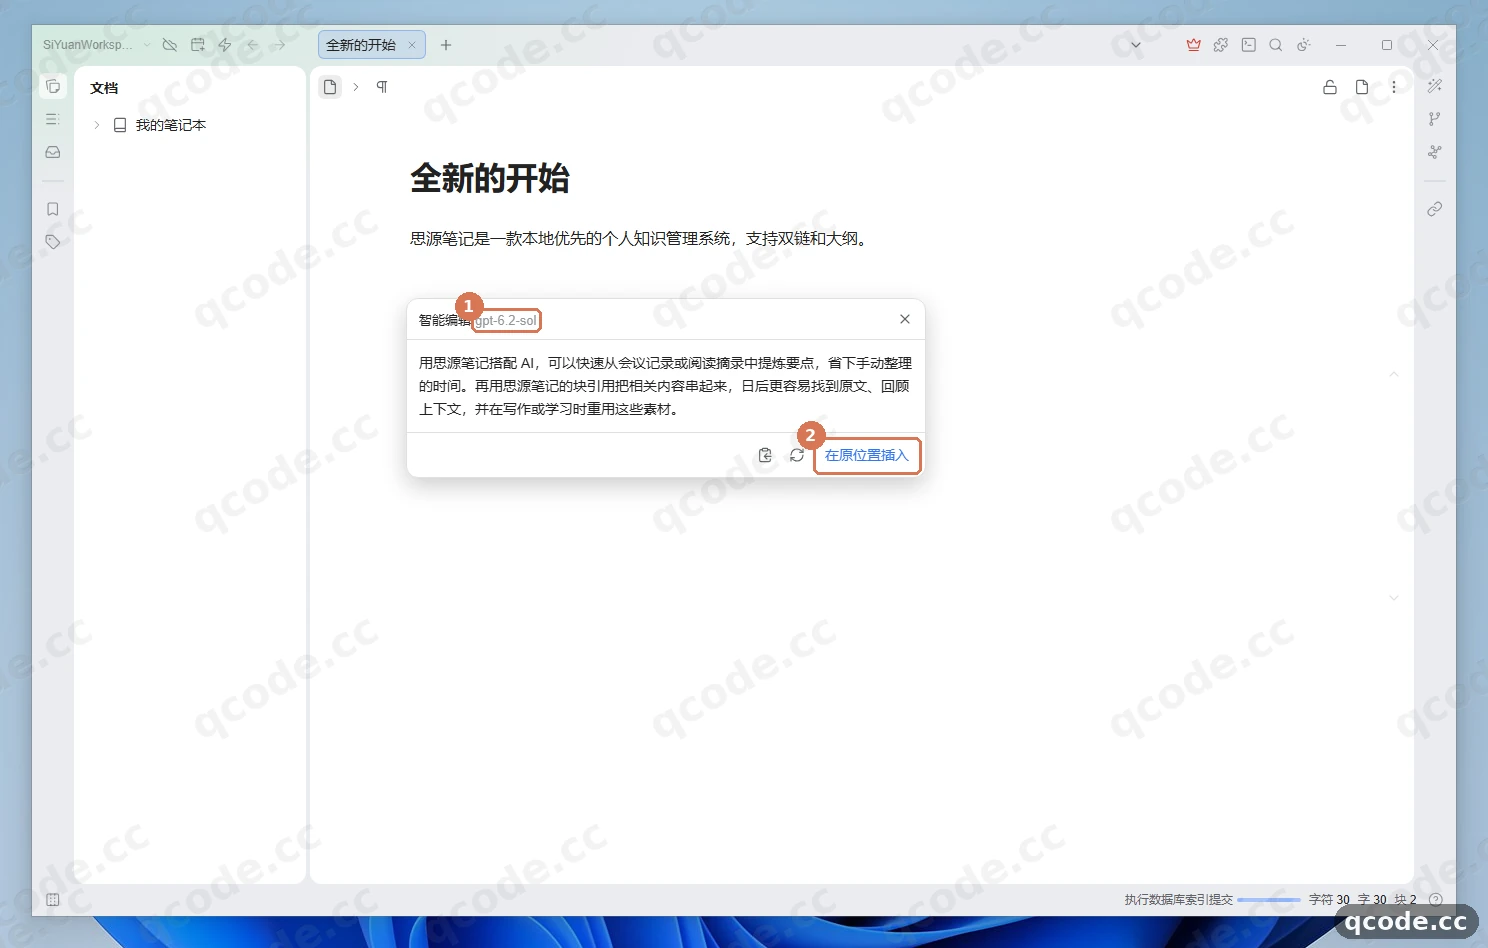
Done right you will see: the preview card shows the complete Chinese text, and after you click 在原位置插入 (Insert in place) the content is written into the current paragraph immediately.
Stuck? Typing / does not open the menu, or AI writing is unavailable
The slash menu needs / typed from the keyboard with an English input method; copying and pasting / will not open it. If AI 编写 (AI writing) is missing from the menu or it says no model is configured, go back to 设置 → 人工智能 (Settings → AI) and confirm the QCode enable switch is on and 编辑器 → 默认模型 (Editor → Default model) is not empty.
Chat in the sidebar 智能体 (Agent) and switch models
Click the 智能体 (Agent) icon at the top of the dock on the far right of the window that ① points at to open the sidebar chat panel. Type a test message in the box at the bottom and send it (or press Ctrl+Enter); a moment later you will see a normal reply at ②. If you added several models earlier, click the model name button that ③ points at in the bottom right of the input box (in the picture it switches from gpt-6.2-sol to deepseek-v4.1-flash) to switch models at any time without leaving the conversation and keep asking (in the picture the test command sent after switching gets PONG back immediately).
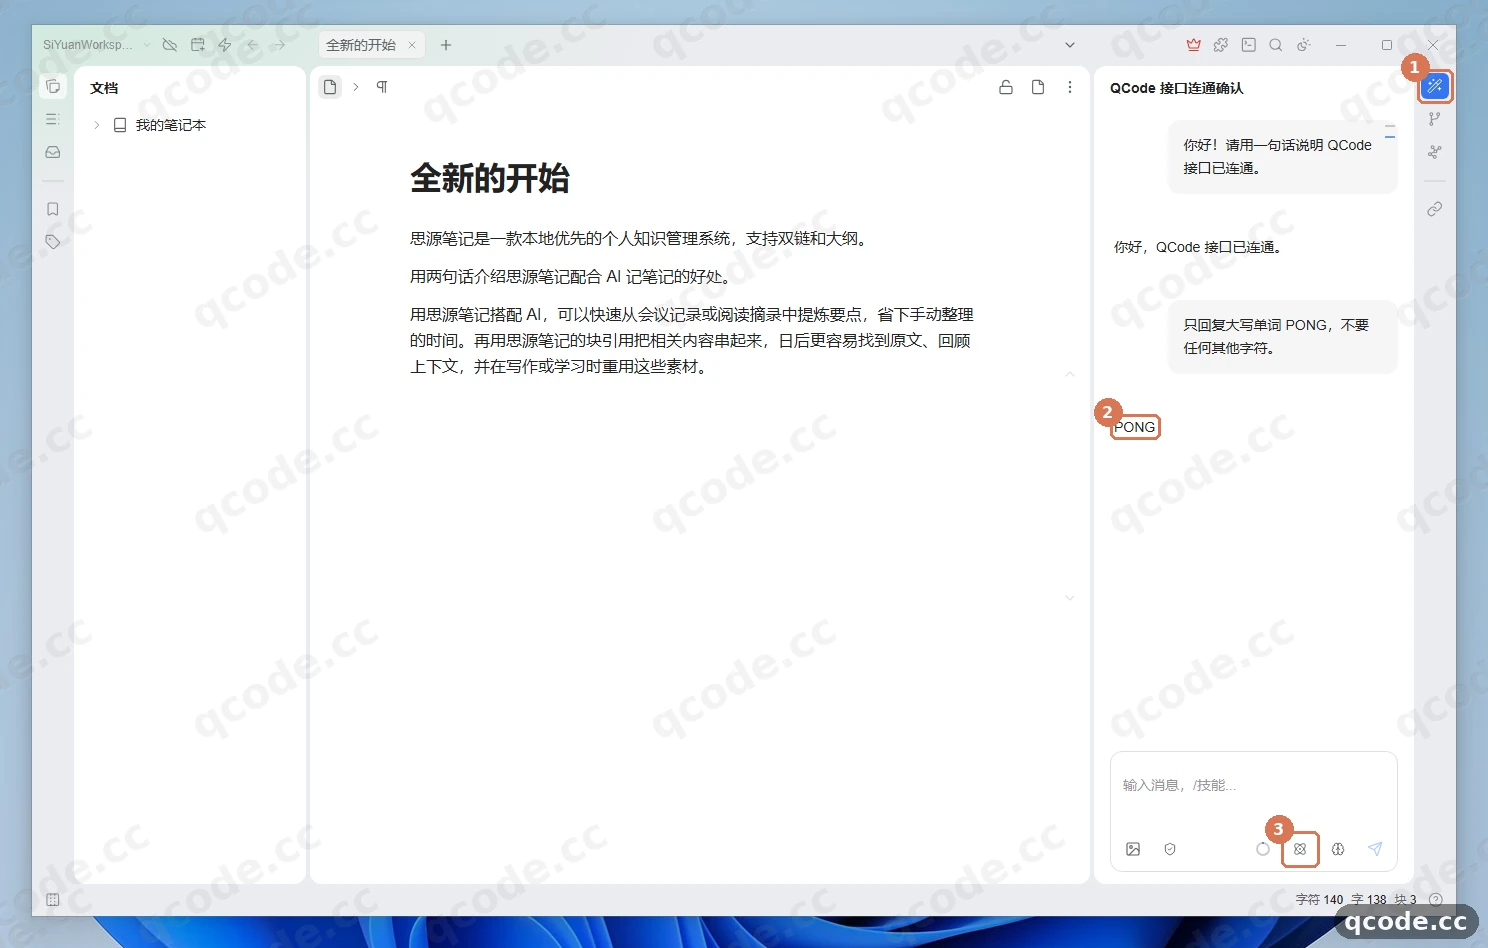
Done right you will see: the 智能体 (Agent) panel on the right returns replies normally, and clicking the model button in the bottom right switches smoothly to another model you added and keeps getting answers.
Check the version under 设置 → 关于 (Settings → About) (optional)
If you later need to confirm the version while troubleshooting or checking where a feature lives, open the main menu at the top left → 设置 (Settings) (or press Alt+P) and click 关于 (About) at the very bottom of the list; ① shows the current SiYuan version (in the picture 当前版本 v3.8.11, Current version v3.8.11). After you close and reopen SiYuan, the QCode provider and default models you just configured are kept in full.
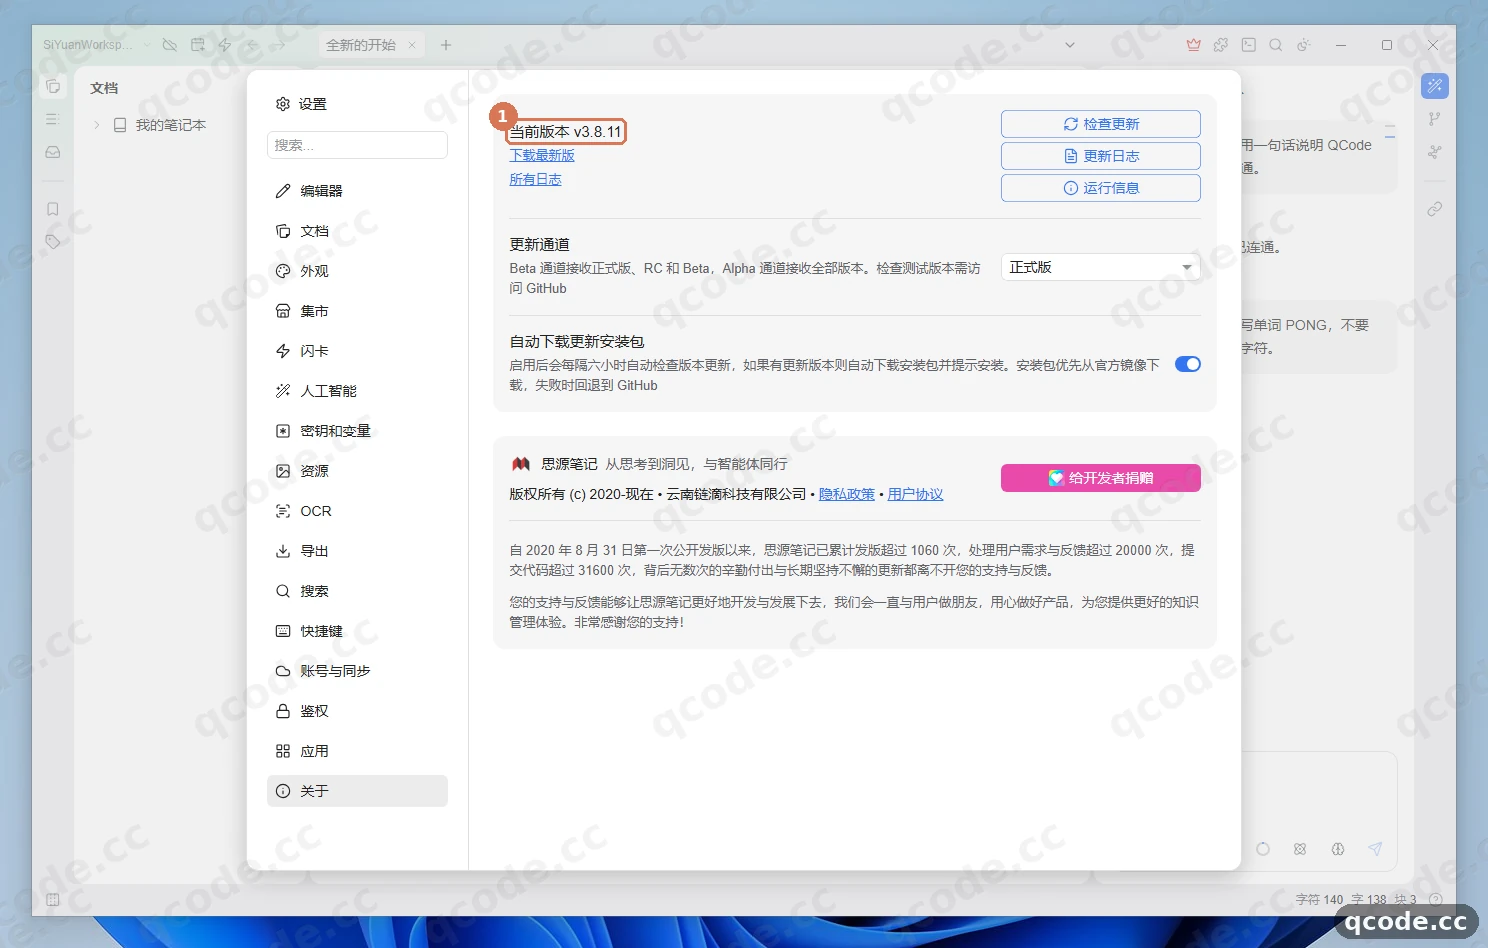
Done right you will see: the 关于 (About) page clearly shows the current version number; after restarting SiYuan, 设置 → 人工智能 (Settings → AI) still lists the QCode configuration.
Verify it works
When all four things check out, SiYuan is fully connected to QCode:
- On
设置 → 人工智能(Settings → AI) theQCodecard switch is on and showshttps://api.qcode.cc/openai/v1plus the number of models you added; - Both
编辑器 → 默认模型(Editor → Default model) and智能体 → 默认模型(Agent → Default model) havegpt-6.2-solselected (or another available model you need); - Typing
/in the note body →AI 编写(AI writing) generates and inserts content, and the智能体(Agent) on the right replies normally and can switch models; - After you close and restart SiYuan, the
QCodeprovider and default model configuration are still there.
All done
You have installed SiYuan on Windows 11 and connected it to QCode. From now on, type / any time you write a note to call AI 编写 (AI writing), or chat and switch models directly in the 智能体 (Agent) panel on the right. From here you can:
- Endpoints and API formats
- Chinese model access
- Billing
- Troubleshooting
- Next: compare the plans on the pricing page
- Go back to your Dashboard to check usage and balance
Common errors
| Error message | Why | What to do |
|---|---|---|
Invalid API key |
The key is empty, truncated, surrounded by spaces or quotes, or an already expired key was pasted | Go back to the QCode Dashboard, copy the whole key starting with cr_ again, clear the API Key field and paste it once more, then click 测试连接 (Test connection) to verify |
Invalid URL (POST /v1/chat/completions/chat/completions) |
/chat/completions was put into API 基础地址 (API base URL) while SiYuan appends the chat path itself, so the path is duplicated; or API 类型 (API type) was left at the default Responses |
Set API 基础地址 (API base URL) back to https://api.qcode.cc/openai/v1 (no /chat/completions and no trailing slash) and change API 类型 (API type) to Chat Completions |
请确认没有将工作空间设置在第三方同步盘路径下,否则会造成数据损坏……是否继续? |
A safety confirmation shown when you first pick the workspace folder, to prevent choosing a OneDrive, iCloud or Nutstore folder by mistake | Confirm the folder is a plain local one (such as C:\SiYuanWorkspace) and click 确定 (OK); if you did pick a sync folder, switch back to a local one |
Microsoft Defender 可能会误杀内核、误删数据和严重降低运行性能,建议将思源安装路径和工作空间路径添加到排除列表 |
A system reminder in the top right when you first enter the main interface | Click 忽略 (Ignore) and carry on configuring QCode — connection is unaffected; if the kernel is later blocked by antivirus, add the install path and workspace to the exclusion list then |
是否要允许公共网络和专用网络访问此应用? |
The Windows Security firewall prompt triggered the first time the local kernel starts | Just cancel or close that window; it does not affect the local kernel or outbound requests to the QCode API |
FAQ
What happens when my key expires?
Two cases:
- A personal plan key cannot be renewed when it expires — reopen a plan and use a new key.
- For a pay-as-you-go pack, buy another pack after the key expires and the same key starts working again.
If you switch to a new key, open 设置 → 人工智能 (Settings → AI), open the QCode card, put the new cr_ key into API Key and click 确定 (OK) to save.
Do I need a third-party OpenAI plugin or a SiYuan account?
Neither. SiYuan v3.8.11 already ships 设置 → 人工智能 → API 提供商 (Settings → AI → API providers) and the sidebar 智能体 (Agent) natively, so the local workspace and the built-in AI both work without signing in — no need to install the old OpenAI plugin from the marketplace, and no OpenAI account either.
Why must API 类型 (API type) be changed from Responses to Chat Completions?
The OpenAI preset in SiYuan defaults API 类型 (API type) to Responses, but the OpenAI-compatible endpoint from QCode uses the standard Chat Completions protocol. Without the change, both the connection test and chat requests fail; after switching to Chat Completions you can fetch models and chat normally.
How do I change the interface language in SiYuan?
On the workspace guide page shown at first launch, pick the language in 外观语言 (Appearance language) directly; once in the main interface, open 设置 → 外观 → 界面 → 语言 (Settings → Appearance → Interface → Language) to switch between Simplified Chinese and other languages at any time.
Can I use Claude models in SiYuan at the same time?
Yes, but do not put Claude models into the OpenAI-compatible endpoint — the QCode OpenAI-compatible endpoint does not accept Claude models. Add a separate provider instead, choose Anthropic Messages as API 类型 (API type), set API 基础地址 (API base URL) to https://api.qcode.cc/api, and fill in the same cr_ key with claude-opus-5-5 (see the advanced setup below).
Connection overview
| Item | Details |
|---|---|
| Where to configure | Main menu at the top left of the title bar → 设置 (Settings) (Alt+P) → 人工智能 (AI) → API 提供商 (API providers) |
| OpenAI-compatible endpoint (GPT / Chinese models) | https://api.qcode.cc/openai/v1 (API type: Chat Completions) |
| Anthropic endpoint (Claude) | https://api.qcode.cc/api (API type: Anthropic Messages) |
| API Key format | cr_xxxxxxxx (the same QCode key works on both protocol endpoints) |
| Where the default models are set | 编辑器 → 默认模型 (Editor → Default model) and 智能体 → 默认模型 (Agent → Default model) under 设置 → 人工智能 (Settings → AI) |
| Official entry points | Official download page · GitHub repository |
Advanced setup: Claude models and other ingress points
Configure Claude separately (Anthropic endpoint)
If you want to call Claude models in SiYuan, go back to 设置 → 人工智能 → API 提供商 (Settings → AI → API providers), click + 添加提供商 (+ Add provider) once more and fill in the parameters below:
| Field | Fill in |
|---|---|
| Custom display name | QCode Claude (yours to choose) |
| API base URL | https://api.qcode.cc/api |
| API type | Anthropic Messages |
| API Key | cr_xxxxxxxx (the same QCode key) |
| Recommended model | claude-opus-5-5 (lightweight alternative claude-haiku-5-5) |
Other ingress points (optional)
If connections feel slow or time out, switch the domain in API 基础地址 (API base URL) to a closer ingress point. All three points offer identical capability, and the same key works on all of them:
| Node | OpenAI-compatible (GPT / Chinese models) | Anthropic (Claude) |
|---|---|---|
| Global (default) | https://api.qcode.cc/openai/v1 |
https://api.qcode.cc/api |
| Asia (an option in mainland China) | https://asia.qcode.cc/openai/v1 |
https://asia.qcode.cc/api |
| North America / Europe | https://us.qcode.cc/openai/v1 |
https://us.qcode.cc/api |
Recommended models
| Model | Matching API type and endpoint | Where it fits |
|---|---|---|
gpt-6.2-sol |
Chat Completions · https://api.qcode.cc/openai/v1 |
The default OpenAI workhorse, balanced for writing, summarising and agent chat |
gpt-6.2-astra |
Chat Completions · https://api.qcode.cc/openai/v1 |
The highest-tier OpenAI alternative, suited to deep analysis and long, complex restructuring |
claude-opus-5-5 |
Anthropic Messages · https://api.qcode.cc/api |
The default Anthropic / Claude workhorse, for long-form polishing and structured outlines |
claude-haiku-5-5 |
Anthropic Messages · https://api.qcode.cc/api |
The lightweight Anthropic / Claude alternative, fast to respond |
deepseek-v4.1-flash |
Chat Completions · https://api.qcode.cc/openai/v1 |
A lightweight Chinese alternative, good for quick questions and everyday note tidying |
More Chinese model IDs are listed under Chinese model access; the full protocol and path comparison is in Endpoints and API formats.
Related docs
- Endpoints and API formats — the source of truth for both protocol endpoints and their paths
- Chinese model access — the Chinese models available on the OpenAI-compatible endpoint
- Billing — usage tracking and billing rules
- Troubleshooting — common connection and authentication problems
- Official SiYuan download page
- SiYuan page in Microsoft Store
Get started with QCode
One API key for Claude Code, Codex and more — billed per token, per-model prices on qcode.cc/models