n8n with QCode: Windows 11 walkthrough, one screenshot per step
Follow 13 steps and 13 screenshots to get n8n 2.48.7 running on Windows 11 with Node.js 24, point its OpenAI node at QCode's OpenAI-compatible endpoint, and get a reply from gpt-6.2-sol.
Need an API key? Sign up →Endpoints & base URLs →
On This Page
- Download and install
- Follow the screenshots: Windows, one step at a time
- Download a Node.js installer that n8n can use
- Reopen PowerShell after installing and check the versions
- Start the local n8n service with npx
- Open n8n and create the local account
- Click through the first-run guides to an empty canvas
- Search for and select the OpenAI node
- Pick Message a model under TEXT ACTIONS
- Click Connect to OpenAI to create the credential first
- Fill in the QCode key and endpoint address
- Confirm the credential was saved
- Choose gpt-6.2-sol in Model
- Write one sentence and execute the node
- Close the parameter window and save the workflow
- Verify it works
- Common errors
- FAQ
- Other ingress points
- Node parameters
- Next step: let it run on its own schedule
- Related documentation
Follow the 13 steps below and you will have the workflow automation tool n8n running on your own Windows 11 PC, with its OpenAI node answering you through QCode.
Short answer: In the Message a model node on the n8n canvas, click Connect to OpenAI, create a new OpenAI account credential, change Base URL to https://api.qcode.cc/openai/v1, paste the key that starts with cr_ into API Key, then pick gpt-6.2-sol under Model and you are done.
| Item | Fill in |
|---|---|
| Local address to open | http://localhost:5678 |
| Credential name | OpenAI account |
Endpoint address (Base URL) |
https://api.qcode.cc/openai/v1 |
Key (API Key) |
cr_xxxxxxxx |
Recommended model (Model) |
gpt-6.2-sol |
Checked on 2026-11-22 · n8n 2.48.7 · Windows 11
n8n is an open-source automation tool: you place a trigger and the things you want done on the canvas, connect them, and it runs them on a schedule or when an event fires. Its OpenAI node accepts a custom endpoint address, so pointing that address at QCode is enough to call QCode's models with the same key — no separate vendor account needed.
One thing first: n8n only has an English interface today, and it stays English on a Chinese Windows. Every button and menu name in this article is written exactly as it appears on the screenshots, so just copy it.
- The PC runs Windows 10 / 11 (64-bit) and can open Windows PowerShell or Windows Terminal
- The PC can reach
nodejs.org,registry.npmjs.org,localhost:5678andapi.qcode.cc - You have already signed up for QCode.cc and copied the API key starting with
cr_from the Dashboard. No account yet? Sign up for QCode first, pick a plan on the pricing page, then create the key in the Dashboard - No n8n website account and no OpenAI account needed: the local account you create the first time you open n8n exists only on your own PC
- Set aside about 20 uninterrupted minutes and do not close the PowerShell window along the way
Download and install
n8n has no Windows .exe installer, and the old official desktop edition is no longer maintained — do not download it. The easiest way on Windows is: install Node.js first, then run npx n8n straight from PowerShell; no administrator rights and no global install.
Official entry points:
- Node.js: official download page (the version has to sit between 20.19 and 24.x; this article uses
v24.22.3 LTS) - n8n installation options overview: docs.n8n.io/choose-n8n
- n8n command-line startup docs: docs.n8n.io/hosting/installation/npm
Network conditions differ by region, and the only difference is which download route is quickest — the install itself is identical. Pick where you are first:
- Download the
Windows Installer (.msi)forv24.22.3 LTSfrom nodejs.org/en/download the same way, double-click it, and accept the wizard defaults. - You can also use
winget, but note thatOpenJS.NodeJS.LTSnow points at v26, and n8n may fail to start with it, so choosing the v24.x MSI as above is still the better route. - The
.msidownloaded from a browser may be stopped byWindows protected your PC; clickMore info→Run anyway.
- Open nodejs.org/en/download and pick
v24.22.3 LTSby hand in the version dropdown at the top of the page (v26 is selected by default, and n8n does not run stably on it), keeping the platform asWindowsand the architecture asx64. - Click the green
Windows Installer (.msi)button lower down the page to download the installer, double-click it, clickNextthrough the wizard, and clickYeson the User Account Control prompt. - If the version dropdown will not open or the download is very slow, wait a moment and click again; after installing, always close the PowerShell window and open a new one so the new Node version takes effect.
Follow the screenshots: Windows, one step at a time
The 13 steps below each do one thing. Type every command in the same Windows PowerShell window; the orange numbers on the screenshots match the ①②③ in the text one to one.
Download a Node.js installer that n8n can use
Open https://nodejs.org/en/download in a browser. First pick v24.22.3 LTS in the version dropdown at ①, leaving the platform on Windows and the architecture on x64. Then click the green Windows Installer (.msi) button at ② to download the installer.
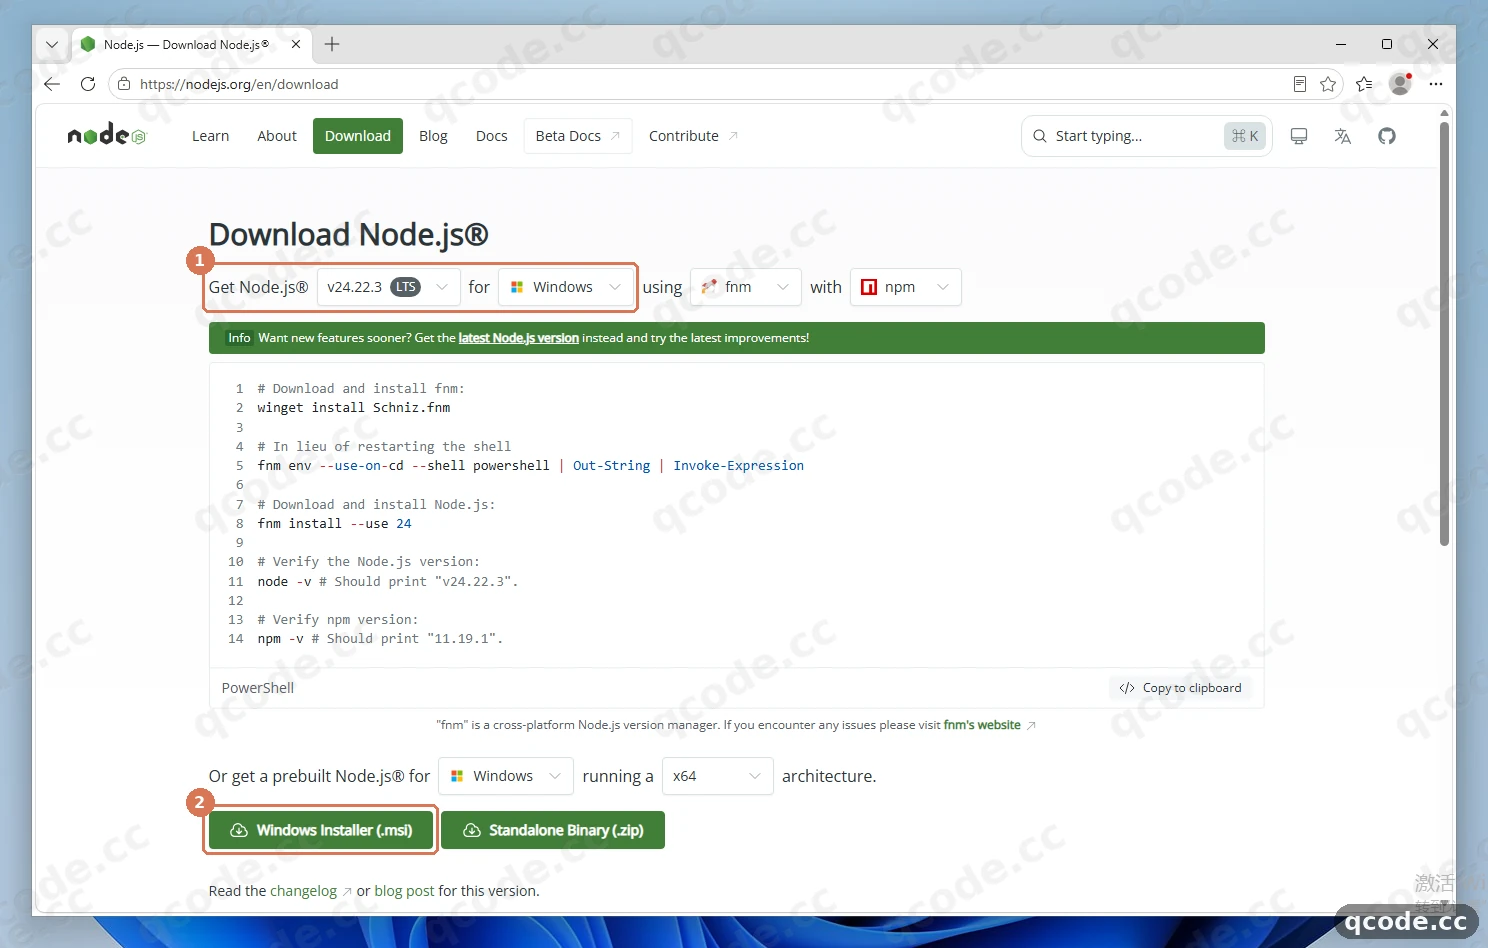
Done right you will see: v24.22.3 LTS in the version dropdown, and the browser starting to download a file named like node-v24.22.3-x64.msi.
Stuck? The download page does not default to v24
The page selects the newer v26 by default, and n8n 2.48.7 fails to start with it. You must switch the dropdown to v24.22.3 LTS, wait until the version number on the button changes too, and then click download.
Reopen PowerShell after installing and check the versions
Double-click the .msi you downloaded and click Next through the wizard. Then close the PowerShell window completely and open a brand-new one, and type node -v and then npm -v: ① should print v24.22.3 and ② should print 11.19.1.
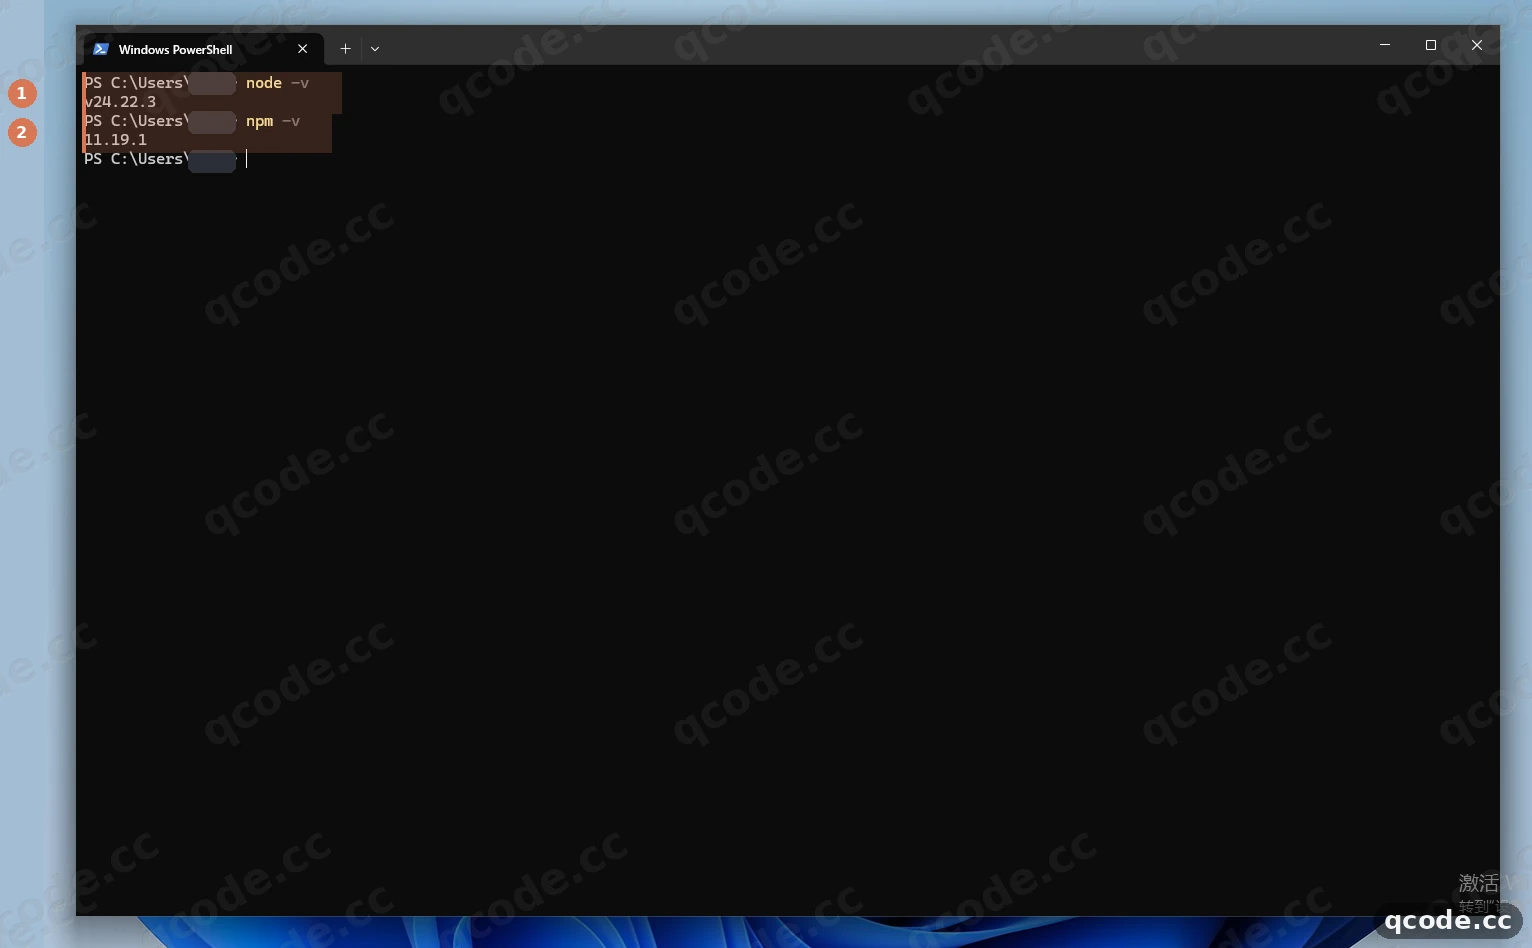
Done right you will see: two clean version lines, v24.22.3 and 11.19.1, after your own prompt, with no red error text at all.
Stuck? It says node or npm is not recognized as an internal or external command
That means Node.js is not installed properly, or you did not open a new window after installing. Close the current PowerShell (not just minimise it), open it again and retry; if it still fails, run the MSI installer again and keep Add to PATH ticked in the wizard.
Start the local n8n service with npx
In the same PowerShell window, type npx n8n and press Enter. The first run downloads dependencies, which can take a minute or two. When the terminal stops scrolling, check two lines: ① is Version: 2.48.7, ② is Editor is now accessible via: http://localhost:5678.
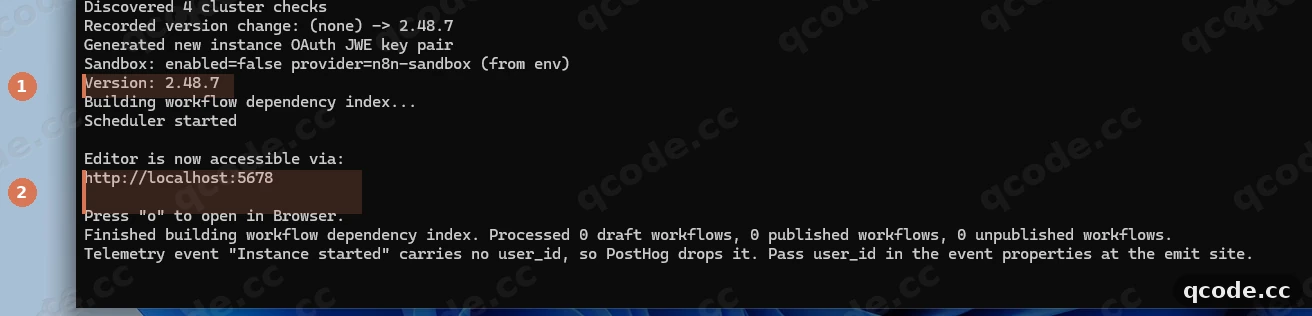
Done right you will see: the terminal sitting on Editor is now accessible via: http://localhost:5678, the cursor no longer scrolling by itself, and this window has to stay open from now on.
Stuck? A pop-up asks whether to let this app through public and private networks
That is Windows Firewall asking whether Node.js may listen on a local port; click Allow and it will not ask again. If the terminal says the port is in use, stop n8n in this window and start it with $env:N8N_PORT = 5679; npx n8n instead, then open http://localhost:5679.
Open n8n and create the local account
Go to http://localhost:5678 in the browser; it redirects to the Set up owner account page. In the form at ①, fill in Email, First Name, Last Name and Password in that order (the password needs at least 8 characters with 1 digit and 1 uppercase letter). When the form is filled, click the pink Next button at ②.
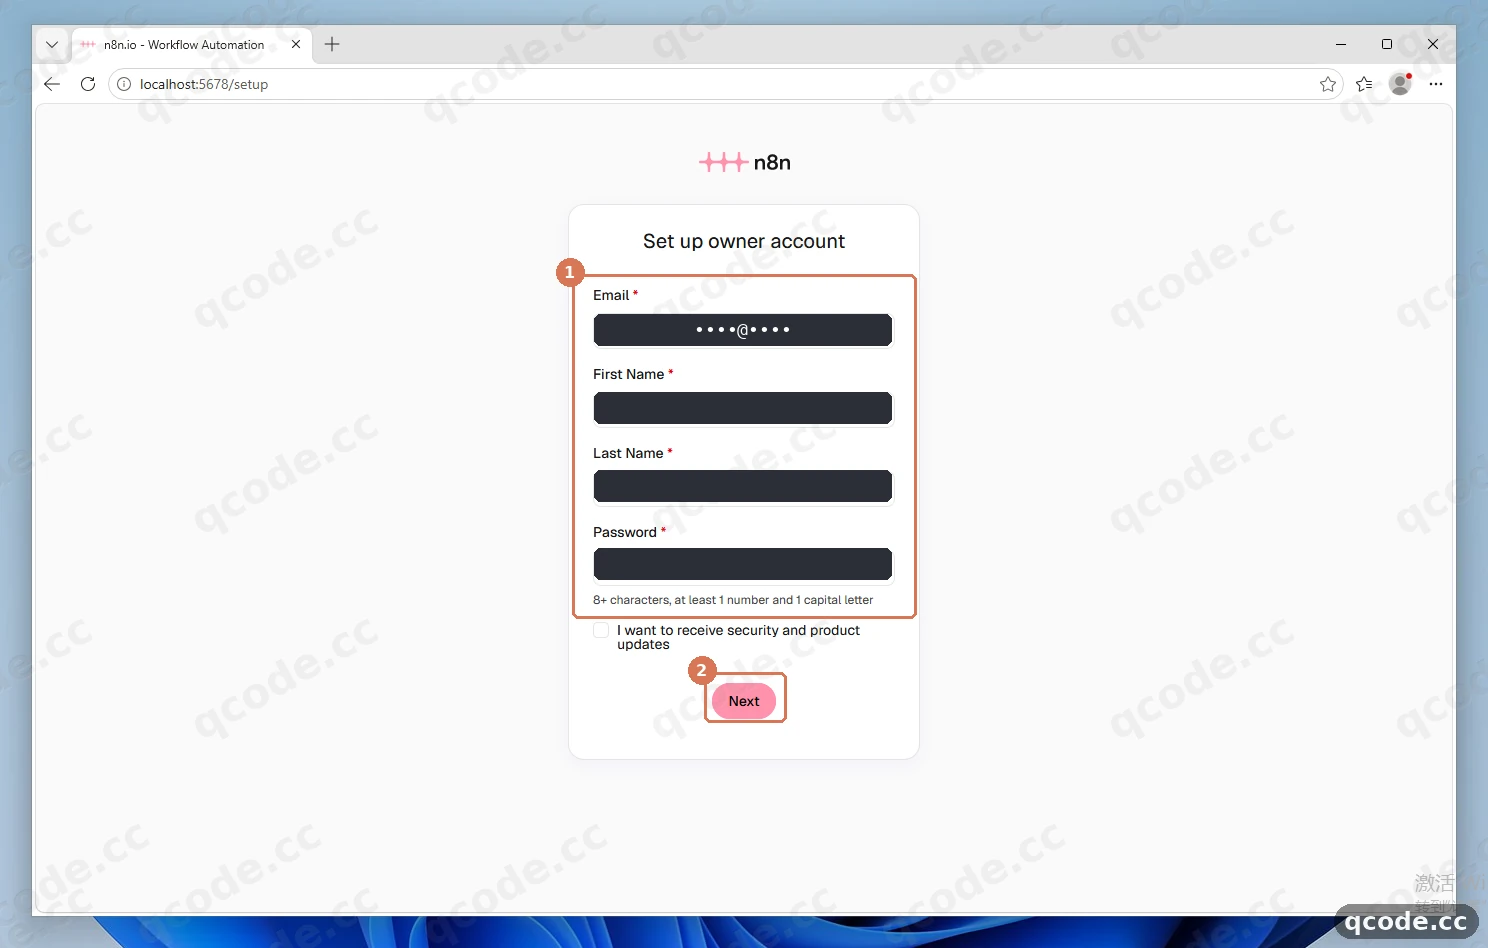
Done right you will see: after clicking Next the page moves on and a small Customize n8n to you survey appears, which means the local account has been created.
Stuck? The page will not open, or you forgot the password you just set
If the page will not open, look back at PowerShell to confirm the terminal still sits on Editor is now accessible via: and refresh once you are sure the window is still open. If you forgot the local password, press Ctrl+C to stop n8n, run npx n8n user-management:reset to reset the local account, then visit http://localhost:5678 again.
Click through the first-run guides to an empty canvas
Then click in this order: Get started at the bottom right of the survey pop-up → Skip at the bottom left of the licence pop-up → Got it on the assistant page → Set up later in Settings lower down the page → Build a workflow on the right side of the Let's build your first automation page. On the canvas, ① is the Add first step... plus square in the middle.
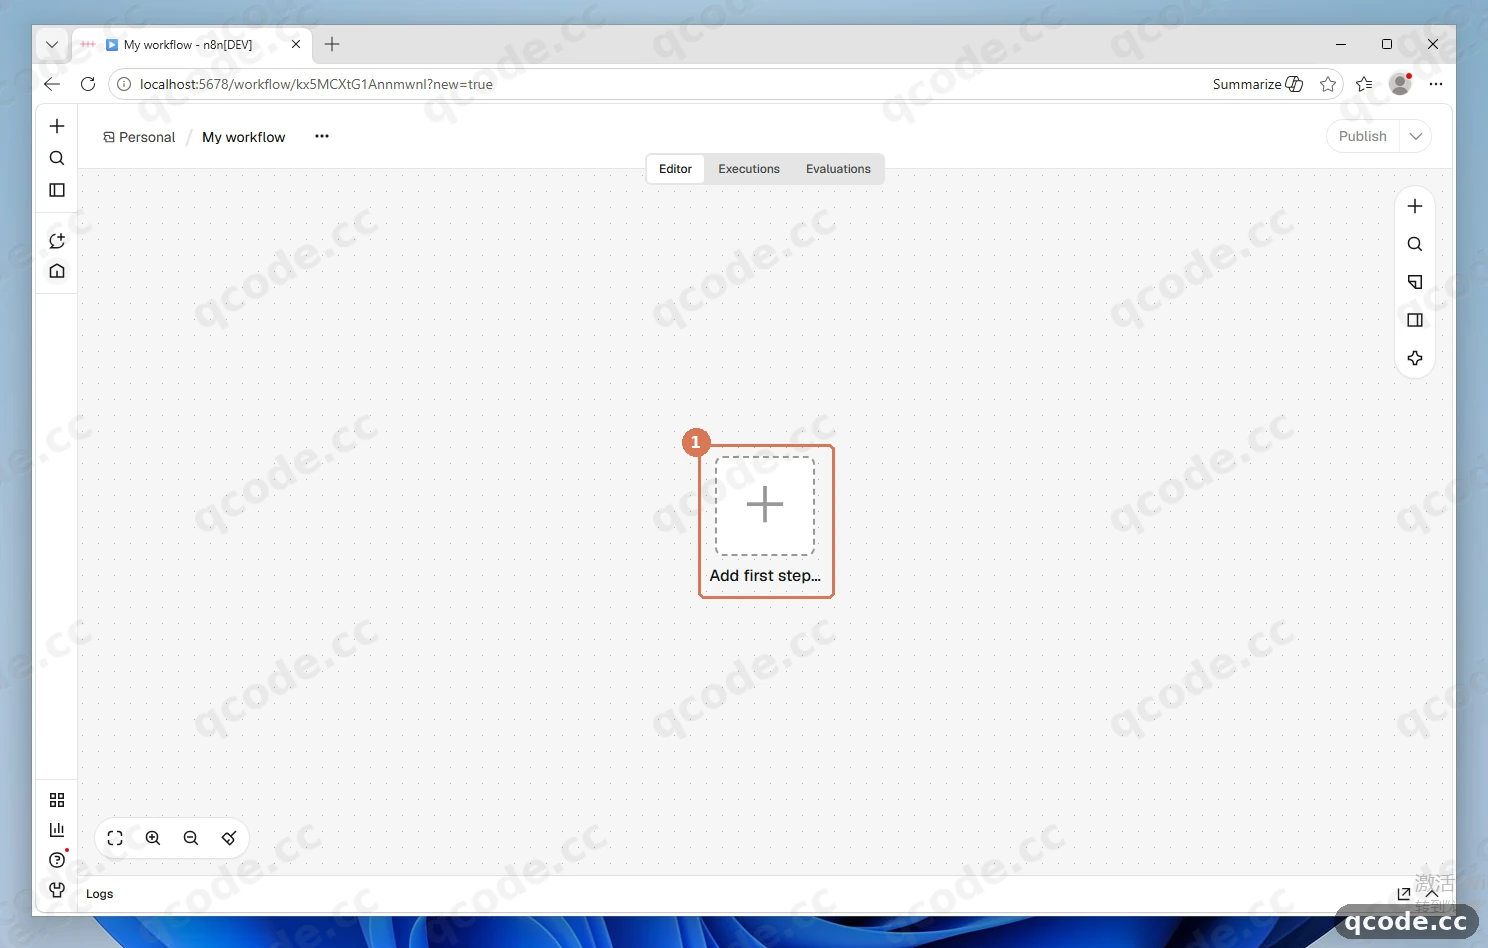
Done right you will see: only one Add first step... square in the middle of the canvas, an empty grey background around it, and the left navigation collapsed.
Search for and select the OpenAI node
Click Add first step... in the middle of the canvas and the node panel slides in on the right. Type OpenAI in the search box at ①, then click the first entry, OpenAI, in ② (it says Message an assistant or GPT... underneath).
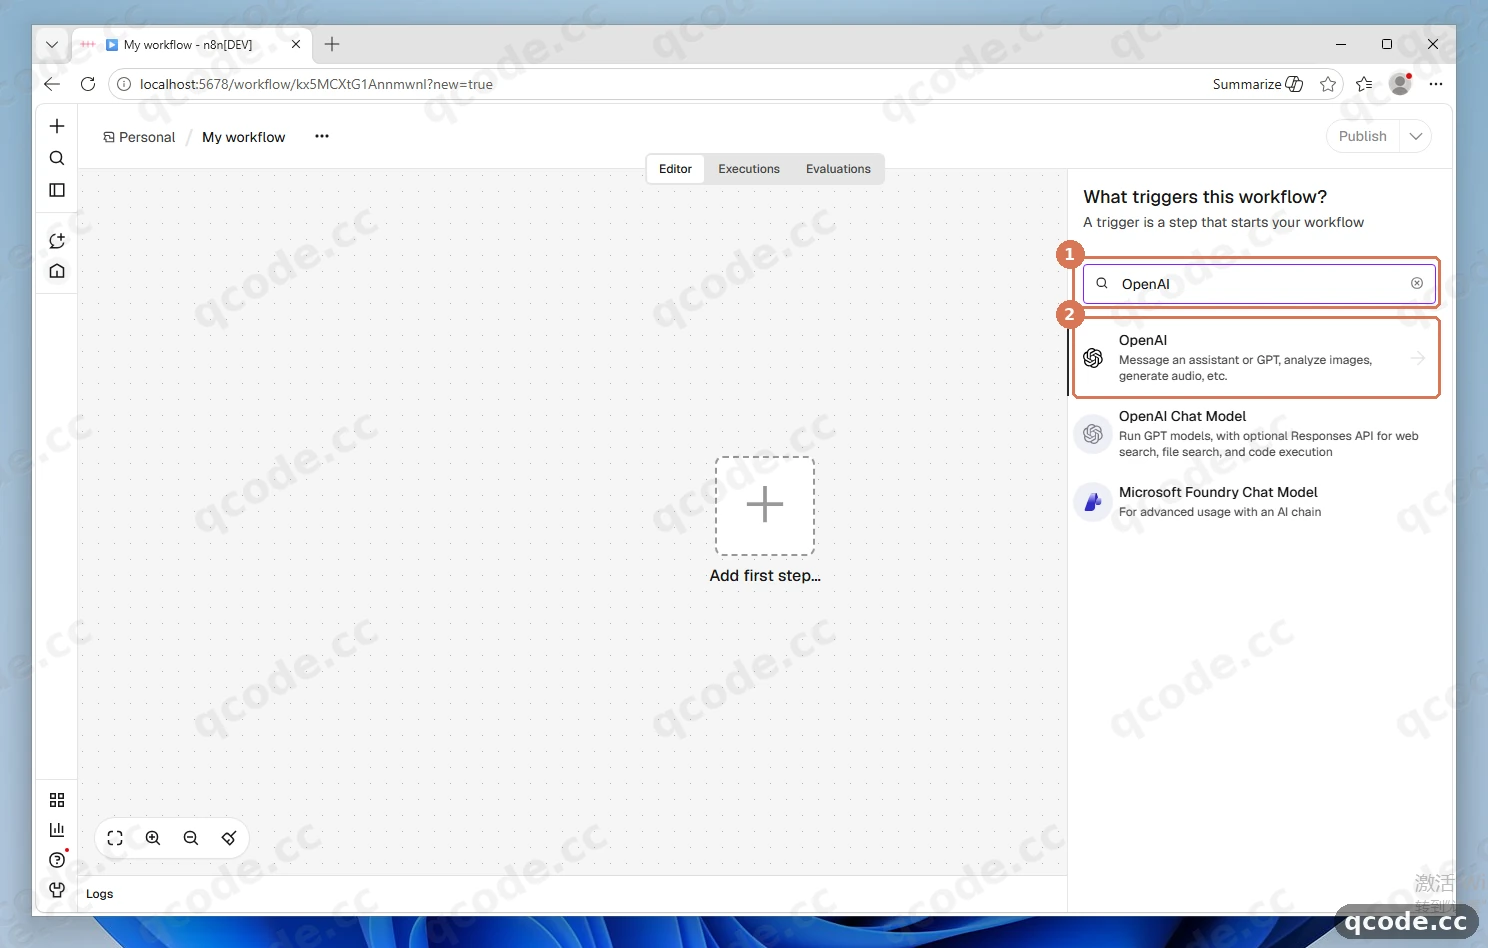
Done right you will see: only a handful of OpenAI-related results left under the search box, with OpenAI as the first one.
Stuck? OpenAI does not show up
Type only the six letters OpenAI in the search box — no other words and no quote marks. The list also holds OpenAI Chat Model and Microsoft Foundry Chat Model; those are not the ones this article uses, so do not click them.
Pick Message a model under TEXT ACTIONS
Clicking OpenAI opens the action list. Scroll down to the TEXT ACTIONS group first, then click Message a model at ①.
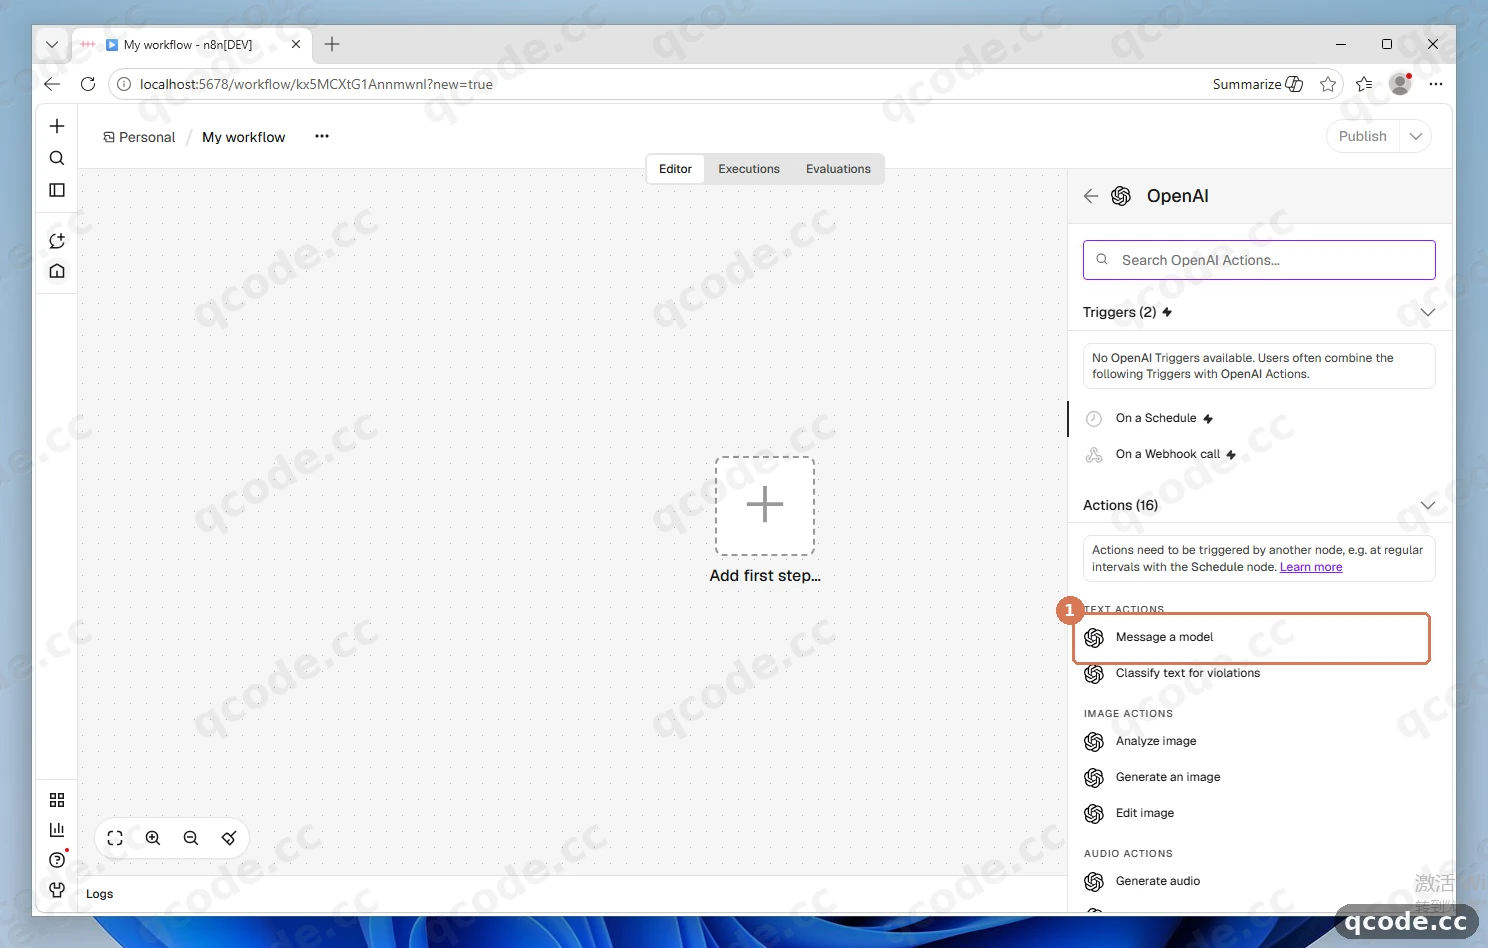
Done right you will see: n8n adding a manual trigger, When clicking 'Execute workflow', on the left of the canvas by itself, with the Message a model parameter window open at the same time.
Click Connect to OpenAI to create the credential first
Leave the parameters alone for now and create the credential first: click Connect to OpenAI at ①. At the same time check the two default values at ② — Resource is Text and Operation is Message a Model — and leaving them as they are is right.
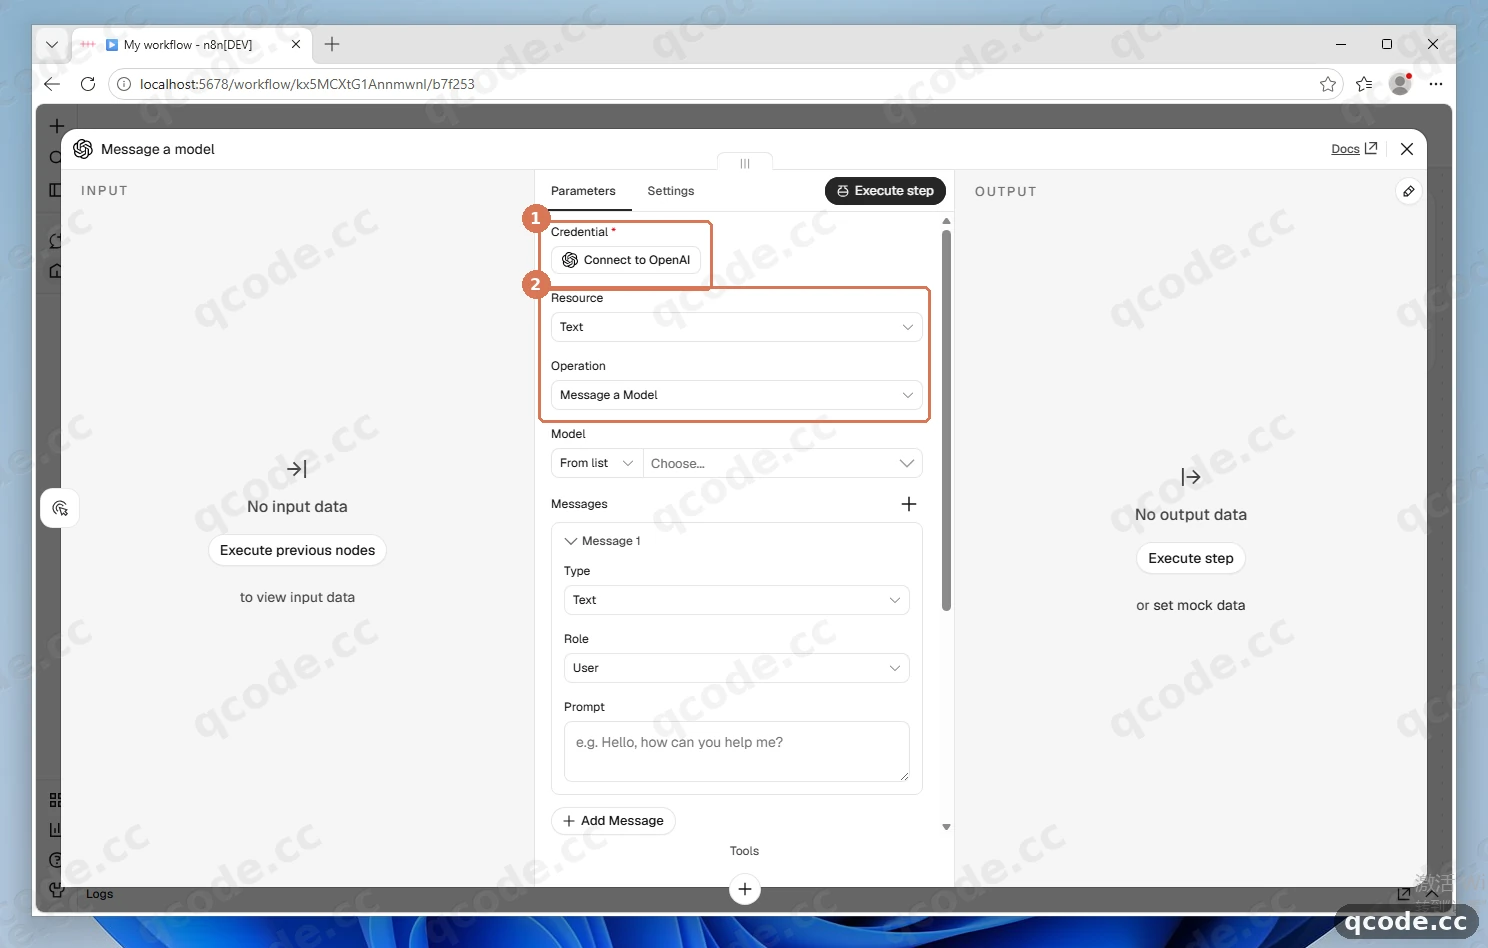
Done right you will see: a credential window titled OpenAI account popping up in the middle of the screen and covering the node on the canvas for now.
Fill in the QCode key and endpoint address
In the credential window: paste your cr_ key into API Key at ① (masked in the screenshot); leave Organization ID empty; press Ctrl+A in Base URL at ② to select and delete the default value, then type https://api.qcode.cc/openai/v1; finally click Save at the top right of ③.
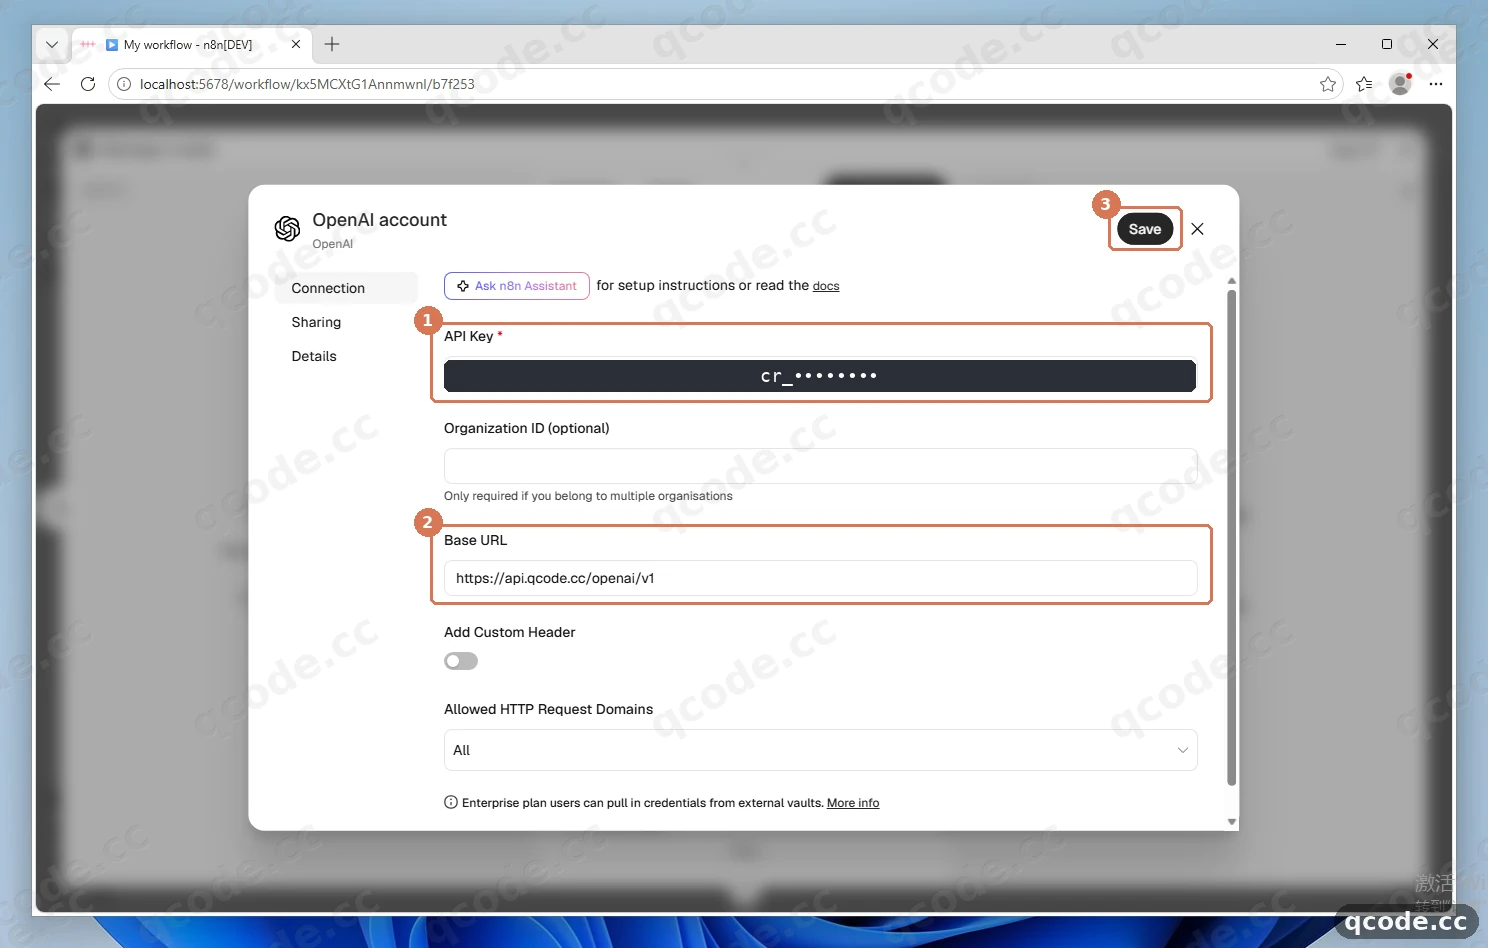
Done right you will see: the Base URL line showing https://api.qcode.cc/openai/v1 in full (ending in /v1, not /v1/v1), and Organization ID empty.
Need an API key?
If you do not have a QCode account yet, Sign up first. If you prefer to pay by usage, buy a Pay-as-you-go Pack first, then create the key in the Dashboard. Copy the whole string that starts with cr_ and paste it into API Key. You can pay by credit/debit card (Visa / Mastercard), Apple Pay / Google Pay, or cryptocurrency — see Payment methods.
Confirm the credential was saved
After you click Save, n8n automatically requests the model list once with this key and the window closes itself when that succeeds. Check two spots: Credential at ① has already selected OpenAI account, and a green toast at the bottom right of ② says Credential successfully created inside your personal space.
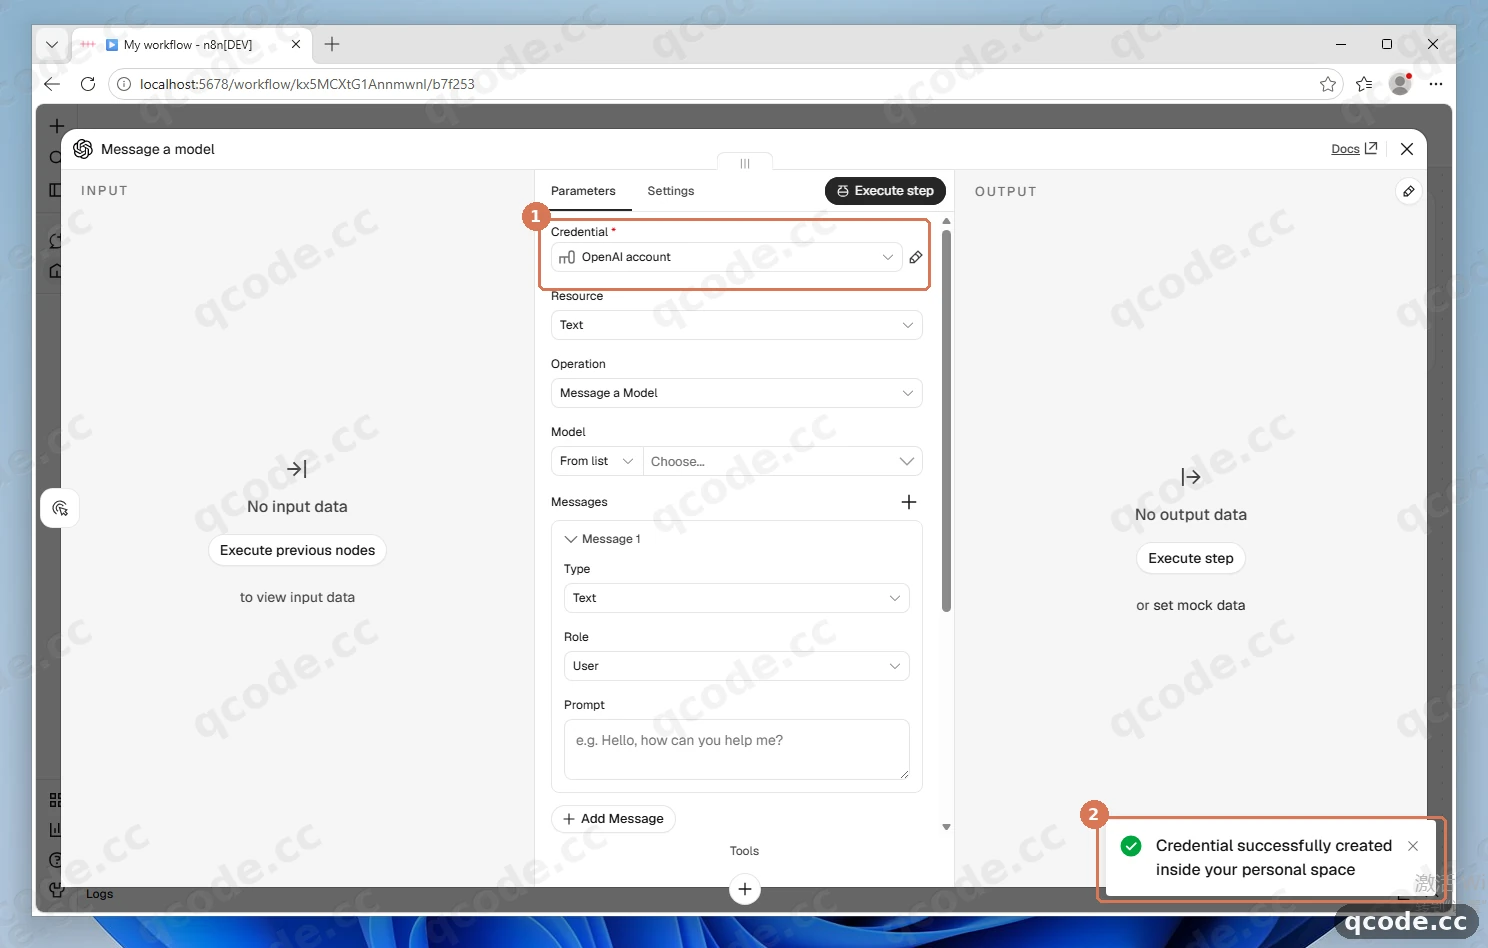
Done right you will see: the green toast popping up from the bottom right, OpenAI account showing in the Credential dropdown, and no red exclamation mark on the node.
Stuck? Saving reports an error, or it says no models were found
Check three things in order: 1) you copied only the string starting with cr_, with no spaces or quote marks around it; 2) Base URL is https://api.qcode.cc/openai/v1 — not /chat/completions and not /v1/v1; 3) Organization ID is empty. Then click Save once more.
Choose gpt-6.2-sol in Model
Click the Choose... dropdown at Model and n8n pulls QCode's model list down by itself. Type gpt-6.2-sol in the search box at ①, then click GPT-6.2-SOL that appears below.
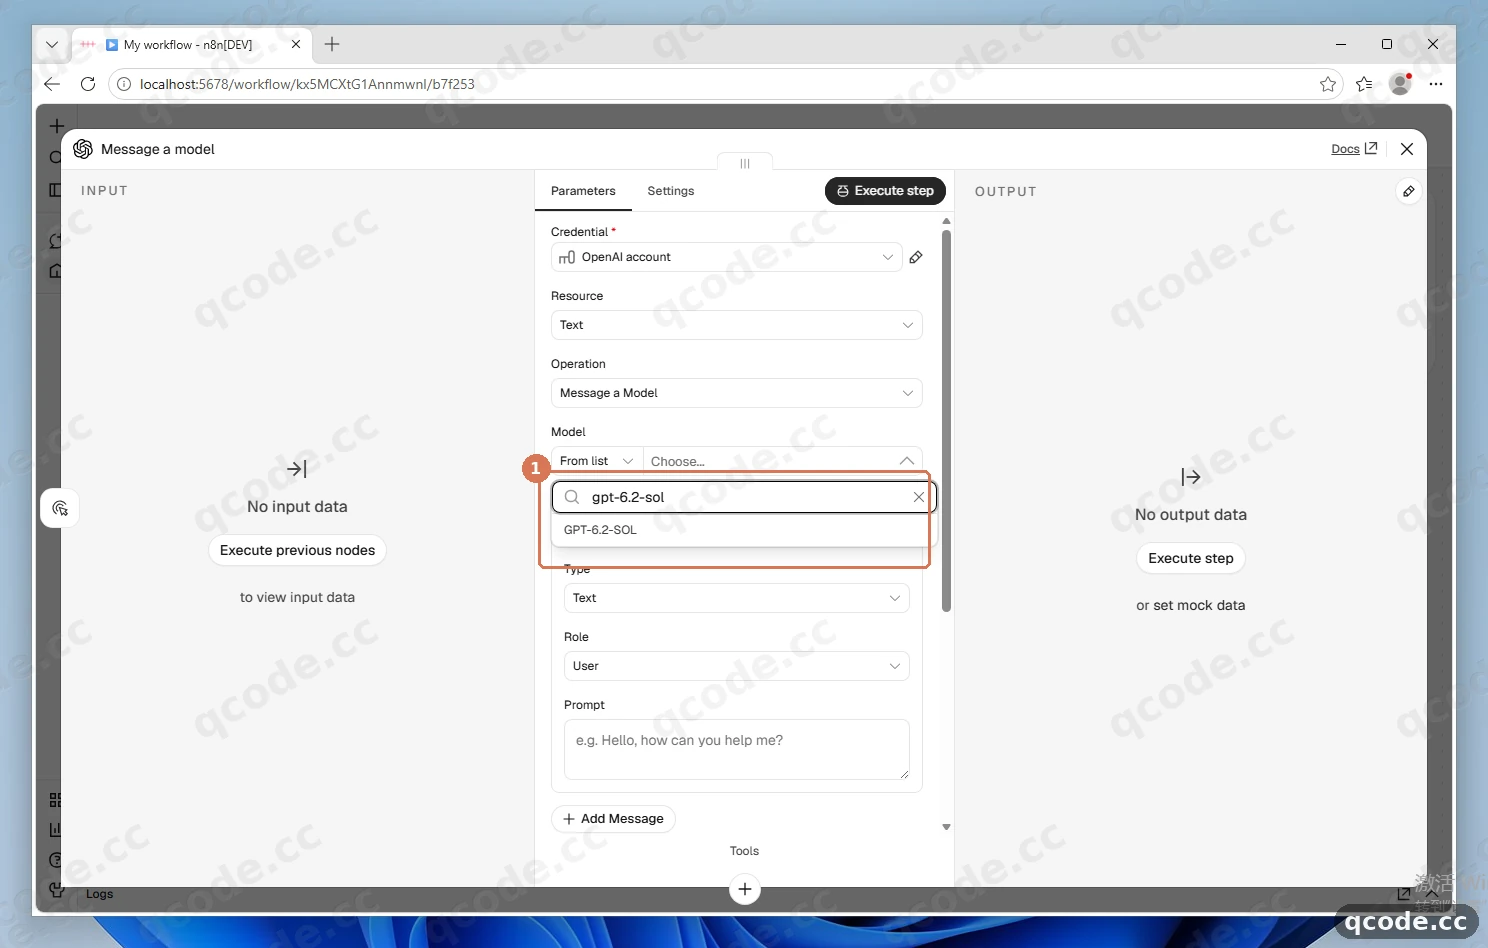
Done right you will see: GPT-6.2-SOL in the Model line, the dropdown collapsed, and other models such as GLM-5.2 and DEEPSEEK-V4-FLASH still visible in the list.
Stuck? The dropdown is empty
That means the Base URL from the previous step was not saved correctly. Go back to Credential, click OpenAI account to edit it again, confirm Base URL is https://api.qcode.cc/openai/v1 and click Save, then close the node window and open it once more so the dropdown reloads the model list.
Write one sentence and execute the node
Type a sentence into the Prompt box at ①, for example Hello, introduce yourself in one sentence. Then click Execute step at ② to send the request and wait a few seconds for the OUTPUT panel at ③.
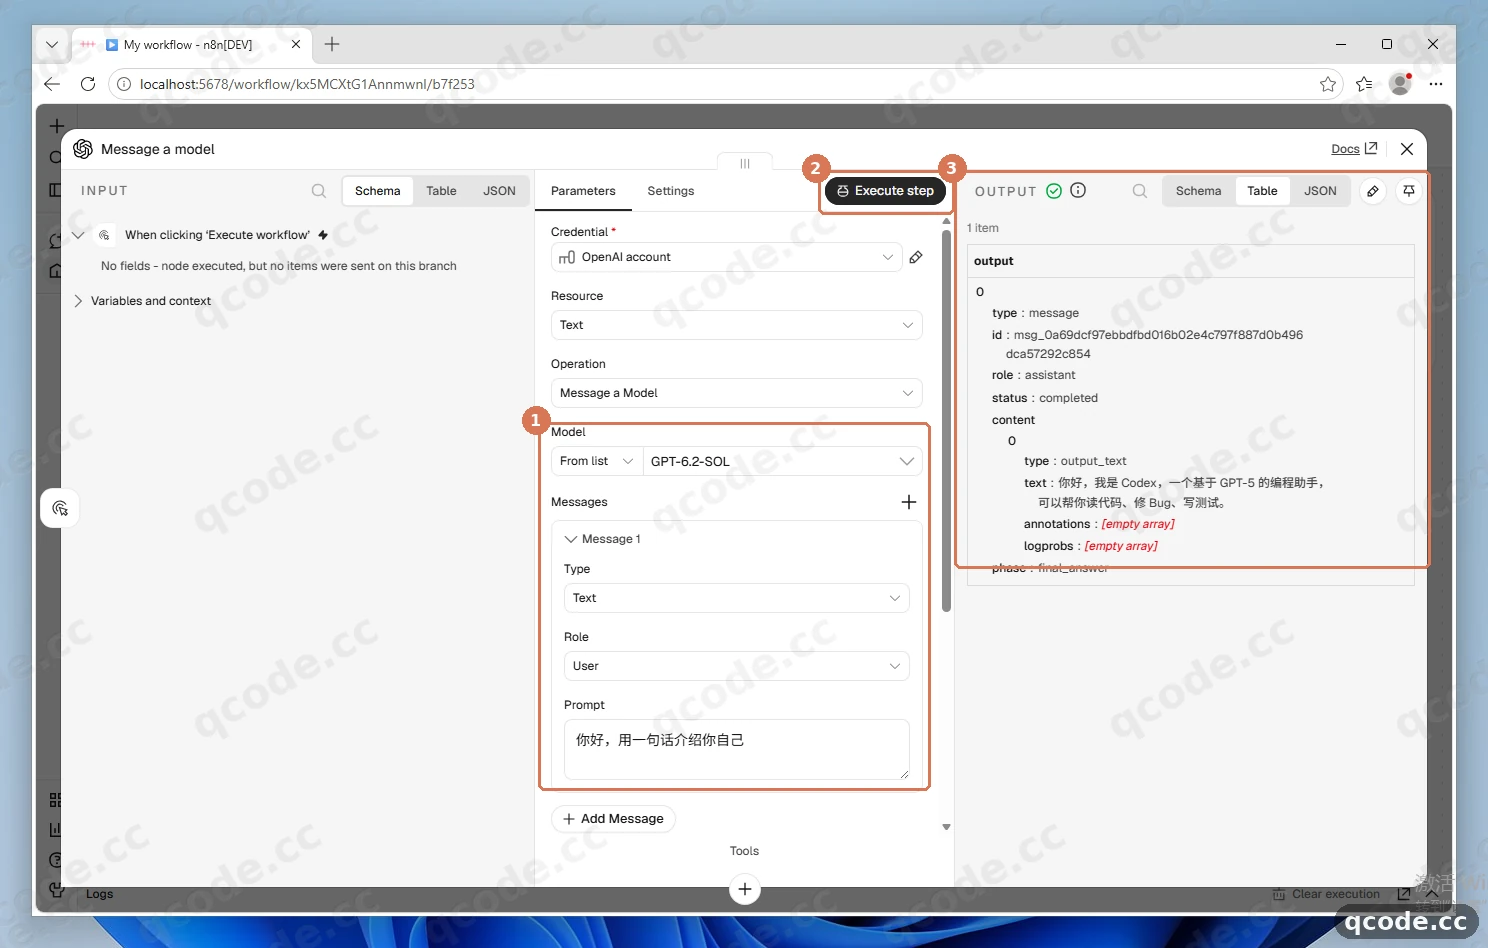
Done right you will see: a green check at the top of OUTPUT, role: assistant and status: completed inside, and the model's reply in the output[0].content[0].text field.
Close the parameter window and save the workflow
Click the × at the top right of the node window to get back to the canvas, then press Ctrl+S to save. Inside ① you can see two nodes: the manual trigger on the left and Message a model on the right, both with green checks.
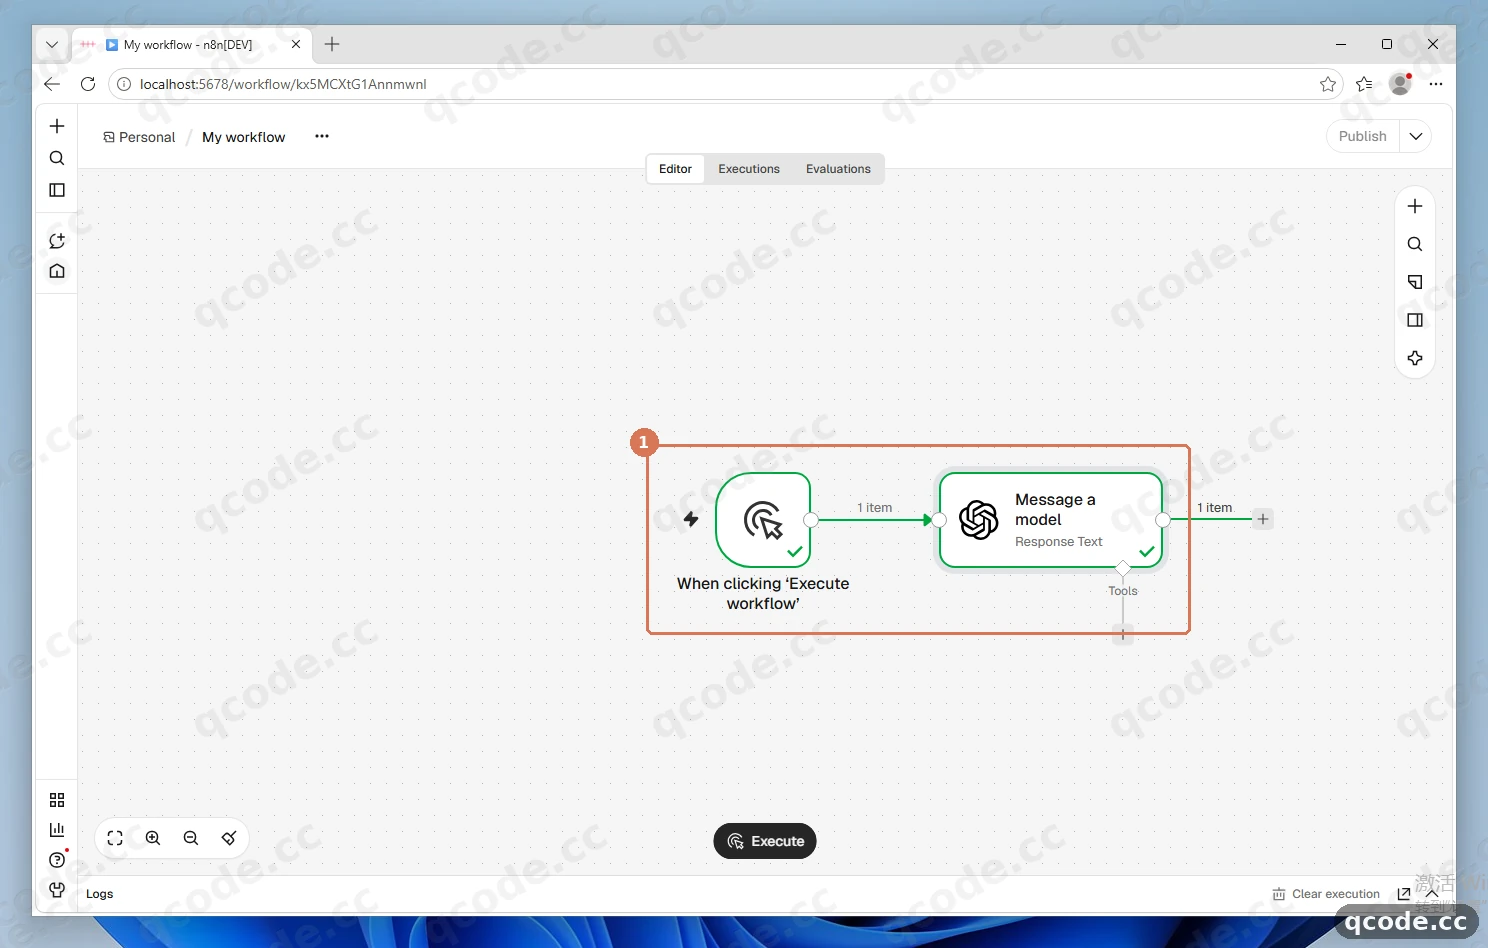
Done right you will see: the two nodes on the canvas joined by one line, both green; after refreshing the page with F5 the workflow is still there.
Verify it works
When all four of these line up, n8n is fully connected to QCode:
node -vprintsv24.22.3andnpm -vprints11.19.1in PowerShell;- the terminal sits on
Editor is now accessible via: http://localhost:5678, and the browser openshttp://localhost:5678; - saving the credential raised no error, and the
Modeldropdown offersGPT-6.2-SOL; - after clicking
Execute step,OUTPUTshows a green check andoutput[0].content[0].textholds the model's reply.
All done
You now have n8n running on your own Windows 11 PC and can get work done with QCode's models. From here you can:
- Endpoints and API formats
- Connecting Chinese models
- Billing
- Troubleshooting
- Next: compare the plans on the pricing page
- Go back to your Dashboard to check usage and balance
Common errors
| Error message | Why | What to do |
|---|---|---|
Error |
The browser opened before n8n's web service, so the local page is not answering yet | Go back to PowerShell and confirm Editor is now accessible via: http://localhost:5678 has been printed, then refresh the page; the address must be http://localhost:5678, not https |
https://api.openai.com/v1 |
The Base URL in the credential is still the official default, so the request never reaches QCode |
Change Base URL to https://api.qcode.cc/openai/v1 and click Save, then close the node window and open it once more so the model list reloads |
Import Workflow? |
You pasted while the cursor was not in an input box, so the canvas took the clipboard content as a workflow to import | Click cancel, open the OpenAI account credential window again, click into the API Key box first and then paste the cr_ key |
sqlite3 |
The Node.js version is too new (v26 for example), so there are no prebuilt binaries for n8n's native dependencies | Go back to Node.js 20.19–24.x (this article uses v24.22.3 LTS), close PowerShell, open it again and run npx n8n once more |
confluent-kafka-javascript |
Same cause: the Node.js version is outside what n8n supports, so the dependency has to be compiled locally | Same as above: switch to v24.22.3 LTS, reinstall and run npx n8n; do not use the v26 that winget installs |
FAQ
What happens when my key expires?
Two cases:
- A personal plan key cannot be renewed when it expires — reopen a plan and use a new key.
- For a pay-as-you-go pack, buy another pack after the key expires and the same key starts working again.
After switching to a new key, go back to the OpenAI account credential window in n8n, replace API Key with the new one and click Save; no other field needs changing.
Can I switch the n8n interface to Chinese?
No. n8n 2.48.7 ships an English-only interface, and it stays English on a Chinese Windows. Every button name in this article is the English original on the screenshots, so just click along; the conversation content itself can be entirely in Chinese.
What if I want to use Claude models?
n8n's OpenAI node only sends requests to an OpenAI-compatible address, and QCode's OpenAI-compatible endpoint https://api.qcode.cc/openai/v1 does not serve the Claude family — which is why this tutorial uses gpt-6.2-sol. Claude goes through the Anthropic-compatible address https://api.qcode.cc/api, with claude-opus-5-5 as the recommended default model and claude-haiku-5-5 as the lightweight alternative.
Does n8n keep working after I close PowerShell?
No. npx n8n runs inside that window, so closing the window stops the service and http://localhost:5678 stops opening. To keep it running in the background, deploy it the official Docker way; for personal use it is enough to reopen that window and run npx n8n again each time — the workflows and credentials you already created stay on your PC and are not lost.
What if port 5678 is already taken?
Start it on another port: run $env:N8N_PORT = 5679; npx n8n in PowerShell, then open http://localhost:5679 in the browser. Note that the old address stops working after the switch.
Other ingress points
QCode has three ingress domains with the same capabilities and only different network routes, and one key works on all of them. If api.qcode.cc is unstable on your network, switch to the Asia node: change Base URL in the credential and click Save.
| Node | OpenAI-compatible (used in this article) | Anthropic-compatible (Claude) |
|---|---|---|
| Global | https://api.qcode.cc/openai/v1 |
https://api.qcode.cc/api |
| Asia | https://asia.qcode.cc/openai/v1 |
https://asia.qcode.cc/api |
| North America / Europe | https://us.qcode.cc/openai/v1 |
https://us.qcode.cc/api |
Node parameters
The items you will use most in the Message a model node:
| Parameter | What to fill in | Notes |
|---|---|---|
Credential |
OpenAI account |
Holds the QCode key and Base URL; several nodes can share one |
Resource |
Text |
Keep the default |
Operation |
Message a Model |
Keep the default |
Model |
gpt-6.2-sol |
The dropdown lists every model QCode offers |
Prompt |
one sentence to ask | What you want to send to the model |
Simplify |
on by default | Turn it off to see the full raw response structure |
The output path is output[0].content[0].text, alongside the role: assistant, status: completed and phase: final_answer fields. A later node that wants this sentence just references that path.
Next step: let it run on its own schedule
Once it works, swap the When clicking 'Execute workflow' trigger on the left for another trigger and you no longer have to click by hand:
- Run on a schedule: delete the manual trigger, search
Schedule Triggeron the canvas, and set the time by hour or by day; - Run when a message arrives: switch to the
Webhooktrigger; n8n gives you a local address, and any other program can call it to trigger the workflow; - Handle the result: hang a
Setnode afterMessage a modelto storeoutput[0].content[0].textas a field, then feed it into email, a spreadsheet or a chat tool.
Related documentation
- Endpoints and API formats — how protocols map to model families
- Connecting Chinese models — Chinese model IDs available on the OpenAI-compatible endpoint
- Billing — how usage is counted
- Troubleshooting — a round-up of common problems
Get started with QCode
One API key for Claude Code, Codex and more — billed per token, per-model prices on qcode.cc/models