Jan Desktop + QCode on Windows 11: setup guide (11 screenshots)
Set up Jan Desktop 0.8.8 with QCode on Windows 11 in 11 screenshots: install Jan, add a custom provider, fetch gpt-6.2-sol, and send your first chat.
Need an API key? Sign up →Endpoints & base URLs →
On This Page
- Download and install Jan
- Copy your QCode API key
- Download the Windows installer
- Run the Jan installer
- Skip the local model download and open Settings
- Open the custom provider form
- Choose the API format and name the provider
- Enter the Base URL, paste your API key, and click Create
- Fetch the QCode model list
- Start a new chat and pick gpt-6.2-sol
- Type a test message and send it
- Confirm the first reply
- Verify it works
- Common errors
- FAQ
- Optional: add Claude models (Anthropic-compatible)
- Alternative access points
- Related docs
Short answer: In Jan’s Settings → MODEL PROVIDERS, click the + button to open Add Custom Provider, pick OpenAI-compatible, set Provider name to QCode, set Base URL to https://api.qcode.cc/openai/v1, paste your cr_ API key, click Create, then refresh Models and select gpt-6.2-sol.
| Item | Fill in |
|---|---|
| API format | OpenAI-compatible |
| Provider name | QCode |
| Base URL | https://api.qcode.cc/openai/v1 |
| API key | cr_xxxxxxxx |
| Recommended model | gpt-6.2-sol |
Checked on 2026-11-22 · Jan 0.8.8 · Windows 11
Follow the 11 screenshots below on Windows 11 to install Jan Desktop, skip the multi-GB local model download, connect your QCode API key as a custom provider, and receive your first reply from gpt-6.2-sol. You can also add a second provider for claude-opus-5-5 using the same QCode key.
Before the first screenshot, check that you have these ready:
- A 64-bit Windows 10 or Windows 11 PC with internet access
- At least 1 GB of available disk space for the 545 MB installer and the Jan app (you do not need to download a local model to use QCode)
- Access to GitHub Releases (
github.com) orjan.aito download the installer, plusapi.qcode.ccfor chat requests - A QCode API key copied from your dashboard (
cr_xxxxxxxx). No account yet? Sign up first, pick a plan on the pricing page, then create the key in your Dashboard.
Download and install Jan
Jan’s Windows download button links directly to GitHub Releases. Pick the tab that matches where you are:
Open jan.ai/download and click Windows → x64 for standard Intel and AMD PCs (choose ARM64 only on Snapdragon / ARM PCs). If the site is temporarily unreachable, download Jan_0.8.8_x64-setup.exe directly from GitHub Releases v0.8.8.
Alternative install options: install Jan from the Microsoft Store, or run winget install Jan.Jan in PowerShell.
There is no official China mirror for Jan. Open GitHub Releases v0.8.8 directly in your browser and download Jan_0.8.8_x64-setup.exe (about 545 MB) for standard Intel and AMD PCs. If the official page jan.ai/download times out or the download stalls, wait a few minutes and retry, or switch networks.
You can also search for Jan in the Microsoft Store or install it from PowerShell with winget install Jan.Jan (store and winget versions may lag behind GitHub Releases).
Copy your QCode API key
Open the QCode console in your browser and click ① Sign in to log in to your account. After signing in, open API Key Management, click the eye icon to reveal your cr_ key, and click Copy. Keep this key ready for the provider form later.
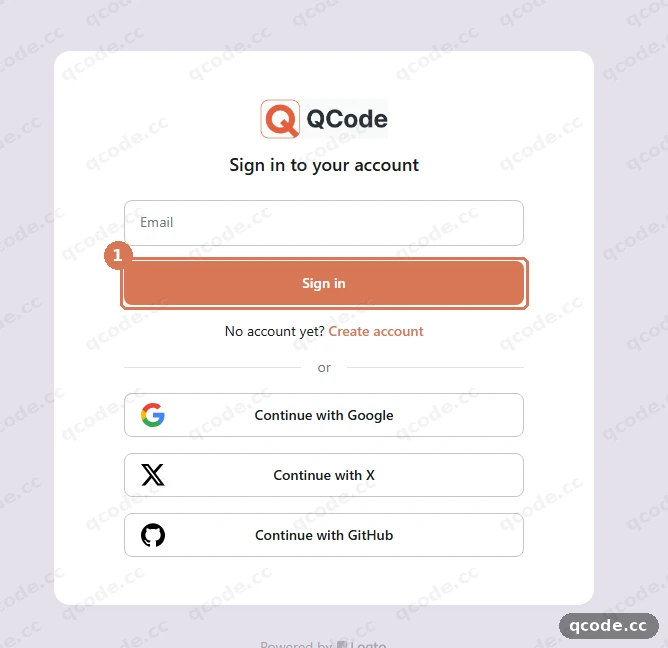
Done right you will see: after clicking ① Sign in and opening your dashboard, you have a single key starting with cr_ copied to your clipboard with no extra spaces.
Download the Windows installer
Open GitHub Releases v0.8.8 (or jan.ai/download) and scroll down to the Assets list. Click ① Jan_0.8.8_x64-setup.exe (545 MB) for standard Intel and AMD Windows PCs. Only click ② Jan_0.8.8_arm64-setup.exe (320 MB) if your PC uses an ARM64 processor.
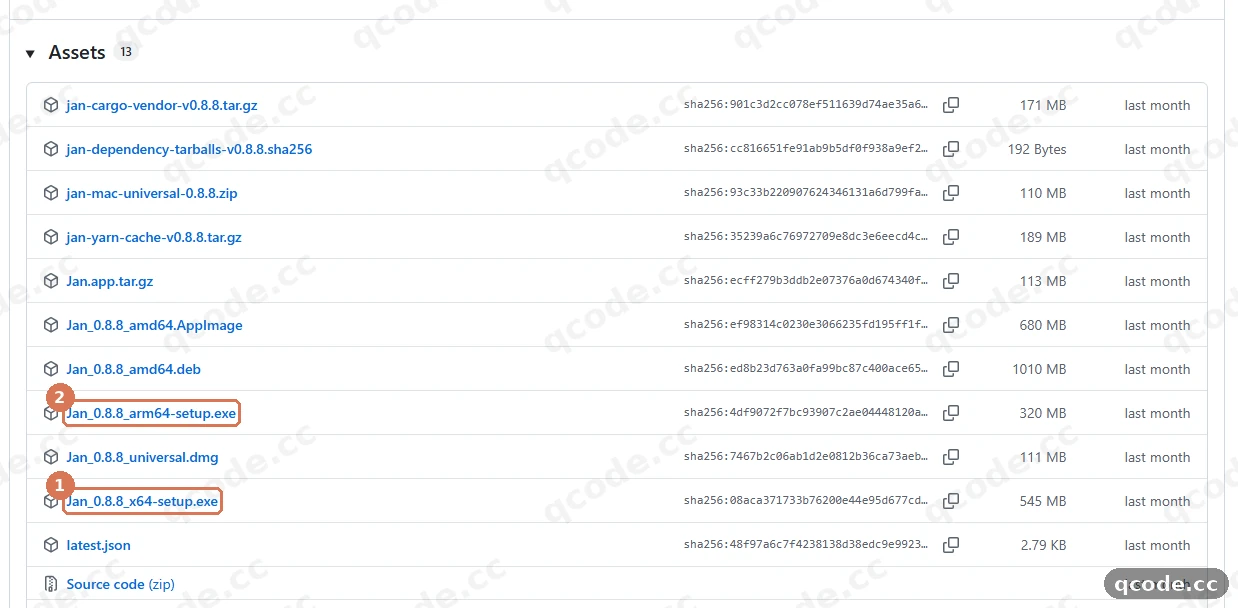
Stuck? The Assets list is empty or the installer will not run
GitHub loads the Assets list after the rest of the page. Scroll to the bottom and wait a few seconds before reloading. If you double-click the installer and nothing happens or Windows says the app cannot run on your PC, you likely downloaded arm64-setup.exe by mistake — go back and download Jan_0.8.8_x64-setup.exe instead.
Done right you will see: ① Jan_0.8.8_x64-setup.exe finishes downloading to your Downloads folder at roughly 545 MB (or ② Jan_0.8.8_arm64-setup.exe on an ARM PC).
Run the Jan installer
Double-click Jan_0.8.8_x64-setup.exe in your Downloads folder. Jan installs for your current user into %LOCALAPPDATA%\Programs\Jan with no folder picker and no Next / Finish screens — a single Jan Setup window shows Installing, then closes and launches Jan automatically.
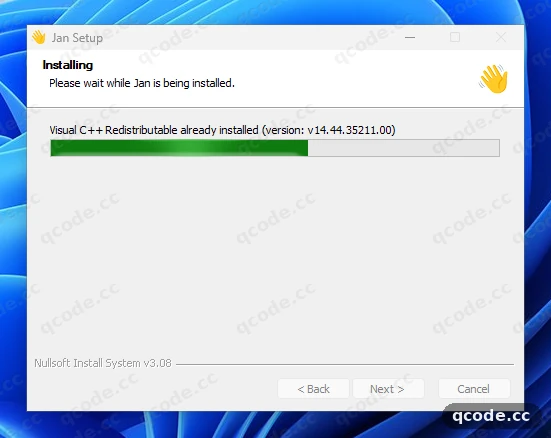
Stuck? Windows asks for administrator permission
Jan itself does not require administrator rights. However, on a fresh Windows PC that does not yet have Microsoft Visual C++ 2015–2022 Redistributable (x64) installed, the installer downloads that runtime first and triggers one User Account Control (UAC) prompt. Click Yes to finish installing the runtime, and Jan Setup will continue automatically.
Done right you will see: the Installing bar completes, the Jan Setup window closes on its own, and the Jan desktop app opens.
Skip the local model download and open Settings
On first launch, Jan runs a 4-step welcome flow: click Let's start, wait for the local engine check and click Continue, then choose Deny (or your preference) on the telemetry screen. On STEP 4 OF 4 — Your first model, do not click ① Download if you only want to use QCode cloud models — click ② Settings in the left sidebar instead to skip straight to settings.
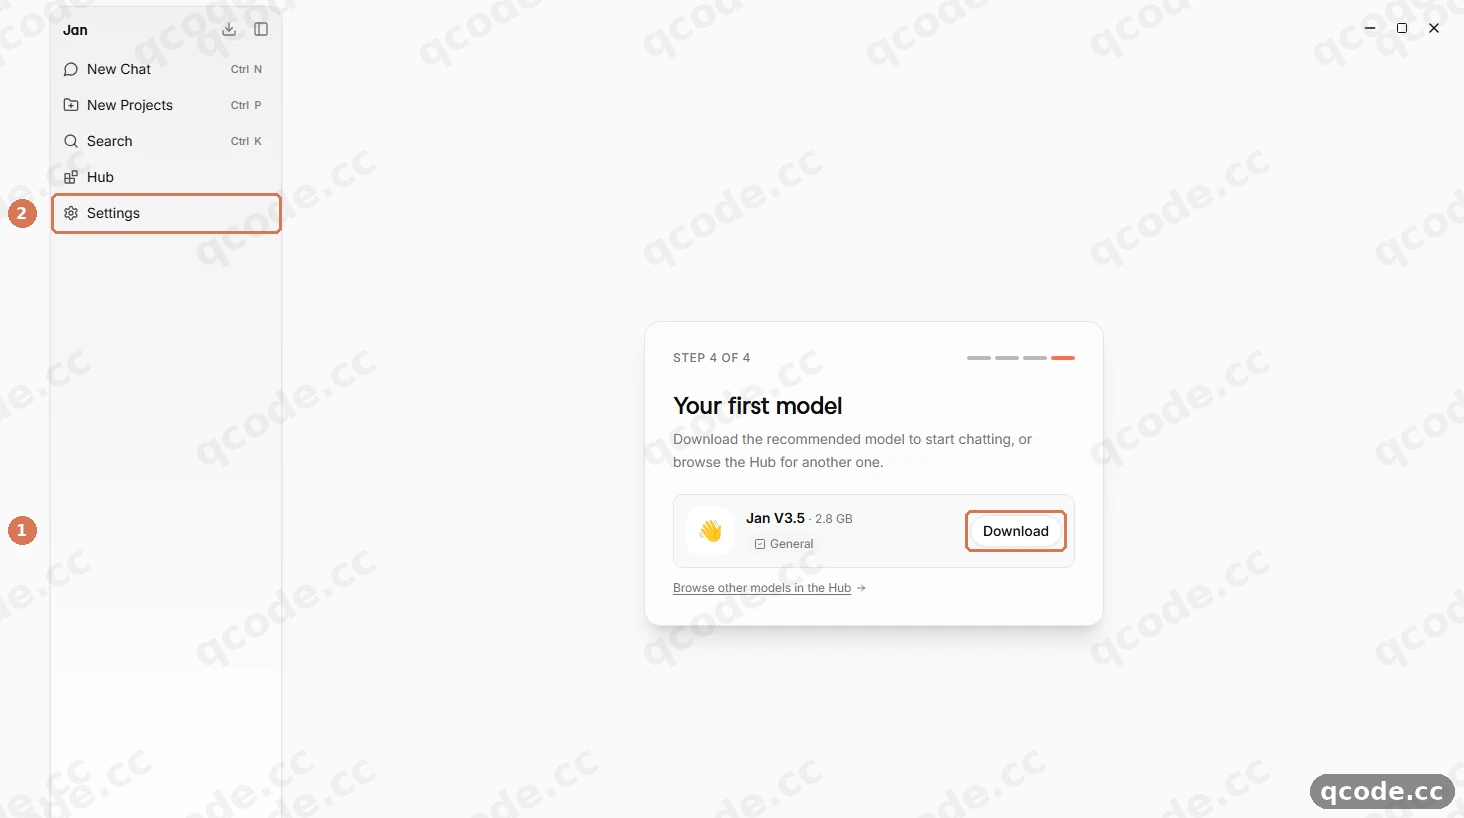
Stuck? I clicked Download by accident
You do not need to wait for the local model download to finish. Click Settings in the left sidebar right away to configure QCode; you can cancel or delete the local model later under Hub or Llama.cpp to reclaim disk space.
Done right you will see: skipping ① Download and clicking ② Settings opens the Settings view without downloading a multi-GB local model.
Open the custom provider form
In the Settings sidebar, locate ① MODEL PROVIDERS (which groups built-in LOCAL and REMOTE providers). Click the ② + icon button directly to the right of the MODEL PROVIDERS heading to add a custom provider.
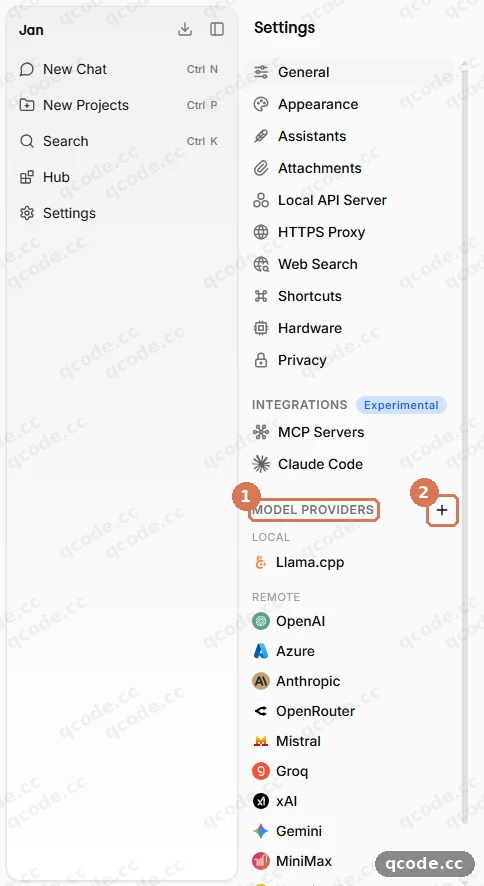
Done right you will see: clicking ② + next to ① MODEL PROVIDERS opens the Add Custom Provider dialog.
Choose the API format and name the provider
In the Add Custom Provider dialog, select ① OpenAI-compatible under API format, and type QCode into ② Provider name (Provider name (e.g. my-llm-server)). Keep the dialog open for the next step.
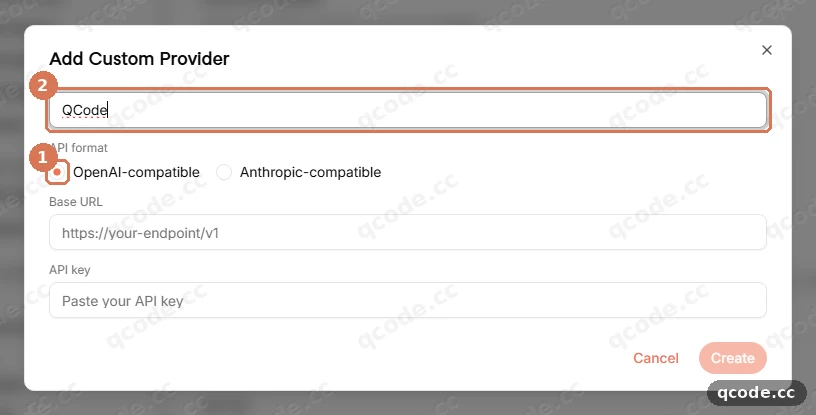
Done right you will see: ① OpenAI-compatible is selected and ② Provider name reads QCode.
Enter the Base URL, paste your API key, and click Create
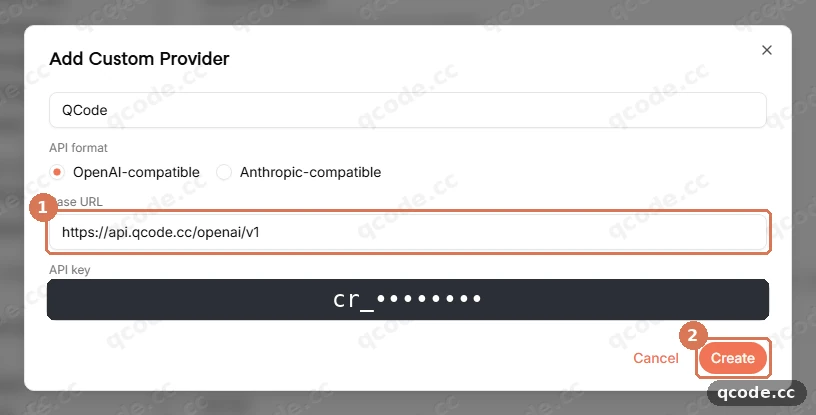
In ① Base URL (https://your-endpoint/v1), enter https://api.qcode.cc/openai/v1 — keep the /v1 suffix with no trailing slash. In the API key field (Paste your API key) right below it, paste your cr_ key from the QCode Dashboard, then click ② Create at the bottom right.
Need an API Key?
If you do not have a QCode account yet, Sign up first. To get started without a monthly plan, buy a pack on the Pay-as-you-go packs page, then create your key in the Dashboard and copy the string starting with cr_. You can pay by credit or debit card (Visa / Mastercard) — see Payment methods.
Stuck? Requests fail with 404 or 401 after saving
Check ① Base URL: for OpenAI-compatible, it must be exactly https://api.qcode.cc/openai/v1 (omitting /v1 causes 404). If you get 401, clear API key and re-copy your cr_ key from the Dashboard without leading spaces or quotation marks.
Done right you will see: ① Base URL reads https://api.qcode.cc/openai/v1, the API key box shows your pasted key, and clicking ② Create saves the provider and opens the QCode provider page.
Fetch the QCode model list
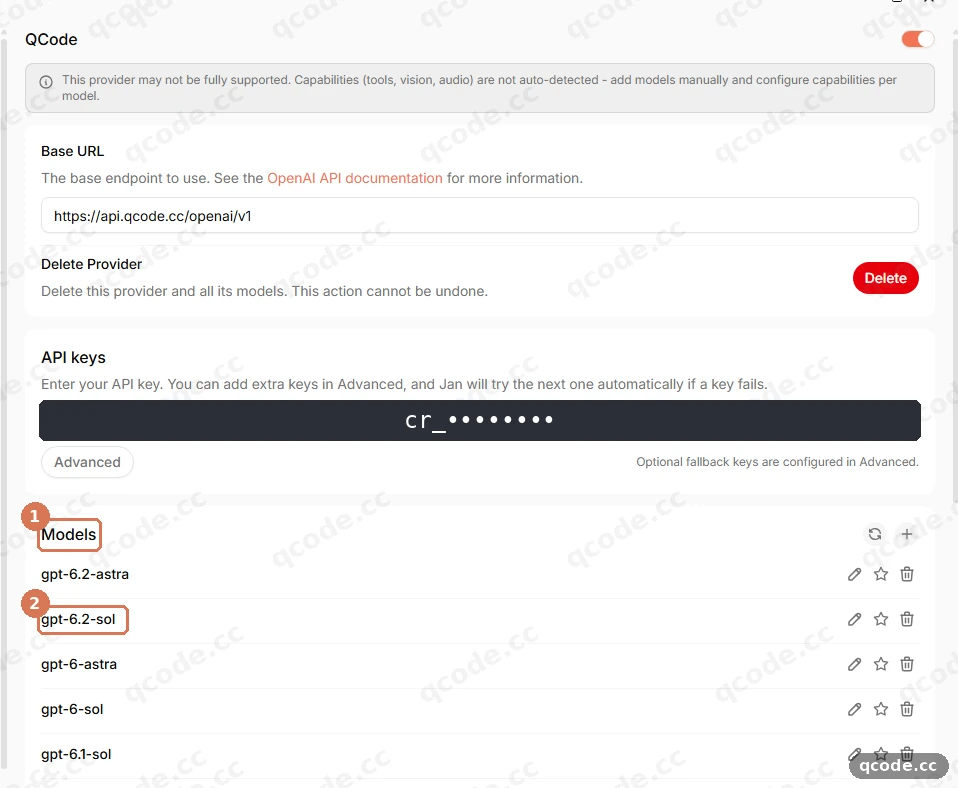
After clicking Create, QCode appears under REMOTE in the left sidebar and opens automatically. At first, ① Models displays No model found (and a grey banner at the top notes This provider may not be fully supported... — you can ignore that banner). Click the refresh icon on the right side of the Models header (the middle icon between search and +) to load models from QCode, including ② gpt-6.2-sol.
Stuck? Models still says No model found after refreshing
Confirm that Base URL ends with /v1 (https://api.qcode.cc/openai/v1) and that your cr_ key has no extra spaces, then click the refresh icon again. You can also click the + button next to the refresh icon and enter gpt-6.2-sol manually.
Done right you will see: under ① Models, the list populates with QCode models and ② gpt-6.2-sol is visible.
Start a new chat and pick gpt-6.2-sol
Click New Chat (Ctrl N) in the left sidebar. Click Select a model at the top left of the chat window to open the model dropdown, find the ① QCode group, and click ② gpt-6.2-sol.
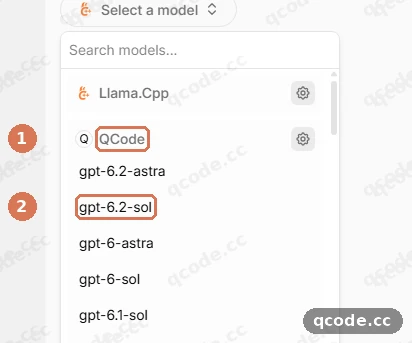
Done right you will see: the dropdown closes after you pick ② gpt-6.2-sol under ① QCode, and the top-left model selector displays gpt-6.2-sol.
Type a test message and send it
Verify that the top-left picker shows gpt-6.2-sol. Click inside ① Ask me anything..., type a short message such as Hello, please introduce yourself in one short sentence, and click the ② orange arrow button at the bottom right (or press Enter).
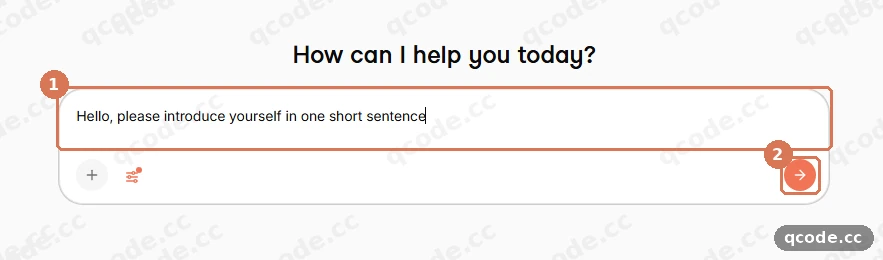
Done right you will see: your prompt is typed in ① Ask me anything... and clicking ② sends it immediately.
Confirm the first reply
Wait a few seconds for the model to respond. Your prompt appears in ① the user message bubble, gpt-6.2-sol streams its reply underneath, and ② the tokens/sec status line appears below the reply.
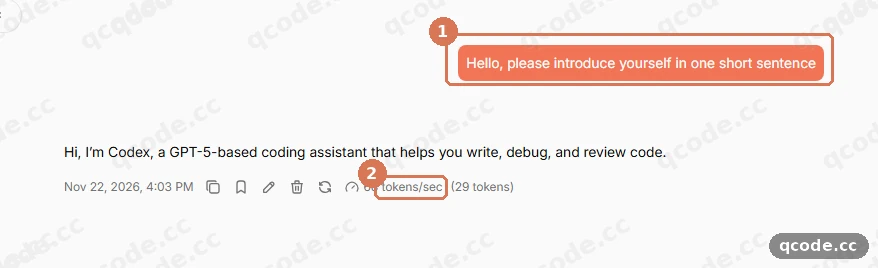
Done right you will see: ① your message bubble, a normal answer from gpt-6.2-sol, and ② a tokens/sec metric underneath with no red error banner.
Verify it works
Your Jan setup is ready when all three checks pass:
- Settings → MODEL PROVIDERS → REMOTE lists
QCode, and its Models section includesgpt-6.2-sol. - A new chat with
gpt-6.2-solreturns a normal reply within a few seconds and shows atokens/secmetric underneath. - Your Dashboard (or
probe.qcode.cc) records the request under yourcr_key.
All done
You now have Jan Desktop connected to QCode on Windows 11 and chatting with gpt-6.2-sol. From here you can:
- Endpoints and API paths — OpenAI-compatible and Anthropic-compatible addresses
- Model selection — available QCode models and recommended defaults
- Billing — how token usage and plans work
- Troubleshooting — fixes for connection and key issues
- Compare the plans on the pricing page
- Go back to your Dashboard to check usage and balance
Common errors
| Error message | Why | What to do |
|---|---|---|
No model found |
Right after clicking Create, Jan opens the new custom provider page without populating its model list | Click the refresh icon on the right side of the Models header to fetch models from QCode, or click + to add gpt-6.2-sol manually |
This provider may not be fully supported... |
Jan displays this grey notice on every custom provider that is not a built-in preset | Ignore the notice; as long as Base URL and your cr_ key are valid, QCode works normally once you refresh Models |
model_not_available_on_endpoint |
A Claude model (such as claude-opus-5-5) was requested on an OpenAI-compatible provider, or a GPT model was sent to an Anthropic-compatible provider |
Use OpenAI-compatible (https://api.qcode.cc/openai/v1) for gpt-6.2-sol, and add a separate Anthropic-compatible provider (https://api.qcode.cc/api) for claude-sonnet-5-5 |
404 |
The OpenAI-compatible Base URL is missing /v1 (https://api.qcode.cc/openai), or an Anthropic-compatible Base URL includes an extra /v1 (https://api.qcode.cc/api/v1) |
Set Base URL to https://api.qcode.cc/openai/v1 for OpenAI-compatible, or https://api.qcode.cc/api (no /v1) for Anthropic-compatible |
401 |
The API key is missing, expired, or pasted with extra spaces or quotation marks | Return to your QCode Dashboard, click Copy on your cr_ key, clear API key in Jan, and paste it cleanly |
FAQ
How do I use Claude models in Jan?
Claude models use QCode’s Anthropic-compatible endpoint rather than the OpenAI-compatible endpoint. In Settings → MODEL PROVIDERS, click + again to add a second custom provider with API format set to Anthropic-compatible and Base URL set to https://api.qcode.cc/api (do not add /v1), paste the same cr_ key, refresh Models, and pick claude-opus-5-5.
Can I use QCode in Jan without downloading a local model?
Yes. On first launch, skip the Download button on STEP 4 OF 4 — Your first model and click Settings in the left sidebar. Jan works purely with QCode cloud models without storing a multi-GB local model on your drive.
What happens when my QCode API key expires?
Renewal behavior depends on the plan type:
- Personal plans: an expired personal plan key cannot be renewed. Purchase a new plan, generate a new
cr_key in your Dashboard, and replace the API key value inside your QCode provider settings in Jan. - Pay-as-you-go packs: when a pay-as-you-go pack expires, buying another pack automatically restores the same
cr_key. You do not need to change anything in Jan.
How do I switch Jan’s interface language?
Open Settings → General → Language and choose your preferred language from the dropdown menu.
Can I switch to a closer QCode access point?
Yes. Replace api.qcode.cc in Base URL with asia.qcode.cc or us.qcode.cc while keeping the exact same path suffix (/openai/v1 for OpenAI-compatible, /api for Anthropic-compatible).
Optional: add Claude models (Anthropic-compatible)
If you want both GPT and Claude models inside Jan, keep your QCode OpenAI-compatible provider for gpt-6.2-sol and add a second custom provider for Claude:
| Item | Fill in |
|---|---|
| API format | Anthropic-compatible |
| Provider name | QCode Claude |
| Base URL | https://api.qcode.cc/api |
| API key | cr_xxxxxxxx (the same QCode key) |
| Recommended model | claude-opus-5-5 |
Jan appends /v1/messages automatically for Anthropic-compatible providers, so Base URL must stop at /api (adding /v1 causes 404). After clicking Create, click the refresh icon next to Models to list claude-opus-5-5.
Alternative access points
All three QCode domains share identical model capabilities and differ only in network routing:
| Region | OpenAI-compatible Base URL | Anthropic-compatible Base URL |
|---|---|---|
| Default (global) | https://api.qcode.cc/openai/v1 |
https://api.qcode.cc/api |
| Asia | https://asia.qcode.cc/openai/v1 |
https://asia.qcode.cc/api |
| North America | https://us.qcode.cc/openai/v1 |
https://us.qcode.cc/api |
Related docs
- Endpoints and API paths — full reference for QCode protocols and access points
- Model selection — choosing between
gpt-6.2-solandclaude-opus-5-5 - Billing — personal plans and pay-as-you-go packs
- Payment methods — card payment options
- Troubleshooting — diagnosing 401, 404, and endpoint mismatches
Get started with QCode
One API key for Claude Code, Codex and more — billed per token, per-model prices on qcode.cc/models