Msty Studio + QCode on Windows: connect GPT and Claude (10 screenshots)
Set up Msty Studio 3.0.1 with QCode on Windows 11 in 10 screenshots: install, add Open AI Compatible, pick gpt-6.2-sol, and send your first chat.
Need an API key? Sign up →Endpoints & base URLs →
On This Page
- Download and install Msty Studio
- Download the Windows installer
- Install Msty Studio
- Skip the first-launch onboarding
- Open Model Providers in Settings
- Choose Open AI Compatible
- Enter your API key and Inference Endpoint
- Select a model, name the provider, and save
- Confirm the saved provider and return to chat
- Pick QCode in the model selector
- Send a test message
- Verify it works
- Common errors
- FAQ
- Optional: use Claude models with the built-in Claude provider
- Regional endpoints and other models
- Related docs
Short answer: In Msty Studio 3.0.1, open Settings → Model Providers → + Add Provider, choose Open AI Compatible, paste your cr_ API key, set Inference Endpoint to https://api.qcode.cc/openai/v1, click Fetch Models, check gpt-6.2-sol, name the provider QCode, and click Save. For Claude models, add a separate built-in Claude provider with Inference Endpoint set to https://api.qcode.cc/api/v1.
| Item | Fill in |
|---|---|
| Provider | Open AI Compatible |
| Inference Endpoint | https://api.qcode.cc/openai/v1 |
| API Key | cr_xxxxxxxx |
| Model | gpt-6.2-sol |
| Built-in Claude endpoint | https://api.qcode.cc/api/v1 |
Checked on 2026-11-22 · Msty Studio 3.0.1 · Windows 11
Follow the 10 screenshots below on Windows 11 to install Msty Studio 3.0.1, connect QCode through the Open AI Compatible provider, select gpt-6.2-sol, and receive your first reply. You do not need a Msty account or an Aurum license, and you can also add the built-in Claude provider at the end of this guide.
Before the first screenshot, confirm that you have these ready:
- A 64-bit Windows 10 or Windows 11 PC (Intel or AMD for
x64, or Windows 11ARM64for ARM devices) that can openmsty.aiand reachapi.qcode.cc - Roughly 1.1 GB of available disk space (~228 MB for the installer plus ~859 MB for the app in your user folder — no administrator rights are needed)
- No Msty account or Aurum license is required — both Open AI Compatible and the built-in Claude provider work out of the box
- A QCode API key copied from your dashboard (
cr_xxxxxxxx). No account yet? Sign up first, pick a plan on the pricing page, then create the key in your Dashboard.
Download and install Msty Studio
Msty Studio is distributed only through its official website and installer CDN (there are no GitHub Releases, winget packages, or Microsoft Store builds). Pick the tab that matches your region:
Open msty.ai/products/studio/ and click Download Studio (which auto-detects Windows x64), or open Choose installer to pick Windows (x64) (Windows 10/11 · Intel or AMD, MstyStudio_x64.exe, ~228 MB) or Windows (ARM64) (Windows 11 · ARM64, MstyStudio_arm64.exe).
Open the official download page msty.ai/products/studio/ in your browser. Click Choose installer next to Download Studio and select Windows (x64) for Intel/AMD PCs (MstyStudio_x64.exe, ~228 MB) or Windows (ARM64) for ARM devices (MstyStudio_arm64.exe).
Installers are served from next-assets.msty.studio and there is no official regional mirror. If the download slows down or stalls, wait a few minutes and retry or switch networks rather than downloading from unofficial sites.
Download the Windows installer
Open msty.ai/products/studio/ and click Choose installer ① next to Download Studio to open the installer menu. Click Windows (x64) ② (Windows 10/11 · Intel or AMD) to download MstyStudio_x64.exe (pick Windows (ARM64) if your PC uses an ARM processor).
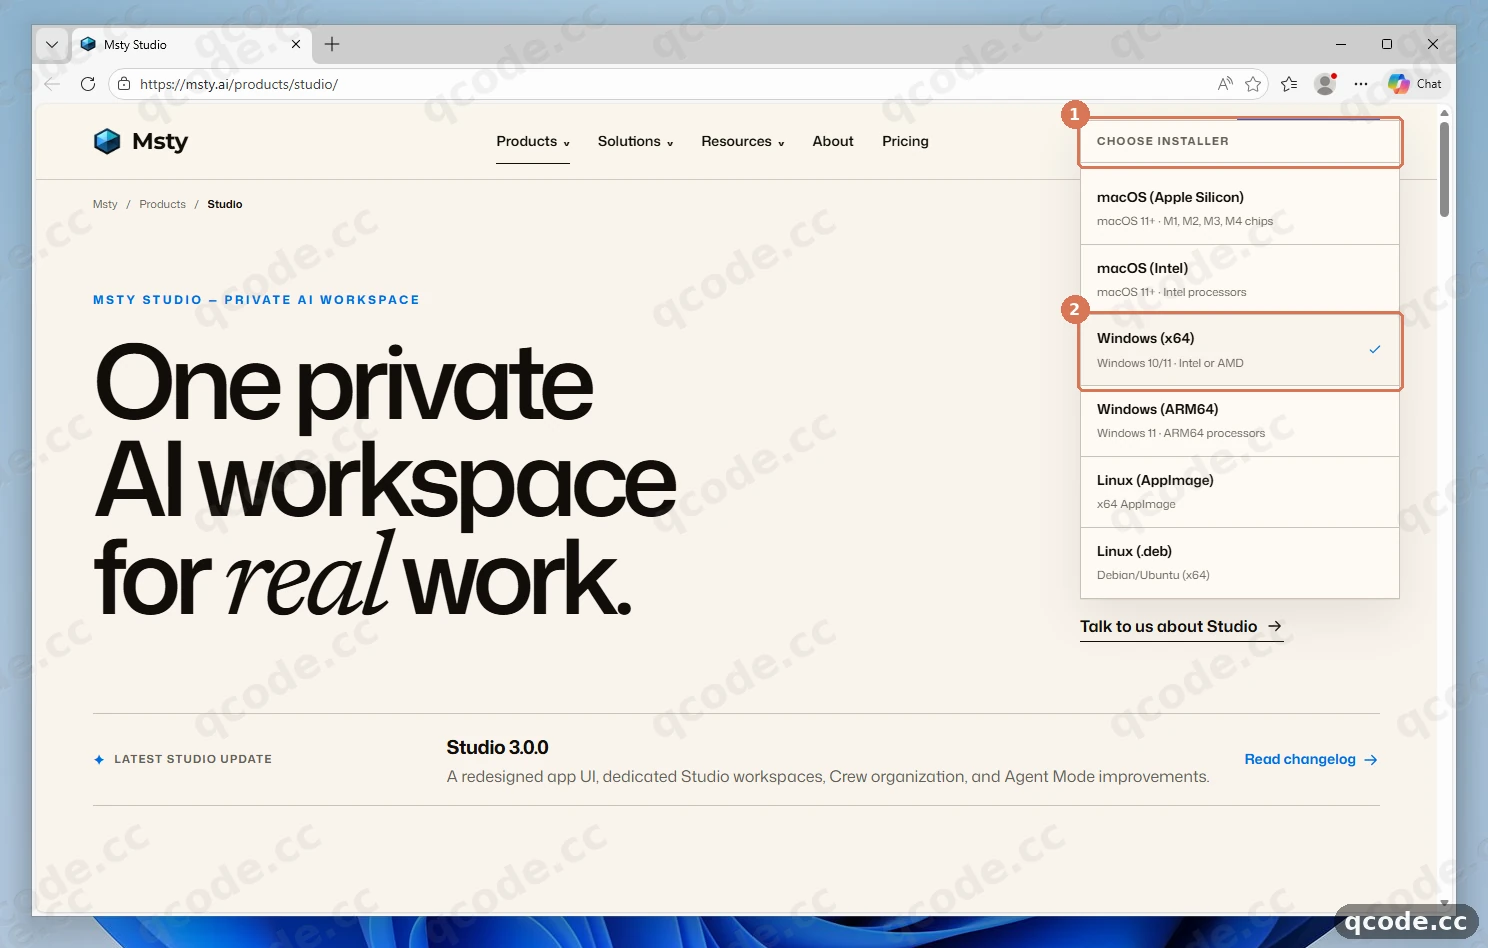
Done right you will see: your browser starts downloading MstyStudio_x64.exe (~228 MB) into your Downloads folder.
Install Msty Studio
Double-click MstyStudio_x64.exe in Downloads. On the first screen (Choose Installation Options), leave Only for me selected and click Next >. On Choose Install Location, keep the default folder under your user profile and click Install ①, then leave Run MstyStudio checked and click Finish.
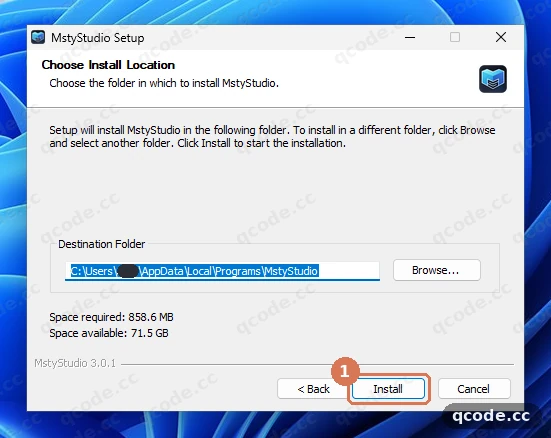
Stuck? Windows SmartScreen shows a warning
If Windows shows Windows protected your PC, click More info and then Run anyway to launch the official installer. Under the default Only for me option, no administrator prompt is needed.
Done right you will see: installation finishes without an administrator prompt, and Msty Studio opens automatically after you click Finish.
Skip the first-launch onboarding
On first launch, Msty Studio asks What brings you to Msty Studio? and confirms No account needed. You can click Just exploring ① if you want to walk through the quick setup, or click Skip to app → ② in the lower right to go straight to the main window.
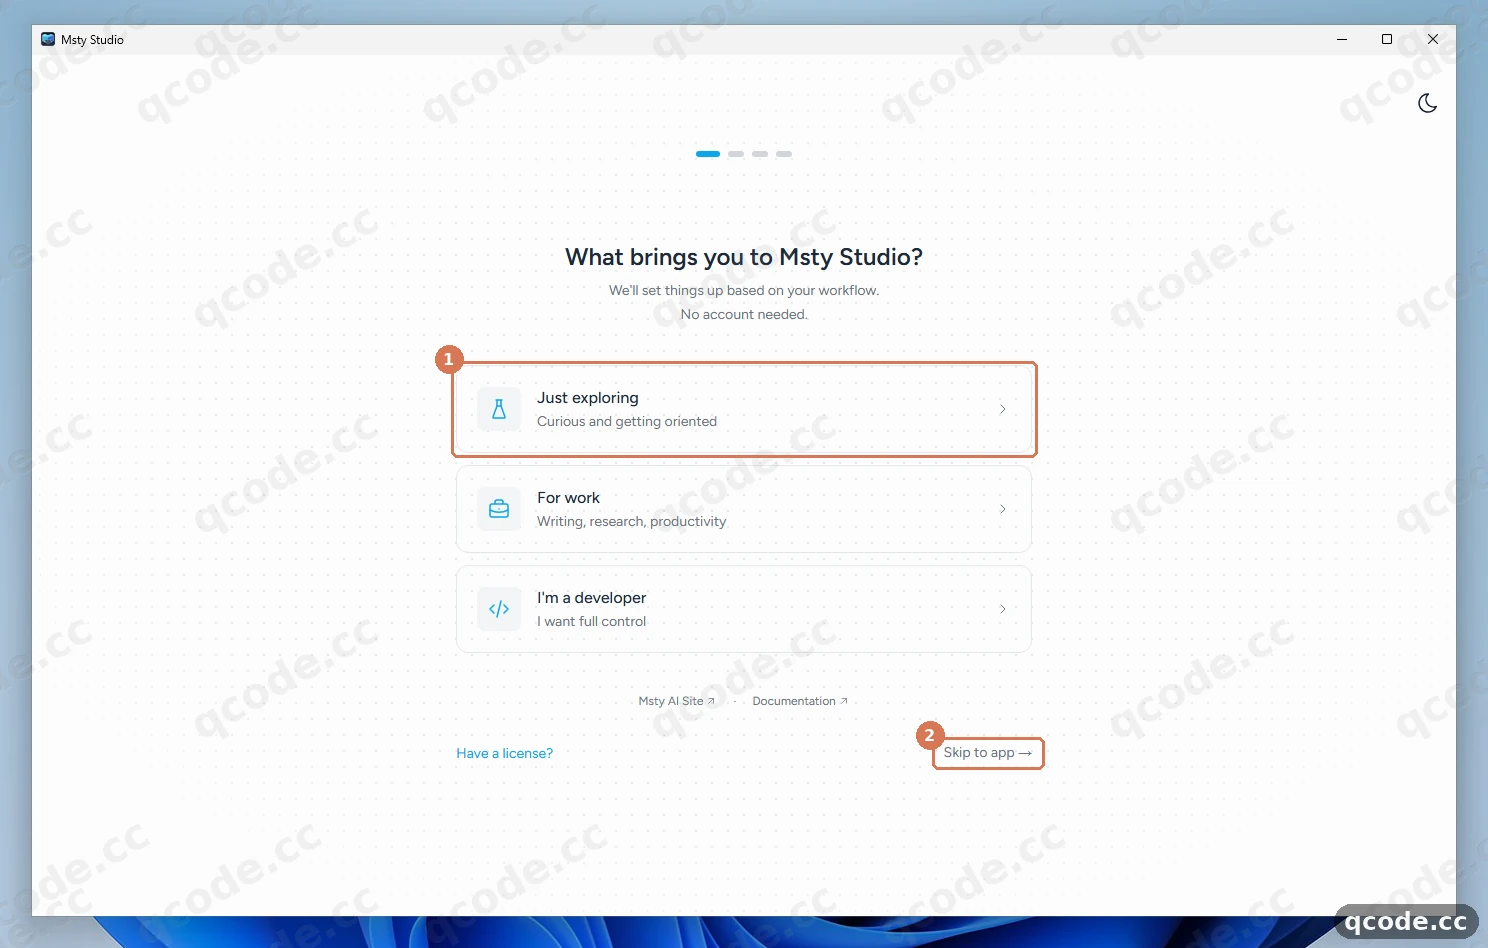
Done right you will see: the main Msty Studio chat workspace opens without asking you to sign in or activate a license.
Open Model Providers in Settings
Click Settings at the very bottom of the left sidebar. Under PROVIDERS & ENGINES, click Model Providers ①, then click the blue + Add Provider ② button in the center of the page.
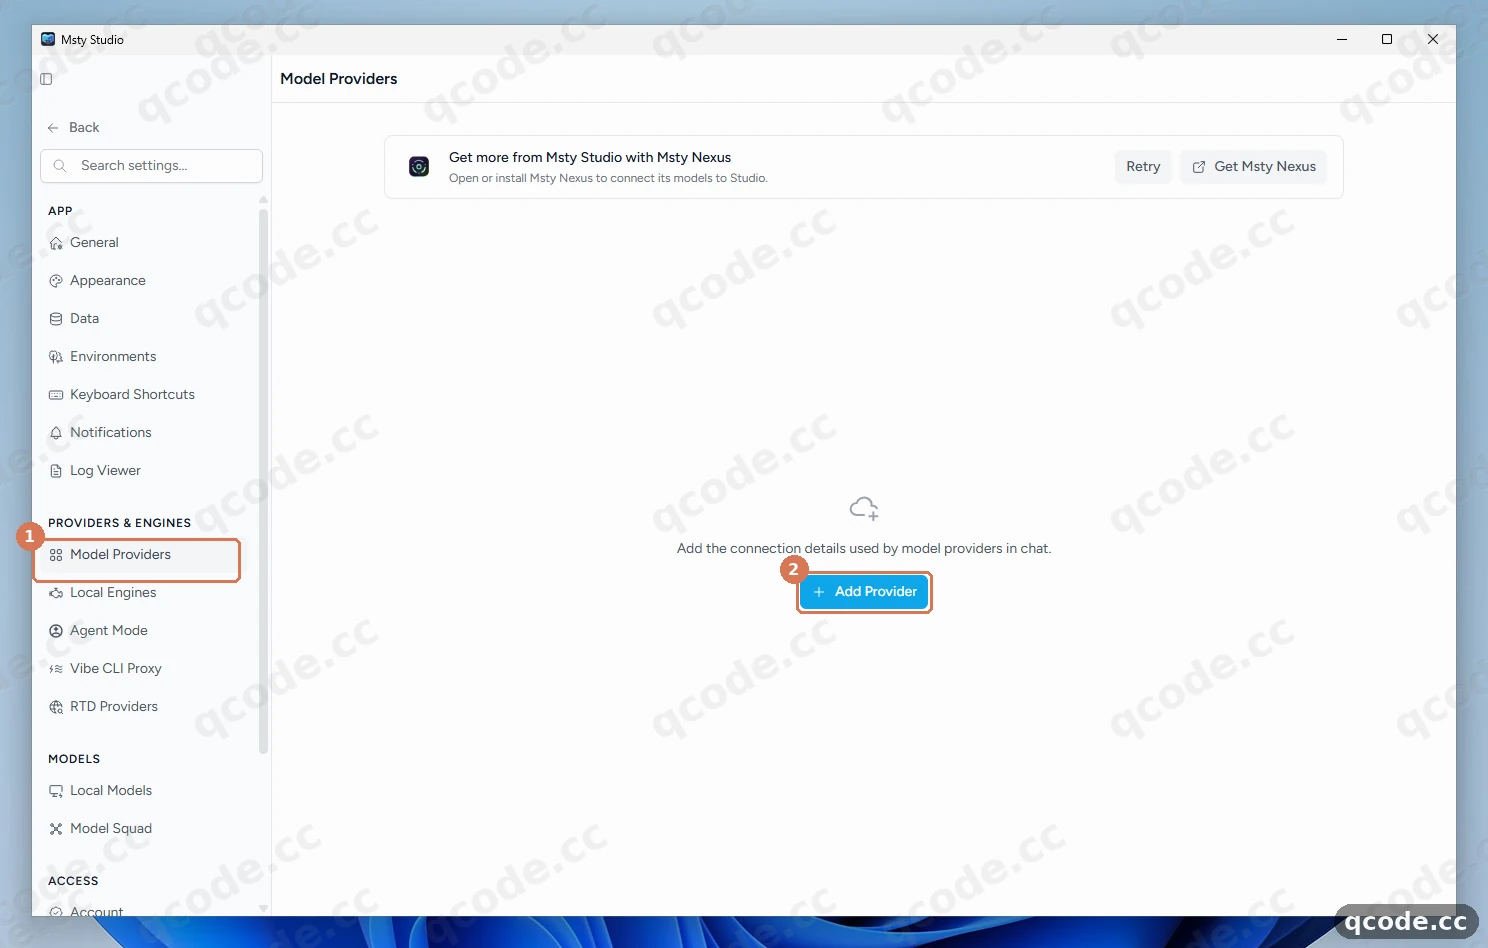
Stuck? I cannot find “Model Hub > Model Providers”
Msty Studio 3.x moved provider management out of Model Hub into Settings → Model Providers (under PROVIDERS & ENGINES). If you already added another provider earlier, + Add Provider moves from the center to the top-right corner of the same page.
Done right you will see: a New Model Provider drawer slides open on the right side of the window.
Choose Open AI Compatible
In the New Model Provider drawer, click the Provider dropdown (it defaults to OpenAI), type compatible into the search box ①, and select Open AI Compatible ② (notice the space between Open and AI).
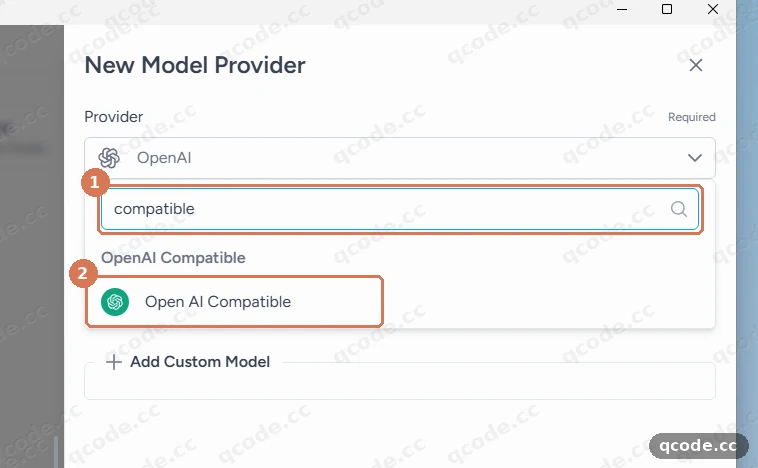
Stuck? Why not keep the default “OpenAI” provider?
The standard OpenAI option targets OpenAI's official host, whereas Open AI Compatible lets you enter QCode's Inference Endpoint directly and does not require an Aurum license. To use Claude models instead, see Optional: use Claude models with the built-in Claude provider below.
Done right you will see: the drawer updates to show API Key, Inference Endpoint (must start with http:// or https://), and a Fetch Models button.
Enter your API key and Inference Endpoint
Paste your QCode key (cr_xxxxxxxx) into API Key ① — the field masks the characters automatically. Enter https://api.qcode.cc/openai/v1 into Inference Endpoint (must start with http:// or https://) ②, leaving out any /chat/completions suffix, then click Fetch Models ③.
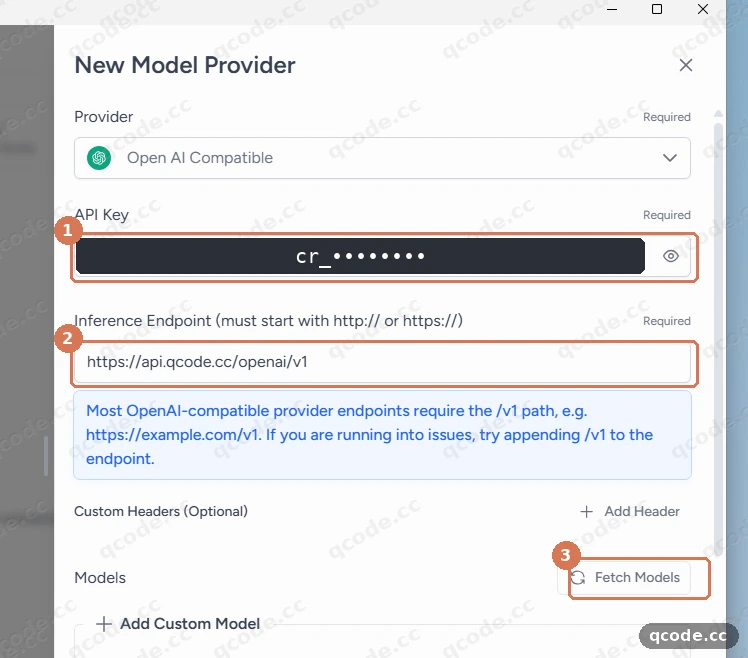
Need an API Key?
If you do not have a QCode account yet, Sign up first, buy a pack on the Pay-as-you-go page, and then create an API key in your Dashboard. Copy the full string starting with cr_. Credit and debit cards are accepted — see Payment methods for details.
Done right you will see: API Key ① shows masked dots, Inference Endpoint ② reads https://api.qcode.cc/openai/v1, and clicking Fetch Models ③ loads a list of QCode models below the button.
Select a model, name the provider, and save
Scroll down to the fetched Models list and check gpt-6.2-sol ① (you can check additional GPT or Chinese models if you like). In Give it a unique name (Optional) ② at the bottom of the drawer, type QCode, then click Save ③.
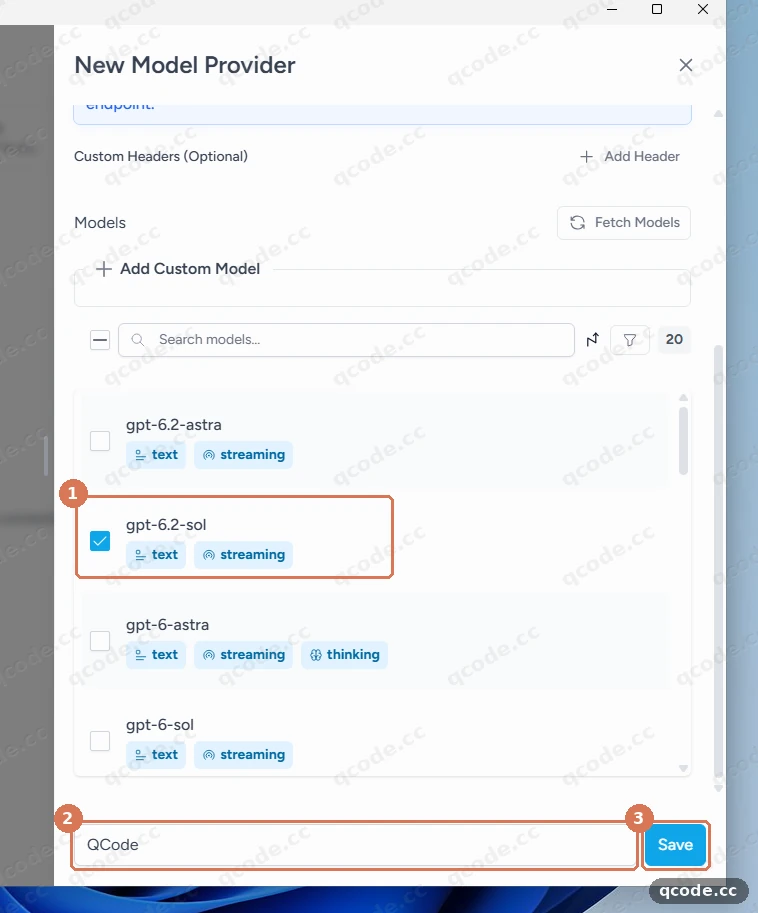
Stuck? The model you want is not in the list
Click + Add Custom Model directly above the model search box and enter the exact model ID (for example gpt-6.2-sol). Checking a model's box here is what makes it appear in the chat model selector — there is no separate “Show in Model Selector” switch in Msty Studio 3.0.1.
Done right you will see: gpt-6.2-sol ① is checked, QCode ② appears in the bottom name field, and clicking Save ③ closes the drawer.
Confirm the saved provider and return to chat
Back on Model Providers, confirm that QCode · Open AI Compatible ① appears with 1 Model (or the count you checked) and its toggle switch on the right is enabled. Click ← Back ② in the top-left corner to return to the chat screen.
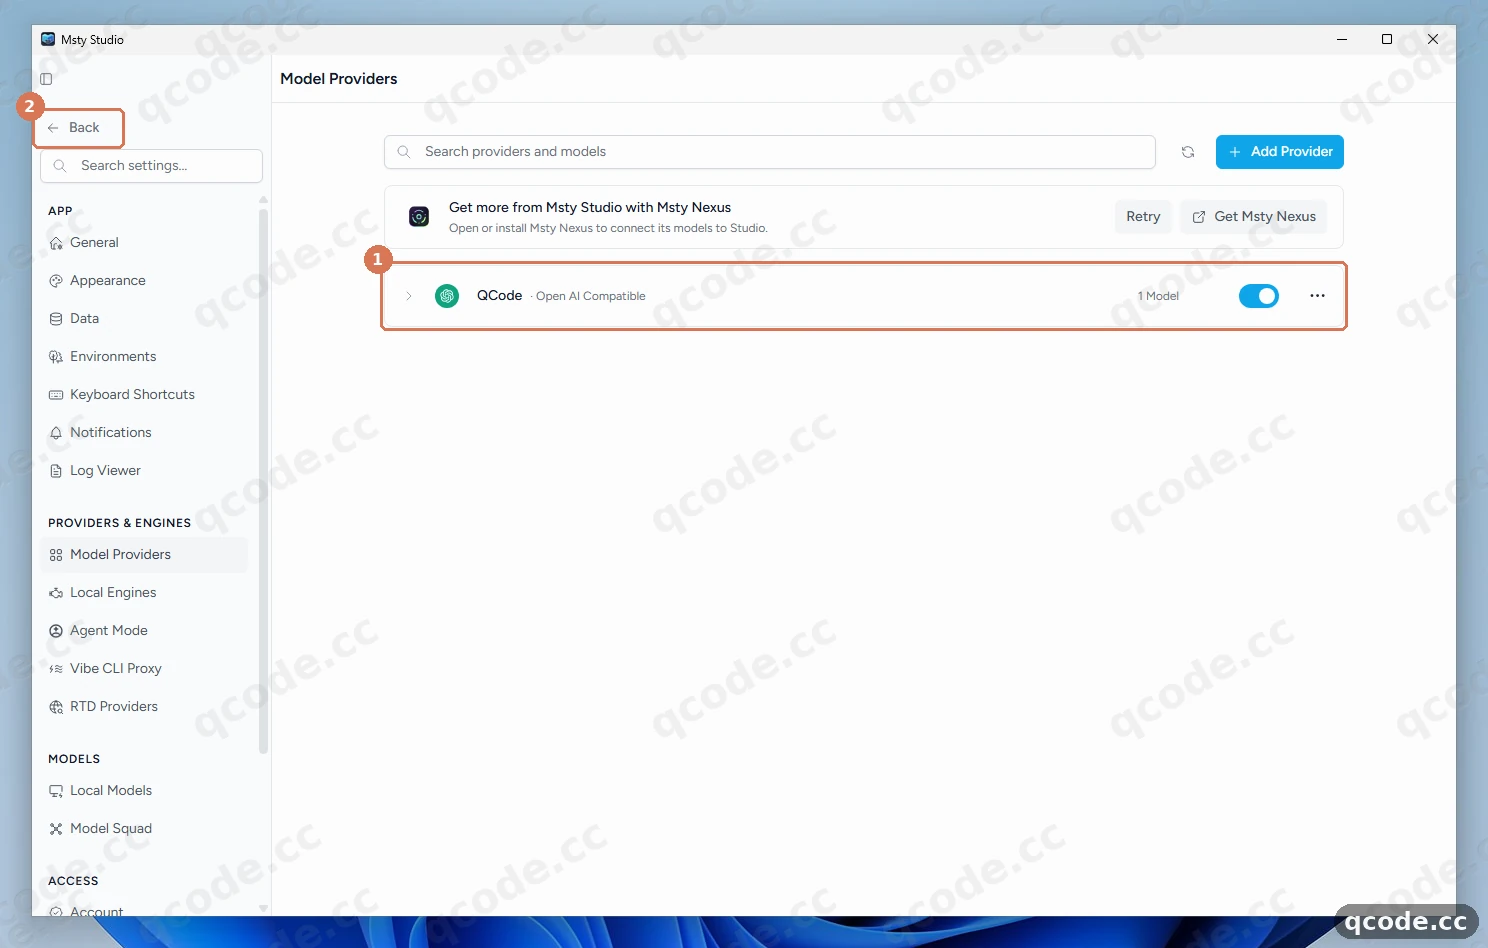
Done right you will see: QCode · Open AI Compatible ① is listed and turned on, and clicking ← Back ② brings you back to New Conversation.
Pick QCode in the model selector
In New Conversation, Msty Studio usually selects your first saved model automatically. Click the model selector at the bottom ① to open the picker, and click gpt-6.2-sol ② under QCode to confirm it is active.
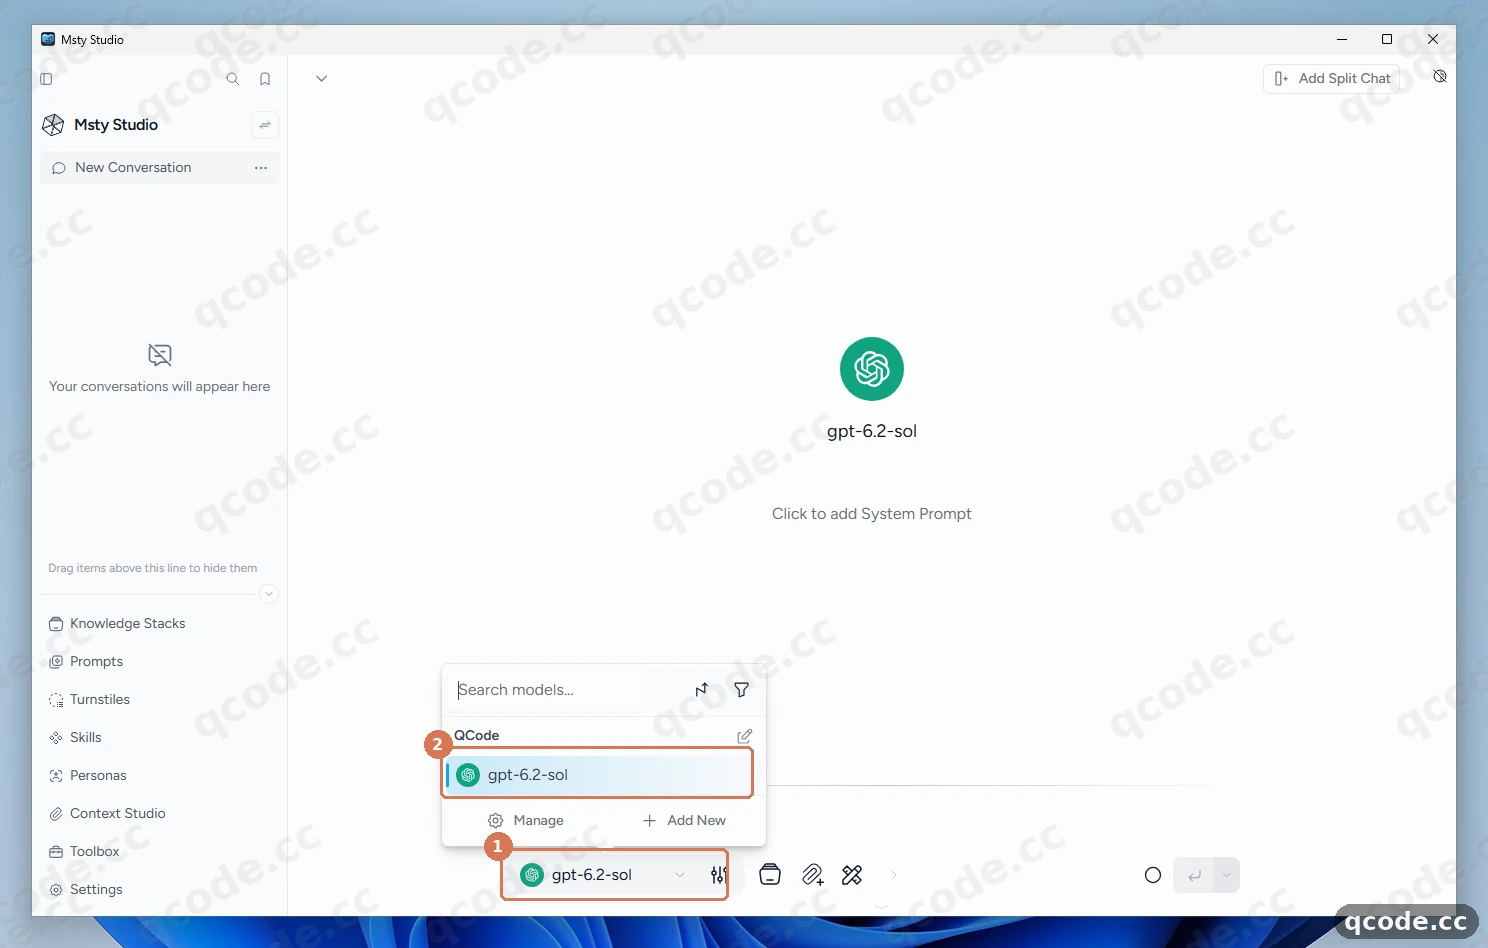
Stuck? The selector still says “Select a model” or QCode is missing
Open Settings → Model Providers, make sure the toggle on the QCode card is switched on, then open the card and verify that at least one model checkbox (such as gpt-6.2-sol) is checked before clicking Save.
Done right you will see: the bottom selector ① displays gpt-6.2-sol, and the popover lists it under the QCode ② heading.
Send a test message
Type Hello, introduce yourself in one sentence. into the chat box and press Enter to send ①. Wait a few seconds for gpt-6.2-sol to stream a reply ②.
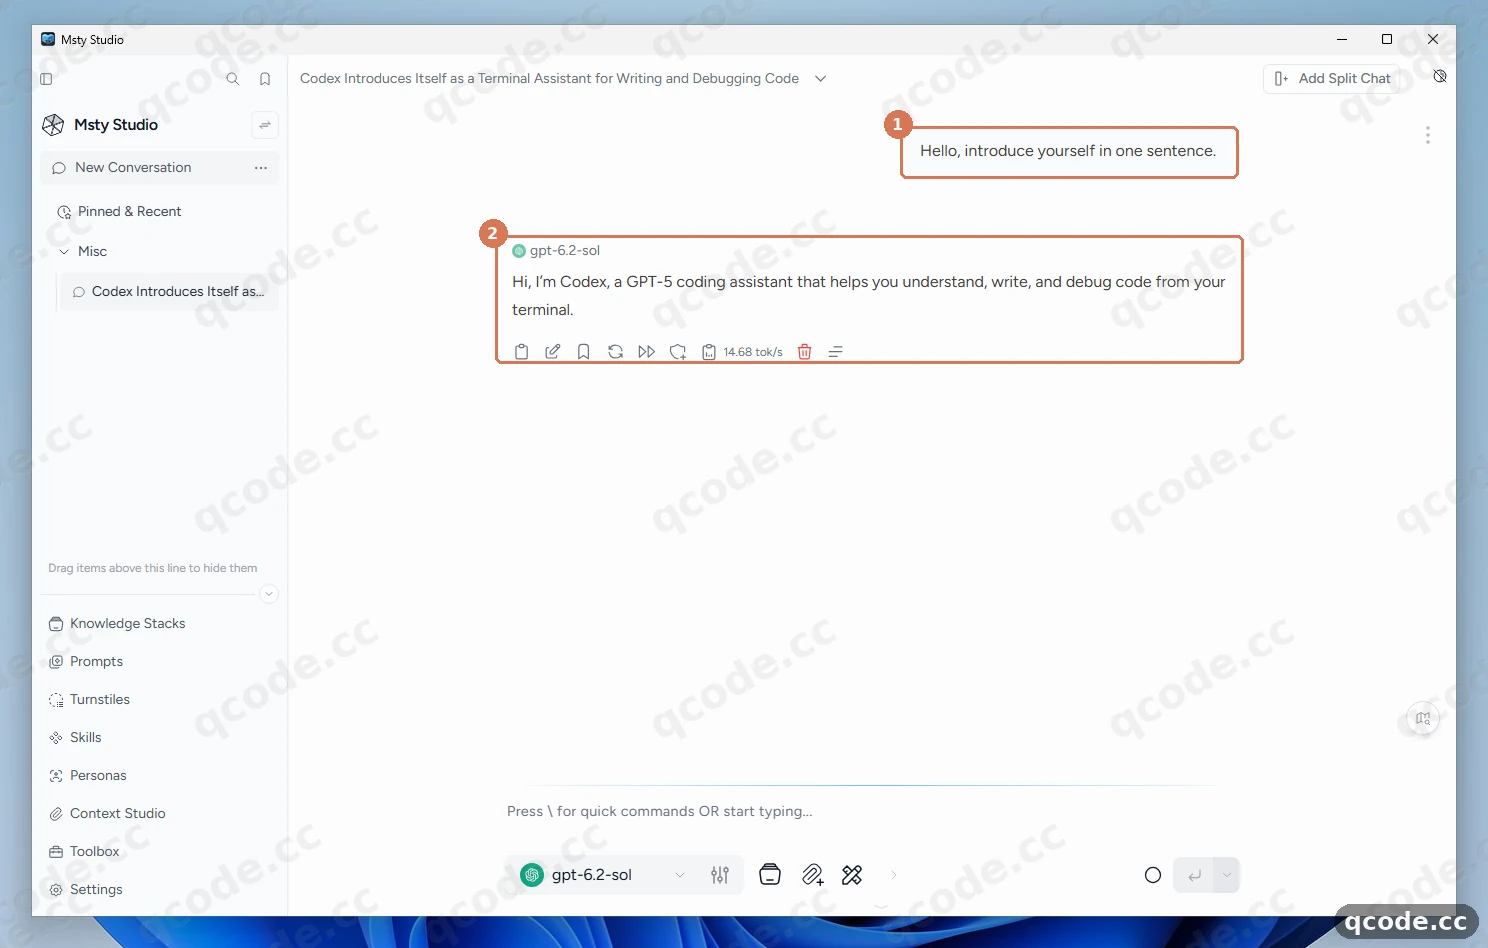
Done right you will see: your prompt ① appears on the right and a streamed reply ② from gpt-6.2-sol appears below it with a token speed indicator (tok/s) and no error banner.
Verify it works
Your setup is complete when all three of these are true:
- Settings → Model Providers lists QCode · Open AI Compatible with its toggle enabled and at least
1 Modelselected. - The model selector at the bottom of New Conversation shows
gpt-6.2-solunder QCode. - Sending a test message streams a normal reply with token speed (
tok/s) and no error banner.
All done
You can now chat with QCode models inside Msty Studio on Windows 11. From here you can:
- Endpoints and API paths — OpenAI and Anthropic routes plus every QCode host
- Model selection — current GPT, Claude, and other model IDs
- Billing — how token usage is calculated
- Troubleshooting — fixing connection and authentication issues
- Compare plans on the pricing page
- Return to your Dashboard to check usage and balance
Common errors
| Error or symptom | Why | What to do |
|---|---|---|
model_not_available_on_endpoint |
A Claude model was added under Open AI Compatible (https://api.qcode.cc/openai/v1), which does not serve Claude |
Use GPT or Chinese models on Open AI Compatible, or add a separate built-in Claude provider using https://api.qcode.cc/api/v1 |
404 |
Inference Endpoint includes /chat/completions, or the built-in Claude provider was set to https://api.qcode.cc/api without /v1 |
Set Inference Endpoint to exactly https://api.qcode.cc/openai/v1 for Open AI Compatible, or https://api.qcode.cc/api/v1 for the built-in Claude provider, then click Save |
Model Hub > Model Providers |
Following an older Msty 2.x tutorial; Msty Studio 3.x reorganized the navigation menu | Confirm you installed Msty Studio 3.x, click Settings at the bottom of the left sidebar, and open Model Providers under PROVIDERS & ENGINES |
Some provider types and options require Aurum |
Picking an Aurum-only provider type (such as Azure or Amazon Bedrock) instead of Open AI Compatible | Open the Provider dropdown, search for compatible, and choose Open AI Compatible (or the built-in Claude provider) — neither requires Aurum |
Select a model |
No model checkbox was checked inside the QCode provider drawer, or the provider toggle in Model Providers is switched off | Open Settings → Model Providers, make sure QCode is toggled on, edit the provider, check gpt-6.2-sol (or add it via + Add Custom Model), and click Save |
FAQ
What happens when my QCode API key expires?
Renewal depends on how you purchased the key. A key from a personal plan cannot be renewed after it expires — purchase a new plan, create a new key in your Dashboard, and replace the API Key inside your QCode provider in Msty Studio. A key from a pay-as-you-go pack resumes working automatically as soon as you buy another pack, so you do not need to change anything in Msty Studio.
Do I need a Msty account or an Aurum license to use QCode?
No. Msty Studio 3.0.1 launches with No account needed. and a Skip to app → link, and both Open AI Compatible and the built-in Claude provider work without an Aurum license.
Can I use Claude models inside the Open AI Compatible provider?
No. QCode serves Claude models only on the Anthropic Messages route, so entering a Claude model ID under https://api.qcode.cc/openai/v1 returns model_not_available_on_endpoint. Add a second provider using Msty Studio's built-in Claude type as described below.
How do I change Msty Studio's interface language?
Open Settings → General → Language to choose from Msty Studio's downloadable locale packs or import a custom locale file.
Optional: use Claude models with the built-in Claude provider
Msty Studio 3.0.1's built-in Claude provider includes an editable Inference Endpoint field (defaulting to https://api.anthropic.com/v1/), so you can run Claude models alongside your Open AI Compatible provider using the same QCode cr_ key:
- Open Settings → Model Providers and click + Add Provider (in the top-right corner once at least one provider exists).
- In the Provider dropdown, choose Claude.
- Paste your QCode
cr_key into API Key. - Change Inference Endpoint (must start with http:// or https://) to
https://api.qcode.cc/api/v1(keep/v1to match Msty's built-in Claude path). - Click Fetch Models, check
claude-opus-5-5and/orclaude-opus-5-5, name the providerQCode Claude, and click Save.
| Field | Fill in |
|---|---|
| Provider | Claude |
| API Key | cr_xxxxxxxx |
| Inference Endpoint | https://api.qcode.cc/api/v1 |
| Recommended models | claude-opus-5-5 |
Regional endpoints and other models
If you prefer a regional route, replace api.qcode.cc with asia.qcode.cc or us.qcode.cc and keep the exact path unchanged (https://asia.qcode.cc/openai/v1 or https://us.qcode.cc/openai/v1 for Open AI Compatible; https://asia.qcode.cc/api/v1 or https://us.qcode.cc/api/v1 for the built-in Claude provider). All three hosts offer the same models and differ only in network routing.
Besides gpt-6.2-sol, you can check or add other OpenAI-compatible models such as gpt-6.2-sol, glm-5.3, kimi-k3, and deepseek-v4-pro. If a model is not shown after clicking Fetch Models, click + Add Custom Model above the model search box and enter the exact ID from Model selection.
Related docs
- Endpoints and API paths — OpenAI and Anthropic routes across
api.qcode.cc,asia.qcode.cc, andus.qcode.cc - Model selection — current GPT, Claude, and Chinese model IDs
- Billing — token billing and usage tracking
- Payment methods — supported payment options
- Troubleshooting — resolving common API and key issues
Get started with QCode
One API key for Claude Code, Codex and more — billed per token, per-model prices on qcode.cc/models