Immersive Translate with QCode: Windows 11 walkthrough, one screenshot per step
Follow 11 steps and 11 screenshots to install Immersive Translate 1.35.4 in Edge or Chrome on Windows 11, connect it to QCode with gpt-6.2-sol, and turn any English page into a bilingual Chinese-English read in one click.
Need an API key? Sign up →Endpoints & base URLs →
On This Page
- Download and install
- Follow the screenshots: Windows, one step at a time
- Open the extension store and click "Get"
- Click "Add extension" in the confirmation dialog
- Pin Immersive Translate to the toolbar
- Open the extension panel and go to "Settings"
- Find "OpenAI 1" and click "Configure"
- Fill in the QCode key, custom model and endpoint
- Click "Click here to test the service" to check connectivity
- Check "Max requests per second"
- Set "OpenAI 1" as the default translation service
- Open an English page and click "Translate (Alt+A)"
- Read the bilingual Chinese-English translation
- Verify it works
- Common errors
- FAQ
- Connection overview
- Other ingress points
- Recommended models
- Related docs
Follow the 11 steps below and you will have the Immersive Translate extension installed in your Windows 11 browser and connected to QCode, so any English page turns into a bilingual Chinese-English view in one click.
Short answer: install the Immersive Translate 1.35.4 extension in your browser, then click the toolbar icon and go to "Settings" → "Translation Services" → "Others/Custom" → "OpenAI 1" → "Configure". Paste your QCode cr_ key, tick "Enter custom model name" and type gpt-6.2-sol, change "Custom API endpoint" to https://api.qcode.cc/openai/v1/chat/completions, and set it as the default once the test passes.
| Item | Fill in |
|---|---|
| Translation service | OpenAI 1 |
| Custom API endpoint | https://api.qcode.cc/openai/v1/chat/completions |
| Custom model | gpt-6.2-sol |
| APIKEY format | cr_xxxxxxxx |
| Max requests per second | 5 |
Checked on 2026-11-22 · Immersive Translate 1.35.4 · Windows 11
Immersive Translate is a browser extension for bilingual web reading: it inserts a Chinese translation right below each English paragraph, which makes technical docs, news and papers easy to read side by side. When you connect the "OpenAI 1" service with your own QCode API key, you do not need to sign in to an Immersive Translate account and you do not need a Pro membership.
- The PC runs Windows 10 / 11 (64-bit) and has Microsoft Edge, Chrome or Firefox installed (Immersive Translate is a browser extension, so no administrator rights are needed)
- You have already signed up for QCode.cc and copied the API key starting with
cr_from the Dashboard. No account yet? Sign up for QCode first, pick a plan on the pricing page, then create the key in the Dashboard. - No Immersive Translate account and no Pro membership are needed — just fill in your own QCode key and translation works
- The PC can open the extension stores normally (such as Edge Add-ons or the Chrome Web Store) and can reach
api.qcode.ccandprobe.qcode.cc
Download and install
Immersive Translate is a browser extension: it has no separate .exe installer and is not distributed through winget or the Microsoft Store. Installing it straight from the browser's extension store does not trigger a Windows SmartScreen block and needs no administrator rights.
Official install entry points:
- Official install guide: immersivetranslate.com installation guide
- Microsoft Edge Add-ons (the route used for this tutorial's screenshots): Immersive Translate on Edge Add-ons
- Chrome Web Store: Immersive Translate on the Chrome Web Store
- Firefox Add-ons: Immersive Translate on Firefox Add-ons
- Offline package (backup): GitHub Releases
Network conditions differ a little by region, so pick yours first:
- Microsoft Edge: open the Edge Add-ons page and click "Get" → "Add extension".
- Google Chrome: open the Chrome Web Store and click "Add to Chrome" → "Add extension".
- Firefox: open the Firefox Add-ons page and add it as prompted.
- Recommended (least effort): open the Edge Add-ons page in the Microsoft Edge that ships with Windows 11, then click "Get" → "Add extension" and you are done — no extra network setup.
- Chrome users, offline install: if the Chrome Web Store will not open, download the package for your browser from GitHub Releases and unzip it into a permanent folder (do not download
.crxfiles from third-party sites). Then typechrome://extensionsin the Chrome address bar, turn on "Developer mode" in the top right, click "Load unpacked" and select the folder you just unzipped. The "Developer mode" notice that appears while loading is normal.
Follow the screenshots: Windows, one step at a time
The 11 steps below use the Microsoft Edge that ships with Windows 11 (Simplified Chinese interface) as the example; the configuration screens later on are identical in Chrome. Each step does exactly one thing, and the orange numbers on the screenshots match the ①②③ in the text one to one.
Open the extension store and click "Get"
Open the Immersive Translate page on Edge Add-ons in Microsoft Edge, check the page title and version, then click the blue "Get" button that ① points to (in the Chrome Web Store this button is called "Add to Chrome").
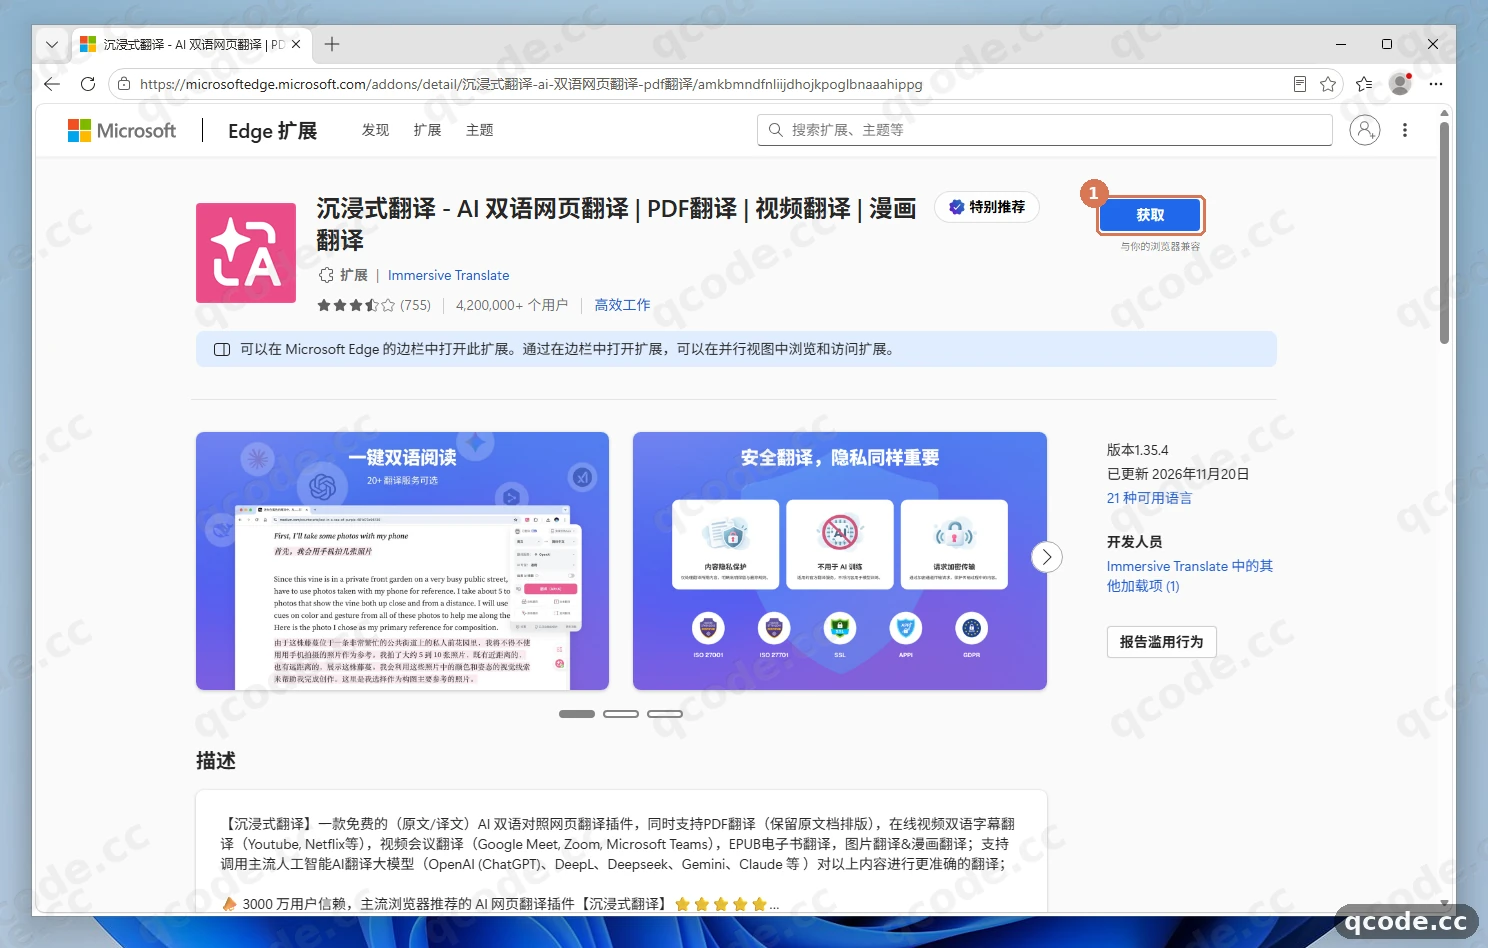
Done right you will see: a small confirmation window pops up at the top of the browser, asking whether to add Immersive Translate to Microsoft Edge.
Stuck? A cookie banner appears at the top of the page, or you are using Chrome
The first time you visit the Microsoft extension store, a banner offering "Accept / Reject / Manage cookies" may appear at the top; click "Reject" or "Accept" to dismiss it, and the install is unaffected. If you normally use Chrome and the Chrome Web Store will not open, follow the "Mainland China" tab under Download and install above, or simply switch to Edge.
Click "Add extension" in the confirmation dialog
In the permission dialog that pops up at the top of the browser, click the "Add extension" button that ① points to (in Chrome this button is labelled "Add extension program"). The browser downloads and installs it in the background — no Windows installer wizard appears.
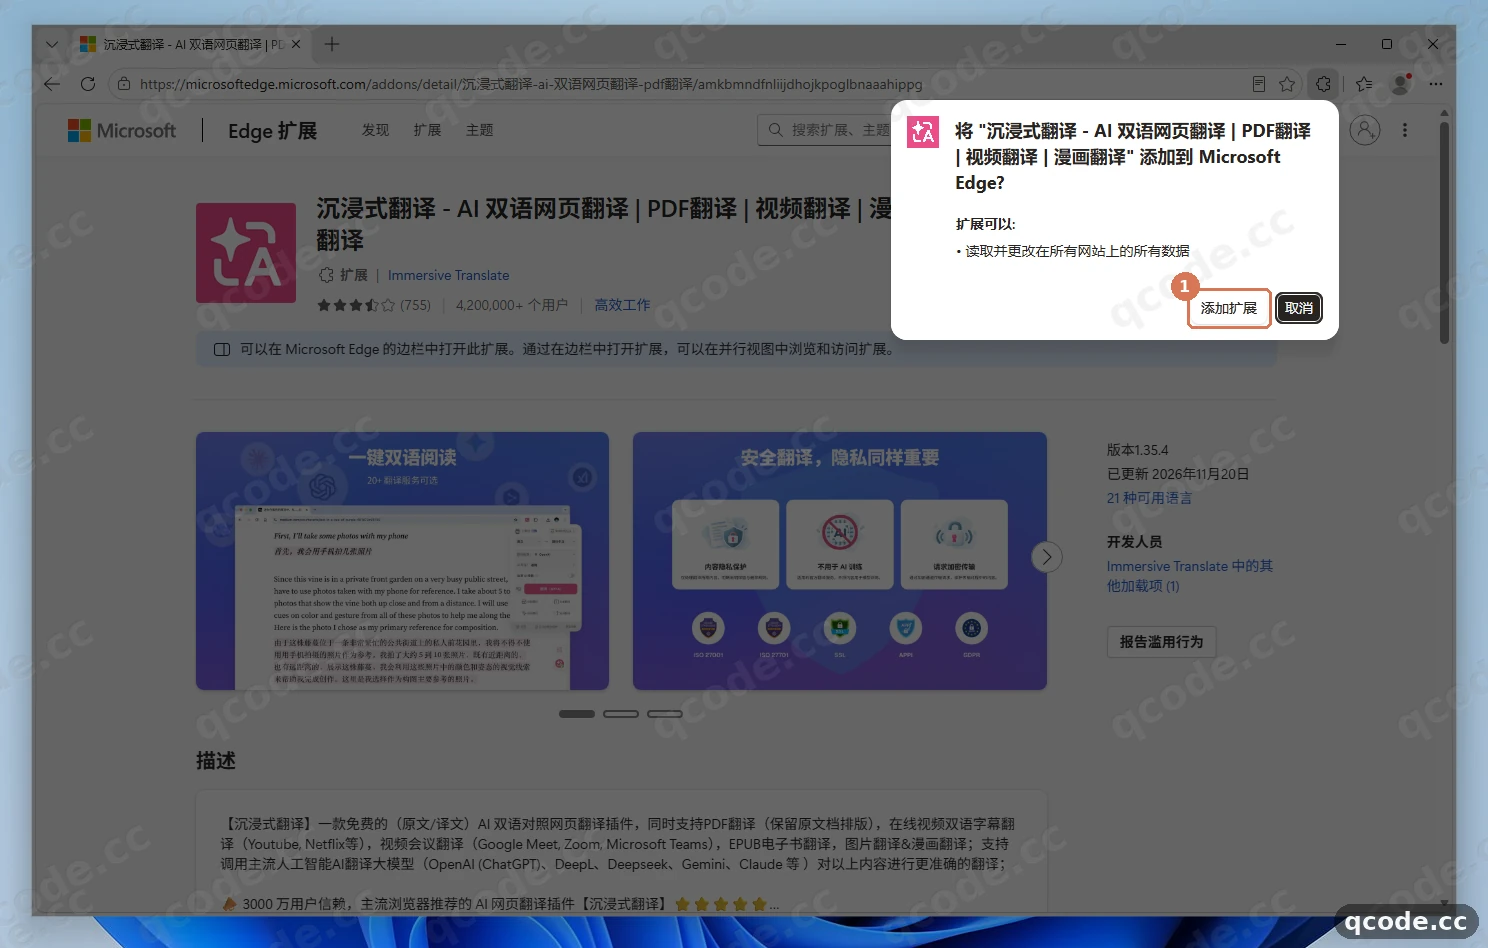
Done right you will see: after a few seconds the browser opens a new welcome tab titled "Explore more features of Immersive Translate", and an install-complete notice appears in the top right at the same time.
Pin Immersive Translate to the toolbar
The welcome page opens automatically once the install finishes; if an "Installed" bubble pops up in the top right, click its close button to dismiss it. Then click the puzzle-piece Extensions icon that ① points to, to the right of the address bar, to expand the list, and click the show/pin icon that ② points to, on the right of Immersive Translate, to pin it to the browser toolbar (in Chrome this button looks like a pin).
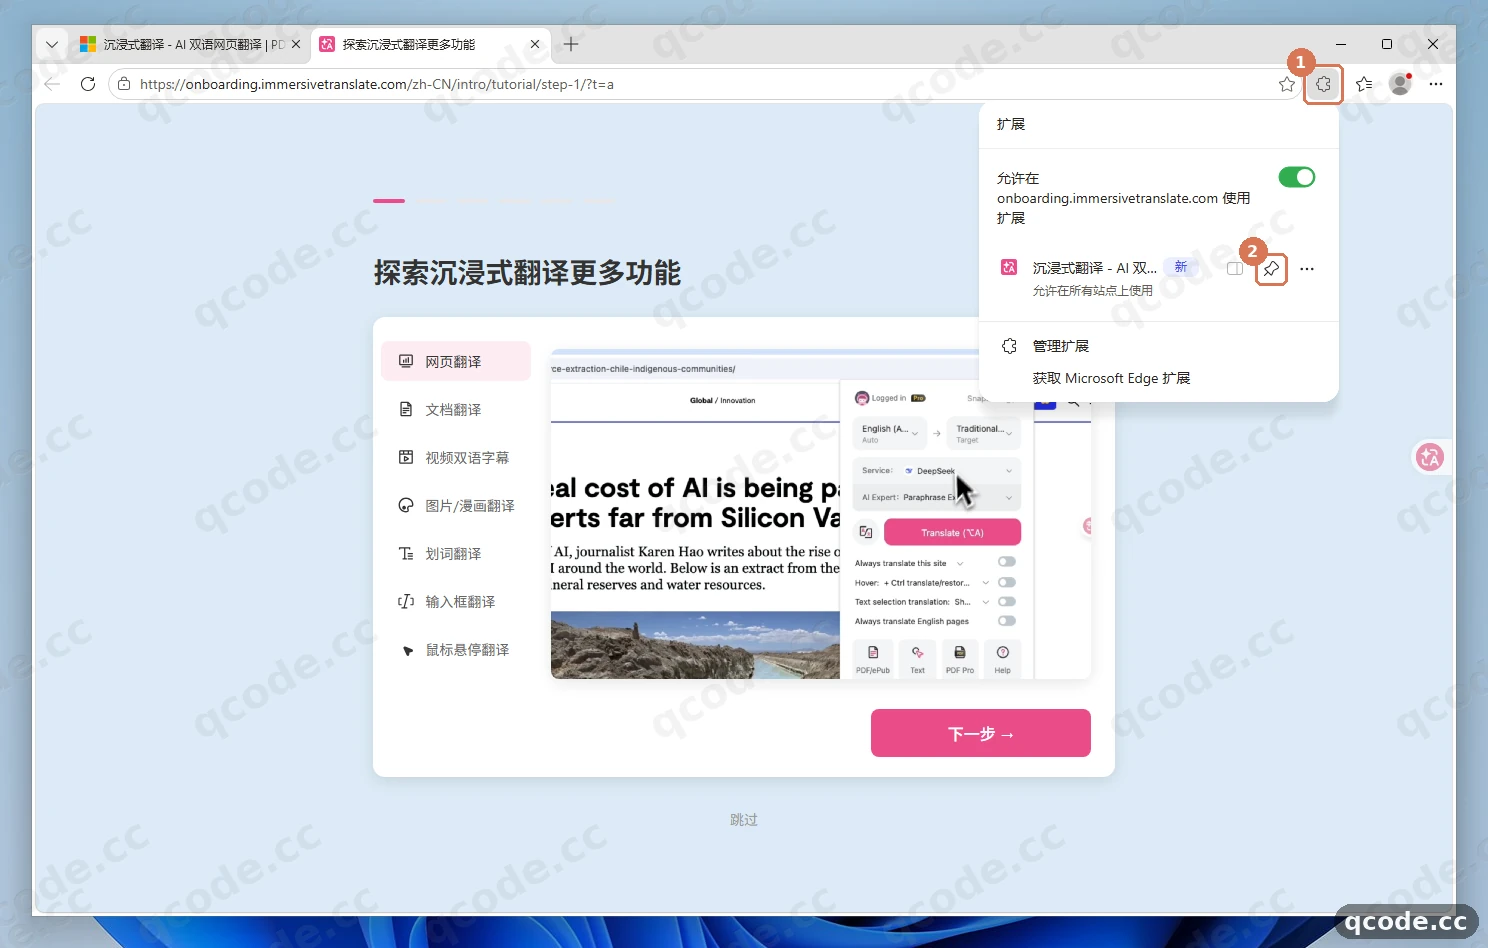
Done right you will see: the Immersive Translate icon stays next to the address bar from now on, so you no longer have to open the puzzle menu to find it every time.
Open the extension panel and go to "Settings"
Click the Immersive Translate icon that ① points to, the one you just pinned to the toolbar, and a quick panel opens. It does not matter that the top of the panel says "Not signed in": you do not need to register or sign in to an Immersive Translate account. Just click "Settings" at the bottom left of the panel, which ② points to.
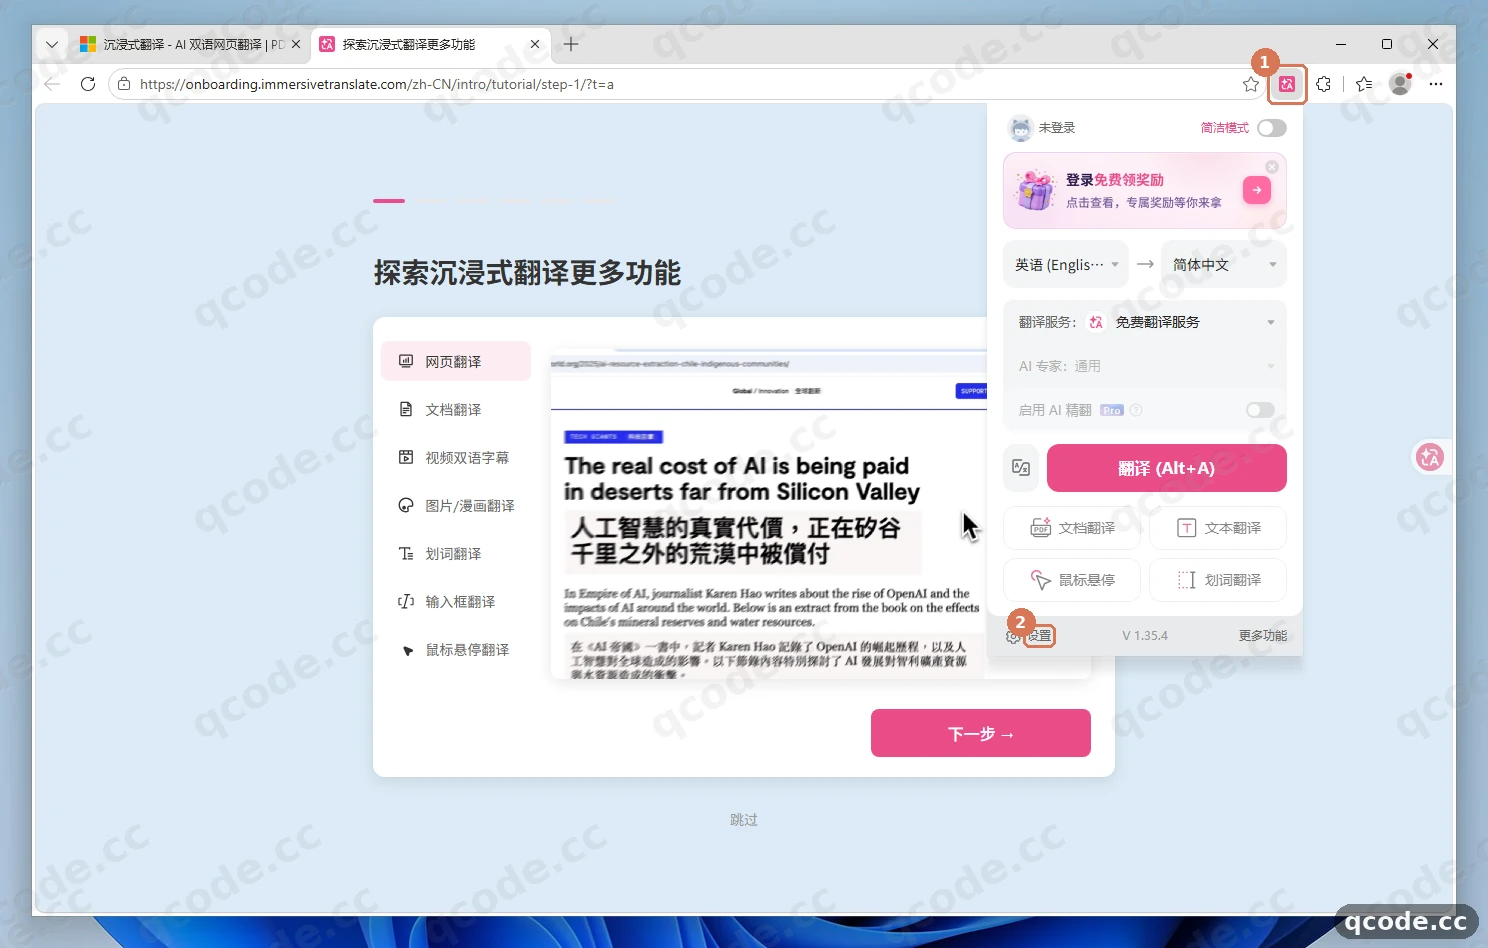
Done right you will see: the browser opens a new settings tab, with a navigation menu on the left and configuration items on the right.
Find "OpenAI 1" and click "Configure"
In the settings page, under "Services and capabilities" on the left, make sure "Translation services" is selected, which ① points to. Scroll the "Translation service list" on the right all the way down to the "Others/Custom" group at the bottom, find "OpenAI 1" that ② points to (no Pro membership restriction), then click the "Configure" button to its right, which ③ points to.
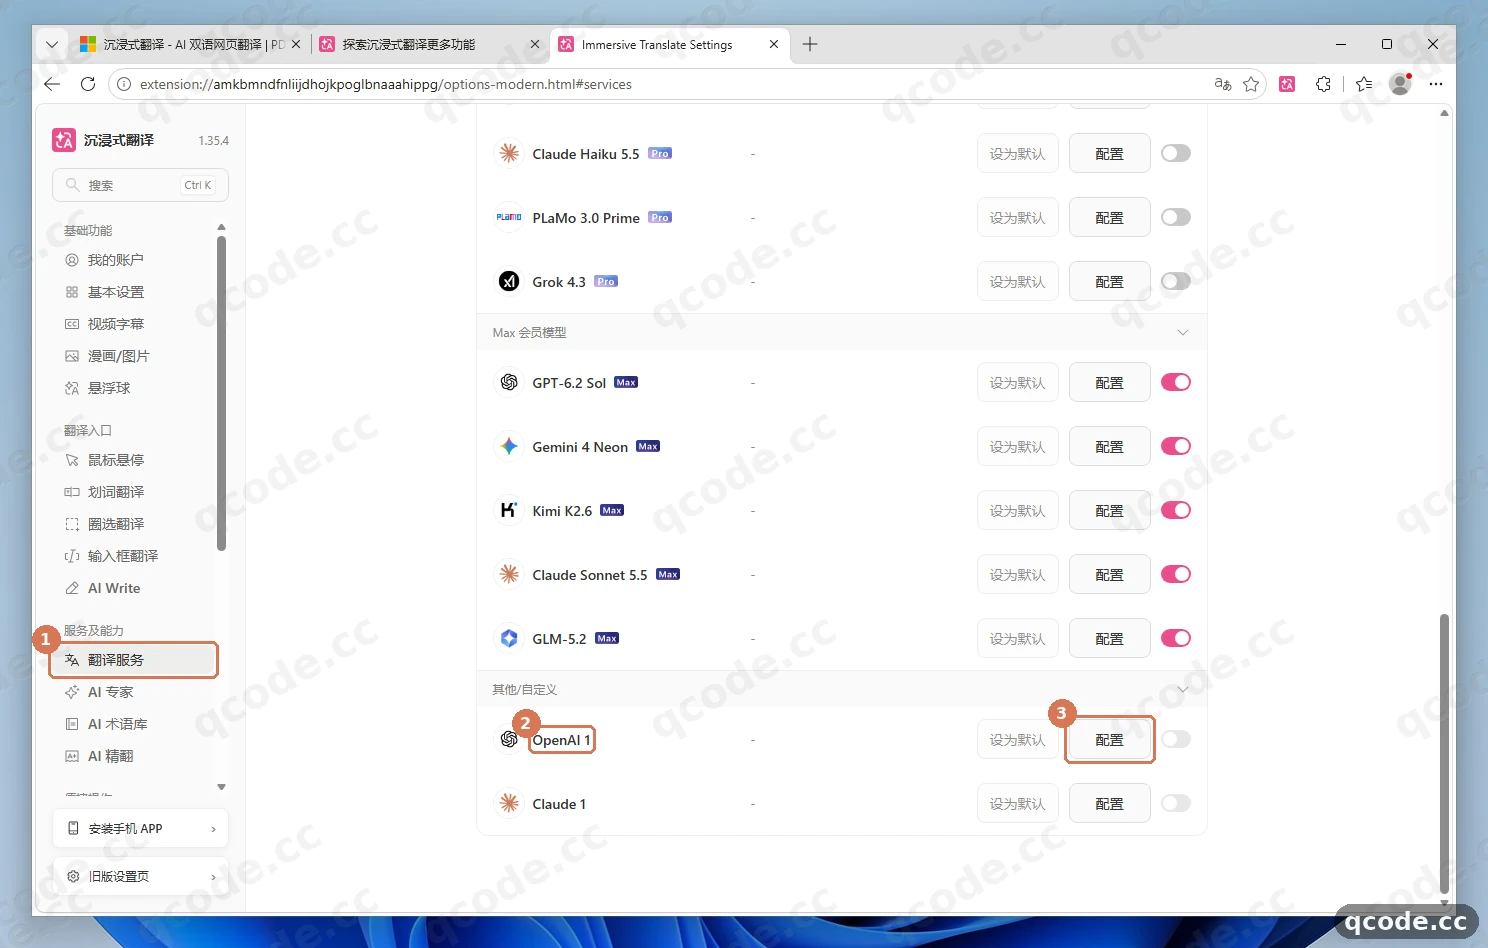
Done right you will see: a "Translation service configuration" drawer slides in from the right, listing the "APIKEY", "Model" and "Custom API endpoint" input fields in that order.
Stuck? The settings layout looks a little different from the screenshot
A fresh 1.35.4 install may open either the old or the new settings page, but both keep the entry under "Translation services" in the left menu; find the OpenAI configuration item and open it. The new settings page also offers a "Switch to old settings page" entry at the bottom left. Be careful not to pick "Custom API translation" by mistake — that is the entry for a different, separate protocol.
Fill in the QCode key, custom model and endpoint
In the "Translation service configuration" drawer that slides in on the right, every required field is on the same screen, so there is no hidden menu to expand. Fill in the three items below in order:
- Paste your QCode key into the "APIKEY" field that ① points to (the format is
cr_xxxxxxxx; the field hides the content behind dots by default, and you can check it by clicking the small eye icon on the right); - Tick the "Enter custom model name" checkbox that ② points to; the dropdown below switches to a text field, where you type
gpt-6.2-sol; - Clear the default address in the "Custom API endpoint" field that ③ points to and replace it with the full address:
https://api.qcode.cc/openai/v1/chat/completions
When everything is filled in, click once on an empty spot in the drawer to blur the field; the configuration saves automatically (this version has no separate "Save" button).
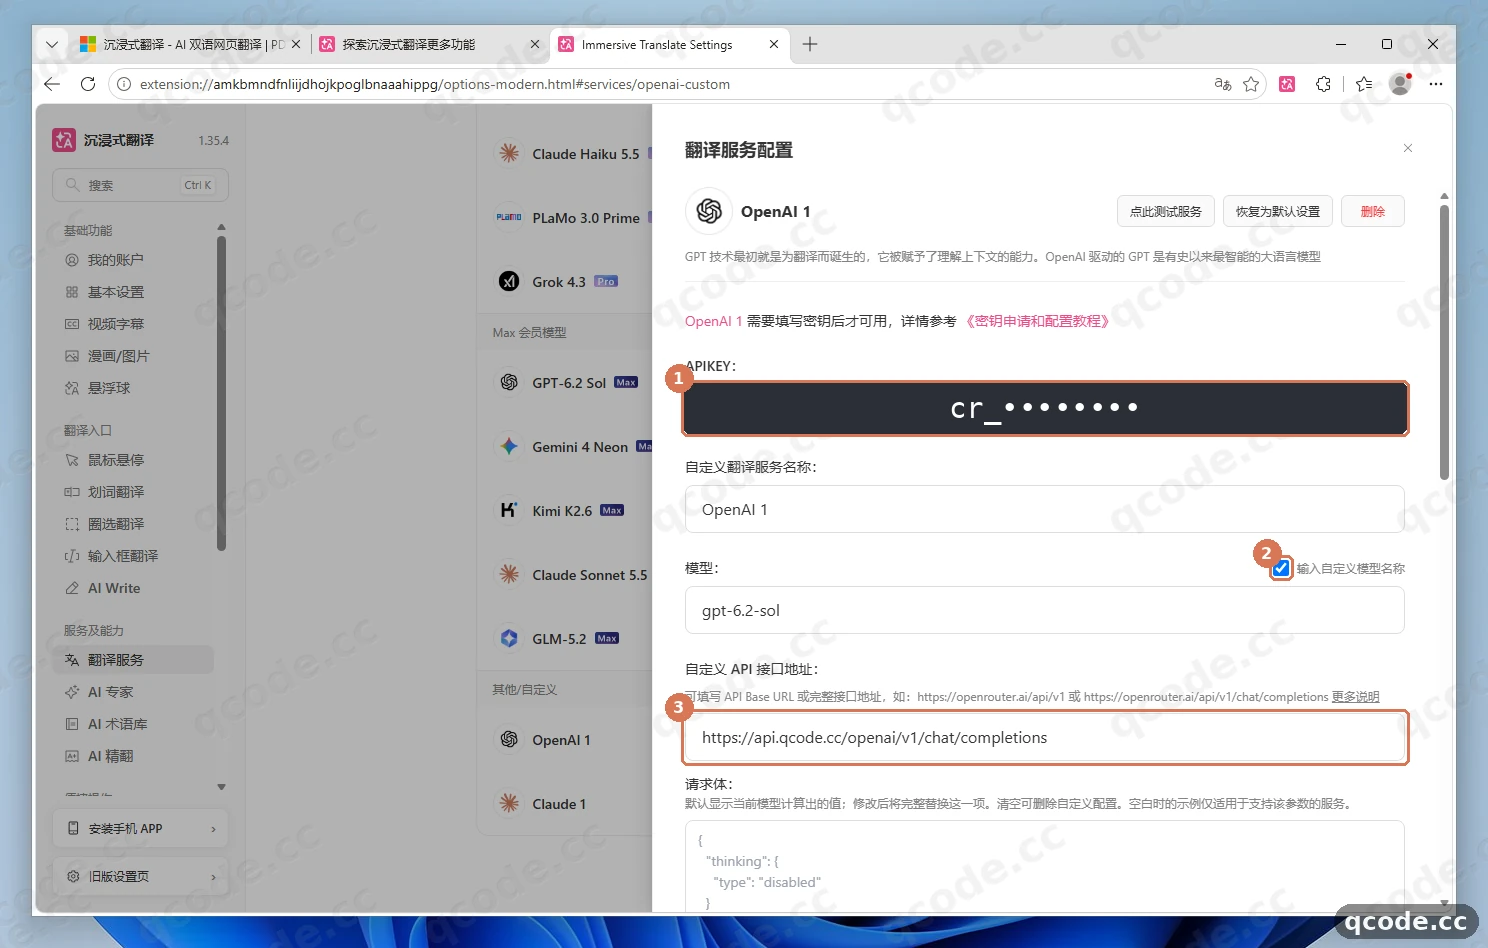
Done right you will see: the "APIKEY" field shows hidden dots, "Enter custom model name" is ticked with gpt-6.2-sol below it, and the endpoint field shows the complete https://api.qcode.cc/openai/v1/chat/completions.
Need an API key?
If you do not have a QCode account yet, Sign up for QCode first. If you prefer to pay for actual usage, buy a Pay-as-you-go Pack first, then create the key in the Dashboard and copy the whole string that starts with cr_ into the "APIKEY" field. You can pay by credit/debit card (Visa / Mastercard), Apple Pay / Google Pay, or cryptocurrency — see Payment methods.
Stuck? You cannot find gpt-6.2-sol or you typed a Claude model
The "Model" dropdown only lists older models by default, so you must first tick "Enter custom model name" before you can type gpt-6.2-sol yourself. Also, "OpenAI 1" speaks the OpenAI-compatible protocol, so a Claude model cannot go here; if you want to use claude-opus-5-5, configure it in "Claude 1" under the "Others/Custom" group instead.
Click "Click here to test the service" to check connectivity
Make sure the fields you just filled in have lost focus and saved, then click the "Click here to test the service" button on the right of the drawer header, which ① points to. Wait 1–3 seconds; when a green response-latency number (in ms) appears where ② points to, to the left of the button, the QCode endpoint is working.
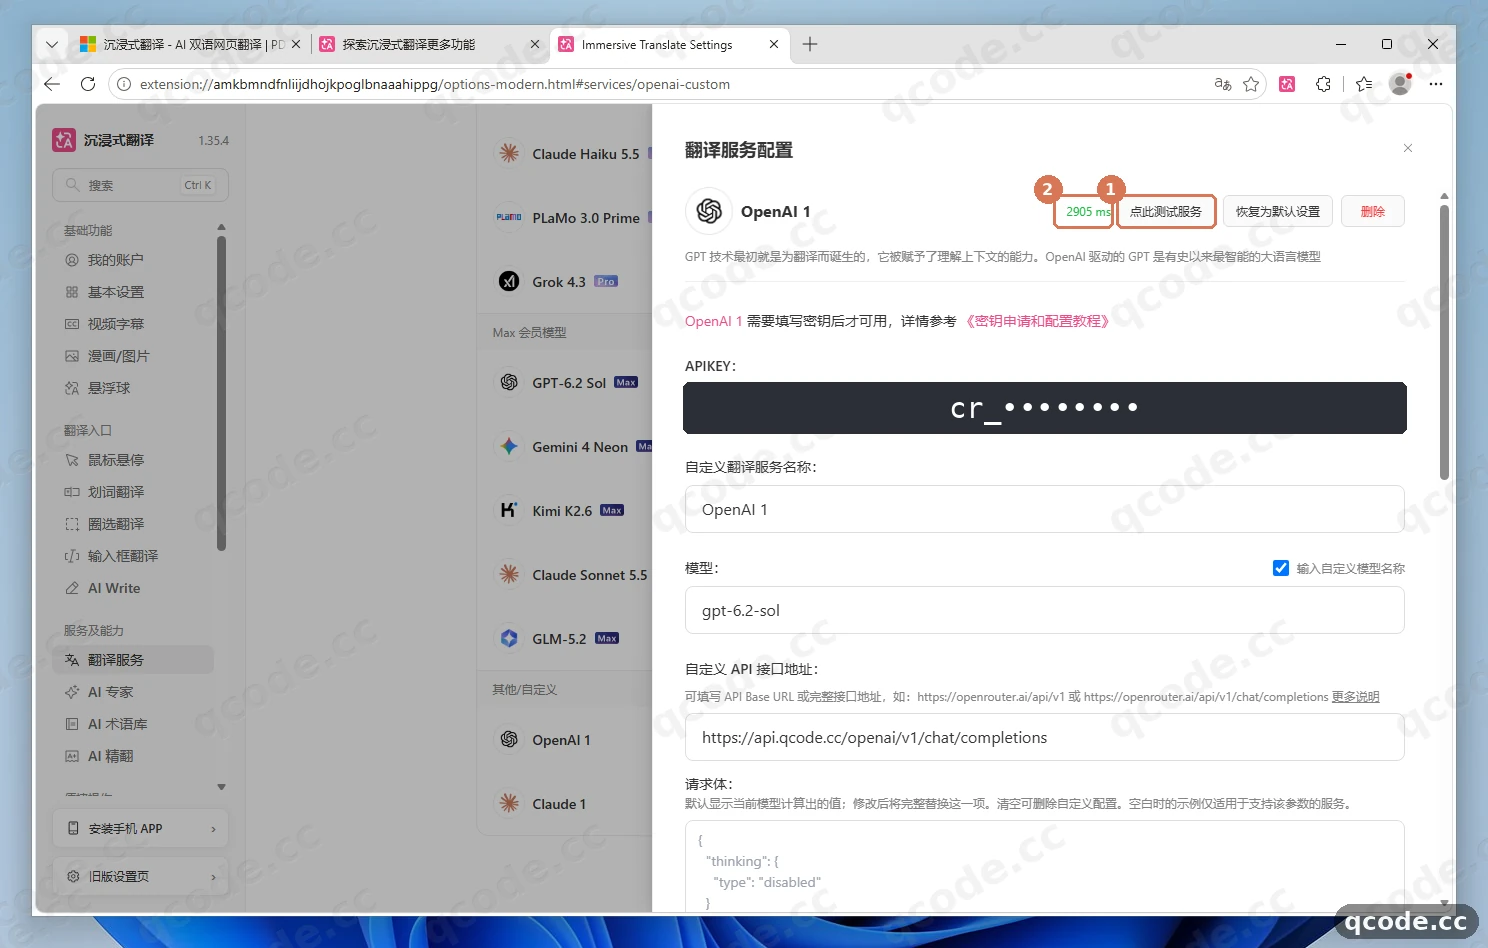
Done right you will see: a green millisecond figure to the left of "Click here to test the service" (anything from a few hundred to a couple of thousand ms), with no red error anywhere on the page.
Stuck? It reports "Error reason: connection failed" or 401
Check three things in order: 1) after typing the endpoint, click an empty spot in the drawer to blur the field and wait a second before clicking "Click here to test the service", so the request does not still go to the default address; 2) check that "APIKEY" holds the complete cr_ key with no spaces before or after it; 3) if the default node is slow from mainland China, switch the endpoint to the Asian node https://asia.qcode.cc/openai/v1/chat/completions.
Check "Max requests per second"
Keep scrolling down in the same "Translation service configuration" drawer and find the "Max requests per second" setting that ① points to; check that the number box that ② points to holds 5 (the 1.35.4 default is already 5, so no manual change is needed, and any change also saves automatically). If you later hit a rate-limit notice while translating a very long page or an e-book, come back here and lower the number to 2 or 3.
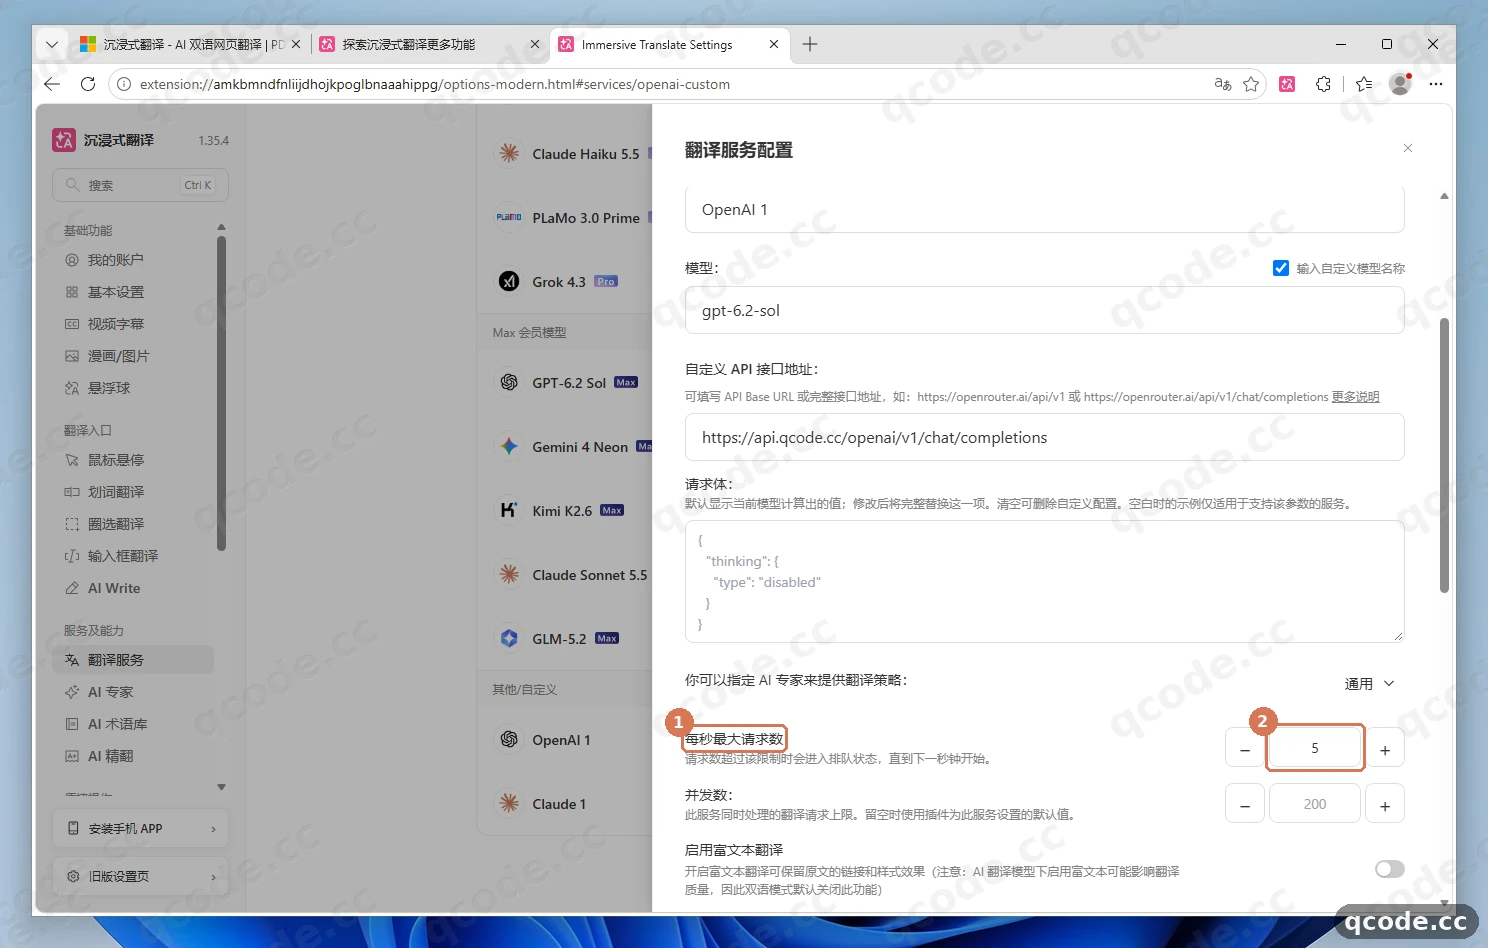
Done right you will see: the number to the right of "Max requests per second" is 5 (or a smaller integer you lowered it to).
Set "OpenAI 1" as the default translation service
Click the close button in the top right to close the configuration drawer and return to the "Translation service list". Find the "OpenAI 1" row at the bottom that ① points to and click the button on its right that currently reads "Set as default"; once you click it, the spot that ② points to changes to "Current default" and the enable switch on the far right turns on by itself.
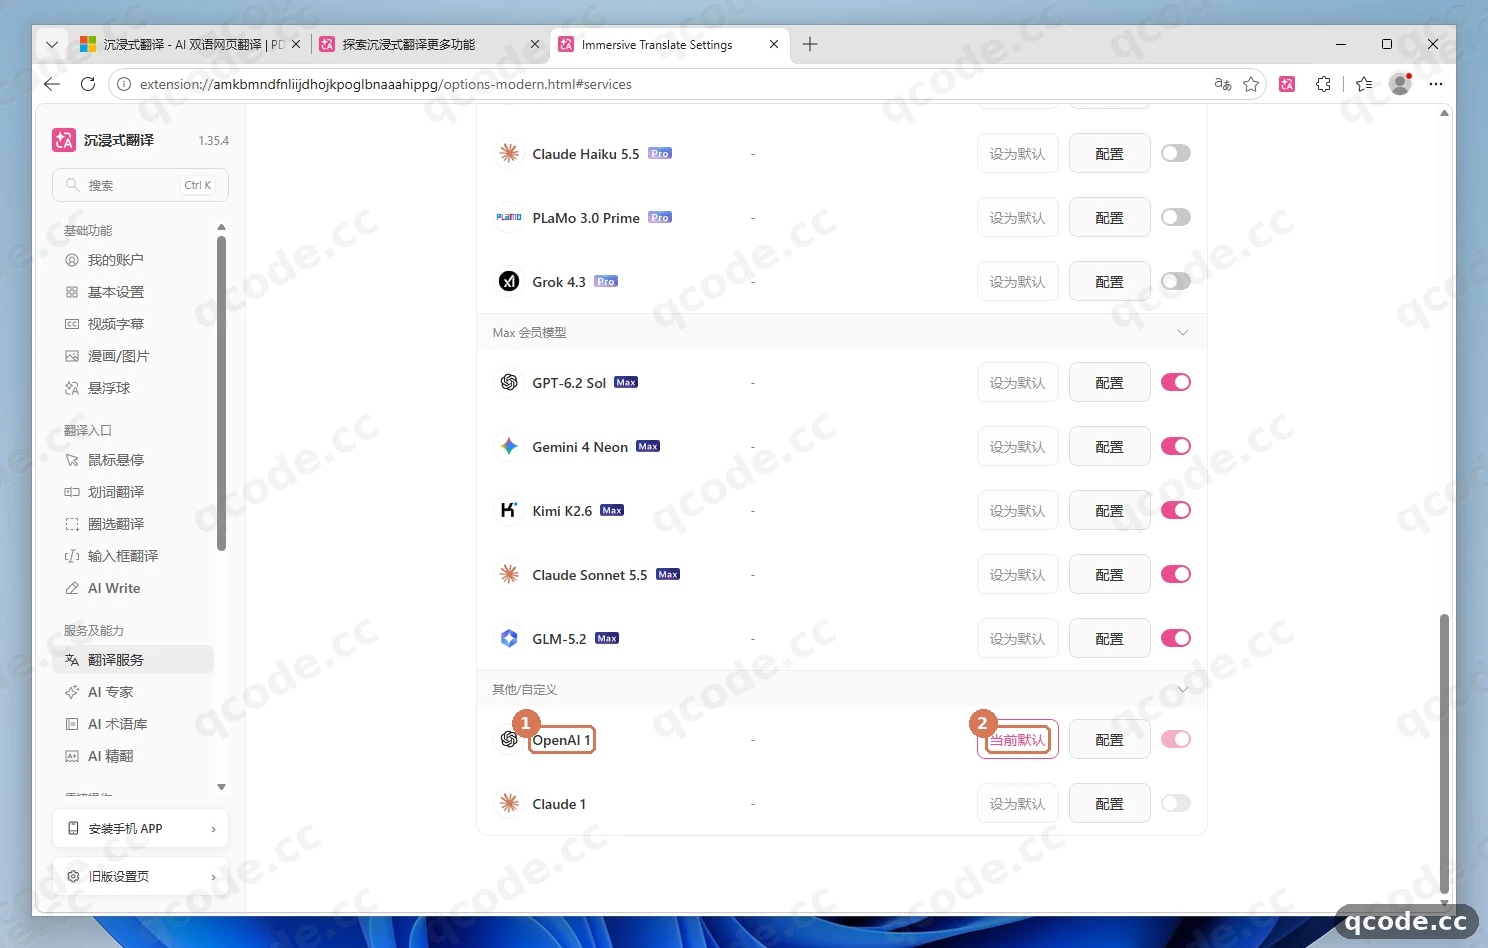
Done right you will see: the "OpenAI 1" row reads "Current default", and from then on translating on any page requests the model through QCode by default.
Open an English page and click "Translate (Alt+A)"
Open any English page in a new tab (for example the official Python docs or an English news page); if the browser offers its own "Translate this page?" popup, close it first. Then click the "Immersive Translate" icon in the toolbar, check that the translation service in the middle of the panel, which ① points to, already reads "OpenAI 1", and click the "Translate (Alt+A)" button that ② points to (from then on you can also trigger it right on the page with the shortcut Alt+A).
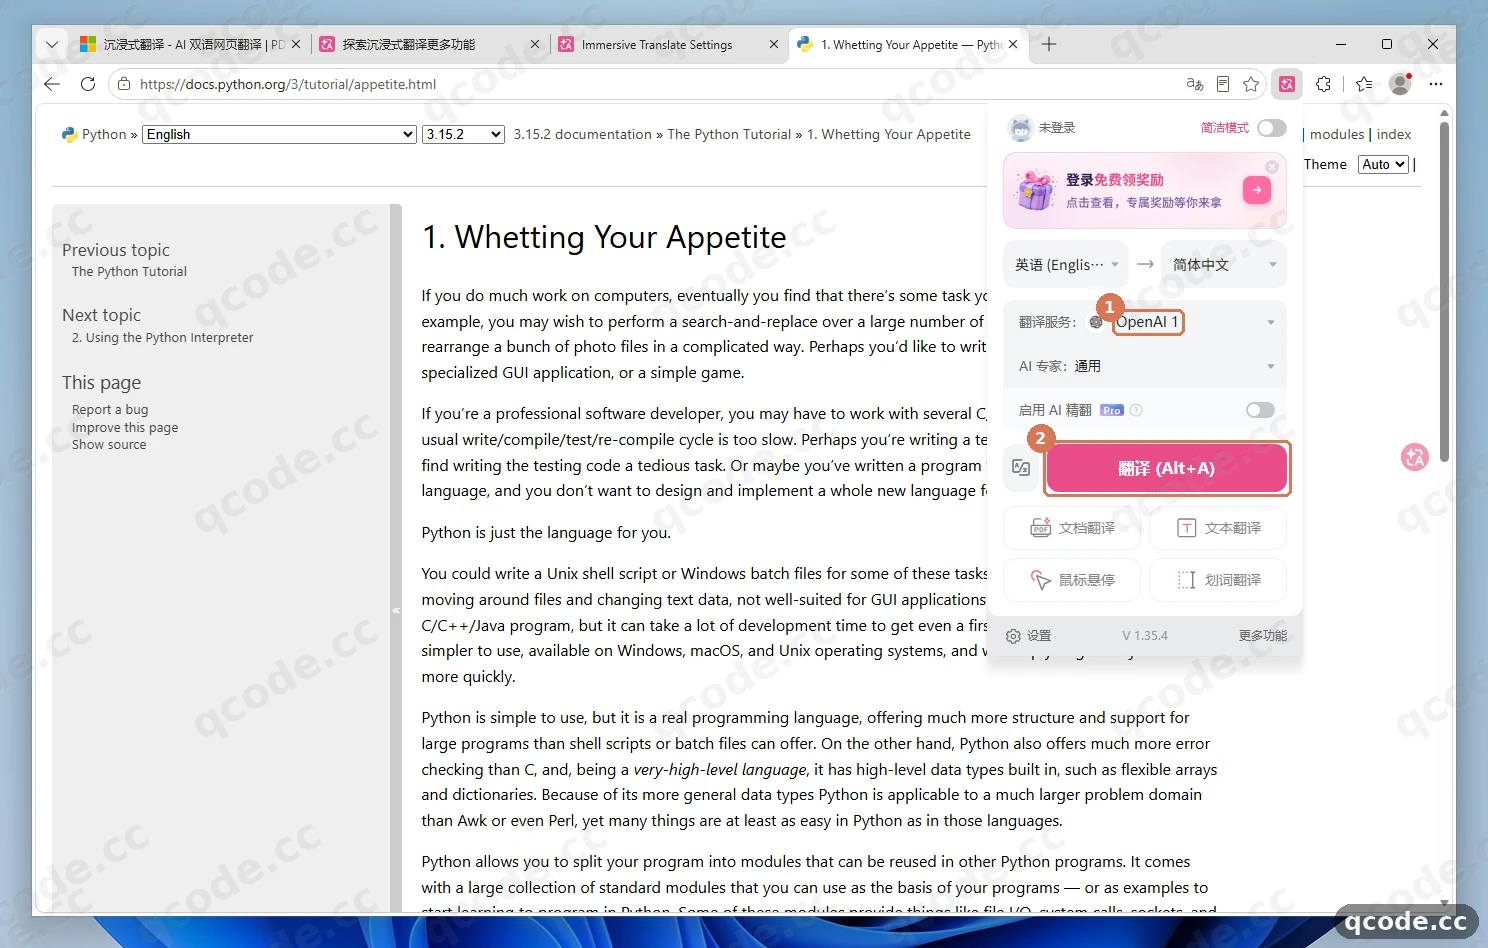
Done right you will see: the panel shows "OpenAI 1" as the translation service, and after you click "Translate (Alt+A)" the button switches to a translating state.
Read the bilingual Chinese-English translation
Wait a few seconds, click an empty spot on the page to collapse the panel, and the complete bilingual page is there: the English source paragraph that ① points to stays untouched, and right below it, where ② points to, a fluent Chinese translation has been inserted automatically, with no red error anywhere on the page.
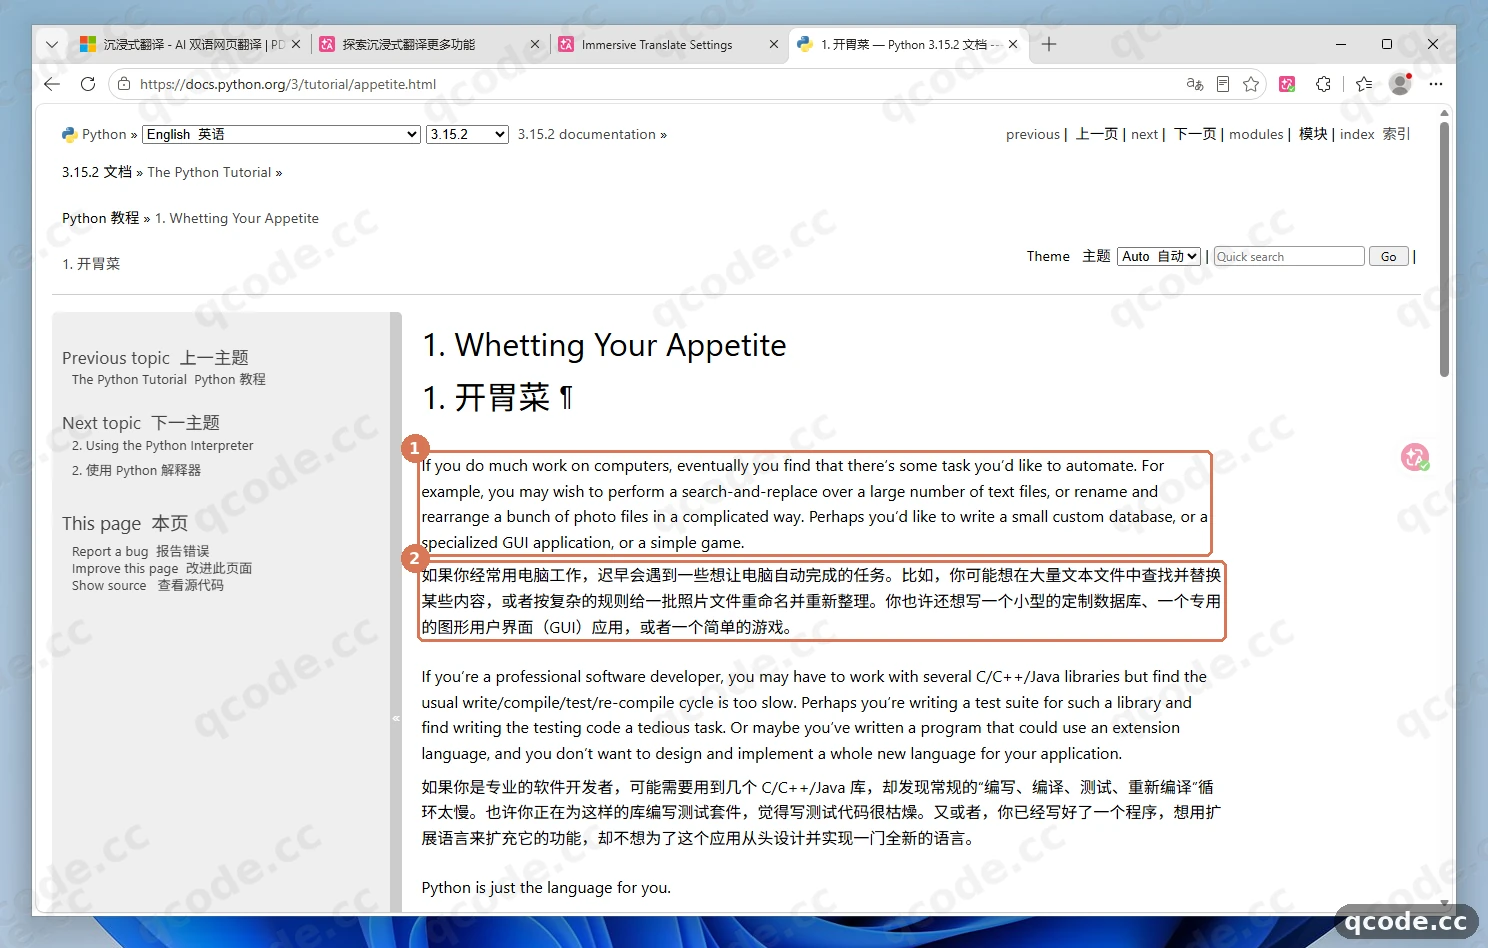
Done right you will see: Chinese translations appear in pairs below the English headings and body paragraphs; pressing Alt+A again switches back to the original text at any time.
Verify it works
When all four of these are true, Immersive Translate is fully connected to QCode:
- In the "Translation service list" on the settings page, "OpenAI 1" reads "Current default", the custom model in the drawer is
gpt-6.2-sol, and the custom API endpoint ishttps://api.qcode.cc/openai/v1/chat/completions; - Clicking "Click here to test the service" in the "OpenAI 1" drawer returns a green
mslatency figure to the left of the button; - Opening any English page and clicking "Translate (Alt+A)" produces a bilingual translation within seconds, with no red error;
- Open probe.qcode.cc, enter the same
cr_key and click query: you can see the request record for the time you just used, with status200.
All done
You have installed Immersive Translate in your Windows 11 browser and connected it to QCode. From now on, one press of Alt+A gives you bilingual reading on any English document or page. From here you can:
- Endpoints and API formats
- Model selection guide
- Chinese models
- Billing
- Next: compare the plans on the pricing page
- Go back to your Dashboard to check usage and balance
Common errors
| Error message | Why | What to do |
|---|---|---|
错误原因:连接失败 |
You clicked "Click here to test the service" right after editing "Custom API endpoint", without blurring the field so it could save, so the request still went to the default official address; or the current network times out on the default node | After typing https://api.qcode.cc/openai/v1/chat/completions, click an empty spot in the drawer to blur the field, wait about 1 second, then click "Click here to test the service"; if it still times out from mainland China, switch to https://asia.qcode.cc/openai/v1/chat/completions |
model_not_available_on_endpoint |
A Claude model was entered in "OpenAI 1", and QCode's OpenAI-compatible endpoint does not accept Claude models | Change the custom model in "OpenAI 1" to gpt-6.2-sol (or gpt-6.2-astra); if you need claude-opus-5-5, configure "Claude 1" under the "Others/Custom" group instead and point it at https://api.qcode.cc/api |
429 / 请求过于频繁 |
A long page or e-book fired too many paragraph requests in parallel at once, triggering the request rate limit | Open the "OpenAI 1" configuration drawer, scroll down to "Max requests per second" and keep it at 5 or lower it further to 2–3, then retry |
HTTP 403 |
On some networks, downloading the offline zip through its direct link is refused | On Windows 11, install in one click from Microsoft Edge Add-ons; if you really need an offline install, load the official GitHub Releases package from the extensions management page instead |
FAQ
What happens when my key expires?
Two cases:
- A personal plan key cannot be renewed when it expires — you have to reopen a plan and use a new key;
- For a pay-as-you-go pack, buy another pack after the key expires and the same key starts working again.
If you switched to a new key, open Immersive Translate "Settings" → "Translation Services" → "OpenAI 1" → "Configure", replace the "APIKEY" field with the new cr_ key and click an empty spot to blur it so it saves automatically.
Do I need to sign in to an Immersive Translate account or get a Pro membership?
No. Even if the top of the panel says "Not signed in" after you click the toolbar icon, you can go straight to "Settings" → "Translation Services", find "OpenAI 1" in the "Others/Custom" group at the bottom (no Pro restriction), and fill in your own QCode key and custom endpoint to translate web pages normally.
Can I use Claude models in Immersive Translate?
Yes. In the "Others/Custom" group at the bottom of the "Translation service list" on the settings page, right next to "OpenAI 1", there is also a "Claude 1" service, which likewise accepts an "APIKEY" and a "Custom API endpoint".
Note that Claude must go through QCode's Anthropic endpoint (https://api.qcode.cc/api) and cannot be entered under "OpenAI 1"; after ticking "Enter custom model name", the recommended value is claude-opus-5-5 (pick claude-haiku-5-5 when you want lower cost and faster responses).
How do I change the extension's display language?
Open the Immersive Translate settings page, click "Basic settings" on the left, find "Interface language" (it controls the display language of the extension panel and the settings page) and switch between Simplified Chinese, English and other languages.
Translation is slow, or only part of the page is translated — what now?
Check two things:
- Switch to a nearer QCode ingress point: from mainland China, change "Custom API endpoint" to the Asian node
https://asia.qcode.cc/openai/v1/chat/completions; in North America or Europe, tryhttps://us.qcode.cc/openai/v1/chat/completions. - Lower the request rate: in the "OpenAI 1" configuration drawer, scroll down to "Max requests per second" and lower it from the default
5to2or3, which reduces the chance of rate limiting when a long page is translated in parallel chunks.
Connection overview
| Item | Details |
|---|---|
| Recommended translation service | OpenAI 1 (settings page "Translation service list" → "Others/Custom" group; no sign-in and no Pro membership needed) |
| OpenAI-compatible endpoint | https://api.qcode.cc/openai/v1/chat/completions (also accepts https://api.qcode.cc/openai/v1) |
| Anthropic endpoint | https://api.qcode.cc/api (used by "Claude 1") |
| Default recommended models | OpenAI-compatible: gpt-6.2-sol · Anthropic: claude-opus-5-5 |
| Default request rate | Max requests per second 5 (saved automatically; lower it if you hit 429) |
| Official install guide | immersivetranslate.com installation guide |
Mind the entry points: the service list also has a "Custom API translation" item, which is aimed at your own private translation protocol and is not the same entry as the "OpenAI 1" and "Claude 1" used in this tutorial — do not pick the wrong one.
Other ingress points
The three ingress points are functionally identical and differ only in network routing; the same cr_ key works with all of them:
| Node | OpenAI-compatible (full "OpenAI 1" address) | Anthropic ("Claude 1" endpoint) |
|---|---|---|
| Global | https://api.qcode.cc/openai/v1/chat/completions |
https://api.qcode.cc/api |
| Asia (first choice from mainland China) | https://asia.qcode.cc/openai/v1/chat/completions |
https://asia.qcode.cc/api |
| North America / Europe | https://us.qcode.cc/openai/v1/chat/completions |
https://us.qcode.cc/api |
Recommended models
| Model ID | Service | Notes |
|---|---|---|
gpt-6.2-sol |
OpenAI 1 |
Default first choice for OpenAI-compatible; fast responses and natural output for paragraph-by-paragraph page translation |
gpt-6.2-astra |
OpenAI 1 |
Higher-tier OpenAI alternative, suited to long complex sentences and careful translation of academic literature |
claude-opus-5-5 |
Claude 1 |
Default first choice for Anthropic; excellent Chinese polishing and grasp of context |
claude-haiku-5-5 |
Claude 1 |
Lightweight Anthropic alternative, good for quick everyday browsing of English pages |
A web-translation request usually contains only a single short paragraph, so prefer the direct-output, non-reasoning models above; under a short output budget some reasoning models can burn the allowance on their thinking process, leaving the translation incomplete or slower. For more available models see the Model selection guide and Chinese models.
Related docs
- Endpoints and API formats — full cross-reference table of protocols and model families
- Model selection guide — what each model is good at and which to pick when
- Chinese models — list of Chinese models available on the OpenAI-compatible endpoint
- Billing — personal plans and pay-as-you-go packs explained
- Troubleshooting — diagnosing common connection and authentication problems
- Immersive Translate official installation docs
Get started with QCode
One API key for Claude Code, Codex and more — billed per token, per-model prices on qcode.cc/models