DeepChat + QCode on Windows 11: Connect GPT and Claude (11 Screenshots)
Connect DeepChat 1.1.4 to QCode on Windows 11 in 11 screenshots: install, add a QCode provider for GPT or Claude, and get your first reply.
Need an API key? Sign up →Endpoints & base URLs →
On This Page
- Download and install DeepChat
- Download the Windows installer
- Choose installation options
- Confirm the install folder and finish setup
- Skip the first-launch Setup Guide
- Expand the sidebar and open Settings
- Open Provider Center and add a custom provider
- Name the provider and select OpenAI Completions
- Enter the Base URL and API Key, then connect
- Confirm QCode and gpt-6.2-sol are enabled
- Return to chat and pick gpt-6.2-sol
- Send a test message
- Verify it works
- Common errors
- FAQ
- Add Claude models via Anthropic
- Access points and available models
- Related docs
Short answer: In DeepChat’s Settings → Providers → Provider Center, click + Add Custom Provider, set Name to QCode, API Type to OpenAI Completions, API Base URL to https://api.qcode.cc/openai/v1, paste your cr_ API key, and click Connect and load models (for Claude, add a second custom provider with API Type Anthropic and API Base URL https://api.qcode.cc/api).
| Item | Fill in |
|---|---|
| Provider name | QCode |
| API Type (GPT) | OpenAI Completions |
| API Base URL (GPT) | https://api.qcode.cc/openai/v1 |
| API Base URL (Claude) | https://api.qcode.cc/api |
| API Key | cr_xxxxxxxx |
Checked on 2026-11-22 · DeepChat 1.1.4 · Windows 11
Follow the 11 screenshots below to install DeepChat on Windows 11, add QCode as a custom provider, and chat with gpt-6.2-sol (or Claude models) without creating any vendor account.
Before you start, make sure you have these ready:
- A 64-bit Windows 10 or 11 PC that can open
deepchatai.cn,github.com, andapi.qcode.cc - About 1.5 GB of available disk space (312 MB for the installer plus 1.1 GB for DeepChat, installed into your own user folder)
- A QCode API key copied from your dashboard (
cr_xxxxxxxx). No account yet? Sign up first, pick a plan on the pricing page, then create the key in your Dashboard. - Note: on a fresh Windows 11 PC without Microsoft Visual C++ Redistributable (x64), the installer prompts to install that runtime once before DeepChat Setup starts
Download and install DeepChat
DeepChat distributes Windows builds as .exe installers via GitHub Releases (there is no Microsoft Store or winget package yet). Pick the tab that matches your network:
Open deepchatai.cn/#/download and click Windows x64 (312 MB) for standard Intel/AMD PCs, or Windows ARM64 (266 MB) for Windows on ARM. You can also download DeepChat-1.1.4-windows-x64.exe directly from GitHub Releases. Do not download .blockmap files.
Open deepchatai.cn/#/download and wait a second or two for the download buttons to appear, or open GitHub Releases directly. Click Windows x64 (DeepChat-1.1.4-windows-x64.exe, 312 MB) for ordinary Intel/AMD PCs, or Windows ARM64 for ARM PCs. Because the installer downloads from GitHub Releases, the connection may be slow or stall from mainland China — if it pauses, retry later or switch networks. Ignore .blockmap files (those are update checksums, not installers).
Download the Windows installer
Open https://deepchatai.cn/#/download in your browser and wait a moment for the page to render. Click ① Windows x64 (312 MB) for a standard Intel or AMD PC; only click ② Windows ARM64 (266 MB) if you use a Windows-on-ARM device.
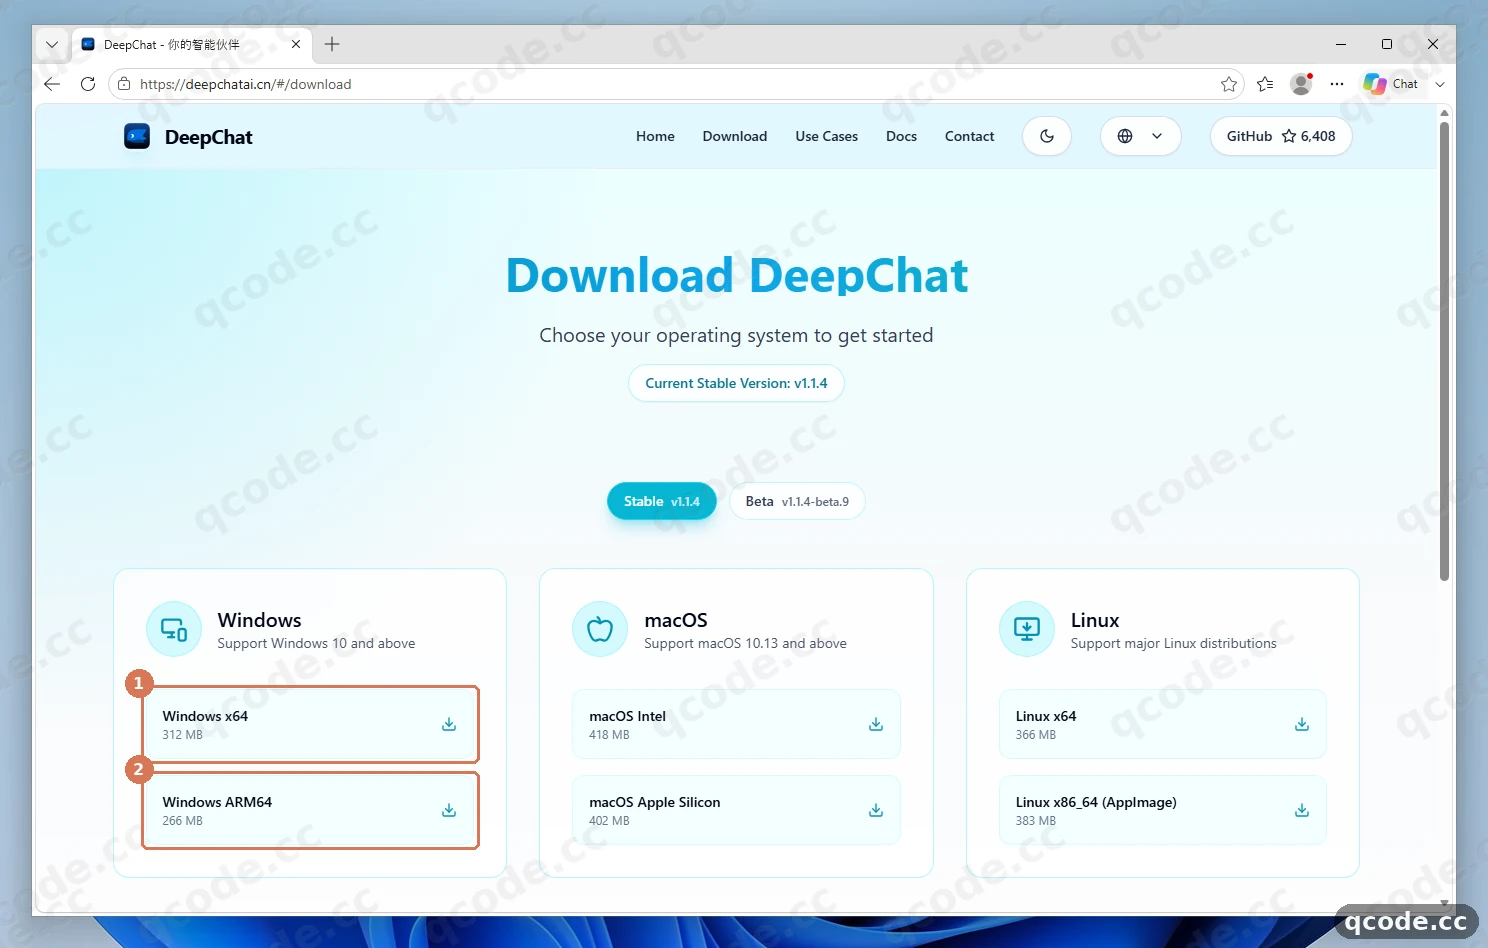
Stuck? Edge asks to translate the page, or the download is slow
The page shows English buttons on English Windows, but its browser tab title still contains Chinese text, so Edge may pop up a translation prompt — simply close that popup. The button pulls DeepChat-1.1.4-windows-x64.exe from GitHub Releases; if it stalls, cancel and retry from GitHub Releases and make sure you pick the .exe file, not .blockmap.
Done right you will see: DeepChat-1.1.4-windows-x64.exe (about 312 MB) finishes downloading into your Downloads folder.
Choose installation options
Double-click DeepChat-1.1.4-windows-x64.exe to start DeepChat Setup. Keep ① Only for me selected — this installs for your user account without needing administrator rights — then click ② Next >.
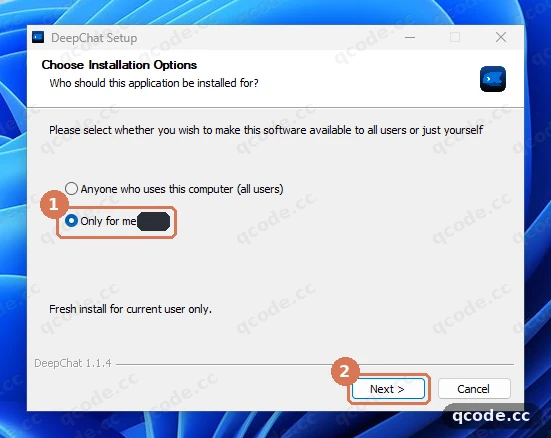
Stuck? Windows SmartScreen or a Visual C++ prompt appears first
Two prompts can appear before the wizard:
- Windows Defender SmartScreen: the installer is unsigned, so Windows may show Windows protected your PC. Click More info, then Run anyway.
- Visual C++ Redistributable: on a clean Windows 11 PC without the runtime, a dialog says
NOTE: DeepChat requires 'Microsoft Visual C++ Redistributable' (x64) to function properly. Download and install now?. Click Yes, agree and click Install (this one-time step triggers a UAC prompt), then close it when finished so DeepChat Setup can continue.
Done right you will see: ① Only for me is selected and clicking ② Next > moves to the install location screen with no UAC prompt.
Confirm the install folder and finish setup
On Choose Install Location, keep the default per-user path (AppData\Local\Programs\DeepChat, about 1.1 GB required) and click ① Install. When the final screen appears, leave Run DeepChat checked and click Finish.
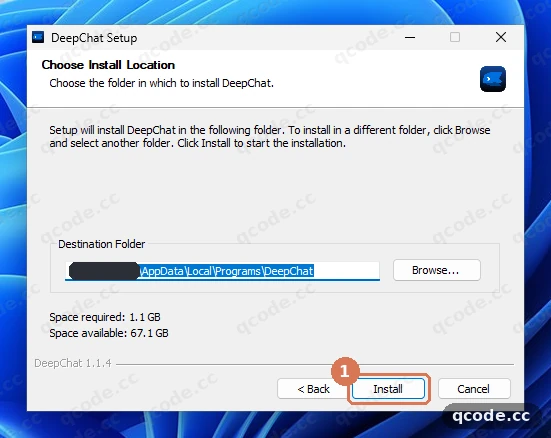
Done right you will see: the progress bar finishes, the Finish button appears, and DeepChat launches automatically after you click Finish.
Skip the first-launch Setup Guide
On first launch, DeepChat shows Welcome to DeepChat Agent with an 8-step SETUP GUIDE (1/8) spotlight overlay. Click ① Skip All to jump straight into the main chat window.
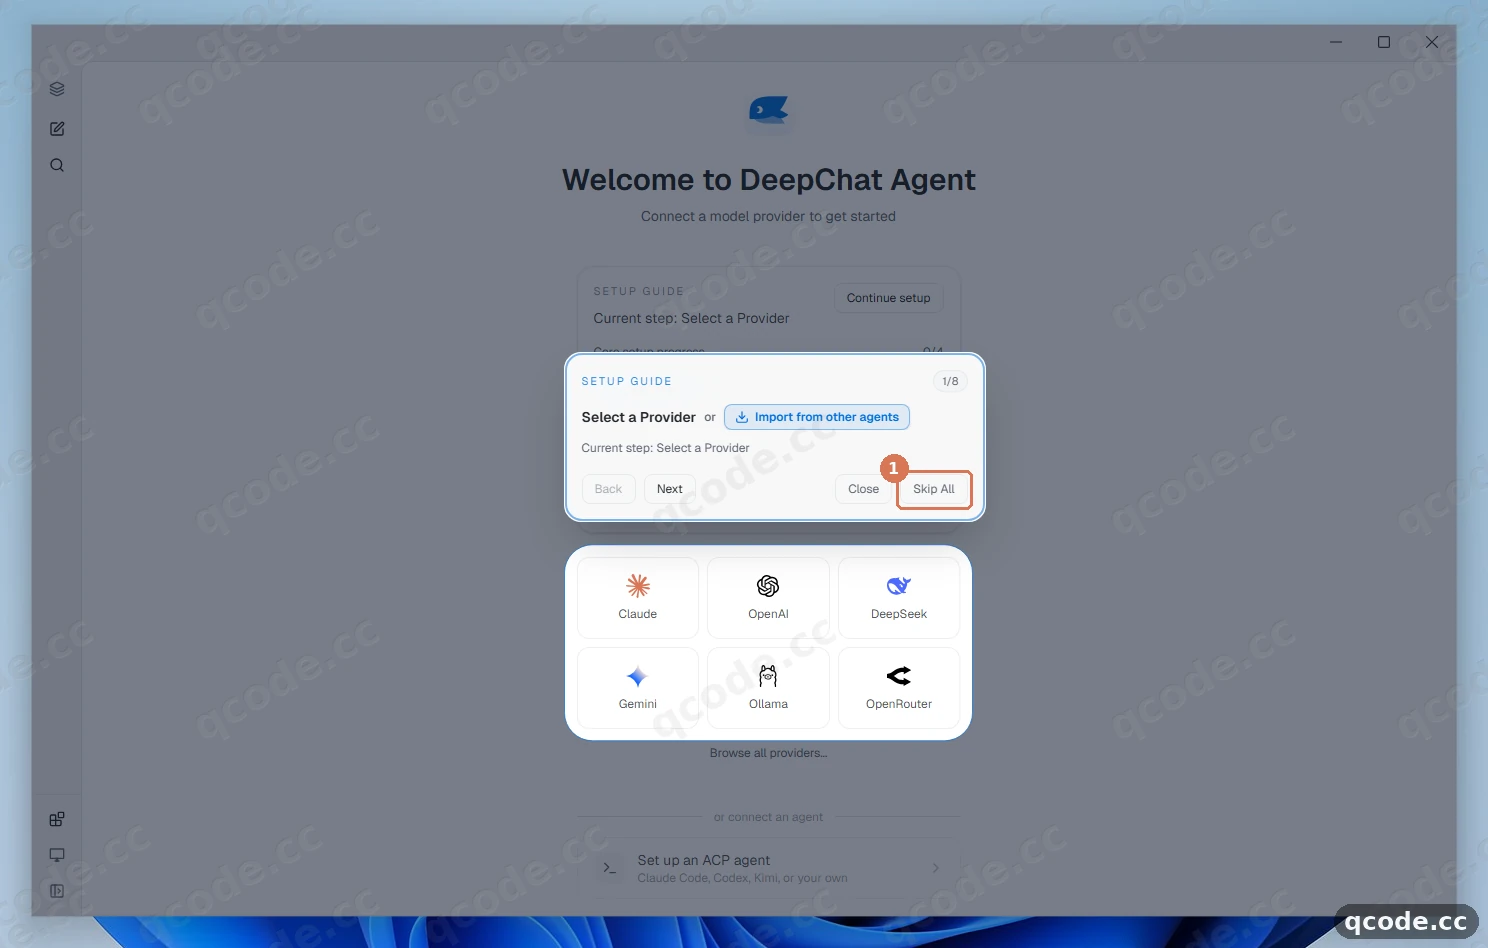
Done right you will see: the dark spotlight overlay disappears and the main DeepChat workspace opens.
Expand the sidebar and open Settings
DeepChat starts with its left sidebar collapsed, hiding the Settings gear button behind Plugins, Theme · System, and Expand sidebar. First click the bottom-left sidebar button at ① (Expand sidebar, which turns into Collapse sidebar once open), then click the ② Settings gear icon right next to it.
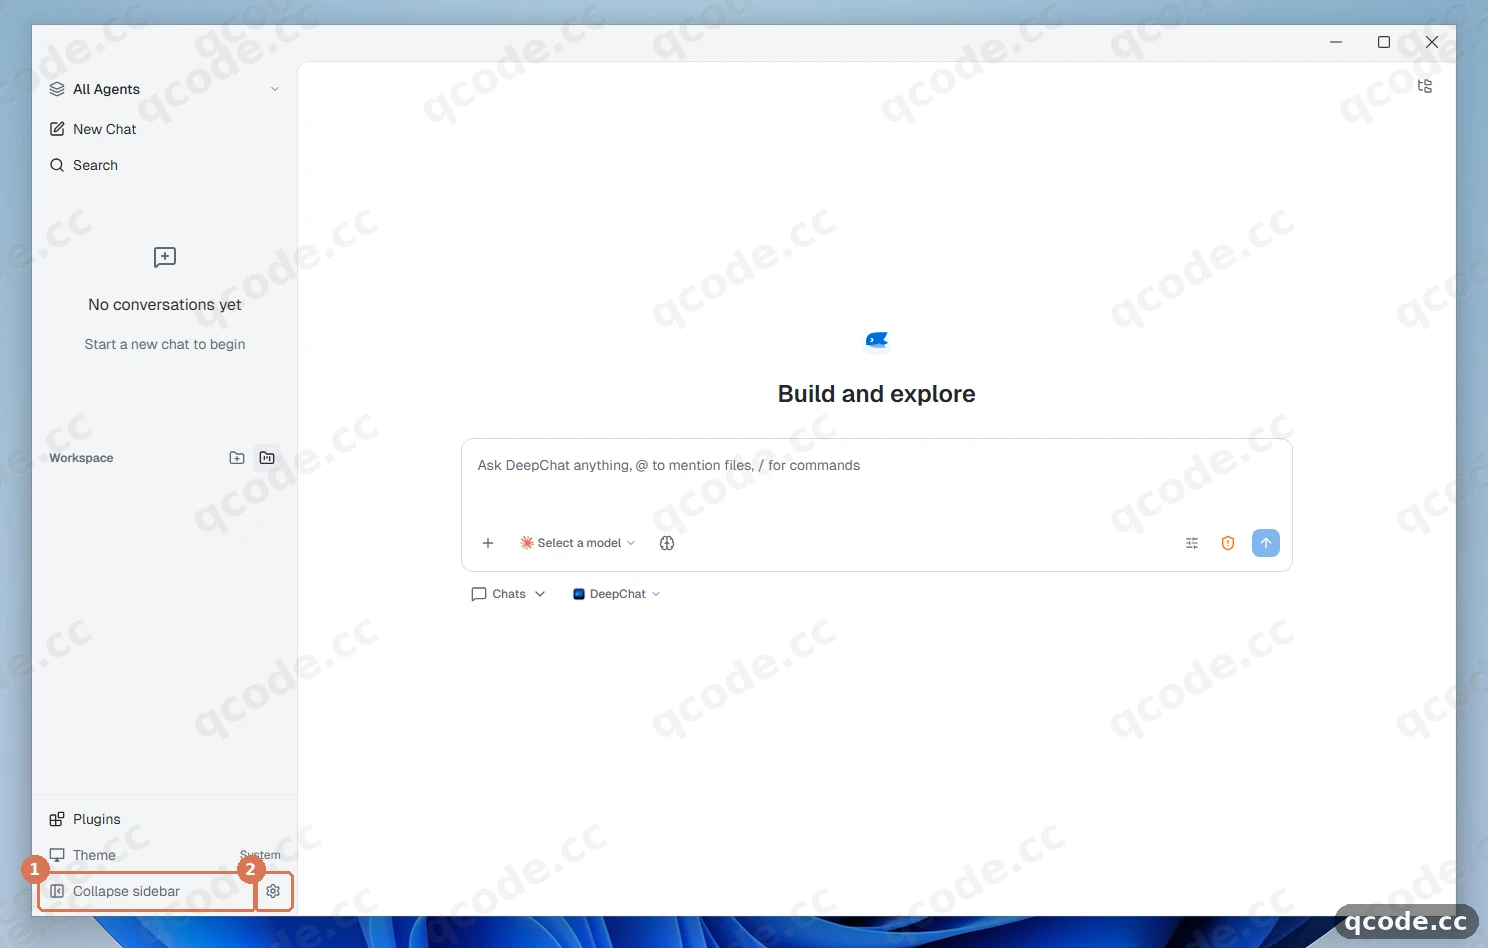
Stuck? I cannot find the Settings gear icon
When the left sidebar is collapsed, the gear icon is hidden. Click the bottom-left Expand sidebar icon first; once the sidebar widens, the Settings gear appears at the bottom right of the sidebar.
Done right you will see: a separate Settings window opens, with a ← Back to chat button at the top left.
Open Provider Center and add a custom provider
In the Settings window, click ① Providers under Agent Settings on the left. In the middle Provider Center column, click ② + Add Custom Provider.
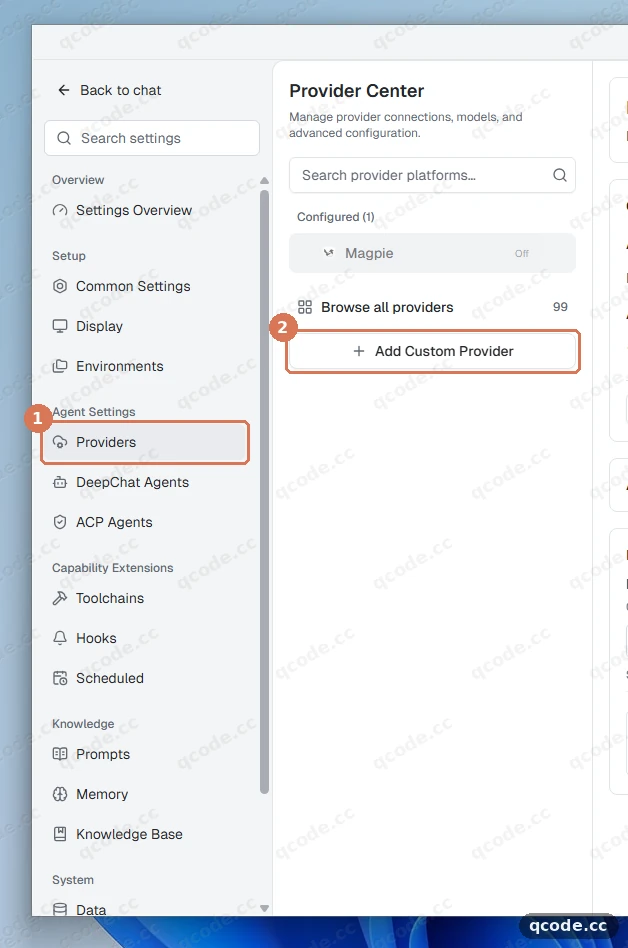
Done right you will see: the Add Custom Provider form opens inline in the right-hand pane of the Settings window.
Name the provider and select OpenAI Completions
In the inline Add Custom Provider form, type QCode into ① Name. Then open the API Type dropdown and pick ② OpenAI Completions.
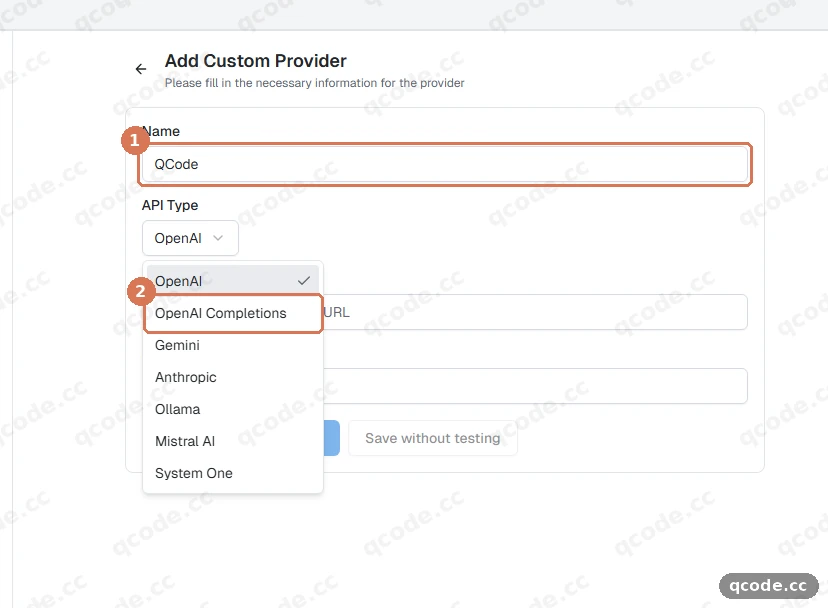
Stuck? Which API Type should I pick?
Pick OpenAI Completions (not OpenAI) for GPT and Chinese models such as gpt-6.2-sol, glm-5.3, kimi-k3, and deepseek-v4-pro. If you want Claude models like claude-opus-5-5, add a second custom provider using Anthropic (see Add Claude models via Anthropic below).
Done right you will see: ① shows QCode and ② OpenAI Completions is selected as the API Type.
Enter the Base URL and API Key, then connect
In ① API Base URL, enter https://api.qcode.cc/openai/v1 — DeepChat automatically previews API Example: https://api.qcode.cc/openai/v1/chat/completions underneath, so do not add /chat/completions. Paste your cr_ key into API Key (it masks as dots), then click ② Connect and load models.
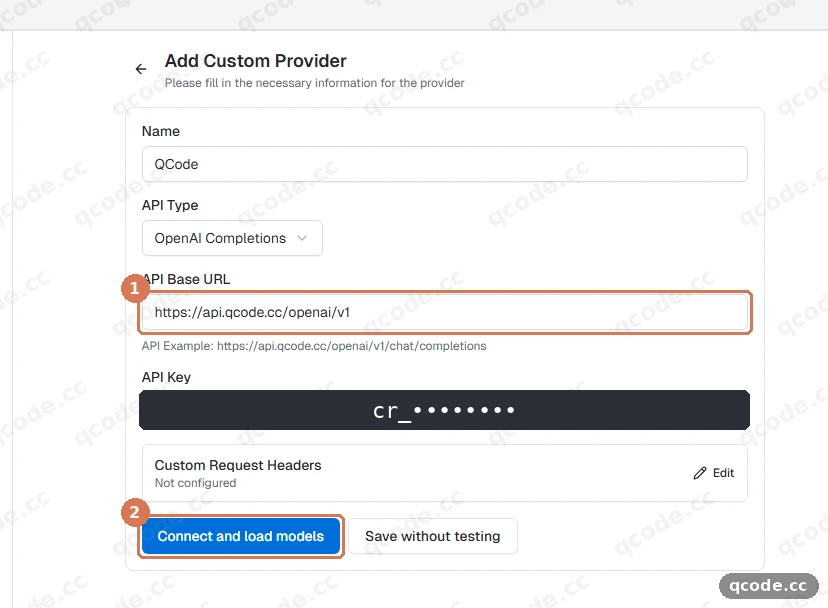
Need an API Key?
If you do not have a QCode account yet, Sign up first. Purchase a pack on the Pay-as-you-go packs page if you prefer not to subscribe to a monthly plan, then create your key in the Dashboard and copy the full cr_ string. For available payment options, including credit and debit cards, see Payment methods.
Stuck? Connection fails with 401 or 404
A 404 error usually means the URL is missing /v1 or already includes /chat/completions — make sure API Base URL is exactly https://api.qcode.cc/openai/v1. A 401 error means the key was copied with extra spaces, quotes, or line breaks, or is invalid; copy the full cr_ key again from your Dashboard.
Done right you will see: DeepChat connects and displays QCode is connected, showing that it loaded QCode’s model list along with Start chatting and View models buttons.
Confirm QCode and gpt-6.2-sol are enabled
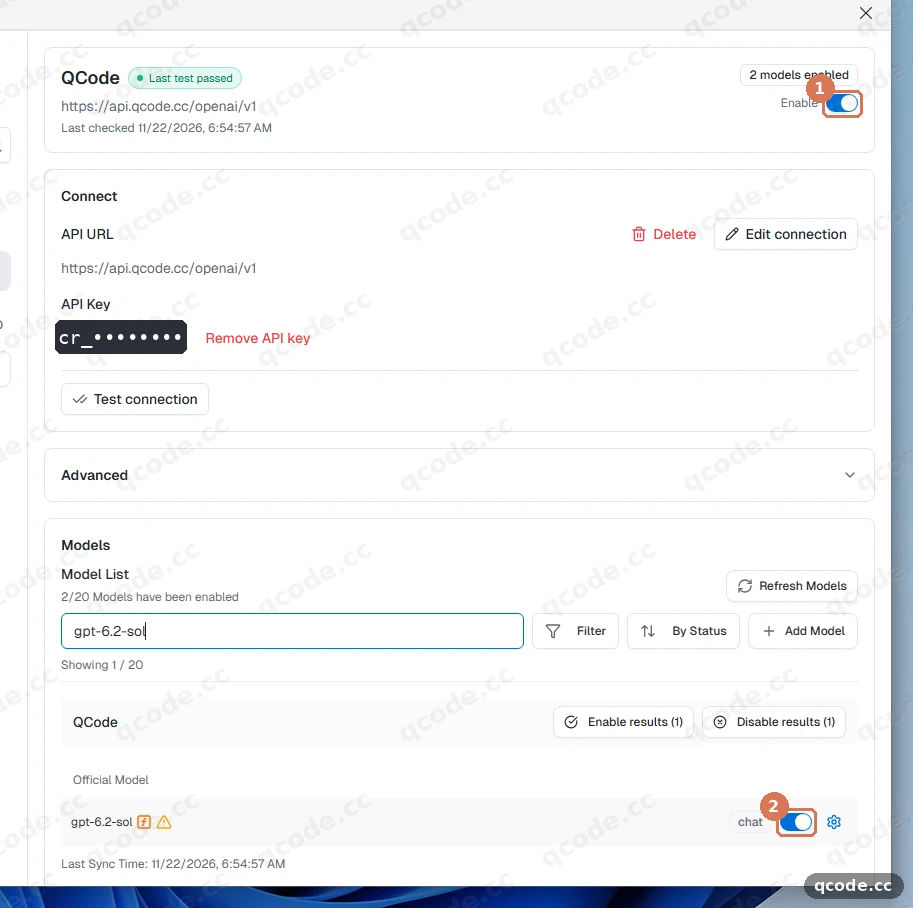
Click View models to open the QCode provider details. Verify the green Last test passed badge and that ① Enable at the top right is switched on. Type gpt-6.2-sol in Search models... and confirm ② its toggle is turned on.
Stuck? You clicked Save without testing, or a model is missing
If you clicked Save without testing, the provider starts turned off. Switch ① Enable on at the top right (which also fetches models automatically), or click + Add Model, enter gpt-6.2-sol in both Model Name and Model ID, and click Save configuration.
Done right you will see: Last test passed in green, ① Enable switched on, and ② gpt-6.2-sol switched on inside Model List.
Return to chat and pick gpt-6.2-sol
Click ← Back to chat in the top-left corner of the Settings window. DeepChat may default to another preselected model (such as gpt-6.2-astra), so click ① the model selector button below the chat input box, then click ② gpt-6.2-sol under the QCODE group.
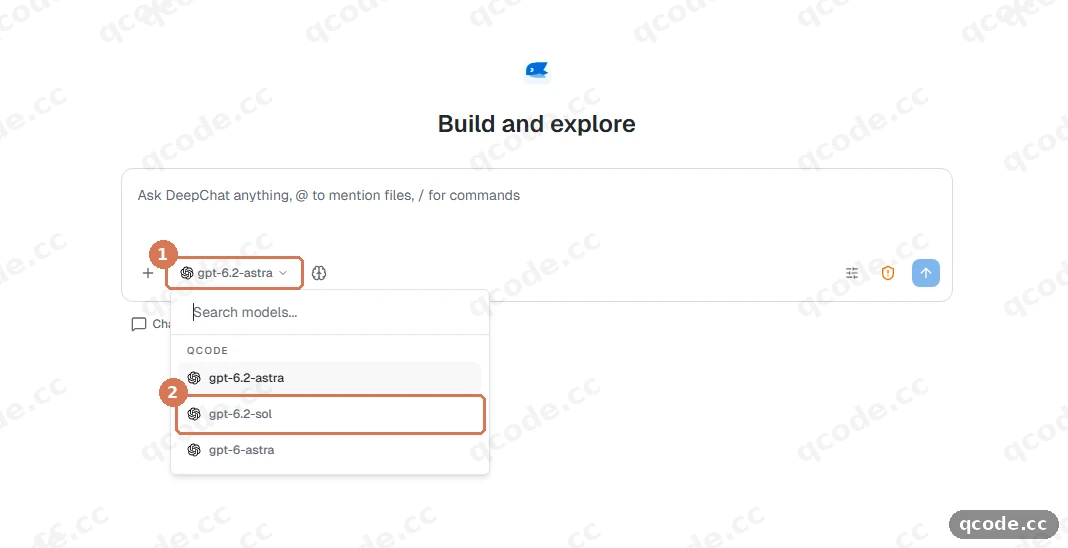
Done right you will see: the model selector button at ① updates to show gpt-6.2-sol.
Send a test message
Type a short prompt such as Introduce yourself in one short sentence. and press Enter. Your message appears at ①, and within a few seconds ② gpt-6.2-sol streams a complete reply.
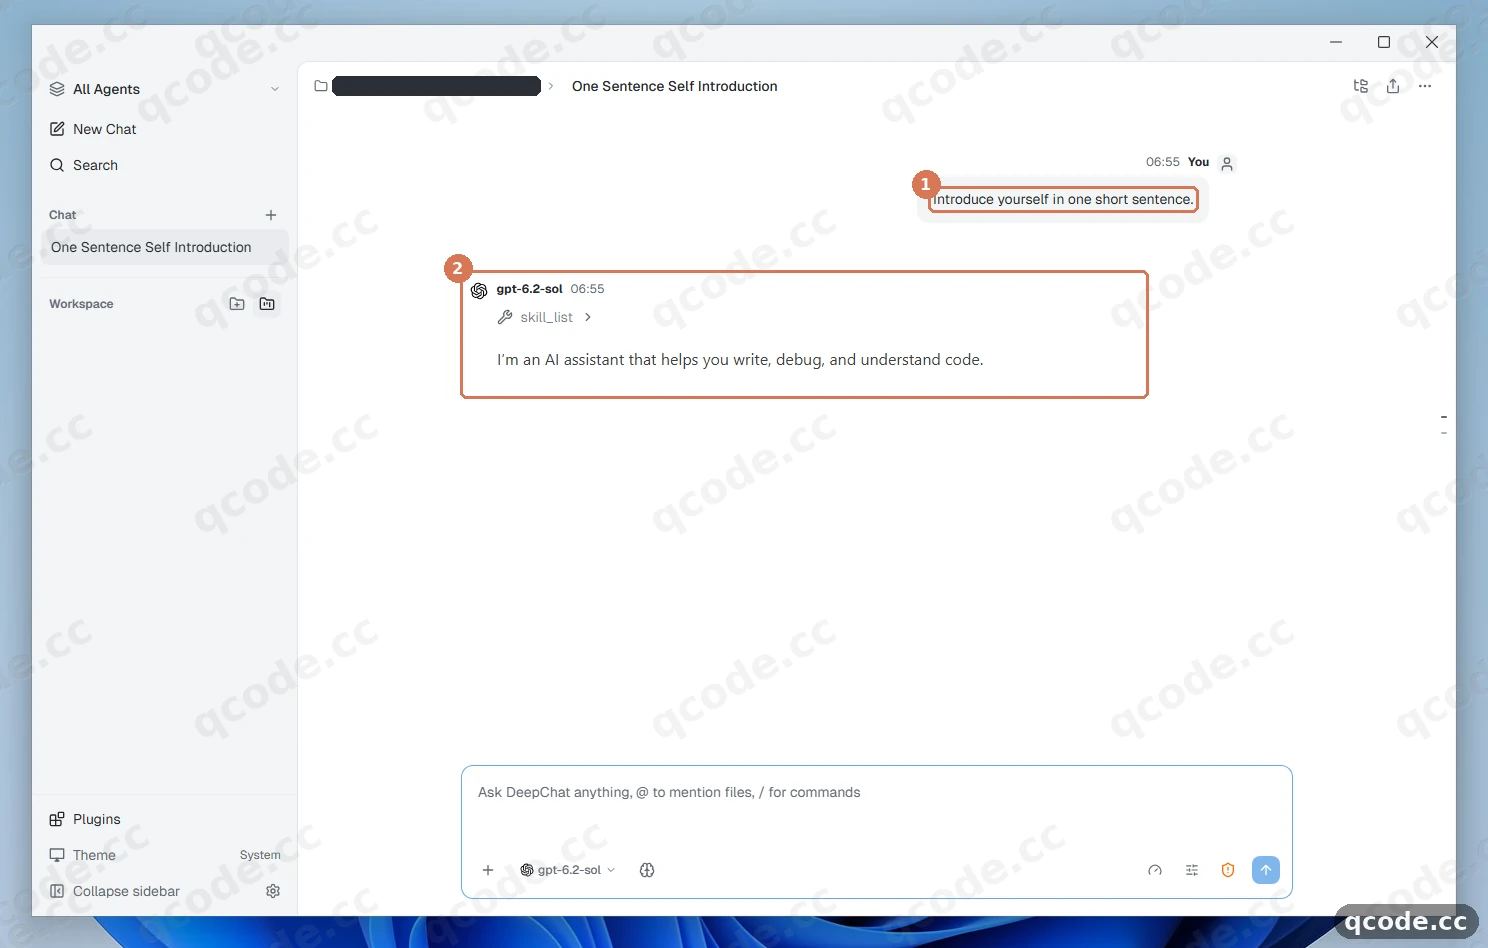
Done right you will see: ① your sent message and ② a live reply from gpt-6.2-sol with no red error banner.
Verify it works
Your setup is complete when all three of these are true:
- In Settings → Providers → Provider Center, QCode shows Last test passed with Enable turned on and
gpt-6.2-solenabled in Model List. - In the main chat window,
gpt-6.2-solis selectable under the QCODE group in the model picker. - Sending a test prompt returns a live reply within seconds, and the request appears in your Dashboard usage records.
All done
DeepChat is now connected to QCode on Windows 11. From here you can:
- Endpoints and API paths — compare the OpenAI and Anthropic paths and regional hosts
- Model selection — browse available GPT, Claude, and other model IDs
- Billing — understand how token usage is calculated
- Troubleshooting
- Compare plans on the pricing page
- Go back to your Dashboard to check usage and balance
Common errors
| Error message | Why | What to do |
|---|---|---|
NOTE: DeepChat requires 'Microsoft Visual C++ Redistributable' (x64) to function properly. Download and install now? |
The 64-bit Visual C++ runtime is not yet installed on this Windows PC | Click Yes, complete the Microsoft Visual C++ 2015–2022 Redistributable (x64) installer (approve the UAC prompt), and close it; DeepChat Setup continues right after |
Authentication failed, API Key is invalid or expired |
The cr_ key was pasted with extra spaces or line breaks, comes from another service, or has expired |
Copy the full cr_ key again from your Dashboard and paste it cleanly into API Key; if it expired, follow the renewal rule in FAQ below |
model_not_available_on_endpoint |
A Claude model (such as claude-opus-5-5) was called through an OpenAI Completions provider (https://api.qcode.cc/openai/v1) |
Add a separate custom provider with API Type set to Anthropic and API Base URL set to https://api.qcode.cc/api (see Add Claude models via Anthropic) |
claude-sonnet-4-5-20250929 (probe fails when clicking Connect and load models on an Anthropic provider) |
DeepChat probes new Anthropic providers with a built-in model name instead of your target QCode Claude model |
Click Save without testing, add claude-opus-5-5 manually via + Add Model, and switch Enable on |
404 |
API Base URL is missing /v1 (for OpenAI Completions) or has an extra /chat/completions or /v1 appended (for Anthropic) |
Use exactly https://api.qcode.cc/openai/v1 for OpenAI Completions and https://api.qcode.cc/api for Anthropic, with no trailing path |
FAQ
What happens when my QCode key expires?
It depends on how you purchased it:
- Personal plan: an expired key cannot be renewed. Activate a new plan, create a new key in your Dashboard, and replace the old key in DeepChat’s QCode provider settings.
- Pay-as-you-go pack: purchase another pack and your existing
cr_key resumes automatically — you do not need to change anything in DeepChat.
Why should I pick OpenAI Completions instead of OpenAI?
In DeepChat’s API Type list, OpenAI follows Responses path rules, whereas OpenAI Completions sends standard Chat Completions requests to https://api.qcode.cc/openai/v1 and loads QCode’s model list automatically when you click Connect and load models.
Can I use both GPT and Claude models in DeepChat?
Yes, with the same cr_ API key. Use two separate custom providers: one OpenAI Completions provider (https://api.qcode.cc/openai/v1) for GPT and Chinese models, and one Anthropic provider (https://api.qcode.cc/api) for Claude models (see Add Claude models via Anthropic below).
How do I change DeepChat’s interface language?
Expand the left sidebar, open Settings, go to Setup → Display, and select your preferred language from the Language dropdown.
What if I clicked Save without testing or do not see a model in the picker?
A provider saved with Save without testing starts disabled. Open Settings → Providers → Provider Center, click QCode, and turn on the Enable toggle in the top right (for OpenAI Completions, this also fetches models). If you need a specific model ID, click + Add Model, fill Model Name and Model ID, click Save configuration, and confirm its toggle is enabled in Model List.
Add Claude models via Anthropic
QCode serves Claude models only on the Anthropic Messages endpoint, so keep Claude in its own custom provider alongside your OpenAI Completions provider:
- Open Settings → Providers → Provider Center and click + Add Custom Provider.
- Fill Name with
QCode Anthropic, set API Type toAnthropic, set API Base URL tohttps://api.qcode.cc/api(do not add/v1— DeepChat appends/v1/messagesautomatically), and paste the samecr_API key. - Click Save without testing instead of Connect and load models (DeepChat’s built-in Anthropic probe uses
claude-sonnet-4-5-20250929and stays on the form). - In the saved QCode Anthropic provider page, click + Add Model, enter
claude-opus-5-5for both Model Name and Model ID, and click Save configuration. - Switch on the Enable toggle at the top right, click ← Back to chat, and pick
claude-opus-5-5from the model selector.
Access points and available models
| Protocol (API Type) | API Base URL | Example models on QCode |
|---|---|---|
OpenAI Completions |
https://api.qcode.cc/openai/v1 |
gpt-6.2-sol, gpt-6.2-astra, glm-5.3, kimi-k3, deepseek-v4-pro |
Anthropic |
https://api.qcode.cc/api |
claude-opus-5-5 |
If you want to route through the Asia or North America access point, replace api.qcode.cc with asia.qcode.cc or us.qcode.cc while keeping the exact same path (/openai/v1 or /api). All three domains offer the same capabilities and differ only in network routing.
Related docs
- Endpoints and API paths — OpenAI and Anthropic paths and regional domains
- Model selection — current GPT, Claude, and other model IDs on QCode
- Payment methods — available ways to pay for plans and pay-as-you-go packs
- Billing — how token-based billing works
- Troubleshooting — general connection and authentication checks
Get started with QCode
One API key for Claude Code, Codex and more — billed per token, per-model prices on qcode.cc/models