Dify self-hosted on Windows 11: connect QCode step by step (13 screenshots)
Run Dify on Windows 11 with Docker Desktop and add QCode as an OpenAI-compatible model: 13 numbered screenshots from install to first reply.
Need an API key? Sign up →Endpoints & base URLs →
On This Page
- Download and install Dify
- Read the requirements page first
- Install Docker Desktop
- Sign in to your Dify instance
- Open Integrations
- Search for the OpenAI-API-compatible provider
- Confirm the plugin installation
- Open the Add model dialog
- Name the model and choose its type
- Enter the QCode base URL and the completion mode
- Check that the model is enabled
- Set it as the default system model
- Create a Chatbot app
- Send your first message and check the reply
- Verify it works
- Common errors
- FAQ
- Do I need a Dify account, or an Anthropic or OpenAI account?
- Why is OpenAI-API-compatible missing from the list?
- Why does the model name have to be gpt-6.2-sol?
- Can I use Claude models in Dify through QCode?
- What happens when my key expires?
- Does Dify keep the model settings after a restart?
- Should I use Chat or Completion for the completion mode?
- Models to use
- How the address is used
- Alternative endpoints
- Self-hosting notes
- Related docs
Short answer: In Dify, open Integrations → Model Provider, install the OpenAI-API-compatible plugin, then click Add Model and fill in the base URL https://api.qcode.cc/openai/v1, the model name gpt-6.2-sol, your cr_ key, and Chat as the completion mode.
| Item | Fill in |
|---|---|
| Integration to install | OpenAI-API-compatible |
| API Base URL | https://api.qcode.cc/openai/v1 |
| Model Name | gpt-6.2-sol |
| Model Type / Completion mode | LLM / Chat |
| API key | cr_xxxxxxxx |
Checked on 2026-11-22 · Dify 1.20.0 · Windows 11
Follow the 13 screenshots below on a Windows 11 PC and you end up with QCode answering inside Dify: a Chatbot app in Studio that answers your first message. Dify itself needs no model-vendor account — the only credential here is a QCode API key.
Before the first screenshot, check that you have these:
- A Windows 10 or 11 PC, 64-bit, that can open websites, with at least 2 CPU cores and 4 GiB of memory kept for Docker
- A browser — Edge or Chrome — because Dify has no desktop app; the whole tutorial runs in a browser tab
- A Dify instance you can sign in to: your own Docker Compose deployment on
http://localhost:8080, or Dify Cloud at cloud.dify.ai - A QCode API key copied from your dashboard (
cr_xxxxxxxx); this is the only item you cannot skip. No account yet? Sign up first, pick a plan on the pricing page, then create the key in your Dashboard.
Download and install Dify
Dify is a web service, so there is no Windows installer for the Dify interface. You either open Dify Cloud in the browser, or you run the same interface locally with Docker Compose. Both routes end on the same Model Provider page used by the steps below. Pick the tab that matches where you are:
Open dify.ai and use the Cloud route: sign up at cloud.dify.ai and the whole tutorial runs in the browser.
For a local deployment, open the official Docker Compose guide at docs.dify.ai, install Docker Desktop from docker.com (Windows, x64), accept the agreement and keep the Use WSL 2 backend. The installer needs administrator rights and usually asks for a restart. The guide's repository also has GitHub Releases, where the Windows file difyctl-v1.20.0-windows-x64.exe is a command-line tool for administrators — it is not the Dify interface, so do not expect a window to open from it. After docker compose up -d, the interface is at http://localhost:8080.
Open dify.ai and use the Cloud route: the interface then lives at cloud.dify.ai, and nothing is installed on the PC.
If you want the interface on your own machine instead, open the official Docker Compose guide at docs.dify.ai and follow it with Docker Desktop. Install Docker Desktop from docker.com first. If a page is slow to load or a download stalls, wait a minute and start it again — the page and the installer are served from the same host, so retrying later usually fixes both.
Read the requirements page first
Before downloading anything, open the official Docker Compose guide. ① the page title confirms you are on the self-hosting page for Docker Compose, and ② the prerequisites block lists what the machine must provide: at least 2 CPU cores, 4 GiB of RAM and Docker Compose itself.
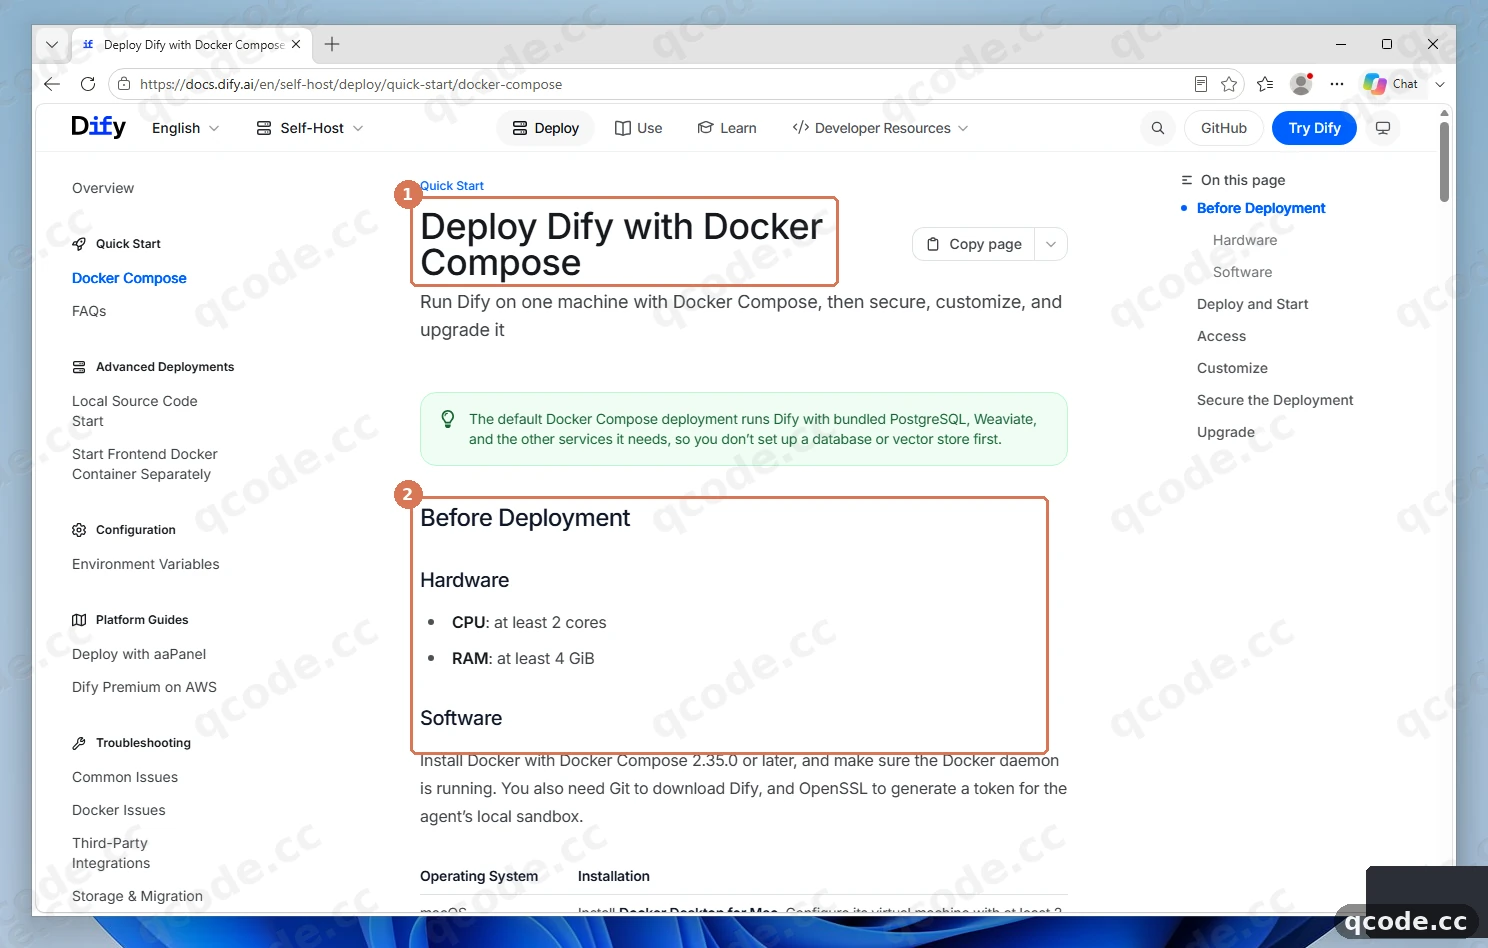
Done right you will see: ① the heading of the Docker Compose install page, and ② the prerequisites list with the CPU, memory and Docker Compose lines readable on one screen.
Stuck? The page shows a different install method
Dify documents Docker Compose and Kubernetes side by side, and search results sometimes land on the Kubernetes page. Scroll to the top and check that the address contains docker-compose; that is the route this tutorial uses.
Install Docker Desktop
Dify runs in containers on Windows, so Docker Desktop comes first. On docker.com, click ① Download Docker Desktop, run the downloaded Docker Desktop Installer.exe, accept the agreement and keep the Use WSL 2 backend selected. The installer asks for administrator rights and usually offers a restart; take it.
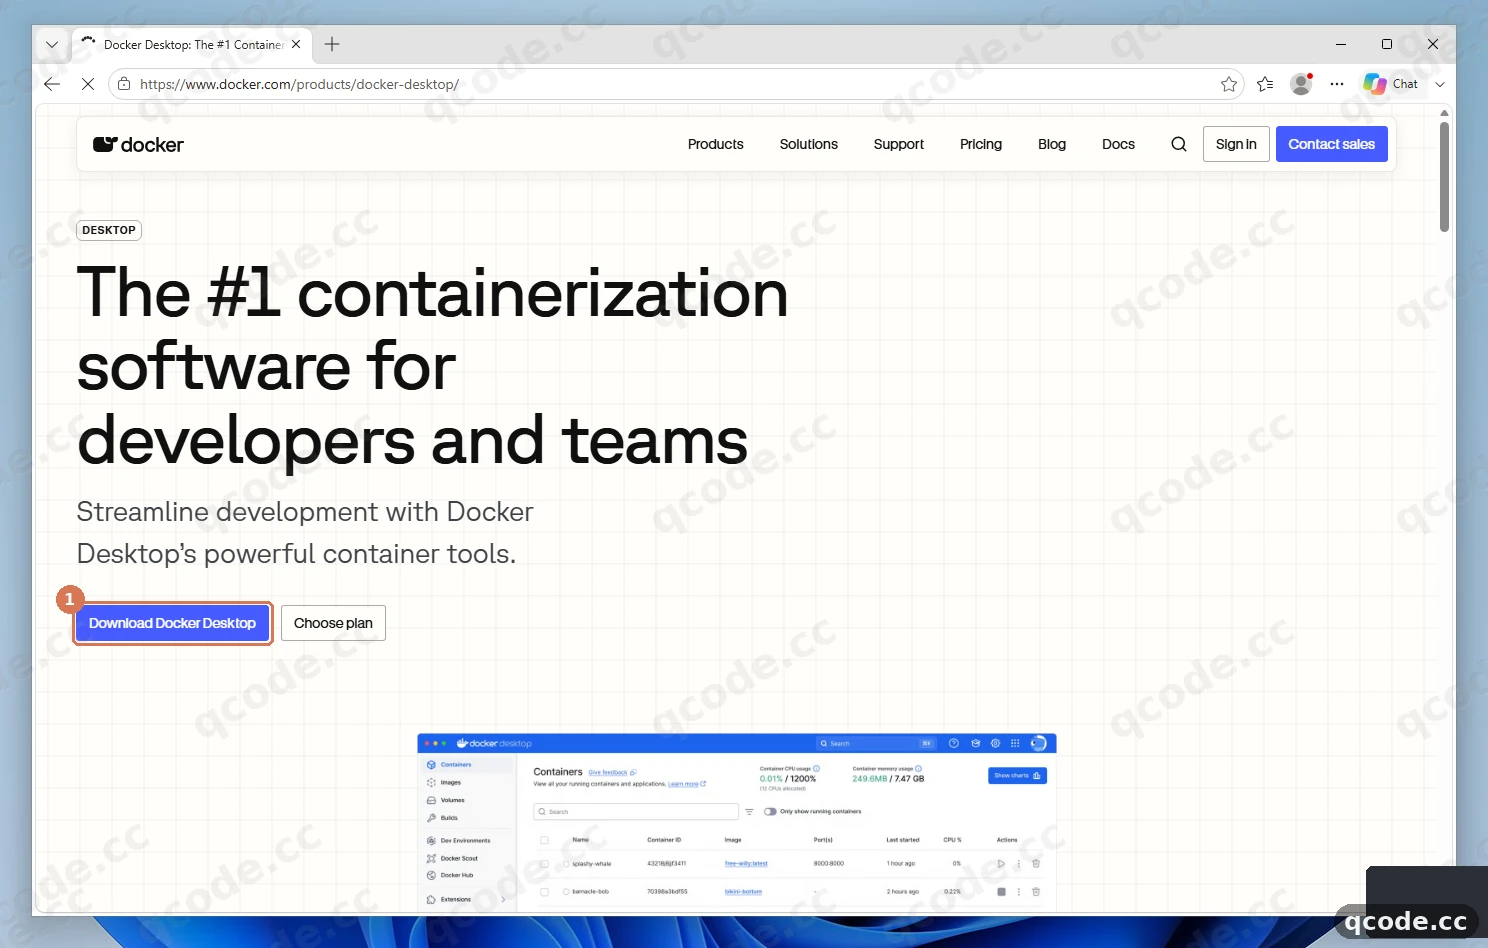
Done right you will see: the download starts from the ① button, and once installed the whale icon appears in the notification area with the status Engine running.
Stuck? Windows shows “Windows protected your PC”
Click More info, then Run anyway. SmartScreen shows that box for installers it has not seen often enough; the file is the one the ① button just downloaded.
Sign in to your Dify instance
Open http://localhost:8080 in your browser. The very first visit goes to the /install page, where you create the administrator account with an email address and a password; every visit after that opens the sign-in page. Type the email and the password into ①, then click ② Sign in.
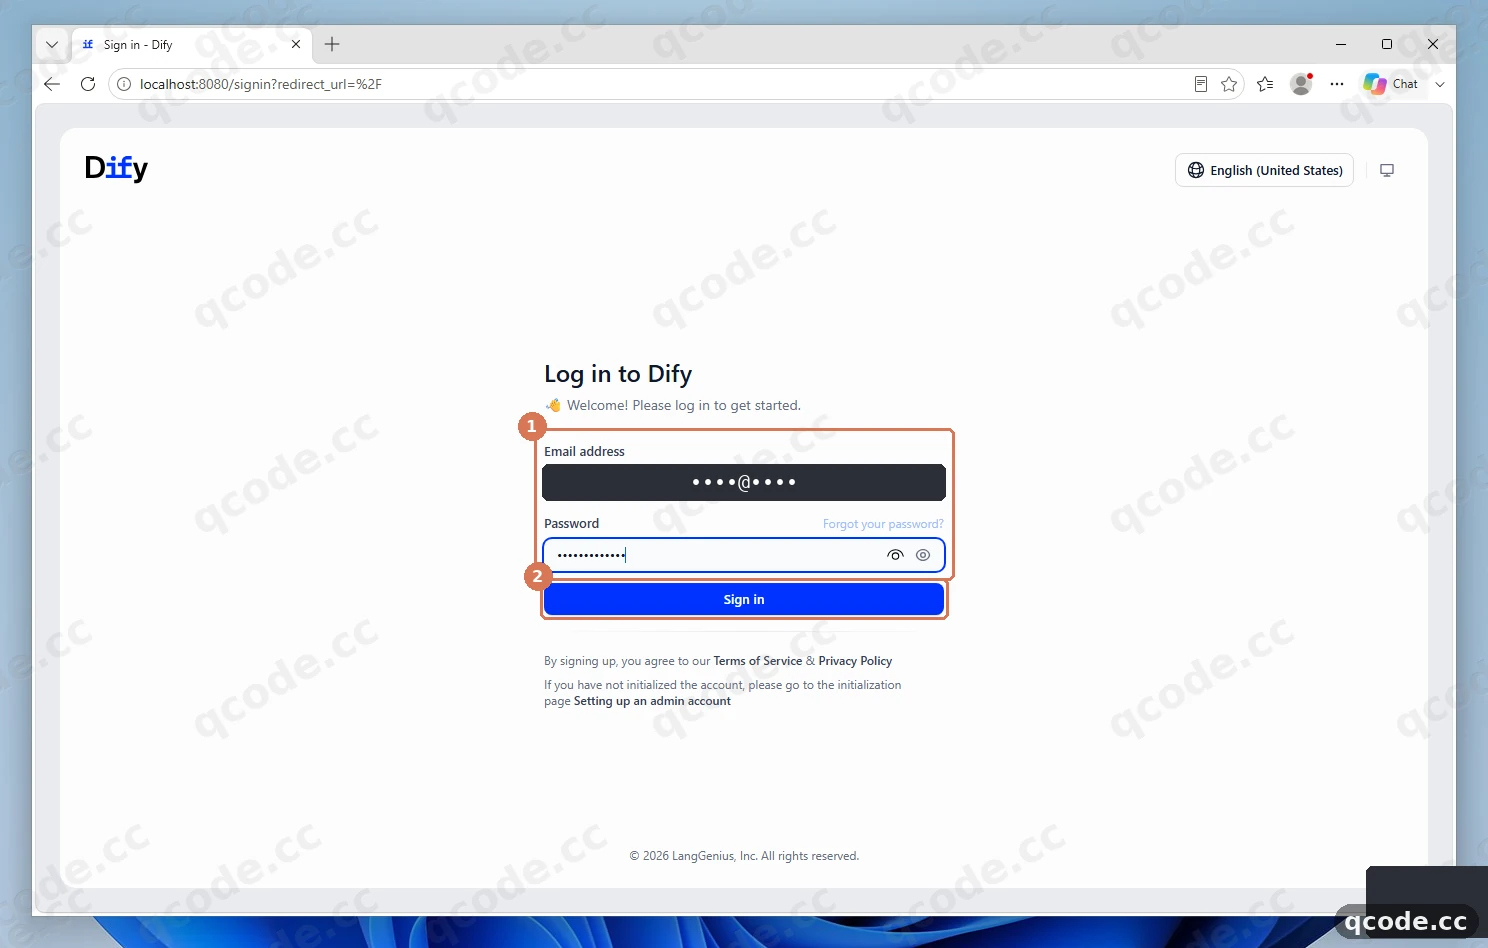
Done right you will see: ① both fields filled with dots covering the password, ② Sign in turning blue, and after the click the Dify Home page with the workspace name in the top-left corner.
Stuck? The browser says the site cannot be reached
The containers are not running yet. Open Docker Desktop, wait for Engine running, then run docker compose up -d in the folder of the Dify source and refresh the page. The first start pulls several images and takes a while.
Open Integrations
Dify Home opens after sign-in. The whole navigation sits in one column down the left side: Home, Studio, Agents, Knowledge, Contacts, Skills, Integrations, Marketplace. Click ① Integrations; Dify takes you straight to Model Provider.
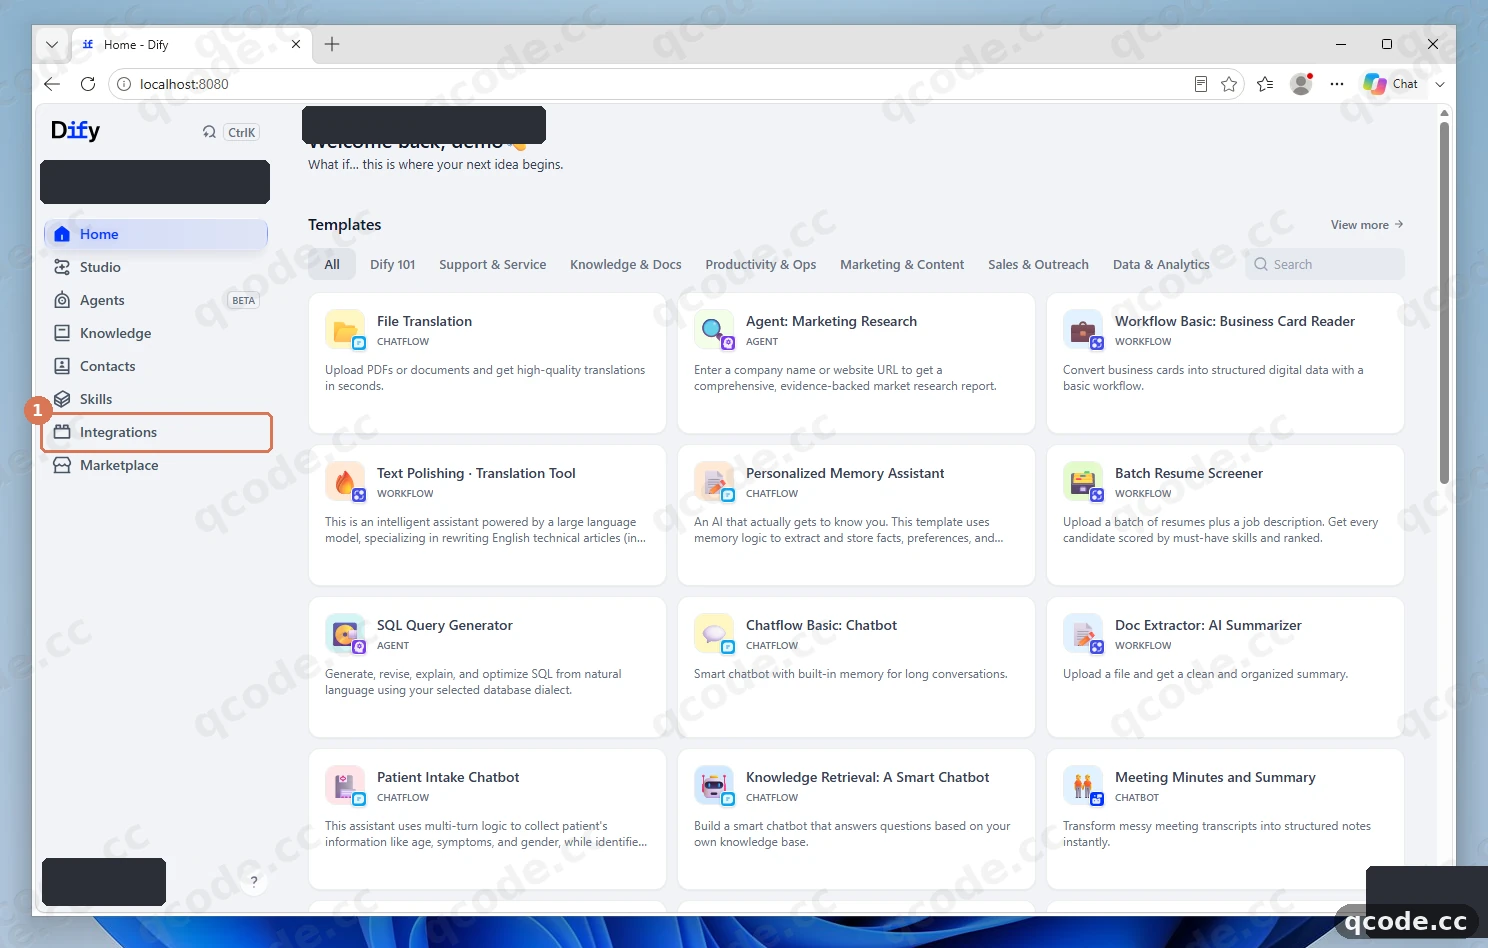
Done right you will see: ① Integrations highlighted in the left column, and the page behind it titled Model Provider with a Search models... box at the top.
Search for the OpenAI-API-compatible provider
Model Provider lists every integration Dify can talk to. Click ① the Search models... box and type OpenAI-API-compatible. ② the matching card appears in the list, with a blue Install button on it.
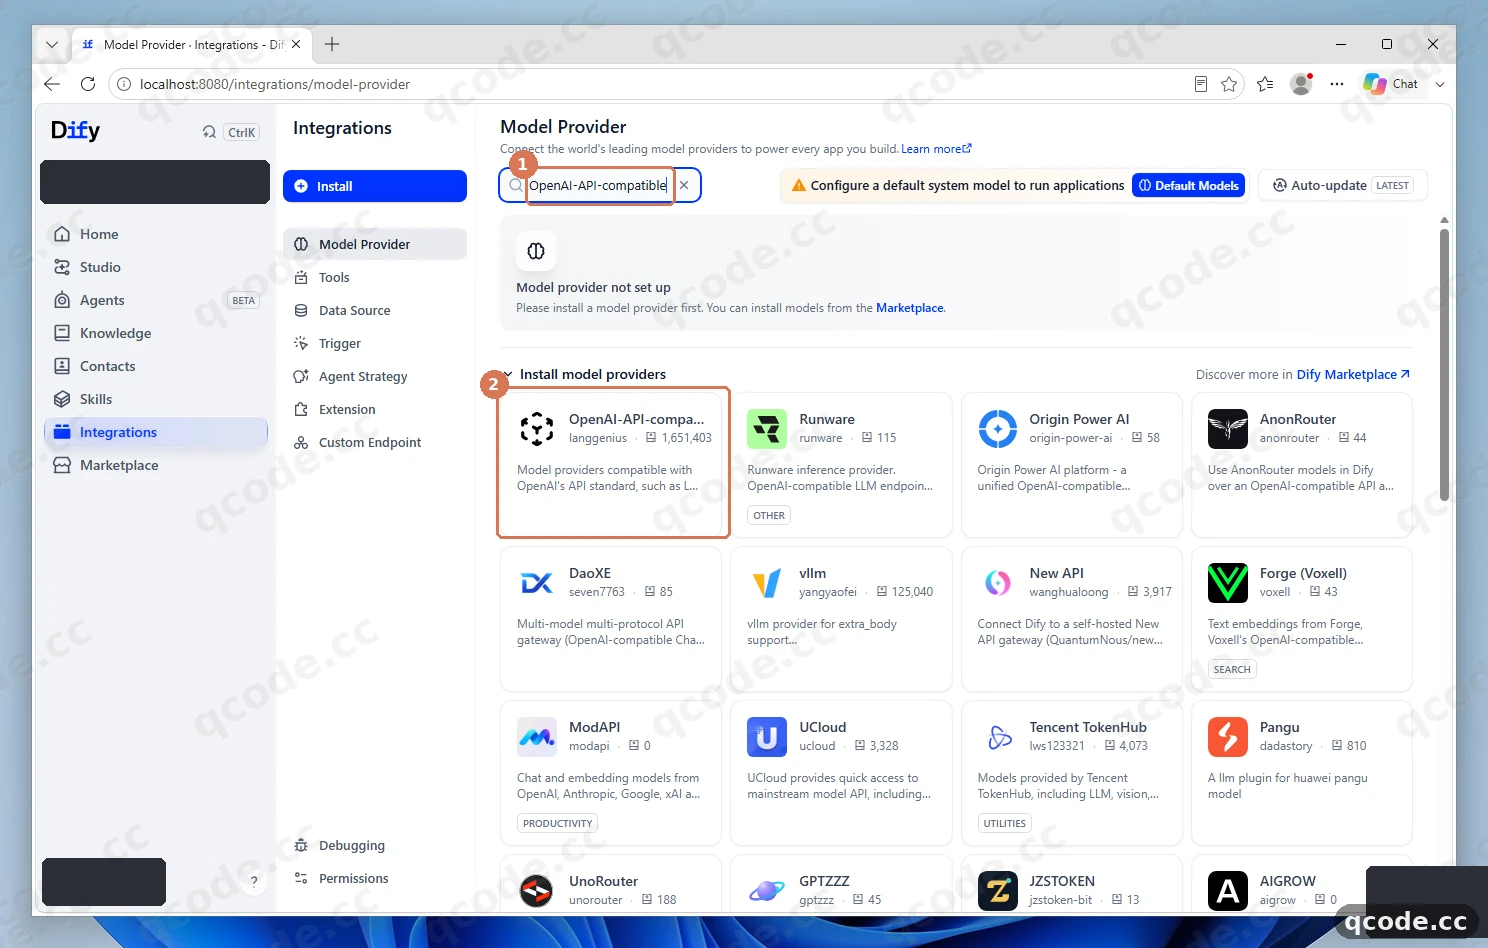
Done right you will see: ① your text in the search box, and ② one card named OpenAI-API-compatible with an Install button — not OpenAI, which is a different plugin.
Stuck? The search returns nothing
Type only OpenAI and scroll the list. Installing plugins needs the workspace owner or an administrator, so a member account may see the cards without the Install button. After installing, refresh the page before you search again.
Confirm the plugin installation
Clicking Install on the card opens a dialog titled Install Integration instead of installing at once. Read the name in the dialog and click ① Install in the dialog footer. Dify then downloads the plugin from its Marketplace, which takes a few seconds.
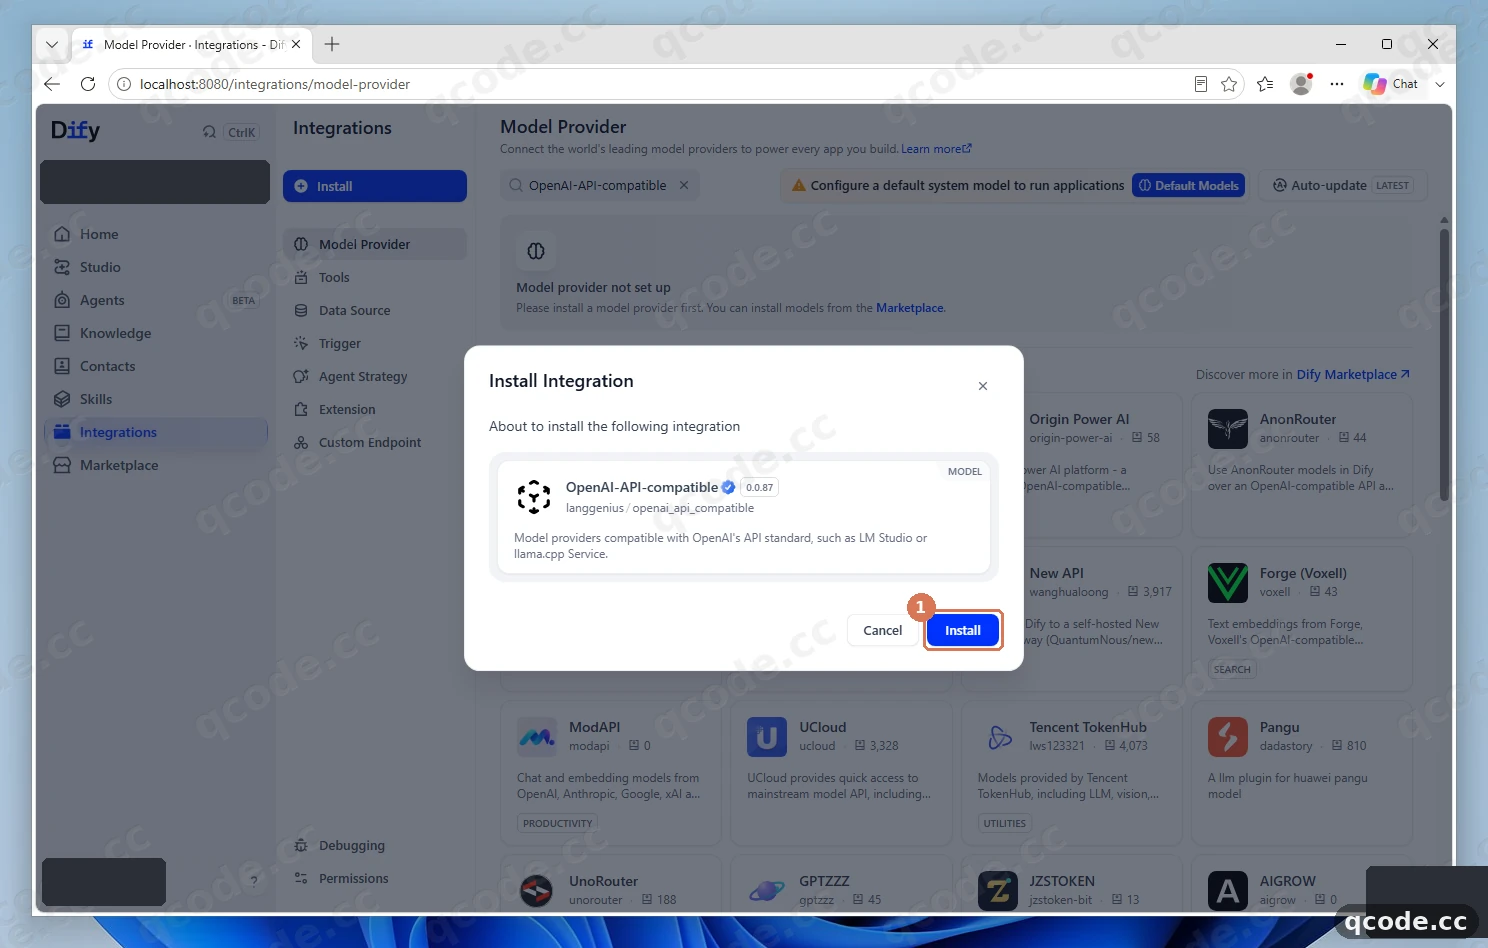
Done right you will see: ① the dialog closes by itself, and the OpenAI-API-compatible card moves into the Configuration required group.
Stuck? The dialog spins and then fails
The plugin is fetched from marketplace.dify.ai. Check that the address opens in another tab; on a company network or behind a proxy the download can be blocked, and retrying on another network usually works.
Open the Add model dialog
The installed plugin now sits under Configuration required with the note Set up api-key or add model to use. Click ① Add Model on the right of that card — this is where the QCode address and the key go in.
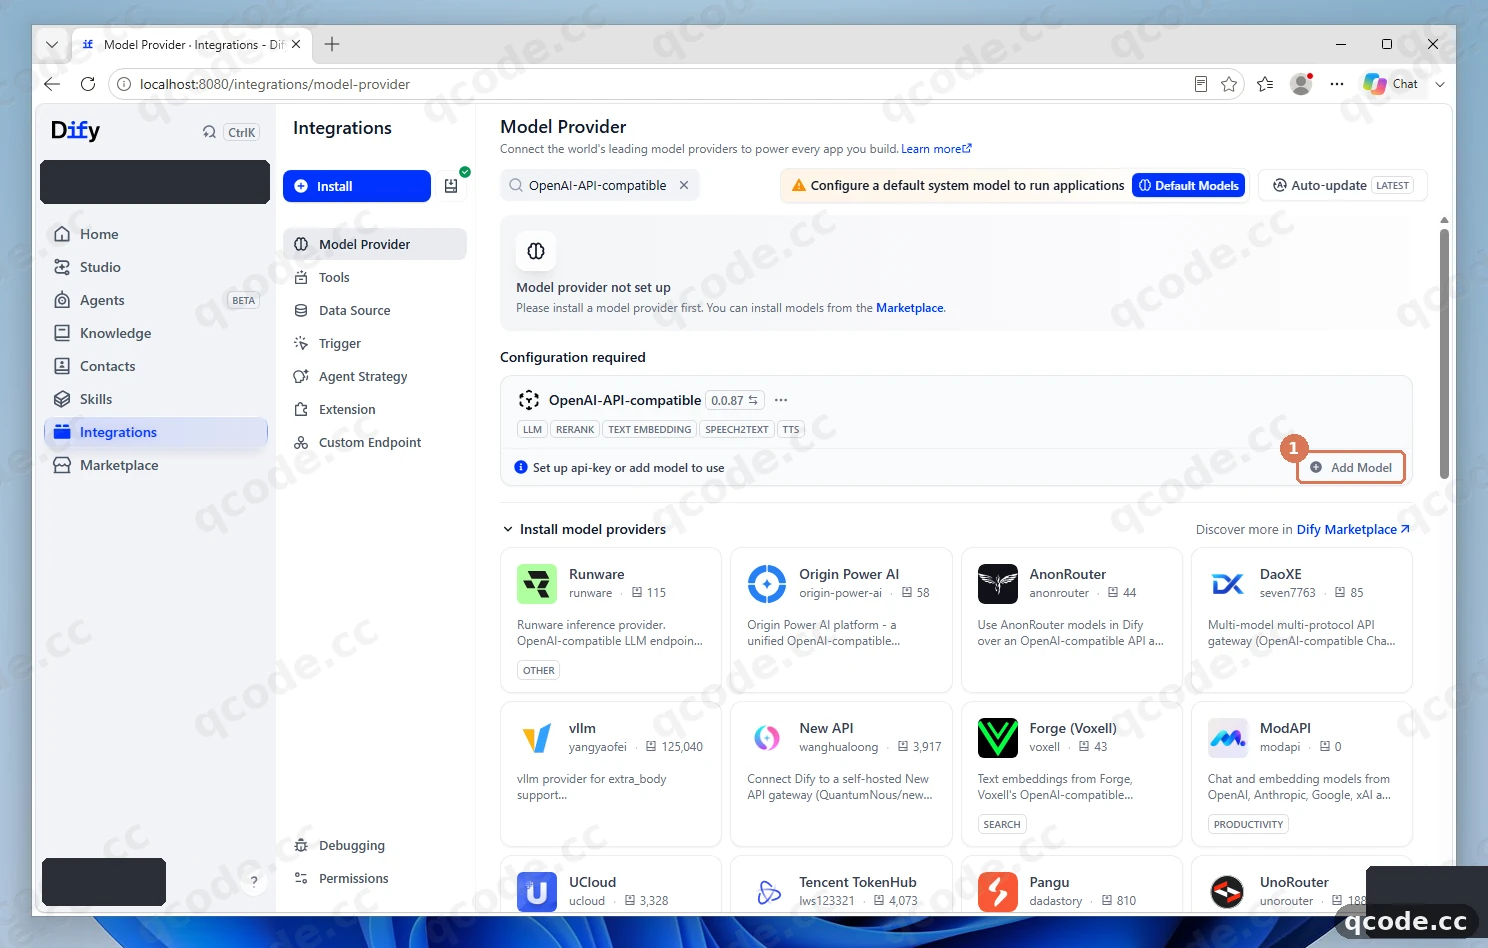
Done right you will see: ① Add Model, and clicking it opens a dialog named Add model with Model Name, Model Type and API Key on it.
Name the model and choose its type
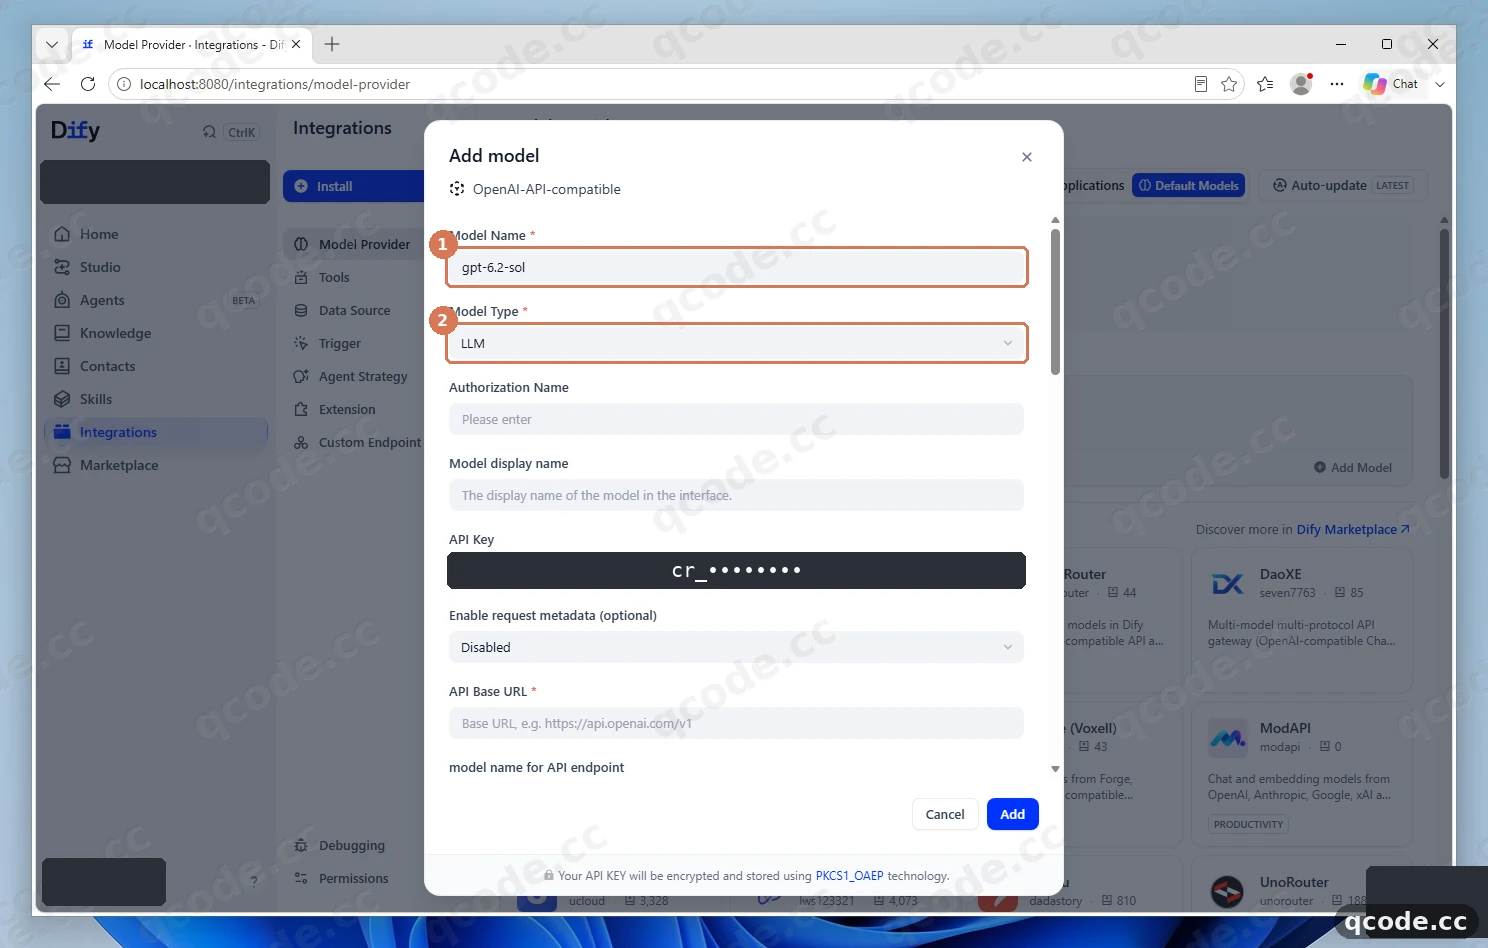
Type gpt-6.2-sol into ① Model Name — that is the QCode model ID, so copy it exactly as written. Open ② Model Type and pick LLM. Then click the API Key field and paste your key, which starts with cr_; the dialog hides it behind dots.
Need an API Key?
If you do not have a QCode account yet, Sign up first. If you do not want a monthly plan, buy a pack from the Pay-as-you-go Packs page, then create the key in the Dashboard. Copy the string starting with cr_ and paste it in place of cr_xxxxxxxx. You can pay by credit or debit card (Visa / Mastercard), Apple Pay / Google Pay, or cryptocurrency — see Payment methods.
Done right you will see: ① gpt-6.2-sol spelled exactly like that, ② LLM in the type field, and a row of dots in API Key — no quotation marks around any of them.
Enter the QCode base URL and the completion mode
Scroll down inside the dialog. Put https://api.qcode.cc/openai/v1 into ① API Base URL — the whole path belongs in the field, /openai/v1 included, with no trailing slash and no /chat/completions. Leave ② Completion mode on Chat, then click ③ Add to save and validate the key.
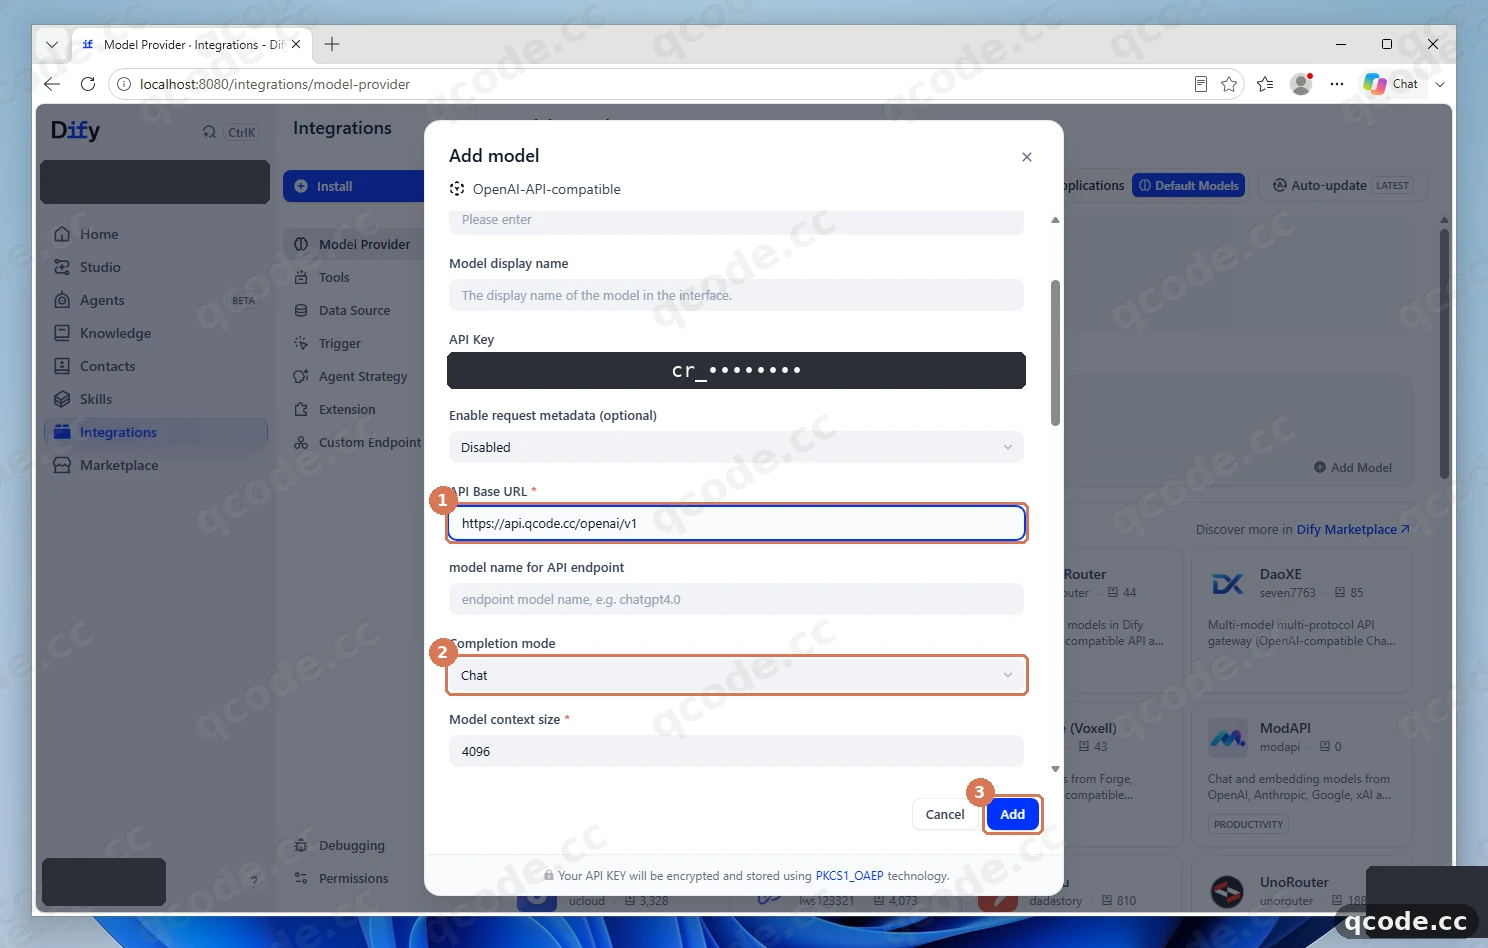
Done right you will see: ① the address ends in /openai/v1, ② Chat is selected, and ③ Add closes the dialog without a red error line.
Stuck? Saving stops with 401 or 404
A 401 means the key was cut short or carries a space or quote — copy it from the Dashboard again and retype the field. A 404 means the address has an extra or missing path; it must be exactly https://api.qcode.cc/openai/v1.
Check that the model is enabled
After Add, the plugin leaves Configuration required. Click Show Models under the card to expand the model list: ① the row gpt-6.2-sol LLM CHAT appears with its switch turned on. Then click ② Default Models in the toolbar at the top right of the page.
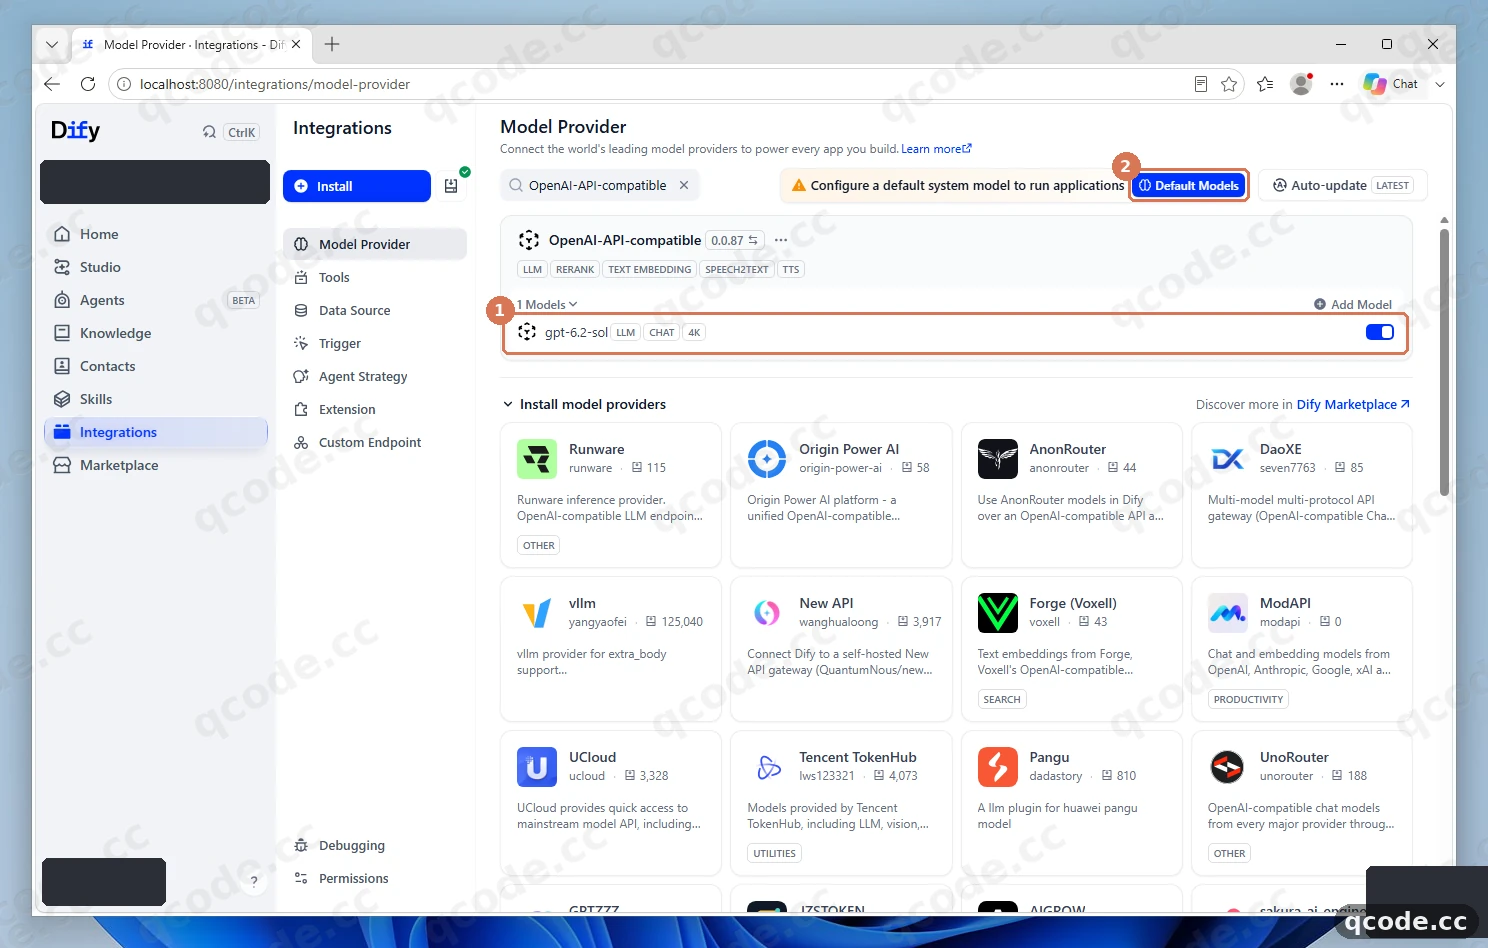
Done right you will see: ① one model row with gpt-6.2-sol, LLM and CHAT on it and the switch on the right turned on, while ② Default Models is a blue button in the top-right corner.
Set it as the default system model
Default Model Settings opens as a dialog. Its first row is ① System Reasoning Model: open it and choose gpt-6.2-sol from the list, then click ② Save.
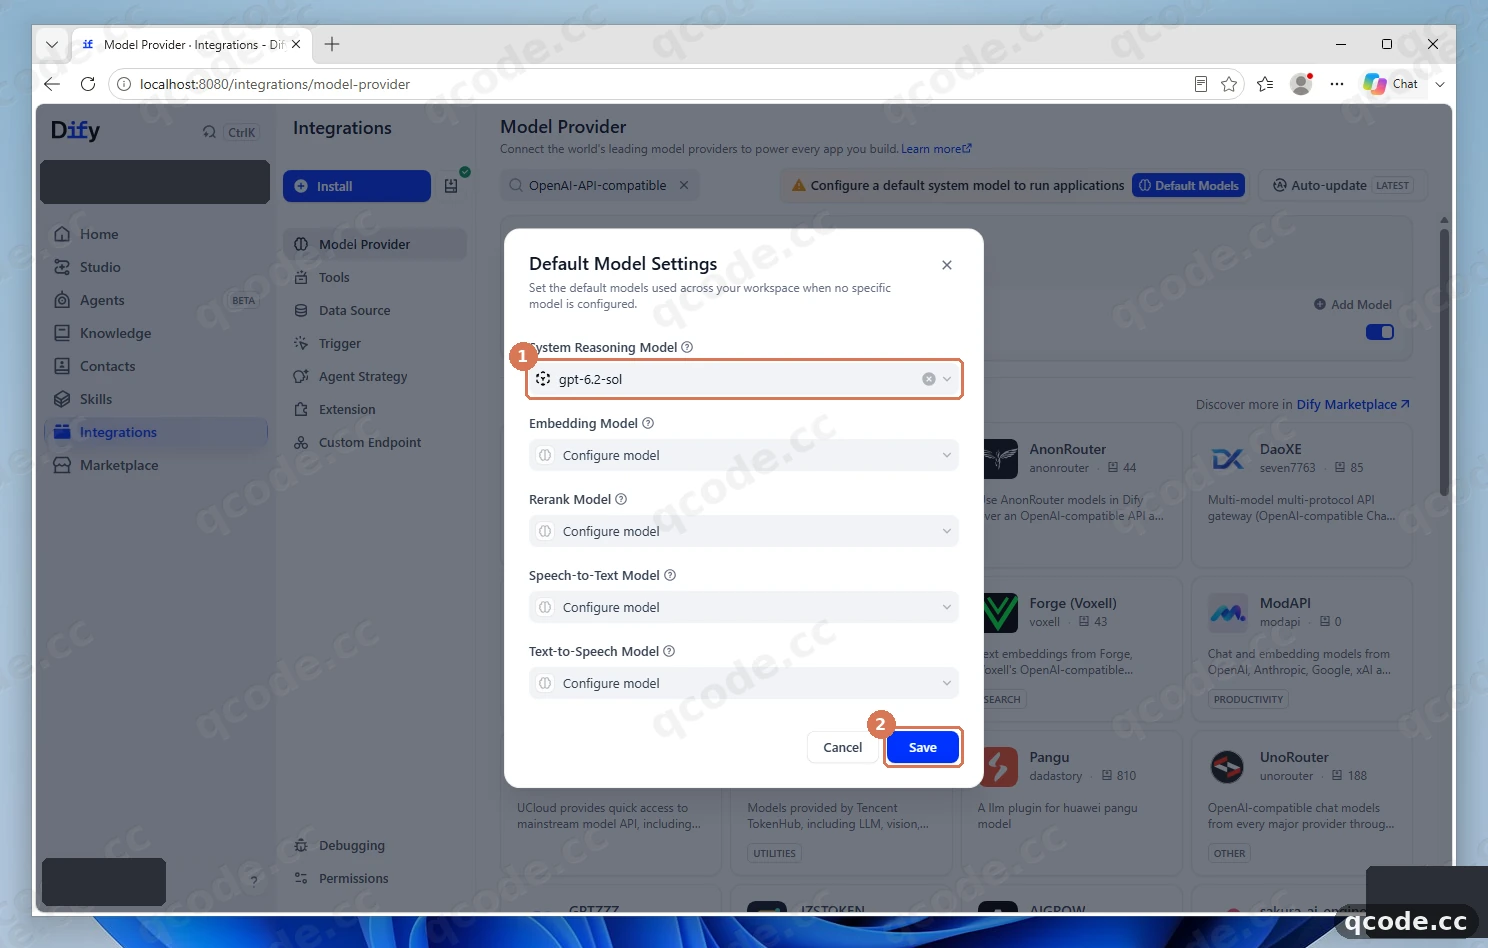
Done right you will see: ① gpt-6.2-sol shown in the System Reasoning Model row, and after clicking ② Save the yellow bar Configure a default system model to run applications disappears from the top of the page.
Stuck? The row says the model list is empty
An empty list means the plugin has no enabled model yet — go back one step and expand Show Models to confirm the switch is on. A model that was disabled in that list is not offered here.
Create a Chatbot app
Open Studio in the left column and click Create from Blank. At first only Workflow and Chatflow are offered; click MORE BASIC APP TYPES to expand the rest and pick ① Chatbot. Type QCode Assistant into ② App name, then click ③ Create.
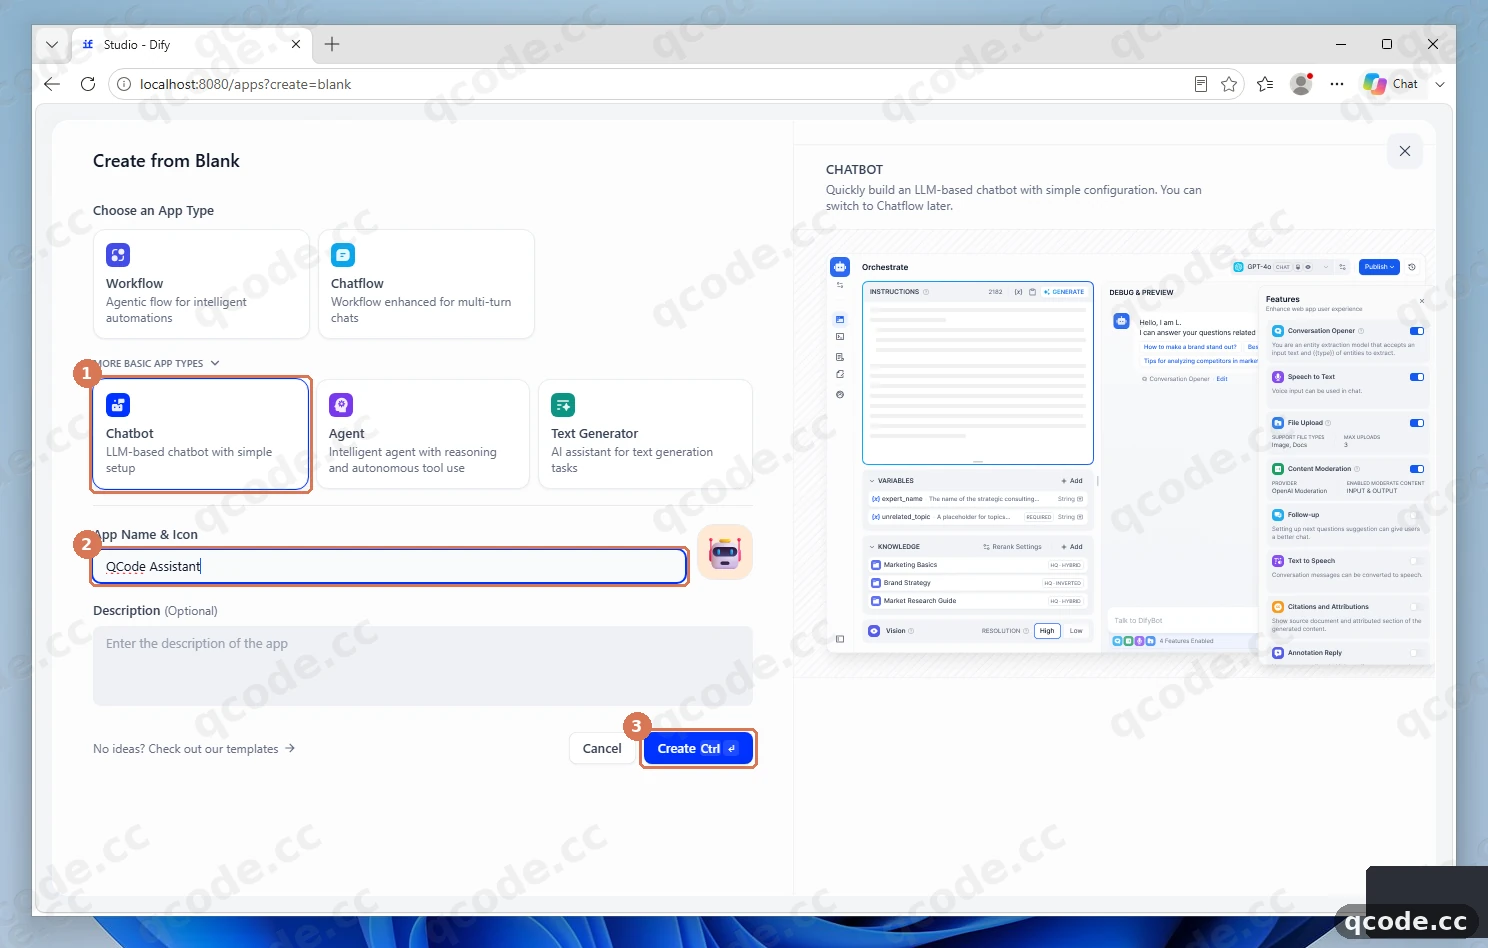
Done right you will see: ① Chatbot framed in blue after you pick it, ② QCode Assistant in the name field, and ③ Create opening the new application.
Stuck? There is no Chatbot option
Chatbot is folded away by default: click MORE BASIC APP TYPES under the two large cards, and Chatbot, Agent and Text Generator appear. Also check that the page is Studio and not Agents.
Send your first message and check the reply
Creating the app opens the Orchestrate page. ① the model selector at the top already reads gpt-6.2-sol CHAT. Type Hello! Please introduce yourself in one sentence. into ③ the Talk to Bot box at the bottom of Debug & Preview and press Send; ② the answer streams into the panel above it.
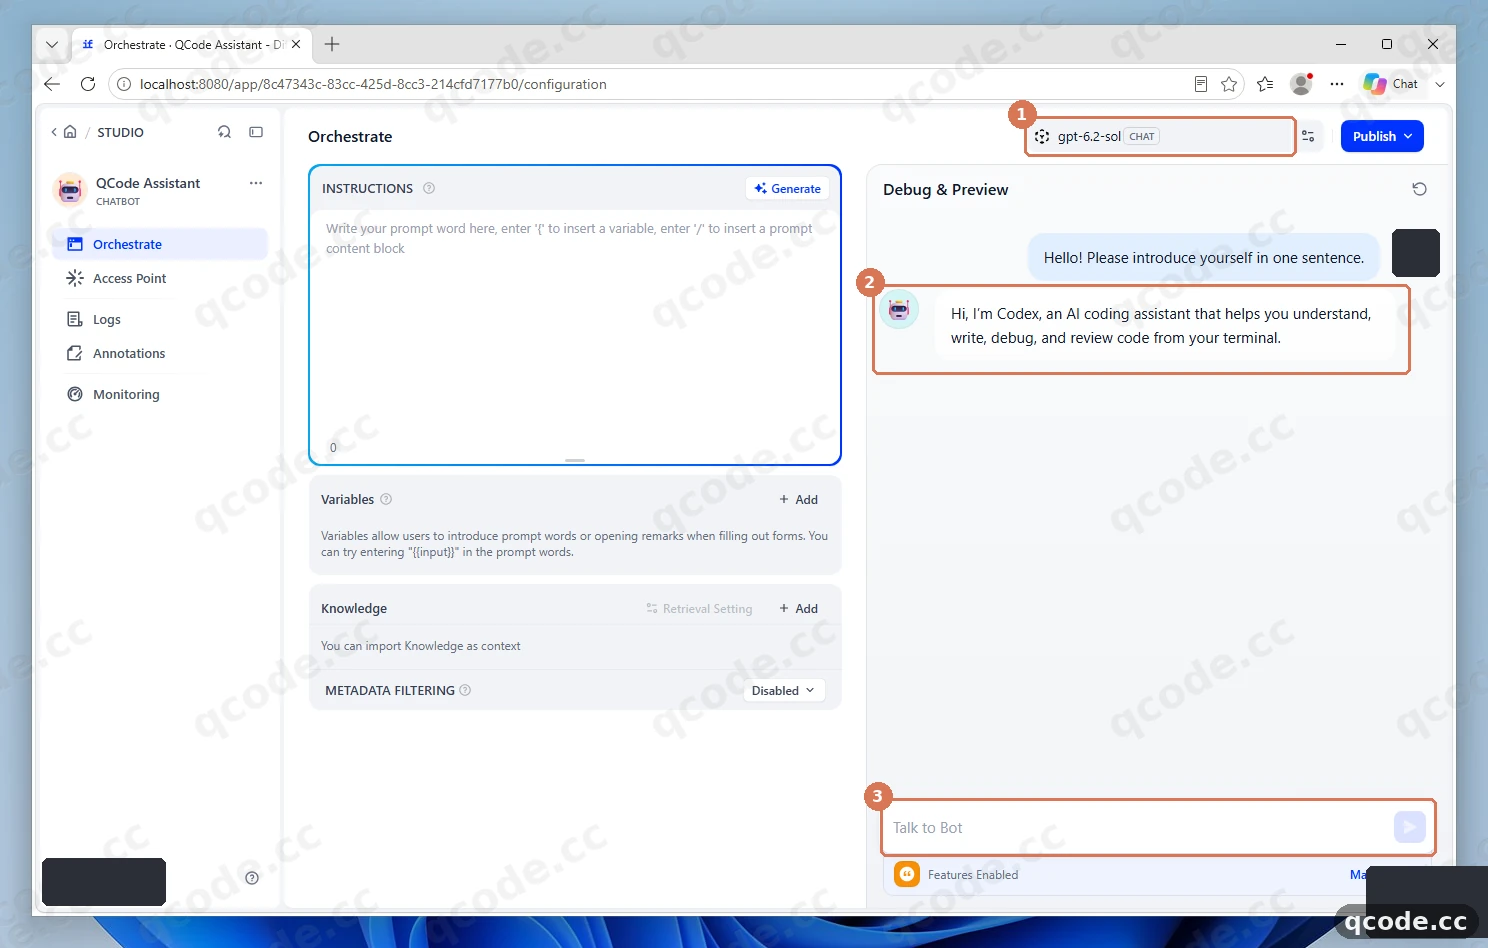
Done right you will see: ① gpt-6.2-sol CHAT in the header, ③ your sentence in the input box, and ② a short English answer appearing word by word — not a 401, 404 or “model not found” message.
Stuck? The answer never starts
Open Default Model Settings again and confirm System Reasoning Model still holds gpt-6.2-sol; an app created before the default was saved starts without a model. If the reply is red, the key or the address is wrong — see Common errors below.
Verify it works
Your setup is complete when all four of these are true:
Model ProviderlistsOpenAI-API-compatibleunder the installed integrations, withgpt-6.2-solenabled inShow Models.Default Model Settingsshowsgpt-6.2-solforSystem Reasoning Modelinstead of an empty row.QCode Assistantanswers inDebug & Preview, and the reply arrives as a stream rather than as a 401, 404 or “model not found” error.- Close the browser tab, open Dify again and the model, the default setting and the app are all still there.
All done
You have QCode wired into Dify and a Chatbot app answering through it. From here you can:
- Endpoints and API paths — the three QCode hosts and every path they serve
- Billing — how one key and one quota are shared across apps and tools
- Troubleshooting
- Compare the plans on the pricing page
- Go back to your Dashboard to check usage and balance
Common errors
| Error message | Why | What to do |
|---|---|---|
Set up api-key or add model to use |
The plugin is installed, but no model has been added to it yet, so Dify has nothing to select | Open Model Provider, click Add Model on the OpenAI-API-compatible card and fill in all four fields |
Configure a default system model to run applications |
A model exists but no default was chosen, so new apps start without a model | Click Default Models at the top right, set System Reasoning Model to gpt-6.2-sol and click Save |
401 |
The key reached QCode and was rejected: it was copied with a space, a quote or only partly, or it belongs to a plan that has ended | Copy the cr_ key from the Dashboard again, paste it into API Key with nothing added, and check the plan state on the Dashboard |
404 |
The address carries an extra or missing path, so QCode receives a request it does not serve | Keep API Base URL at exactly https://api.qcode.cc/openai/v1 — no trailing slash, no /chat/completions |
FAQ
Do I need a Dify account, or an Anthropic or OpenAI account?
No model-vendor account is needed. Dify Cloud asks for a Dify account; a self-hosted instance asks for the administrator account you create on the /install page. In both cases the key that reaches the model is your QCode cr_ key, and nothing in this tutorial asks for an Anthropic or OpenAI login.
Why is OpenAI-API-compatible missing from the list?
Three usual reasons: the search box still holds a longer phrase (type only OpenAI and scroll), the plugin is already installed and therefore moved out of the Marketplace part of the page, or the account is not a workspace owner or administrator, which is required to install plugins. Refresh the page once before you search again.
Why does the model name have to be gpt-6.2-sol?
Model Name is not a label — Dify sends that string to QCode as the model ID. A QCode model ID must be spelled exactly as the QCode documentation lists it, so gpt-6.2-sol works while GPT 6.2 Sol does not. Any other ID served by the same endpoint goes in the same field, such as gpt-6.2-astra.
Can I use Claude models in Dify through QCode?
Yes, through Dify's own Anthropic integration, with the Anthropic-compatible address https://api.qcode.cc/api instead of the OpenAI-compatible one. The QCode default there is claude-opus-5-5. The 13 screenshots on this page follow the OpenAI-compatible plugin because that is the route covered here end to end; treat the Anthropic address as the option for later.
What happens when my key expires?
It depends on what you bought. A key that came with a personal plan cannot be renewed — reopen the plan, create a new key and paste it into the API Key field again. A key from a pay-as-you-go pack comes back when you buy another pack: the same key keeps working, and nothing in Dify has to be changed.
Does Dify keep the model settings after a restart?
Yes. Models, their keys and the default model are stored in the Dify database, not in the browser session, so signing out or restarting the containers does not remove them. Only deleting the data volumes wipes them, and that also deletes the administrator account and every app.
Should I use Chat or Completion for the completion mode?
Use Chat. QCode serves chat-completions models on this endpoint, and Completion expects a prompt-completion interface that these models do not expose. A wrong choice here shows up as an error on Add rather than in the app.
Models to use
The same QCode key exposes models from several vendors, and the model ID goes into Model Name. Pick one and keep the rest of the fields as they are.
| Model | Protocol and address | Use for |
|---|---|---|
gpt-6.2-sol |
OpenAI-compatible — https://api.qcode.cc/openai/v1 |
Default for this tutorial: everyday chat, writing, code questions |
gpt-6.2-astra |
OpenAI-compatible — https://api.qcode.cc/openai/v1 |
The higher tier of the GPT family, for the hardest tasks |
claude-opus-5-5 |
Anthropic-compatible — https://api.qcode.cc/api |
Flagship Claude, for long reasoning and large refactors |
claude-haiku-5-5 |
Anthropic-compatible — https://api.qcode.cc/api |
Lightweight Claude, for fast, cheap answers |
A claude-* ID sent to the OpenAI-compatible endpoint is refused, and a gpt-* ID sent to the Anthropic endpoint is refused as well — the model family has to match the address. The live list of IDs is on your Dashboard.
How the address is used
API Base URL is a base, not a full request path. Dify keeps the /openai/v1 part and appends chat/completions itself, which is why the field must stop at /v1.
| Field | Value | Note |
|---|---|---|
API Base URL |
https://api.qcode.cc/openai/v1 |
Keep /openai/v1; no trailing slash |
| What Dify requests | https://api.qcode.cc/openai/v1/chat/completions |
Built from the field above — do not type it |
Model Name |
gpt-6.2-sol |
Any model ID served on that endpoint |
Model Type |
LLM |
The type that answers chat requests |
Completion mode |
Chat |
Not Completion |
API Key |
cr_xxxxxxxx |
Stored with the model, so it is typed once |
Alternative endpoints
If the default host is slow or unreachable from your network, replace only the domain and keep the rest of the address as it is:
| Endpoint | OpenAI-compatible base | Anthropic-compatible base |
|---|---|---|
| Default | https://api.qcode.cc/openai/v1 |
https://api.qcode.cc/api |
| Asia | https://asia.qcode.cc/openai/v1 |
https://asia.qcode.cc/api |
| North America and Europe | https://us.qcode.cc/openai/v1 |
https://us.qcode.cc/api |
Both alternative hosts accept the same key and the same paths. If you switch hosts, edit API Base URL on the model card and click Add again to validate it. Full details are in Endpoints and API paths.
Self-hosting notes
- Windows needs Docker Desktop plus WSL 2. The Dify repository is a set of services, not an application you can double-click; Docker Desktop runs them, and the guide asks for at least 2 CPU cores and 4 GiB of RAM.
- The source belongs on the Linux file system. Performance and file permissions behave better when the Dify folder lives inside WSL 2 rather than on
C:\. - The first start is slow. Several container images are pulled the first time, and the page stays blank until the API container reports ready. Later starts take seconds.
http://localhost:8080is the interface, not the API. Nothing of Dify itself has to be downloaded for the browser; the port is served by the containers.- The Dify interface language is separate from the browser. It is switched in the account menu under
Preferences→General→Display Language; this tutorial uses the English interface, so every label here matches what the screenshots show.
Related docs
- Endpoints and API paths — every ingress domain and its paths
- Billing — shared quota rules
- Troubleshooting — when a request returns 401, 404 or a model error
- Claude Code tutorial — the same key in a terminal
- Payment methods — how a pack or a plan can be paid for
Get started with QCode
One API key for Claude Code, Codex and more — billed per token, per-model prices on qcode.cc/models