AnythingLLM + QCode on Windows 11: connect GPT models and local RAG (11 screenshots)
Add QCode to AnythingLLM Desktop on Windows 11 in 11 screenshots: download, install, choose Generic OpenAI, fill in the Base URL and key, get a first reply.
Need an API key? Sign up →Endpoints & base URLs →
On This Page
- Download and install AnythingLLM
- Open the download page
- Start the installer and confirm the folder
- Wait for the installer to finish
- Open the app and click Get Started
- Choose Generic OpenAI
- Fill in the Base URL and the API key
- Pick the model and the context window
- Skip the survey
- Accept the data handling page
- Create a workspace
- Send your first message
- Verify it works
- Common errors
- FAQ
- Do I need an AnythingLLM account?
- Why does the Base URL end in /v1 and not in /api?
- Can I use Claude models in AnythingLLM?
- The Selected Model list stays empty, or spins forever
- My answers stop in the middle of a sentence
- What happens when my key expires?
- How do I change the model later?
- Where did the app install itself, and how do I remove it?
- Does AnythingLLM send my documents anywhere?
- The five fields at a glance
- Which model to put in Selected Model
- Other QCode access points
- Related docs
Short answer: In AnythingLLM Desktop’s onboarding, pick Generic OpenAI, put https://api.qcode.cc/openai/v1 in Base URL, paste your cr_ key, and set Selected Model to gpt-6.2-sol.
| Item | Fill in |
|---|---|
| LLM provider | Generic OpenAI |
| Base URL | https://api.qcode.cc/openai/v1 |
| API key | cr_xxxxxxxx |
| Selected Model | gpt-6.2-sol |
| Model context window | 1050000 |
Checked on 2026-11-22 · AnythingLLM Desktop 1.20.0 · Windows 11
Follow the 11 screenshots below on a Windows PC and you end up with a working AnythingLLM Desktop whose answers come from QCode, ready for workspaces and document chat. AnythingLLM needs no account of its own: the only credential is a QCode API key, and you paste it once.
Before the first screenshot, check that you have these:
- A Windows 10 or 11 PC, 64-bit, with a stable internet connection
- About 2 GB of free disk space; the installer puts the app in your own user folder, so no administrator password is needed
- A browser that can open anythingllm.com and reach api.qcode.cc
- A QCode API key copied from your dashboard (
cr_xxxxxxxx); this is the only item you cannot skip. No account yet? Sign up first, pick a plan on the pricing page, then create the key in your Dashboard.
Download and install AnythingLLM
The Windows build is one exe file, about 378 MB. Pick the tab that matches where you are:
Open anythingllm.com/download. The page has one card per platform; the Windows card holds two buttons — Download for Windows (x64) and Download for Windows (ARM). Take the x64 build for an ordinary Intel or AMD PC, or the ARM build for a Windows-on-ARM machine. If the page will not open, use GitHub Releases (github.com/Mintplex-Labs/anything-llm/releases) and take the same file names from the latest release.
Open anythingllm.com/download in your browser, or start the download straight from the official link https://cdn.anythingllm.com/latest/AnythingLLMDesktop.exe. The file is called AnythingLLMDesktop.exe. Connections from mainland China to cdn.anythingllm.com and anythingllm.com can be slow: if a download stalls below 1 MB, cancel it and start again later, or try another network. GitHub Releases (github.com/Mintplex-Labs/anything-llm/releases) carries the same AnythingLLMDesktop.exe file as a backup. There is no official copy of this installer on any Chinese mirror site.
Open the download page
Go to anythingllm.com/download in a browser. The page shows three platform cards: macOS, Windows and Linux. ① is the Windows card in the middle, and ② is the button under it that you want, Download for Windows (x64) — the build for ordinary Intel and AMD PCs.
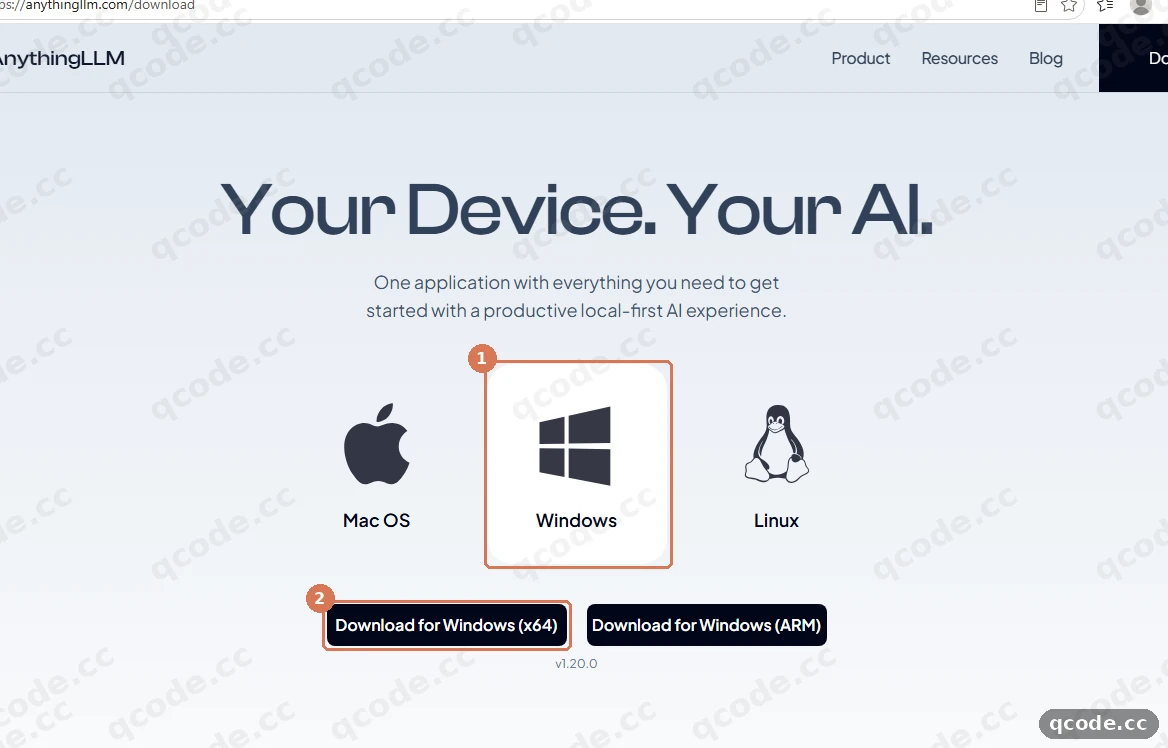
Done right you will see: your browser starts saving a file called AnythingLLMDesktop.exe, about 378 MB. The download bar is in the browser’s download list, not in the page.
Stuck? The download stops at under 1 MB
The file comes from cdn.anythingllm.com, and a slow route can leave the download hanging. Cancel it, wait a few minutes and start again, or run the same official link (https://cdn.anythingllm.com/latest/AnythingLLMDesktop.exe) in a new browser tab. A AnythingLLMDesktop.exe.crdownload file in the folder means the download never finished.
Start the installer and confirm the folder
Double-click AnythingLLMDesktop.exe. The installer opens straight on Choose Install Location, with C:\Users\<your name>\AppData\Local\Programs\AnythingLLM already typed in. There is no “all users or just me” question: this installer always installs into your own user folder. ① click Install.
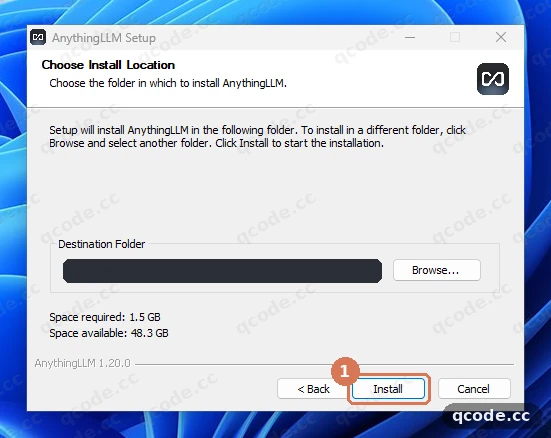
Done right you will see: the window title stays AnythingLLM Setup, and the page changes to a progress line that starts with “Please wait while AnythingLLM is being installed.”
Stuck? A blue “Windows protected your PC” box appears
That is SmartScreen warning you about a file it has not seen often, not a report that the file is broken. Click More info, then Run anyway. The installer is signed by Mintplex Labs Inc; you can read the publisher name in that box.
Wait for the installer to finish
The progress bar writes the application files first, then the installer runs the Microsoft Visual C++ 2015-2022 Redistributable and Windows asks you for permission to install it. Click Yes so the installer can finish. Do not close the window while the bar is moving.
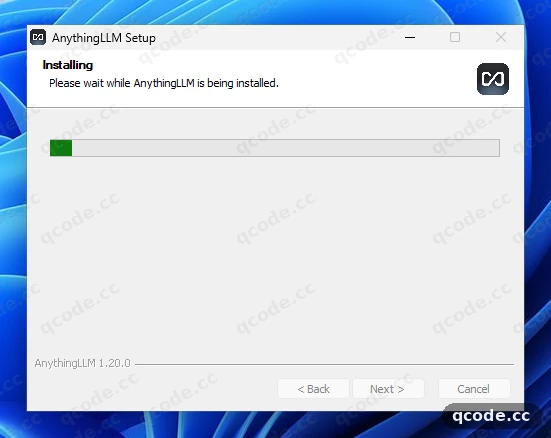
Done right you will see: the progress bar reaches the end, and later a permission box for the Microsoft Visual C++ 2015-2022 Redistributable asks for Yes. After you accept it, the installer closes and AnythingLLM appears in your Start menu.
Stuck? The bar has not moved for ten minutes
The installer unpacks about 1.5 GB of program files, so a slow disk stretches this step, but a frozen bar is usually a failed file write. Close the window, run AnythingLLMDesktop.exe again, and let it install over the top. Nothing from the first attempt is lost.
Open the app and click Get Started
Start AnythingLLM from the Start menu. The first window is a plain welcome screen: no sign-in, no email, no account. ① click Get Started in the middle of the page.
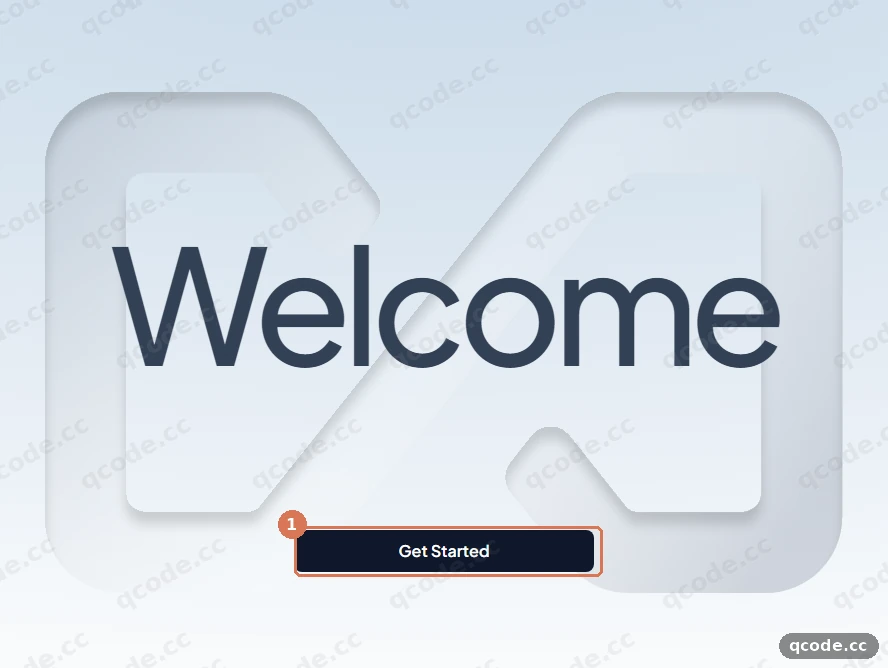
Done right you will see: a page headed Set Up options that offers to download a small local model (Qwen3 Vision 2B Instruct, about 2.6 GB). You do not need it — the next step skips past it.
Stuck? The window stays white for several minutes
The first launch builds the app’s local database and unpacks its backend; one to two minutes is normal, and a slow laptop can take longer. Leave the window alone and do not resize it while it loads. If it is still blank after five minutes, close the app and start it again.
Stuck? Windows asks about firewall access
A box reading “Do you want to allow public and private networks to access this app?” (Publisher: Mintplex Labs Inc) belongs to AnythingLLM’s local service. Allow it for private networks; the app needs its own local port, and pressing Esc only hides the question until the next launch.
Choose Generic OpenAI
On the Set Up options page, click Manual set up at the bottom — that is the route that asks you for an API address instead of downloading a local model. The provider list opens with the heading LLM Preference. Type generic into the search box to shorten the list, then click ① the Generic OpenAI row (its subtitle reads “Connect to any OpenAi-compatible service via a custom configuration”).
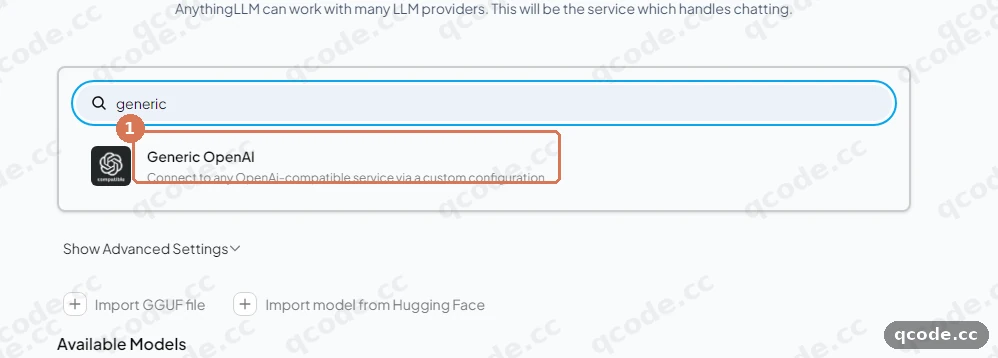
Done right you will see: a form under the row with Base URL, API Key, Selected Model, Model context window and Max Tokens — five fields, all empty except the placeholders.
Stuck? There is no Manual set up link
Look at the very bottom of the Set Up options page, below the hardware recommendation card. A window that is too short hides it: maximise the window and it appears. If the page never shows up at all, you are already on LLM Preference — carry on there.
Fill in the Base URL and the API key
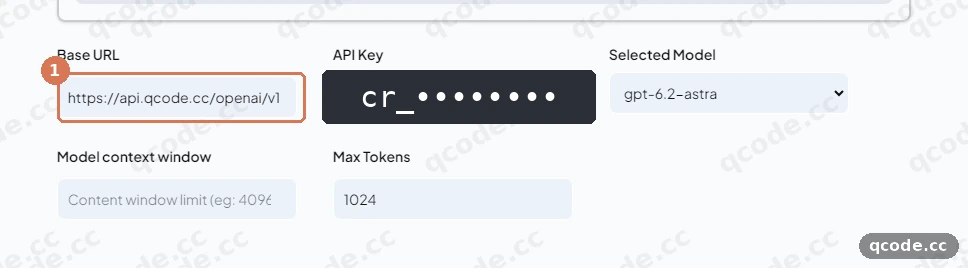
Type https://api.qcode.cc/openai/v1 into ① the Base URL field. Stop at /v1: AnythingLLM appends /chat/completions by itself, so an address that already ends in /chat/completions returns 404 on every message. Then click the API Key field to its right and paste your cr_ key; the box shows dots only.
Need an API Key?
If you do not have a QCode account yet, Sign up first. If you would rather not take a monthly plan, buy a pack on the Pay-as-you-go packs page, then create the key in your Dashboard and copy the string that starts with cr_. You can pay by credit or debit card (Visa / Mastercard) — see Payment methods.
Stuck? A 401 or 404 comes back later
A 401 means the key arrived empty or with a stray space: click the field, clear it, and paste again. A 404 means the address is wrong: it must be exactly https://api.qcode.cc/openai/v1, with no /chat/completions and no trailing slash. A key from a different service will never work here.
Done right you will see: the Base URL box holds the address ending in /v1, the API Key box holds a row of dots, and after a few seconds Selected Model turns from a text box into a dropdown list.
Pick the model and the context window
Open ① the Selected Model list. It is filled straight from QCode, and the first entry is gpt-6.2-astra; pick gpt-6.2-sol instead, one entry lower. Then set ② Model context window to 1050000 (1.05M, the context this model is served with). Leave Max Tokens at its default of 1024.
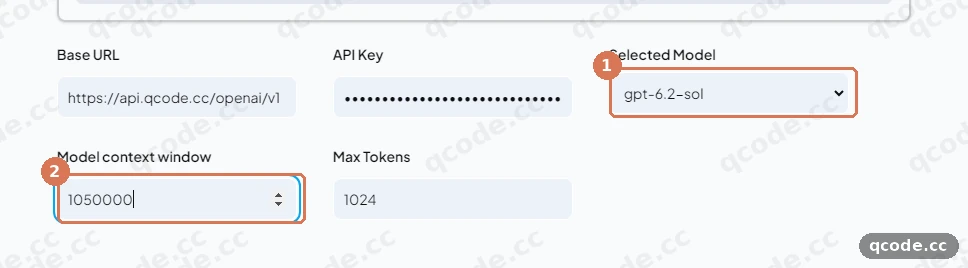
Done right you will see: ① reads gpt-6.2-sol, ② reads 1050000, and Max Tokens still holds 1024. The list also contains gpt-6.2-astra, glm-5.3, kimi-k3 and deepseek-v4-pro if you want to try others.
Stuck? Selected Model stays an empty text box
The list is fetched from <Base URL>/models, so an empty or spinning box means the address or the key was not accepted. Check Base URL for a doubled path (/openai/v1/v1), then type gpt-6.2-sol into the box by hand — the field accepts typed ids as well.
Skip the survey
Click ① the arrow button at the bottom right — it has no Next label, only an icon. The provider step ends there, and a Welcome to AnythingLLM survey opens with an optional email field and a few questions about what you do. Nothing on this page is required, so leave every field empty and click the same ① arrow again.
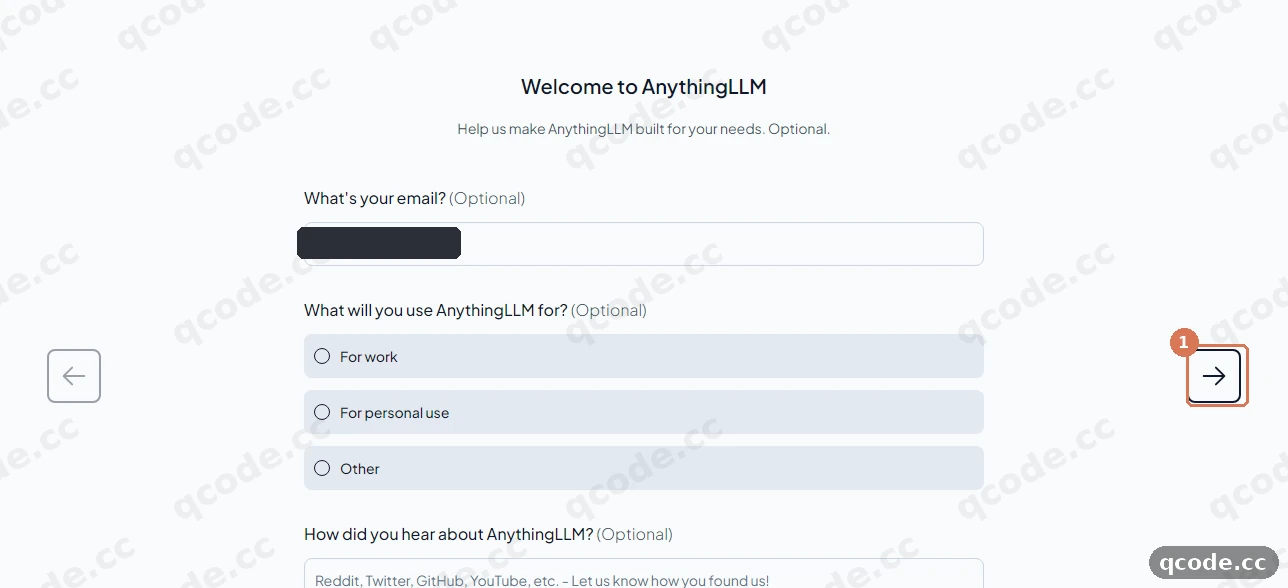
Done right you will see: the survey page is replaced by a page headed Data Handling & Privacy. No red text, no validation message, nothing to fill in.
Accept the data handling page
Data Handling & Privacy explains where your chats go and what the app collects. Anonymous telemetry is already switched on; you can change it later in the app’s settings. Read the page, then click ① the arrow at the bottom right to finish onboarding.
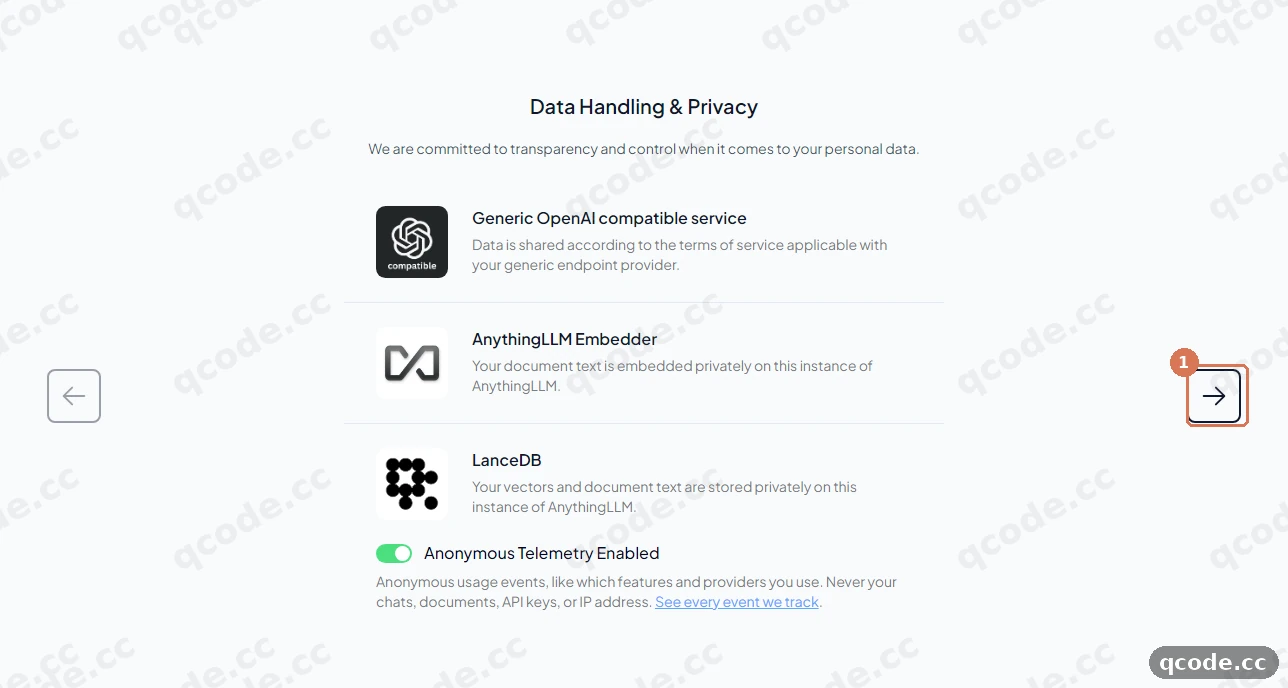
Done right you will see: the onboarding pages close and the main window opens, with a workspace already listed in the left sidebar.
Stuck? A “What’s New” card covers the window
The first visit to the main window often opens a large What’s New card about tasks and schedules. Close it with the X in its top-right corner; everything in the next step is behind it.
Create a workspace
The app opens on a workspace it made for you, usually My Workspace. Close any What’s New card first, then click the + button next to the sidebar search box (hovering it shows New Workspace). In the New Workspace dialog, ① type a name into Workspace Name — this tutorial uses QCode Test — and then ② click Save.
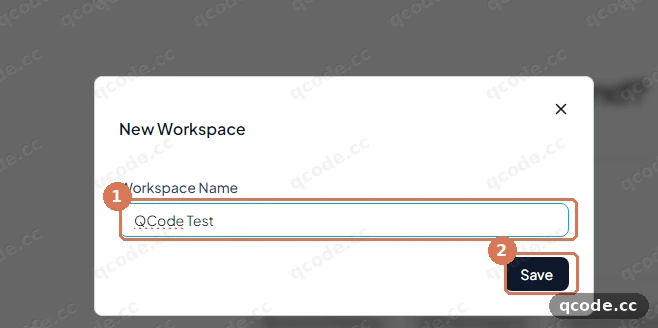
Done right you will see: the dialog closes and QCode Test appears in the sidebar list under the other workspace. The chat area shows the headline “What’s on your mind?”.
Send your first message
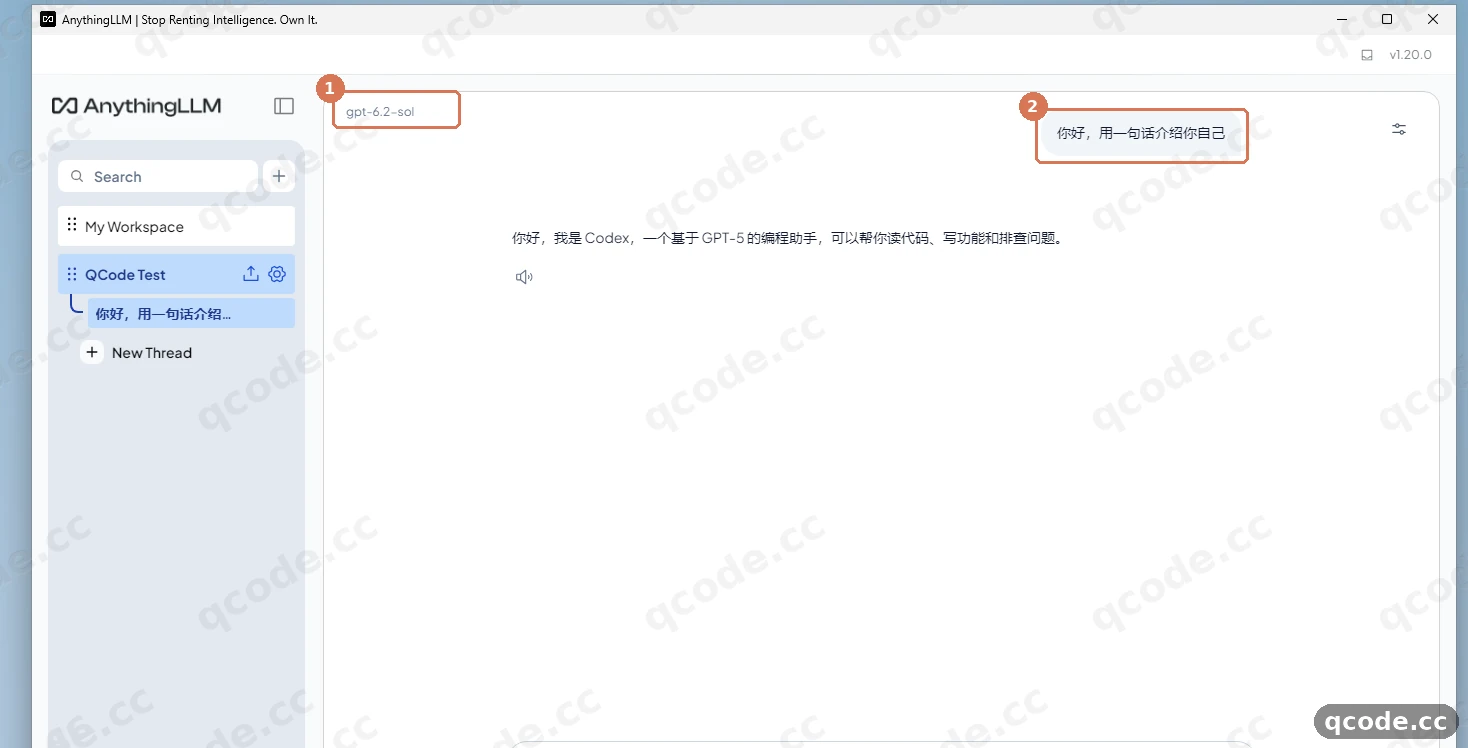
Click the message box at the bottom (its placeholder reads Send a message), type a question, and press Enter. The screenshots use 你好,用一句话介绍你自己, which means “introduce yourself in one sentence” — any question works. Once the answer arrives, ① the model name at the top left of the chat reads gpt-6.2-sol, and ② your own message sits in the chat above the reply.
Stuck? The answer is a red error box
Open LLM Preference from the settings icon and compare the five fields with the answer card at the top of this page: Base URL https://api.qcode.cc/openai/v1, key starting with cr_, model gpt-6.2-sol, context window 1050000, Max Tokens not 0. Nine times out of ten one character in the Base URL is the whole problem.
Done right you will see: a normal reply within a few seconds — for this question, a sentence introducing the assistant. ① names gpt-6.2-sol, which proves the request went to QCode, not to a model on your own machine.
Verify it works
Your setup is complete when all three of these are true:
- In LLM Preference, the provider reads Generic OpenAI, Base URL is
https://api.qcode.cc/openai/v1, Selected Model isgpt-6.2-soland Model context window is1050000. - A message sent in any workspace gets a normal answer within a few seconds, with
gpt-6.2-solshown at the top left of the chat. - The same key, pasted into probe.qcode.cc, shows that request in its log with a model name, a time and a token count — proof that the traffic went through QCode.
All done
AnythingLLM Desktop now answers through QCode, and every workspace you create uses that one key. From here you can:
- Cherry Studio — another desktop client, with the Claude route this app does not have
- Open WebUI — the browser-based cousin for documents and RAG
- Endpoints and API paths — every QCode address and which models each one serves
- Model selection — context sizes and which model to pick for what
- Compare the plans on the pricing page before you commit to long-term use
- Go back to your Dashboard to check usage and balance
Common errors
| Error message | Why | What to do |
|---|---|---|
model_not_available_on_endpoint |
The model id in Selected Model is a Claude id, and Generic OpenAI speaks the OpenAI Chat protocol only | Pick an OpenAI-compatible id such as gpt-6.2-sol, glm-5.3, kimi-k3 or deepseek-v4-pro, then send the message again |
404 |
Base URL carries a full request path or a doubled version segment, so /chat/completions is appended to a path that already ends in it |
Set Base URL to exactly https://api.qcode.cc/openai/v1 — no /chat/completions, no trailing slash — and save |
401 invalid_request_error: You didn't provide an API key. You need to provide your API key in an Authorization header using Bearer auth |
The API Key field reached QCode empty, usually after a copy that grabbed a trailing space, or after a window reload cleared it | Paste the cr_ key again into API Key, confirm the box shows dots, then send the message again |
Do you want to allow public and private networks to access this app? |
Windows Firewall asks about AnythingLLM’s local service on first launch; blocking it keeps the app’s requests from leaving the machine | Click Allow access for private networks, reopen the workspace and send the message again — the request to https://api.qcode.cc/openai/v1 cannot go out while the app is blocked |
FAQ
Do I need an AnythingLLM account?
No. The desktop app runs locally and asks for no email, no sign-in and no licence. The welcome screen goes straight to setup, and the only credential in the whole tutorial is your QCode API key.
Why does the Base URL end in /v1 and not in /api?
Because AnythingLLM’s Generic OpenAI provider speaks the OpenAI Chat protocol, whose root address on QCode is https://api.qcode.cc/openai/v1. The address https://api.qcode.cc/api is the Anthropic-protocol root, and AnythingLLM has no field for a custom Anthropic base address — a /api value in this form returns 404.
Can I use Claude models in AnythingLLM?
Not on this route. Claude models are served only over QCode’s Anthropic protocol, and Generic OpenAI sends OpenAI Chat requests, so a Claude id is rejected before the request is even answered. AnythingLLM’s built-in Anthropic provider is fixed to Anthropic’s own address and cannot be pointed at QCode. If a client does speak the Anthropic protocol, the model to pick on QCode is claude-opus-5-5, with claude-haiku-5-5 as the lighter option.
The Selected Model list stays empty, or spins forever
The list is loaded from <Base URL>/models, so it fails for the same reasons a message would: a wrong Base URL, a key with a stray space, or a key that has expired. Fix the address, paste the key again, and wait a few seconds; if the list still does not fill, type gpt-6.2-sol into the box directly — a typed id works just as well.
My answers stop in the middle of a sentence
Model context window is too small for the model, or Max Tokens is set to 0. Use 1050000 for gpt-6.2-sol, keep Max Tokens at 1024 or raise it to 4096, and never set it to zero.
What happens when my key expires?
It depends on what the key came with. A key from a personal plan cannot be renewed: reopen the plan, create a new key in the dashboard, and paste it into API Key in place of the old one. A key from a pay-as-you-go pack comes back when you buy another pack — the same key keeps working, so nothing in AnythingLLM has to change.
How do I change the model later?
Open the settings icon in the bottom left of the sidebar and go to LLM Preference; the same five fields are there. Choose the new model in Selected Model, update Model context window to that model’s own size, and send a test message in a workspace.
Where did the app install itself, and how do I remove it?
The program lives in C:\Users\<your name>\AppData\Local\Programs\AnythingLLM, your workspaces and settings in %APPDATA%\anythingllm-desktop. To remove it, use the AnythingLLM entry in Settings → Apps → Installed apps. Uninstalling does not delete your QCode key or your QCode account.
Does AnythingLLM send my documents anywhere?
Your workspaces, embeddings and documents stay on your machine; only the chat request — the question plus the passages the app selects — goes to QCode, because that is where the model runs. The anonymous telemetry on the Data Handling & Privacy page is the app’s own usage counter, and you can turn it off in the app’s settings.
The five fields at a glance
| Field | What to put in | Notes |
|---|---|---|
| Base URL | https://api.qcode.cc/openai/v1 |
The API root, not a full request path; the app appends /chat/completions |
| API Key | cr_xxxxxxxx |
From the QCode dashboard; the field shows dots only |
| Selected Model | gpt-6.2-sol |
The list comes from QCode; a typed id is accepted too |
| Model context window | 1050000 |
1.05M for gpt-6.2-sol; change it when you change models |
| Max Tokens | 1024 (default) or 4096 |
Never 0 |
Which model to put in Selected Model
| Model id | Good for | Context |
|---|---|---|
gpt-6.2-sol |
The default pick: everyday chat, document questions, coding | 1.05M |
gpt-6.2-astra |
The highest tier on QCode, for the hardest problems | 1.05M |
glm-5.3, kimi-k3, deepseek-v4-pro |
Chinese models, cheaper per token, fine for plain chat | Check Model selection |
Claude ids never appear in this list on this route; see Can I use Claude models in AnythingLLM? above.
Other QCode access points
Two more hosts serve the same endpoints with the same paths: asia.qcode.cc for Asia and us.qcode.cc for North America. They have identical capabilities and differ only in network routing. To use one, replace the domain and keep the path, for example https://asia.qcode.cc/openai/v1 in Base URL. The default api.qcode.cc works everywhere; switch only if requests from your network are slow.
Related docs
- Endpoints and API paths — the OpenAI, Anthropic and Responses roots, and which models each one serves
- Model selection — context sizes, prices and model ids
- Subscription vs API key — what a plan includes and how a key is billed
- Troubleshooting — checks that apply to every client on this site
- Cherry Studio and Open WebUI — two more desktop routes for the same key
Get started with QCode
One API key for Claude Code, Codex and more — billed per token, per-model prices on qcode.cc/models