Obsidian Copilot plugin with QCode: Windows 11 walkthrough, one screenshot per step
Follow 17 steps and 17 screenshots to install Obsidian 1.15.1 and Copilot 4.1.0 on Windows 11, fill in the QCode address and key with BYOK, and chat with gpt-6.2-sol and claude-opus-5-5 in Quick Chat.
Need an API key? Sign up →Endpoints & base URLs →
On This Page
- Download and install
- Follow the screenshots: Windows, one step at a time
- Open the official Obsidian download page
- First launch: click Create to make a vault
- Fill in the vault name and location
- Open Third-party plugins in settings
- Search for Copilot and install it
- Click Enable to turn the plugin on
- Open the Copilot BYOK page
- Choose Add a custom provider
- Fill in the QCode address and key
- Tick the model and save
- Add a second endpoint for Claude (optional)
- Check that both endpoints pass
- Enable the models in Quick Chat
- Open Quick Chat from the command palette
- Ask it to summarize the current note
- Switch to Claude and ask again
- Check the request at probe.qcode.cc
- Verify it works
- Common errors
- FAQ
- Other ingress points
- Available models
- Connection overview
- How it differs from Copilot Chat
- Related docs
Work through the 17 steps below and your Windows 11 PC will have the Copilot plugin installed in Obsidian, talking to QCode through gpt-6.2-sol and claude-opus-5-5: open Quick Chat on the right of a note and a few seconds later you have Chinese explanations, summaries and rewrites.
Short answer: In Obsidian settings, go to 第三方插件 (Third-party plugins) → Copilot → BYOK, click + Add a provider, choose Add a custom provider, set Base URL to https://api.qcode.cc/openai/v1, paste your cr_ key, turn on Enable CORS, wait until Test shows Verified, tick gpt-6.2-sol and save.
| Item | Fill in |
|---|---|
| Endpoint address (GPT, Chinese models) | https://api.qcode.cc/openai/v1 |
| Endpoint address (Claude) | https://api.qcode.cc/api |
| Default model (GPT) | gpt-6.2-sol |
| Default model (Claude) | claude-opus-5-5 |
| Key format | cr_xxxxxxxx |
Checked on 2026-11-22 · Obsidian 1.15.1 + Copilot 4.1.0 · Windows 11
- The PC runs Windows 10 / 11 (64-bit) and can open a browser to reach
obsidian.md - Obsidian 1.15.1 is already installed; if it is not, that is fine — Download and install below walks you through it
- You have an Obsidian vault: a freshly created empty vault is fine
- You have already copied your QCode API key, which starts with
cr_, from the Dashboard. No account yet? Sign up first, pick a plan on the pricing page, then create the key in the Dashboard. - The PC can reach
api.qcode.ccandprobe.qcode.cc
Download and install
Obsidian's Windows installer is a single .exe file taken from the official site; the Copilot plugin is not part of that installer — you install it from inside Obsidian's plugin browser once Obsidian itself is installed.
Pick your region first:
- Open obsidian.md/download to download the Windows build, or go straight to GitHub Releases and take
Obsidian-1.15.1.exefrom the latest release. - Download only the
.exe; the.dmgin the list is macOS and the.apkis Android — installing them gets you nowhere. - If you prefer the easy route, run
winget install Obsidian.Obsidianin Windows Terminal.
- Open obsidian.md/download and click
Download for Windowsto getObsidian-1.15.1.exe. - The installer is actually hosted on GitHub, so when the direct connection is slow or drops, install the same version from the command line instead:
winget install Obsidian.Obsidian. - The package installs for the current user and usually raises no User Account Control prompt; once it finishes, Obsidian is in the Start menu.
- The official site and GitHub are normally both reachable: opening obsidian.md/download and clicking the Windows button is the least work.
- If the version on the page is not the one you want, find the
v1.15.1release on GitHub Releases and download the.exeof the same name. - If Windows shows
Windows protected your PCduring setup, clickMore info→Run anyway.
- Prefer the official site, obsidian.md/download; if it will not open, use
winget install Obsidian.Obsidian. - You can also download from GitHub Releases; the file name always follows
Obsidian-<version>.exe. - After installing, open Obsidian once and make sure you reach the
新建仓库(Create new vault) screen before going on.
Follow the screenshots: Windows, one step at a time
The 17 steps below each do one thing. The screenshots show a Chinese-language Windows 11 interface; the orange numbers on the screenshots match the ①②③ in the text one to one.
Open the official Obsidian download page
Open obsidian.md/download in a browser. The page detects your system automatically; the purple button at ① — Download for Windows — is the Windows installer.
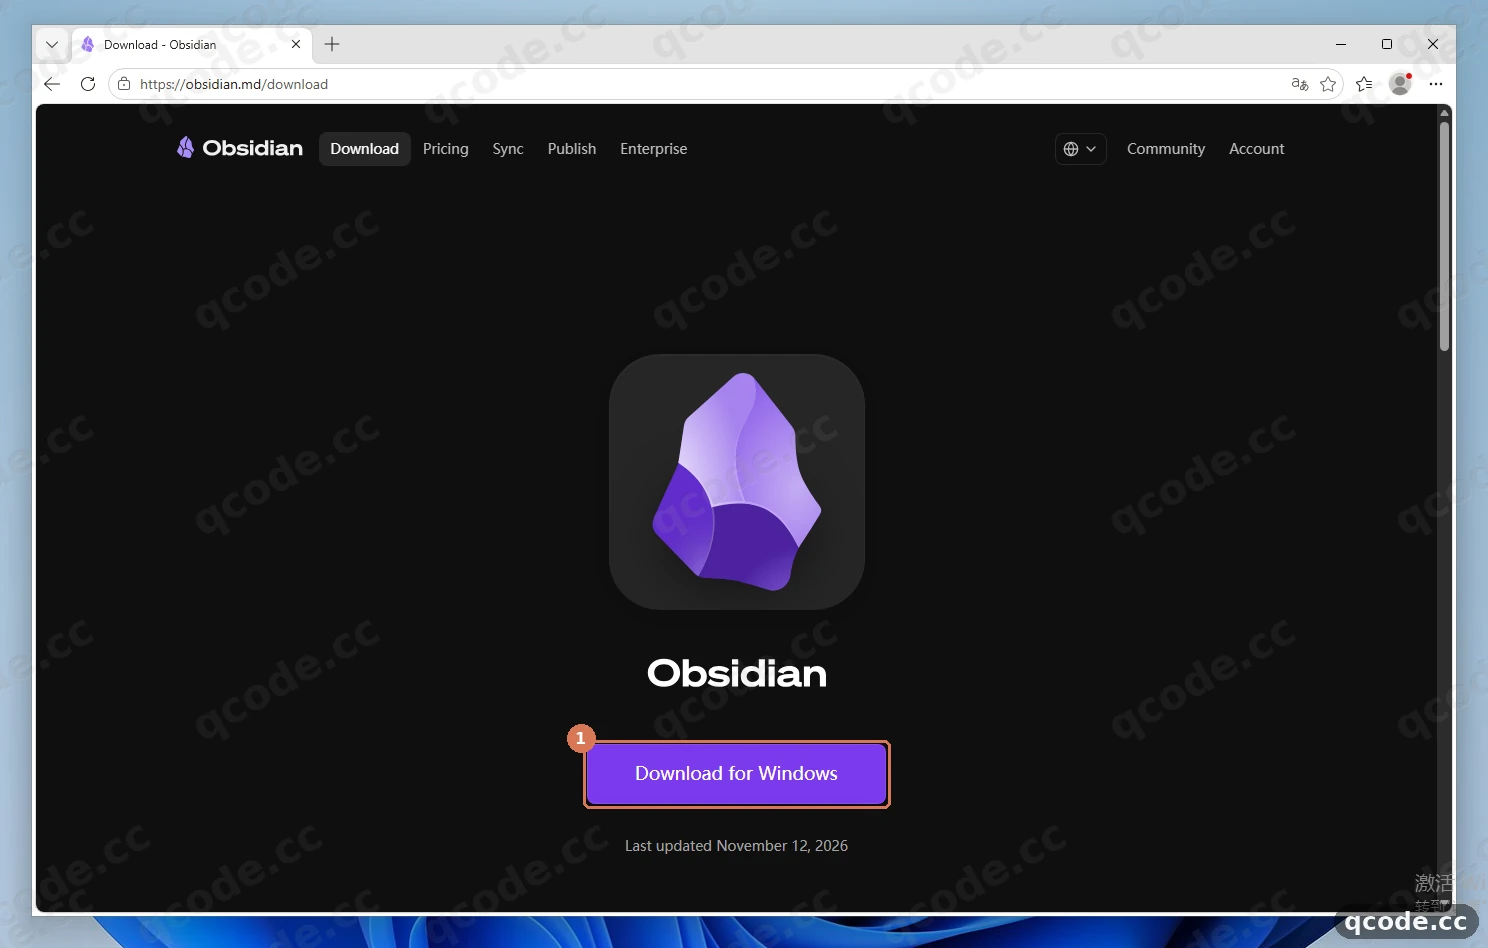
Done right you will see: the browser starts downloading a file named Obsidian-1.15.1.exe, not .dmg or .apk.
Stuck? The button does nothing, or the download stays at 0%
The installer is hosted on GitHub and tends to stall on a poor connection. Switch to one of the other regional routes in Download and install, or run winget install Obsidian.Obsidian in Windows Terminal to install the same version.
First launch: click Create to make a vault
Double-click the installer you just downloaded and finish the setup (the installer has a single button and opens the app automatically when it finishes), then open Obsidian from the Start menu. On first launch it switches to Simplified Chinese by itself; the home screen has three options — click the purple 创建 (Create) button to the right of 新建仓库 (Create new vault) at ①.
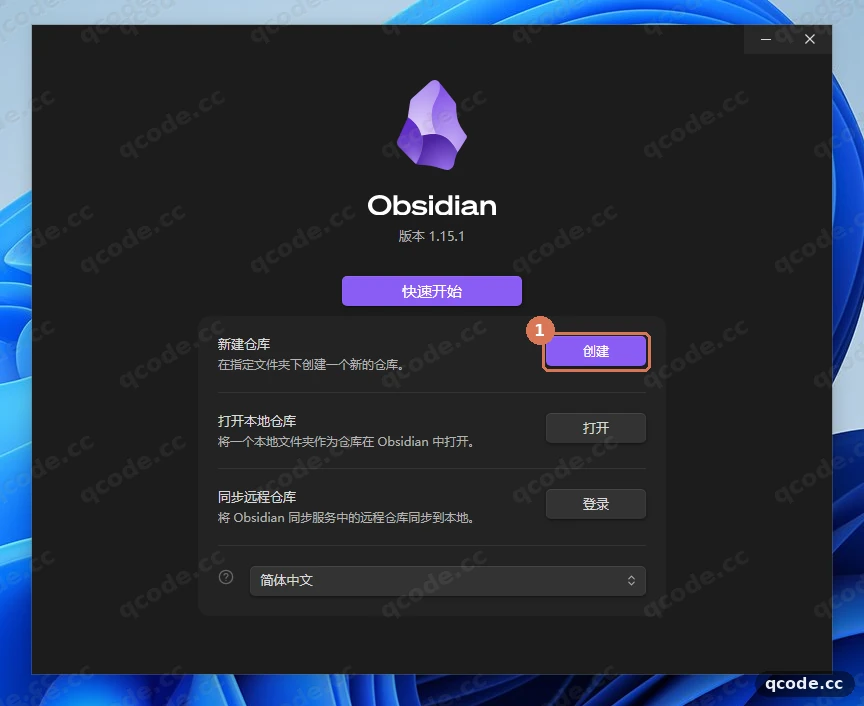
Done right you will see: a 创建本地仓库 (Create local vault) form appears, with 返回 (Back) in the top left and 版本 1.15.1 (Version 1.15.1) in the top right.
Fill in the vault name and location
Type an easy-to-remember name such as QCodeDemo into 仓库名称 (Vault name) (①); click 浏览 (Browse) at ② and pick a folder as the vault location (the username in the screenshot is masked); finally click 创建 (Create) at ③.
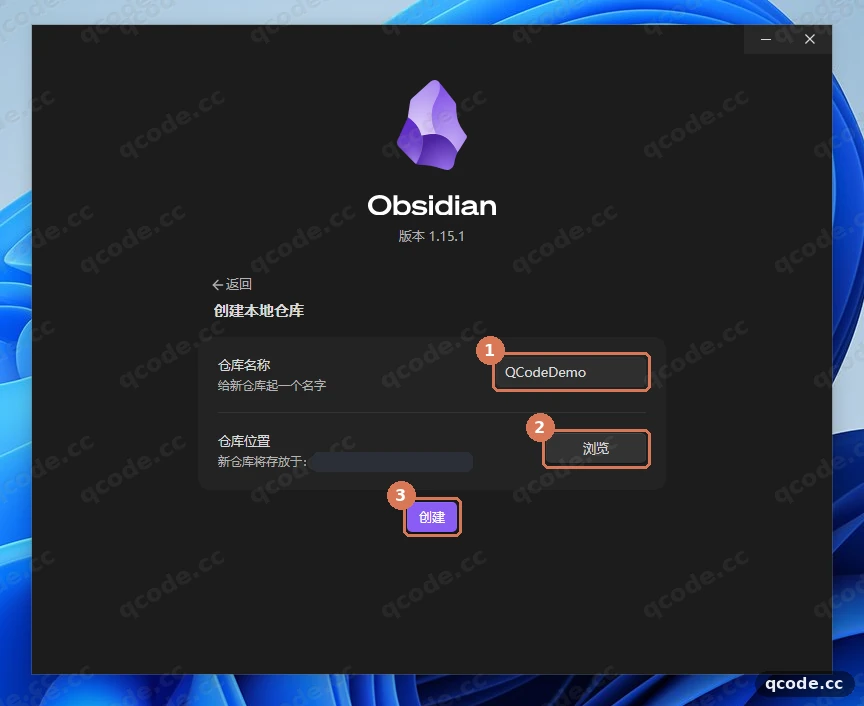
Done right you will see: Obsidian's main window opens, the title bar reads QCodeDemo - Obsidian, and a note called 欢迎 (Welcome) is open in the middle.
Stuck? It says this location already contains a vault
That means the folder you picked already holds an Obsidian vault. Pick an empty folder, or create a subfolder under 仓库位置 (Vault location) and click 创建 (Create) again.
Open Third-party plugins in settings
Press Ctrl + , inside the Obsidian window to open settings. In the left-hand list click 第三方插件 (Third-party plugins) at ①; the right side is still restricted, so click 退出受限模式 (Turn off Restricted Mode) at ②.
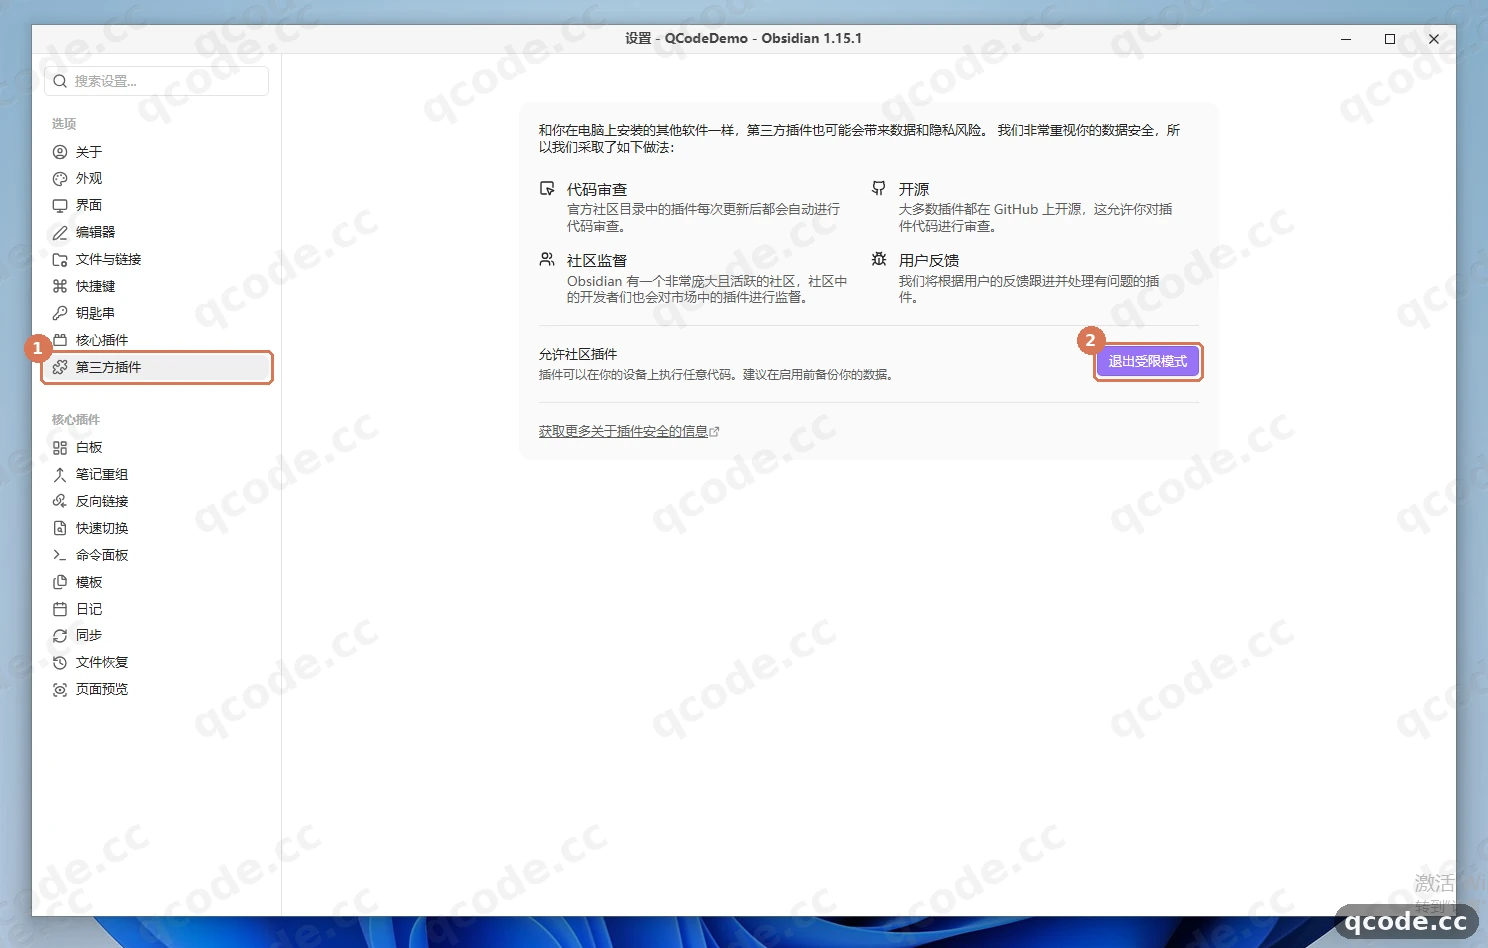
Done right you will see: the restricted-mode notice disappears and a 浏览 (Browse) button plus the list of installed plugins appear on the page.
Stuck? There is no Third-party plugins item on the left
That means your Obsidian version is too old. Go back to Download and install and install 1.15.1, or run winget upgrade Obsidian.Obsidian in Windows Terminal, then reopen settings.
Search for Copilot and install it
Click 浏览 (Browse) to enter the community plugin browser. Type Copilot into the search box (①), select the Copilot by Logan Yang at ②, and on the detail page on the right, which shows version 4.1.0, click 安装 (Install) at ③.
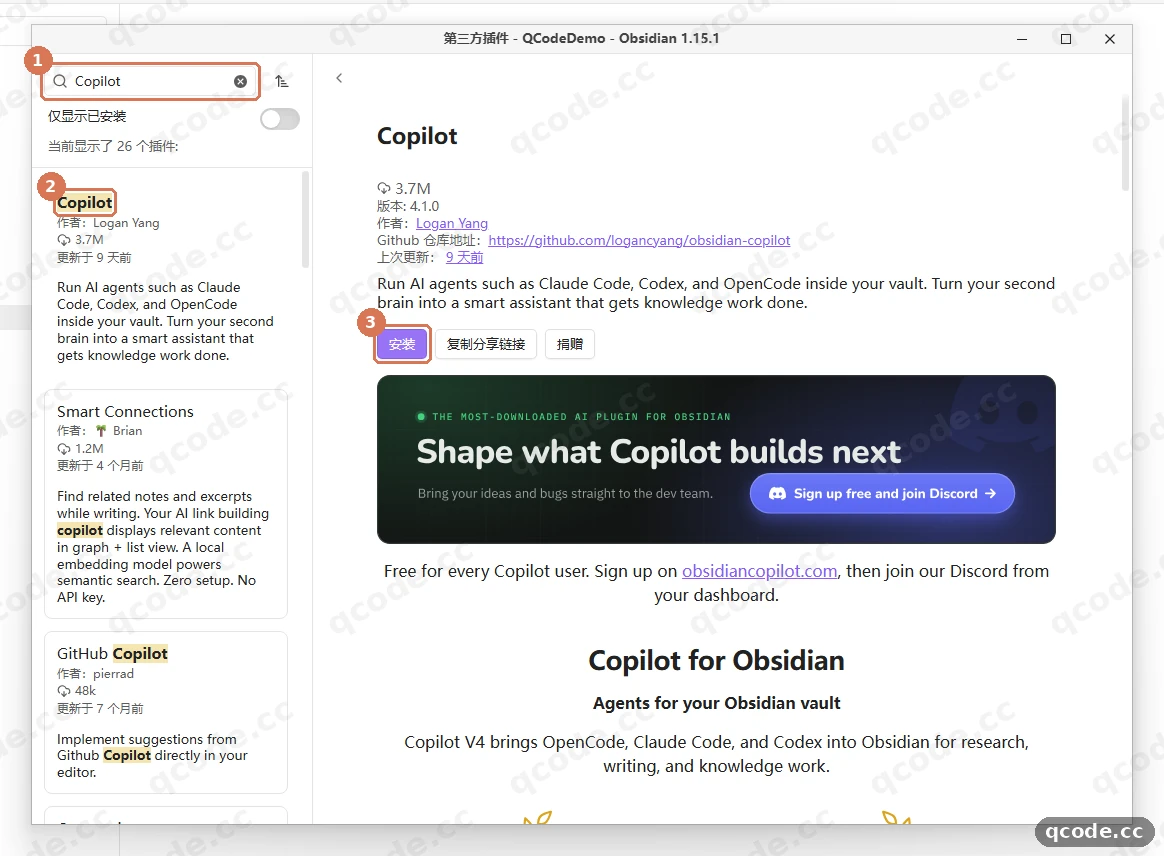
Done right you will see: the button starts spinning and after a few dozen seconds the same spot reads 启用 (Enable).
Click Enable to turn the plugin on
When the install finishes the button turns into 启用 (Enable) by itself — click it at ①. If 信任作者并启用插件 (Trust author and enable plugin) pops up, just click the trust option.
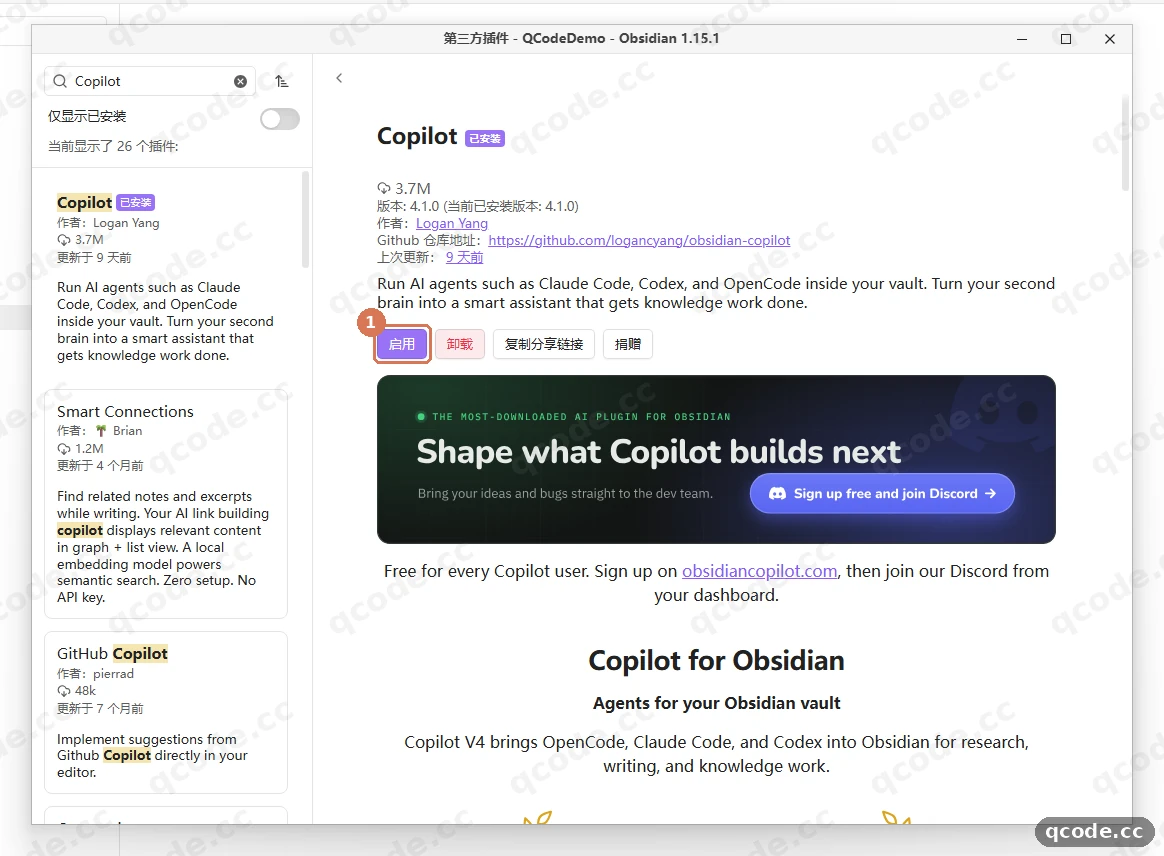
Done right you will see: back in the Third-party plugins list in settings, Copilot appears among the installed plugins with the status enabled.
Stuck? It asks you to trust the author
This is Obsidian's normal confirmation for community plugins. Look over the author name (Logan Yang) and the repository address, then click 信任作者并启用 (Trust author and enable); it will not ask again.
Open the Copilot BYOK page
Press Ctrl + , to get back to settings, click Copilot under the 第三方插件 (Third-party plugins) group on the left at ①, switch to the BYOK tab at ②, then click + Add a provider at ③.
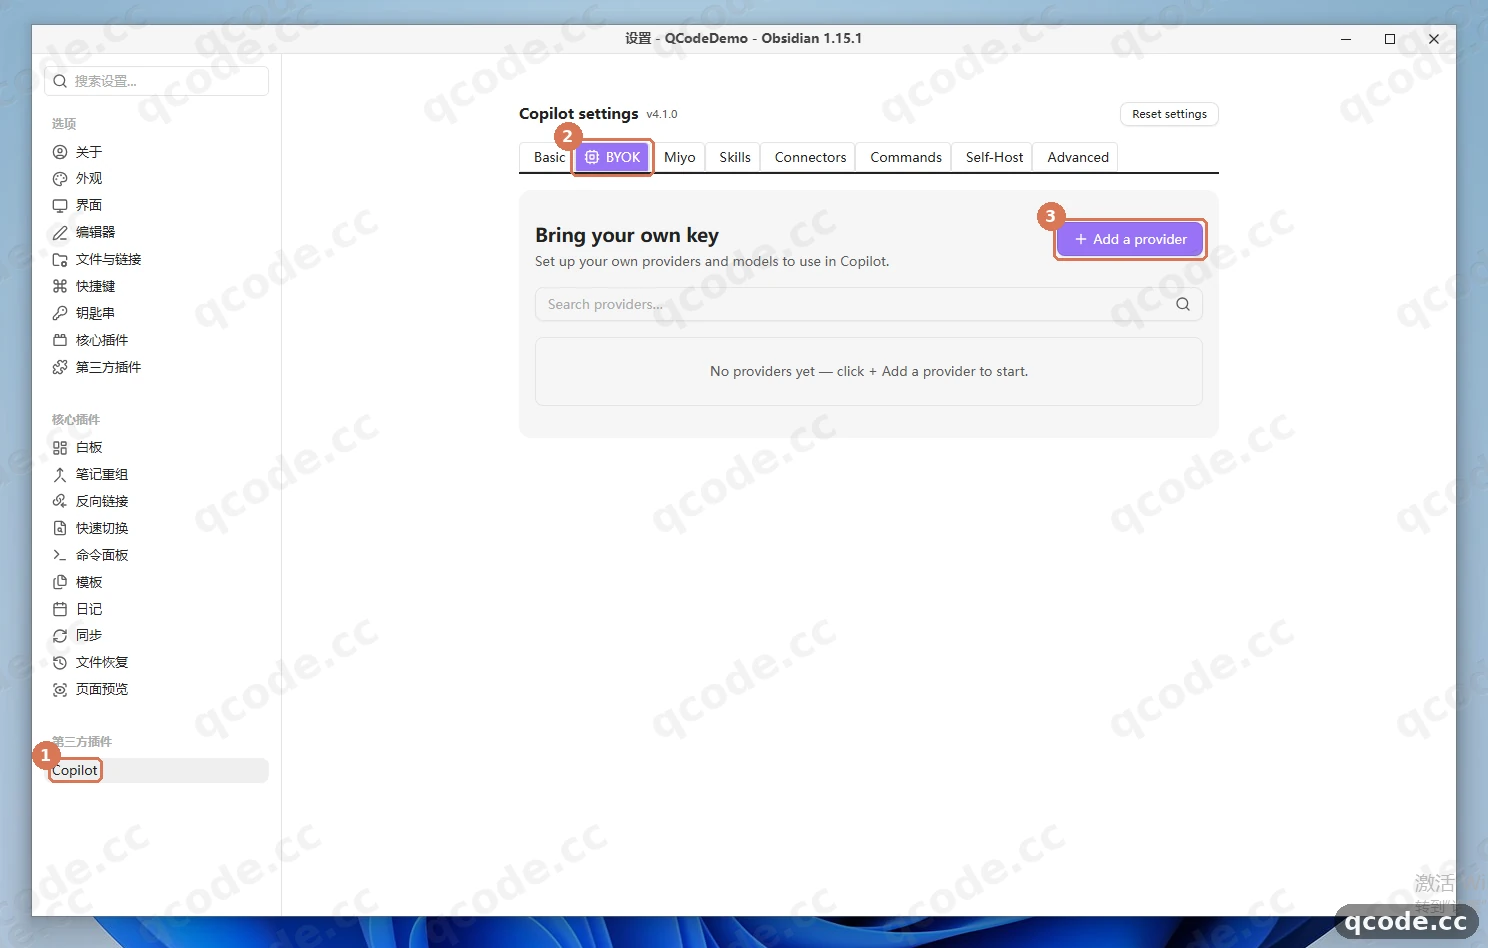
Done right you will see: an Add a provider dialog opens, listing a row of provider names.
Choose Add a custom provider
The dialog lists common providers by category. QCode's GPT and Chinese models speak the OpenAI-compatible protocol, so click + Add a custom provider at ① at the bottom; if you also want Claude, click Add Anthropic provider at ②.
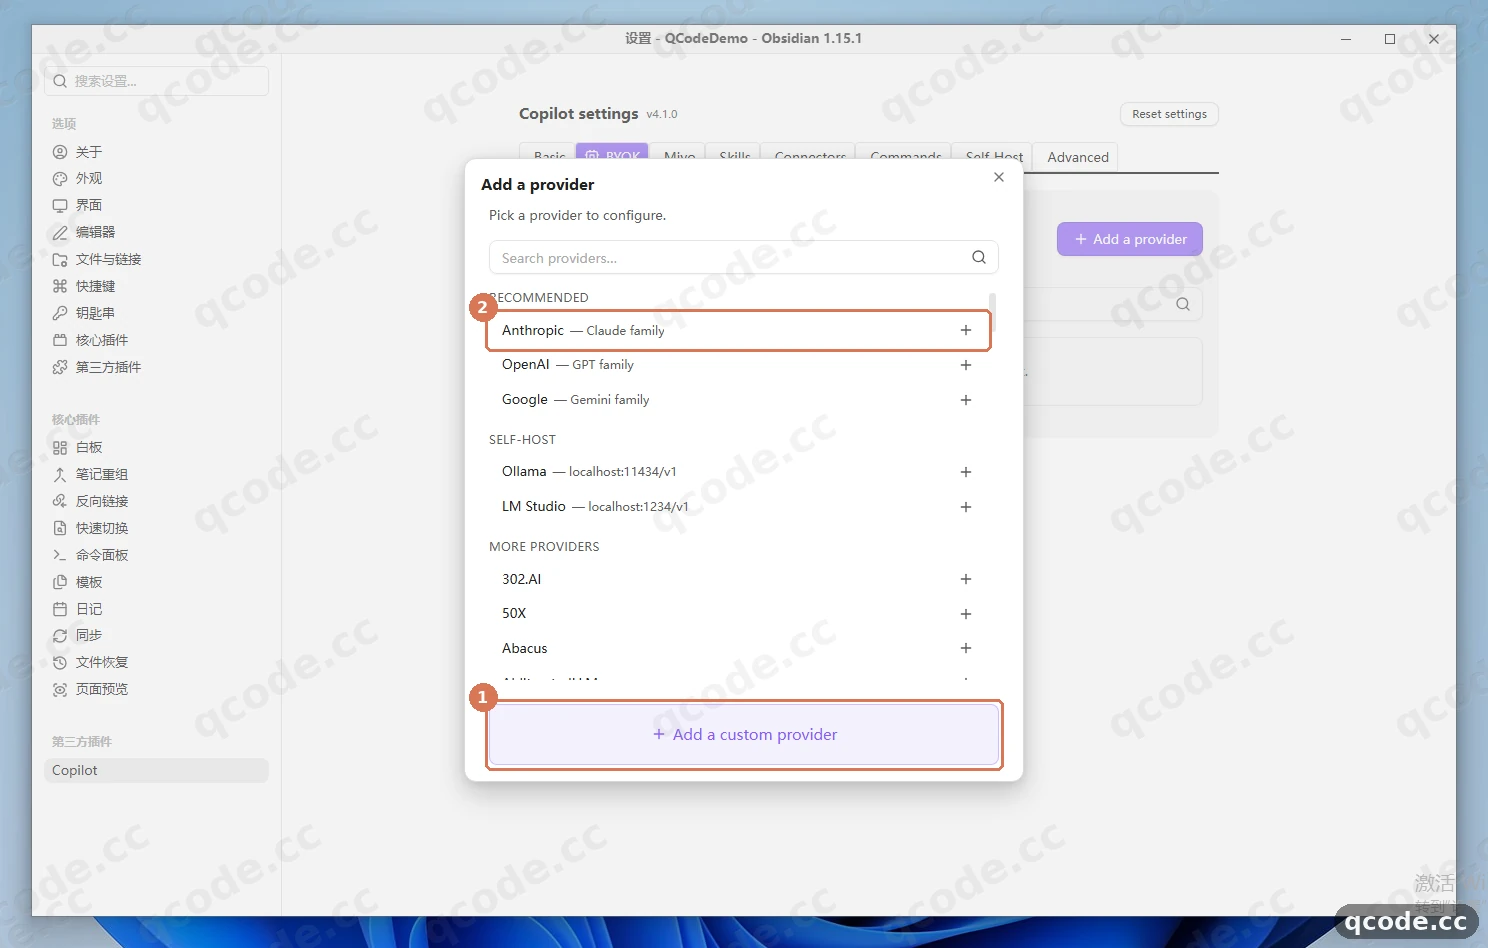
Done right you will see: a Configure Custom OpenAI-compatible form appears, with Display name, API key, Base URL, Enable CORS and Models from top to bottom.
Fill in the QCode address and key
Set Display name to QCode; paste the whole string that starts with cr_ into API key; set Base URL to https://api.qcode.cc/openai/v1 at ① — stop at /v1, with no trailing slash; then turn on the Enable CORS switch at ②; finally click Test at ③.
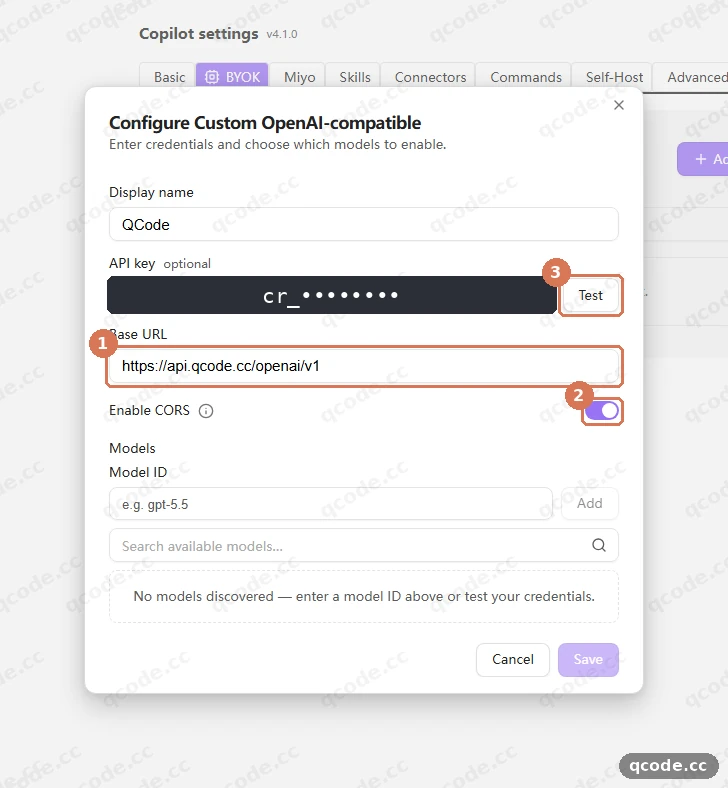
Done right you will see: a green Verified appears to the right of Test, and the Models area below starts listing model names.
Need an API key?
If you do not have a QCode account yet, Sign up first. If you prefer to pay by usage, buy a Pay-as-you-go Pack first, then create the key in the Dashboard. Copy the whole string that starts with cr_ and paste it into API key. You can pay by credit/debit card (Visa / Mastercard), Apple Pay / Google Pay, or cryptocurrency — see Payment methods.
Stuck? Test shows Verified, but sending a message fails with Failed to fetch
That means Enable CORS is off. Obsidian's chat panel goes through browser APIs, so with this switch off the test still passes but no message can be sent. Go back to this step, turn the switch on at ②, and click Test once more.
Tick the model and save
The green Verified next to the key at ① means the address and the key are both right; tick gpt-6.2-sol at ② in the model list, then click Save at ③.
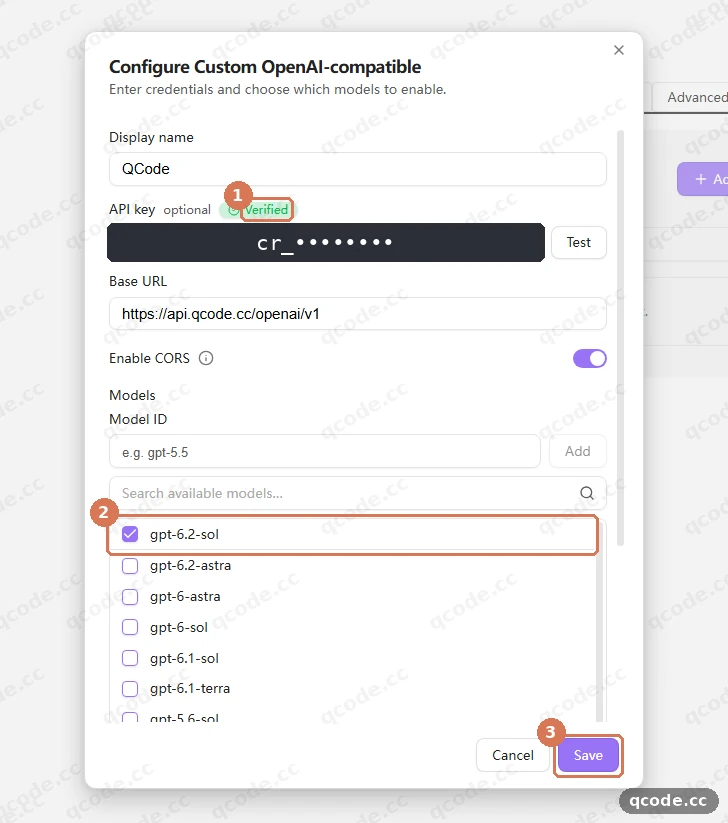
Done right you will see: the dialog closes and the BYOK list gains a row QCode with a green Verified on its right.
Add a second endpoint for Claude (optional)
① is the green Verified that appears once Test passes. Before you test, click + Add a provider → Add Anthropic provider, set Display name to QCode Claude, paste the same cr_ key, set Base URL to https://api.qcode.cc/api at ②, turn on Enable CORS, then click Test and wait for it to turn green, add claude-opus-5-5 under Model ID, and finally click Save at ③.
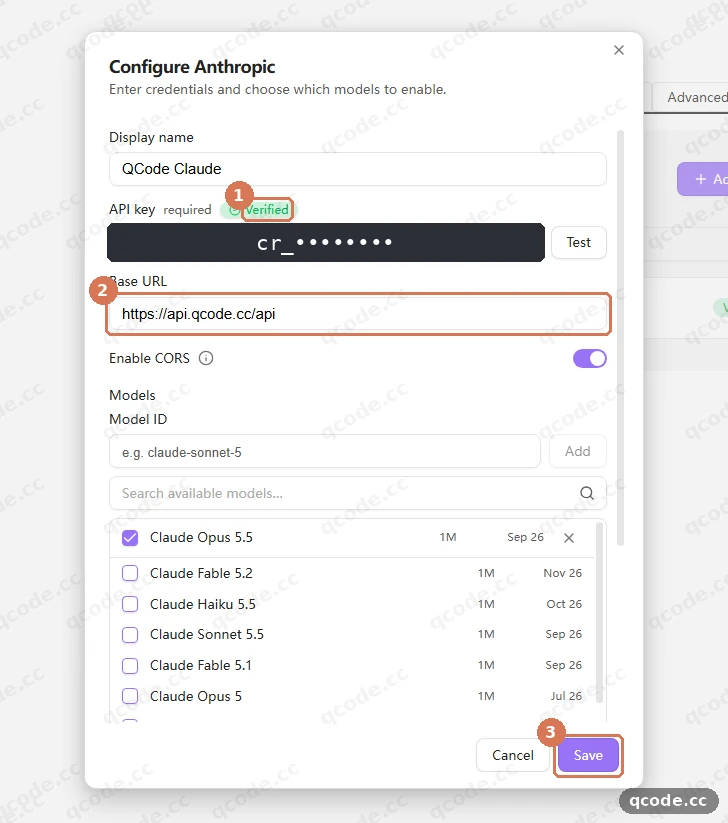
Done right you will see: after the dialog closes you are back in the BYOK list, which this time has two provider rows instead of an empty list.
Stuck? I only want GPT — can I skip this step
Yes. If you only use gpt-6.2-sol, skip this step entirely and carry on with the rest, just using GPT wherever Claude is mentioned.
Check that both endpoints pass
Back in the BYOK list, check the two rows: QCode (OpenAI-compatible) at ① and QCode Claude (Anthropic) at ② should both show a green Verified on the right.
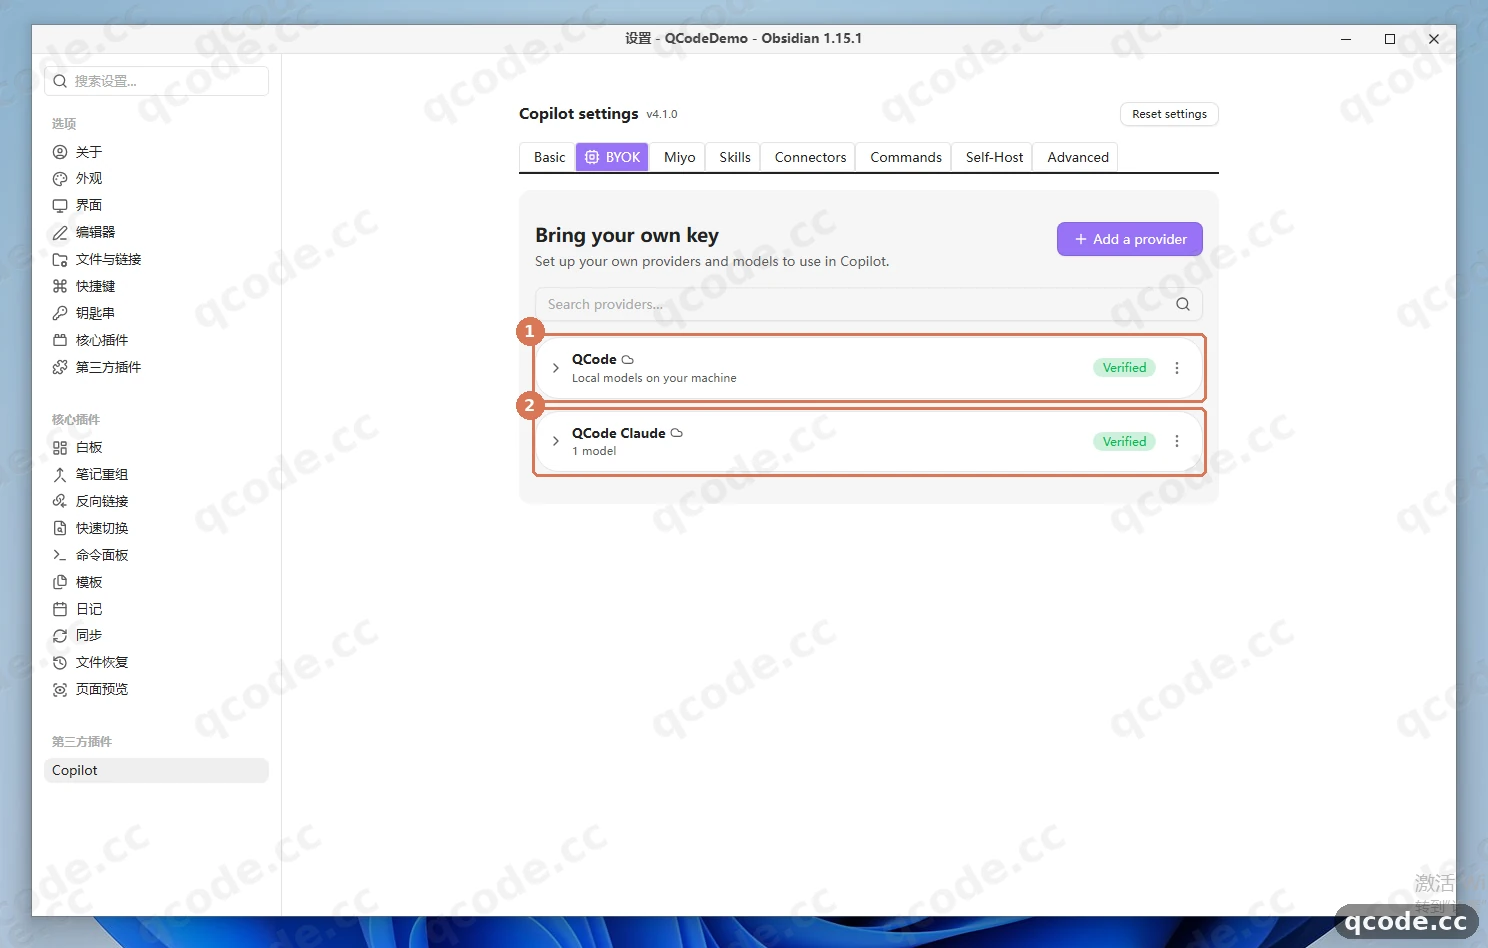
Done right you will see: both rows are a green Verified, with no red warning and no Invalid key.
Enable the models in Quick Chat
Switch back to the Quick Chat tab at ① (it sits in the Basic → Agents row). Check that Default model at ② is gpt-6.2-sol; ③ is the model toggle list, where both gpt-6.2-sol under QCode and Claude Opus 5.5 under QCode Claude need to be switched on.
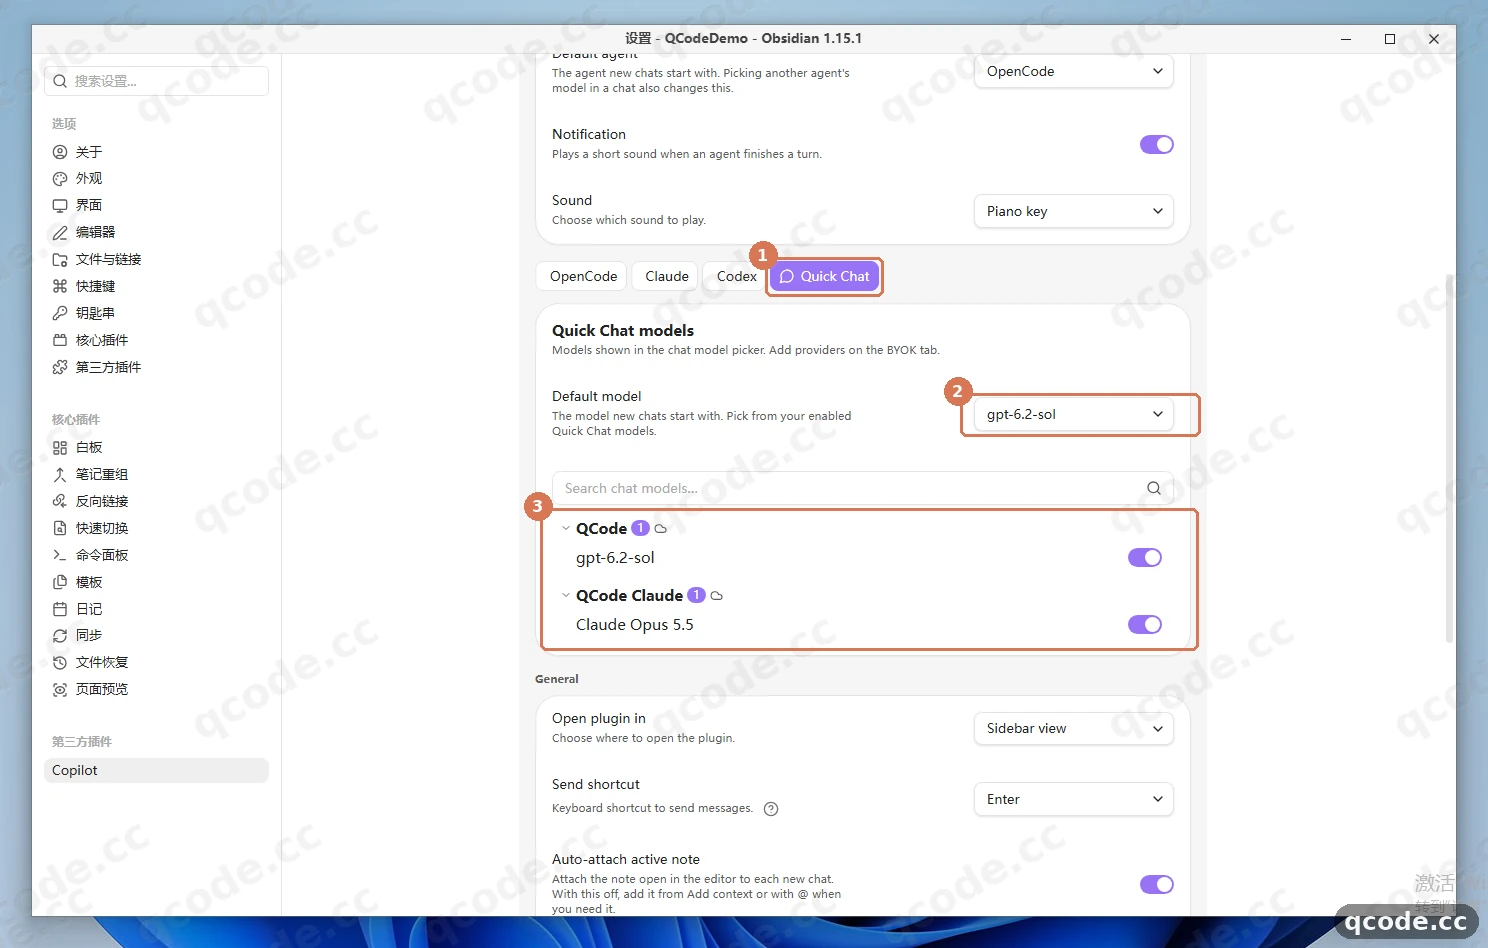
Done right you will see: both switches are on (purple) and the Default model line reads gpt-6.2-sol.
Stuck? The model list only has GPT, no Claude
First check that QCode Claude from the previous step shows a green Verified. Then come back to this page and switch on Claude Opus 5.5; if it still does not appear, click 重新加载插件 (Reload plugins) at the top of settings and come back once more.
Open Quick Chat from the command palette
Close settings and go back to the note window, press Ctrl + P to open the command palette, type Quick Chat, select Copilot: Open Copilot Quick Chat window at ① and press Enter.
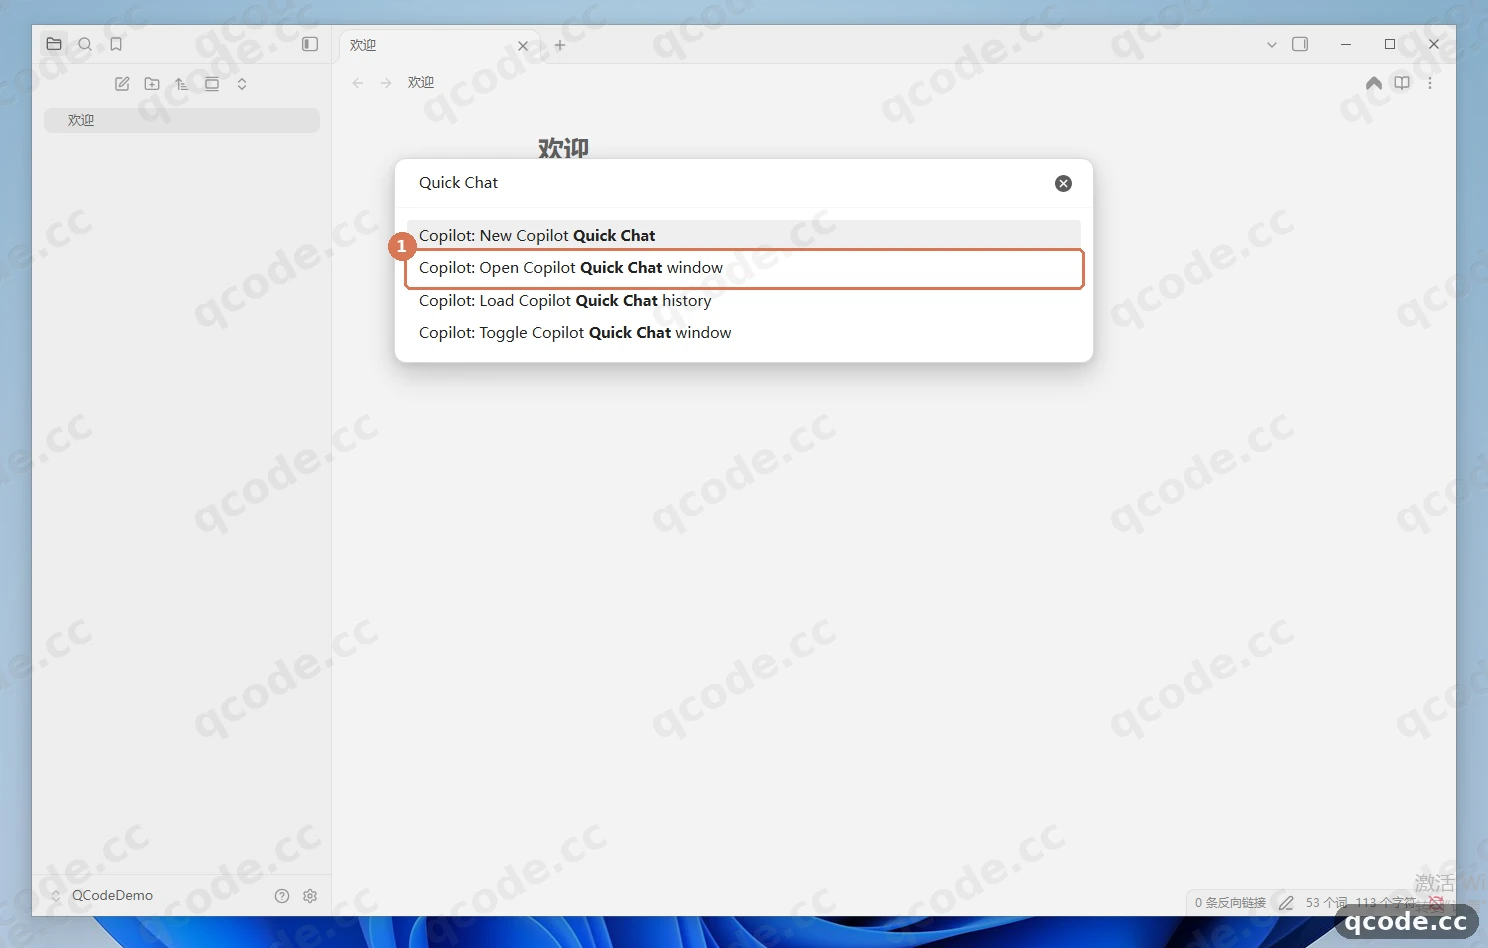
Done right you will see: the Copilot panel opens on the right of the window, with an input box and the model name at the bottom and a hint in the middle that you can press @ to add context.
Stuck? Clicking Open Copilot Chat asks me to download something else
That is Copilot V4's agent mode, which needs a separate runtime and is a different route from the BYOK setup in this tutorial. Pick the command whose name contains Quick Chat window.
Ask it to summarize the current note
Type 用三句话总结当前笔记 (Summarize the current note in three sentences) into the input box on the right and press Enter. The panel automatically brings along the 欢迎 (Welcome) note that is open, and a few seconds later a Chinese summary appears at ① while ② shows that this reply used gpt-6.2-sol.
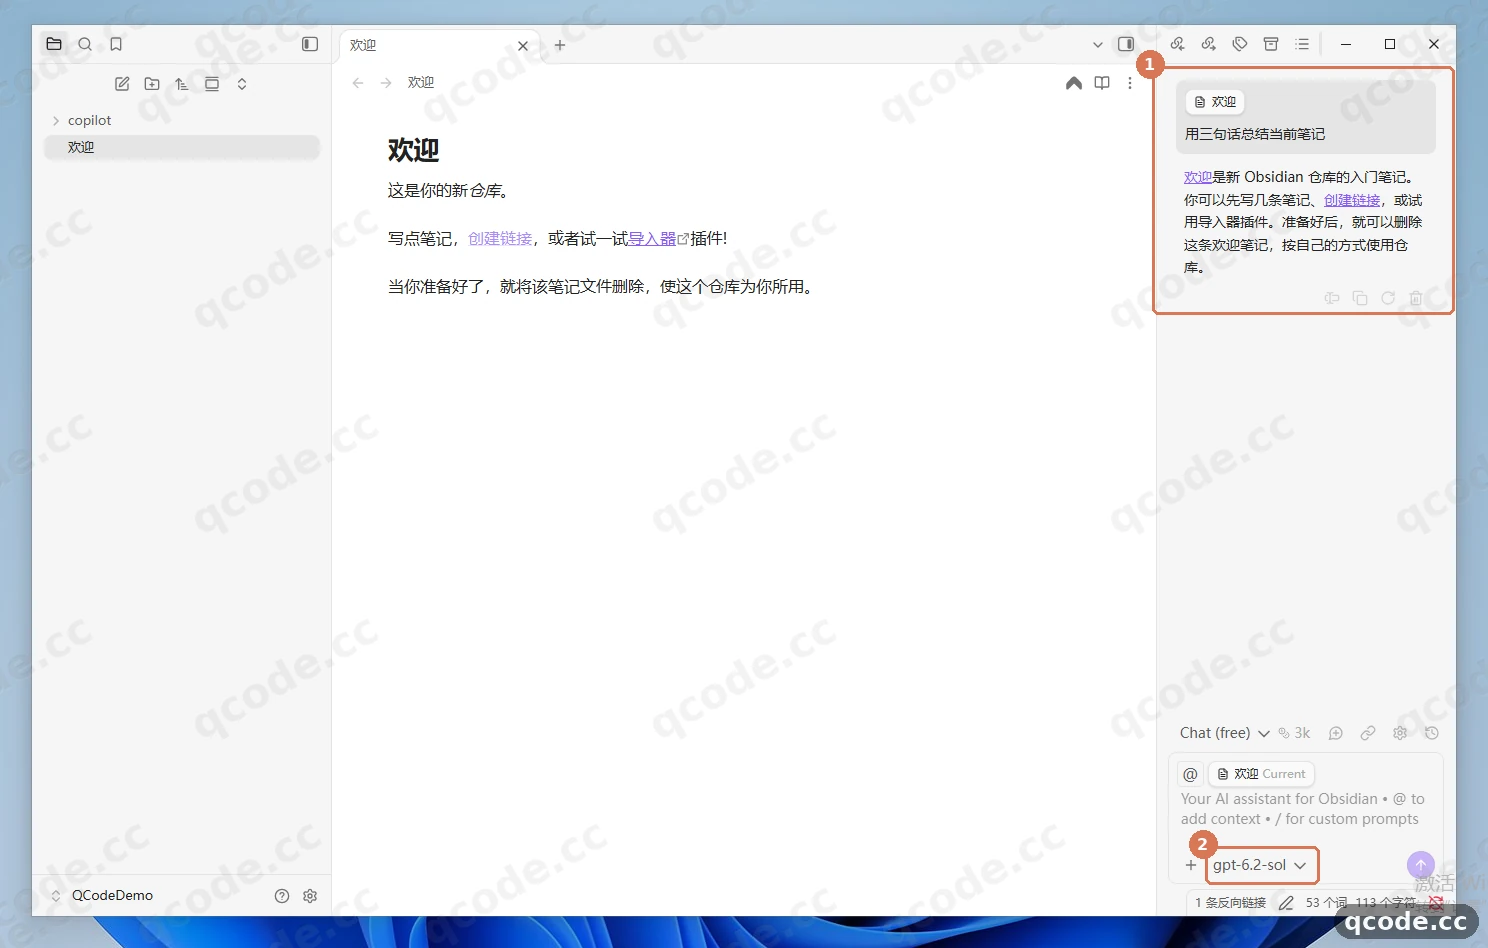
Done right you will see: the reply is fluent Chinese, it really talks about the 欢迎 (Welcome) note, and the model name at the bottom is gpt-6.2-sol.
Switch to Claude and ask again
① is Claude's reply after you switch models. First change gpt-6.2-sol to Claude Opus 5.5 in the model dropdown at ②, then type 你好,用一句话介绍你自己 (Hello, introduce yourself in one sentence) and press Enter; the reply appears at ① a few seconds later.
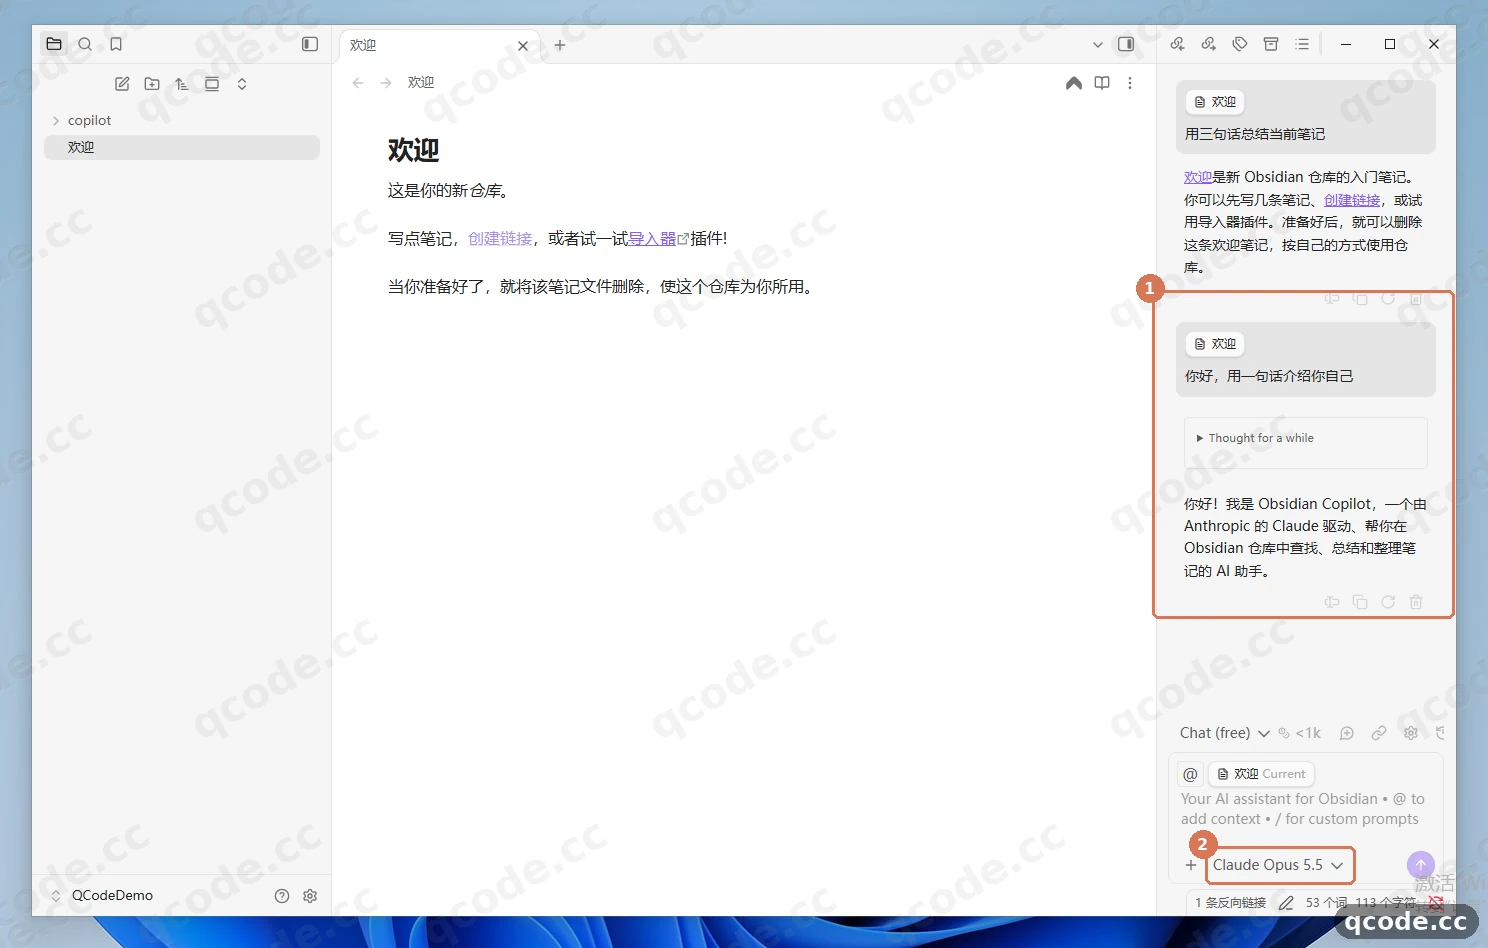
Done right you will see: the answer is in Chinese, the model name at the bottom becomes Claude Opus 5.5, and a line Thought for a while appears in the middle.
Check the request at probe.qcode.cc
Open probe.qcode.cc, paste the same cr_ key, click 查询 (Query), and the top row of the list is the conversation you just had: the time on the row boxed at ① matches, and the status is 200.
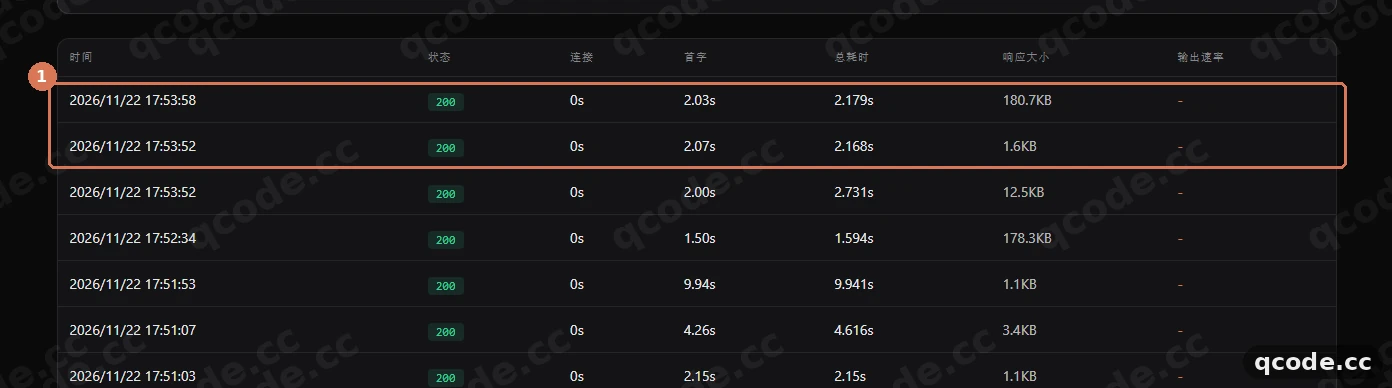
Done right you will see: the status column reads 200 and the time matches the moment you sent the message, which shows the request really went through QCode.
Verify it works
When all four of these check out, Copilot in Obsidian is fully connected to QCode:
- In Settings →
第三方插件(Third-party plugins) →Copilot→BYOK, bothQCodeandQCode Claudeshow a greenVerified; - In
Basic→ Agents →Quick Chat,gpt-6.2-solis the Default model and theClaude Opus 5.5switch is on too; - Running
Copilot: Open Copilot Quick Chat windowfrom the command palette and sending用三句话总结当前笔记(Summarize the current note in three sentences) gets a Chinese reply within seconds; - Entering the same key at probe.qcode.cc finds that request, with status
200.
All done
You can now select a note in Obsidian that you did not quite follow and let gpt-6.2-sol or claude-opus-5-5 in Quick Chat on the right explain it, summarize it or rewrite it. From here you can:
- Endpoints and API formats
- Chinese models
- Billing
- Next: compare the plans on the pricing page
- Go back to your Dashboard to check usage and balance
Common errors
| Error message | Why | What to do |
|---|---|---|
Connection error. more message: Failed to fetch |
Test passes, but the chat panel cannot send messages because Enable CORS is off |
In BYOK open the QCode row, turn on the Enable CORS switch, click Test again, then reopen Quick Chat |
{"error":{"message":"Invalid URL (POST /v1/chat/completions/chat/completions)","type":"invalid_request_error"}} |
/chat/completions was included in Base URL and the client appended it a second time |
Set Base URL to https://api.qcode.cc/openai/v1 only — no trailing slash and no /chat/completions — then fill it in again and click Test |
401 invalid_api_key |
The key is incomplete, has spaces around it, or belongs to another provider | Copy the whole string starting with cr_ from the Dashboard again, paste it into the API key field with no spaces around it, then click Test |
Missing API key |
The API key field is still empty, or you switched tabs after pasting without saving | Paste the key into API key, check that the field holds something starting with cr_, then click Test and Save in that order |
FAQ
What happens when my key expires?
Two cases: a personal plan key cannot be renewed when it expires — you have to reopen a plan and use a new key; for a pay-as-you-go pack, buy another pack after the key expires and the same key starts working again.
After switching to a new key, go back to BYOK, open QCode (and QCode Claude), paste the key again, click Test and, once it passes, click Save.
The model I just added does not show up in Quick Chat?
BYOK only connects the provider; models still have to be switched on one by one: go to Basic → Agents → Quick Chat, switch on the models you want and select one as Default model. If the settings page has not refreshed, click 重新加载插件 (Reload plugins) at the top and come back.
Do I have to turn on Enable CORS?
Yes. With it off, Test still shows Verified, but sending a message in Quick Chat fails. Turn the switch on for both the GPT endpoint and the Claude endpoint.
Can I use the same key for both endpoints?
Yes. The same cr_ key works on the Anthropic endpoint (https://api.qcode.cc/api) and the OpenAI-compatible endpoint (https://api.qcode.cc/openai/v1), and usage is all billed to the same account.
Do I need a Copilot license or an account login?
No. This tutorial uses BYOK: your own key connects straight to QCode, you do not sign in to any model vendor, and you do not need a paid Copilot account.
Other ingress points
The three ingress domains have the same capabilities and differ only in network routing; the same key works on all of them. When api.qcode.cc is slow from mainland networks, switch the address to the Asian node and click Test again.
| Ingress | Anthropic (Claude) | OpenAI-compatible (GPT / Chinese models) |
|---|---|---|
| Global | https://api.qcode.cc/api |
https://api.qcode.cc/openai/v1 |
| Asia (first choice in mainland China) | https://asia.qcode.cc/api |
https://asia.qcode.cc/openai/v1 |
| North America / Europe | https://us.qcode.cc/api |
https://us.qcode.cc/openai/v1 |
Available models
| Model | Model ID to fill in Copilot | Notes |
|---|---|---|
| Claude Opus 5.5 | claude-opus-5-5 |
Default recommendation for the Anthropic endpoint |
| Claude Haiku 5.5 | claude-haiku-5-5 |
Lighter alternative that replies faster |
| GPT 6.2 Sol | gpt-6.2-sol |
Default recommendation for the OpenAI-compatible endpoint |
| GPT 6.2 Astra | gpt-6.2-astra |
Higher-tier alternative |
| GLM 5.3 | glm-5.3 |
Main Chinese model, served through the OpenAI-compatible endpoint |
Claude models can only go into the QCode Claude Anthropic endpoint; GPT and Chinese models go into the QCode OpenAI-compatible endpoint. Put them in the wrong endpoint and Test fails. See Chinese models for the full model list.
Connection overview
| Item | Details |
|---|---|
| Plugin | Copilot for Obsidian 4.1.0 (by Logan Yang, installed from the community plugin browser) |
| Protocol and Base URL | Anthropic: https://api.qcode.cc/api · OpenAI-compatible: https://api.qcode.cc/openai/v1 |
| Key | A cr_ key from the same QCode account works on both endpoints |
| Required switch | Enable CORS (turn it on for both endpoints) |
| Chat entry point | Copilot: Open Copilot Quick Chat window in the command palette |
| Official docs | Obsidian download page · Copilot plugin repository |
How it differs from Copilot Chat
Copilot V4 has two separate routes that do not share anything:
- Quick Chat (this tutorial): ask questions about the current note in the right sidebar, with models from the provider you connected in BYOK — an address and a key are all it takes.
- Copilot Chat (agent mode): calls runtimes such as OpenCode, Claude Code or Codex, needs those installed or signed in separately, and takes far more configuration.
If all you want is an AI that reads your notes, answers questions and edits wording, Quick Chat is enough; when you need the AI to change several files and run commands by itself, look into agent mode.
Related docs
- Endpoints and API formats — the address and model family for each protocol
- Chinese models — Chinese model IDs available on the OpenAI-compatible endpoint
- Billing — how usage is calculated
- Troubleshooting — common connection and authentication problems
Get started with QCode
One API key for Claude Code, Codex and more — billed per token, per-model prices on qcode.cc/models