Page Assist with QCode: Windows 11 walkthrough, one screenshot per step
Follow 11 steps and 11 screenshots to install the Page Assist 1.5.91 extension in a Windows 11 browser, configure the QCode OpenAI-compatible endpoint, and use gpt-6.2-sol to summarize and question any web page from the sidebar.
Need an API key? Sign up →Endpoints & base URLs →
On This Page
- Download and install
- Follow the screenshots: Windows, one step at a time
- Click "Get" in the extension store
- Click "Add extension" in the permission dialog
- Pin Page Assist to the browser toolbar
- Open the Web UI and go to settings
- Switch to Simplified Chinese and open "OpenAI Compatible API"
- Add the QCode provider and fill in the API key
- Tick the recommended model in the model list
- Confirm the QCode provider is enabled
- Check the imported models under "Manage Models"
- Open a web page and pick the model in the sidebar
- Tick "Chat with current page" and send your question
- Verify it works
- Common errors
- FAQ
- What happens when my key expires?
- Why can't I use Claude models in Page Assist?
- The model list is empty after saving the provider — how do I add a model by hand?
- How do I make the sidebar read the current page by default instead of ticking the box every time?
- What if responses are slow or occasionally time out?
- Connection overview
- Other ingress points
- Available models
- Related docs
Follow the 11 steps below and you will have the open-source Page Assist extension installed in a Windows 11 browser, connected to the QCode OpenAI-compatible endpoint, so you can ask AI to summarize a page or answer questions right in the sidebar of any web page.
Short answer: install the Page Assist 1.5.91 extension in Microsoft Edge or Chrome, click the gear icon in the top right to open "OpenAI Compatible API" → "Add provider", keep the type as Custom, fill in the base URL https://api.qcode.cc/openai/v1 and your cr_ key, tick gpt-6.2-sol and save; then press Ctrl+Shift+Y to open the sidebar, tick "Chat with current page" and ask away.
| Item | Fill in |
|---|---|
| API type | Custom |
| Provider name | QCode |
| Base URL | https://api.qcode.cc/openai/v1 |
| API key | cr_xxxxxxxx |
| Default recommended model | gpt-6.2-sol |
Checked on 2026-11-22 · Page Assist 1.5.91 · Windows 11
Page Assist is an open-source browser extension that lets you chat with AI in a standalone tab (Web UI) or in the right-hand sidebar of any web page — especially handy for reading English docs or long articles while asking the model for Chinese summaries and follow-up answers. Connecting QCode inside Page Assist goes through the OpenAI-compatible API, so the GPT family and Chinese models are available directly (recommended: gpt-6.2-sol).
- The PC runs Windows 10 / 11 (64-bit) with Microsoft Edge, Google Chrome or Firefox installed (Edge ships with Windows, no extra software needed)
- You have already signed up for QCode.cc and copied the API key starting with
cr_from the Dashboard. No account yet? Sign up for QCode first, pick a plan on the pricing page, then create the key in the Dashboard. - The browser can open the official extension stores (such as the Edge Add-ons store), plus
api.qcode.ccandprobe.qcode.cc - Know the current scope: Page Assist reaches QCode only through the OpenAI-compatible endpoint, so
gpt-6.2-soland other GPT and Chinese models are available; if you need Claude models such asclaude-opus-5-5, use a client that supports a custom Anthropic endpoint instead
Download and install
Page Assist is a browser extension: there is no standalone Windows .exe installer, and it is not in winget or the Microsoft Store. Installing it takes two clicks in the browser store, triggers no Windows SmartScreen warning and needs no administrator rights.
Official store entries:
- Microsoft Edge (recommended): Page Assist page in the Edge Add-ons store (no Microsoft account sign-in needed)
- Google Chrome: Page Assist page in the Chrome Web Store
- Mozilla Firefox: Page Assist page in the Firefox Add-ons store
Browser store availability differs slightly by region, so pick your region first:
- All three official extension stores (Chrome, Edge, Firefox) open normally; just pick the browser you use:
- Edge: open the Edge Add-ons store, click 「获取」 (Get) → 「添加扩展」 (Add extension).
- Chrome: open the Chrome Web Store, click 「添加至 Chrome」 (Add to Chrome) → 「添加扩展程序」 (Add extension).
- Firefox: open the Firefox Add-ons store, click Add to Firefox.
- Once installed, the configuration screens and steps inside the extension are identical in every browser.
- Prefer the built-in Microsoft Edge on Windows and open the Page Assist page in the Edge Add-ons store: no Microsoft account needed, click 「获取」 (Get) → 「添加扩展」 (Add extension) and the install is done (all screenshots below use Edge).
- If you normally use Firefox, you can also install straight from the Firefox Add-ons store.
- The Chrome Web Store usually cannot be reached directly from mainland networks, so use the Edge or Firefox store instead, and do not download
.crxfiles from third-party sites, in case they have been tampered with.
Follow the screenshots: Windows, one step at a time
Each of the 11 steps below does just one thing, demonstrated with the Microsoft Edge that ships with Windows 11 (the operations are the same in Chrome / Firefox once installed). The orange numbers on the screenshots match the ①②③ in the text one to one.
Click "Get" in the extension store
Open the Page Assist page in the Edge Add-ons store with Microsoft Edge (no Microsoft account needed; if a cookie banner appears at the top, click 「拒绝」 (Reject) or 「接受」 (Accept) to close it). Click the blue 「获取」 (Get) button at ① on the right.
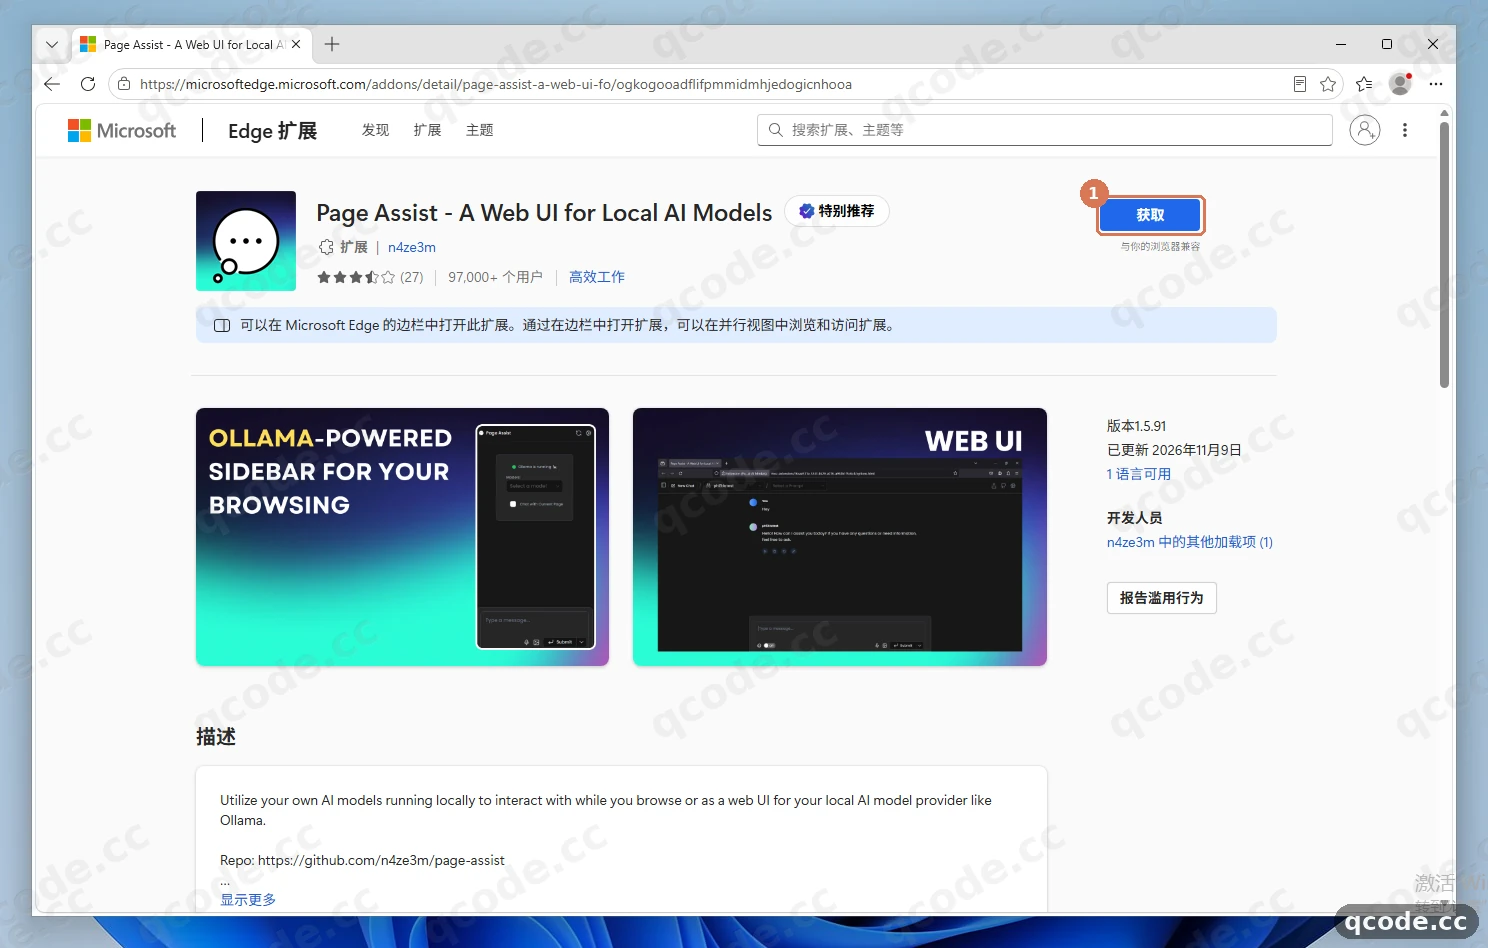
Done right you will see: a small install confirmation window pops up below the browser address bar, listing the permissions the extension needs.
Stuck? The store will not open, or you want to install in Chrome
If the Chrome Web Store keeps spinning and never opens, use the built-in Microsoft Edge to visit the Edge store link above; where the Chrome Web Store is reachable directly, clicking 「添加至 Chrome」 (Add to Chrome) works the same — after installing, jump straight to step 3.
Click "Add extension" in the permission dialog
Edge shows a confirmation dialog saying Page Assist will be added to the browser, and lists two permissions ("Read and change all your data on all websites" and "Display notifications"). Click 「添加扩展」 (Add extension) at ① to start the install; the whole process needs no administrator rights.
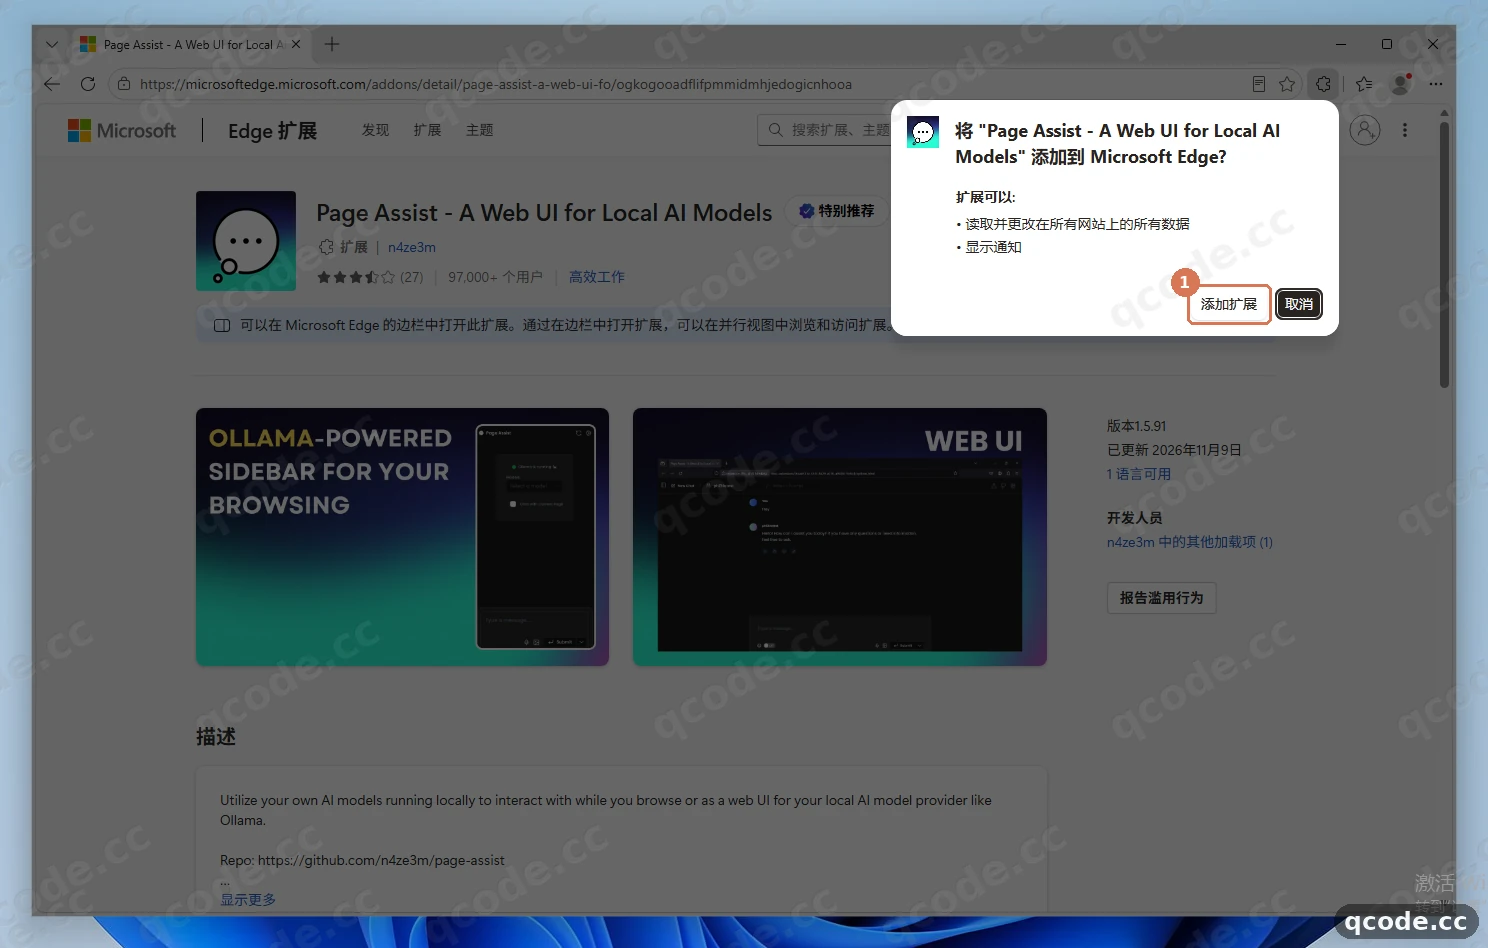
Done right you will see: the download and install finish within seconds, and a bubble in the top right of Edge says 「Page Assist - 本地 AI 模型的 Web UI 现已安装」 (Page Assist - a web UI for local AI models is now installed).
Pin Page Assist to the browser toolbar
First click × in the top right to close the "now installed" bubble. Then click the puzzle-piece 「扩展」 (Extensions) icon at ① on the right of the address bar, find Page Assist in the drop-down list, and click the pin icon at ② on its right (「固定到工具栏」, Pin to toolbar); the Page Assist icon at ③ then stays on the toolbar permanently.
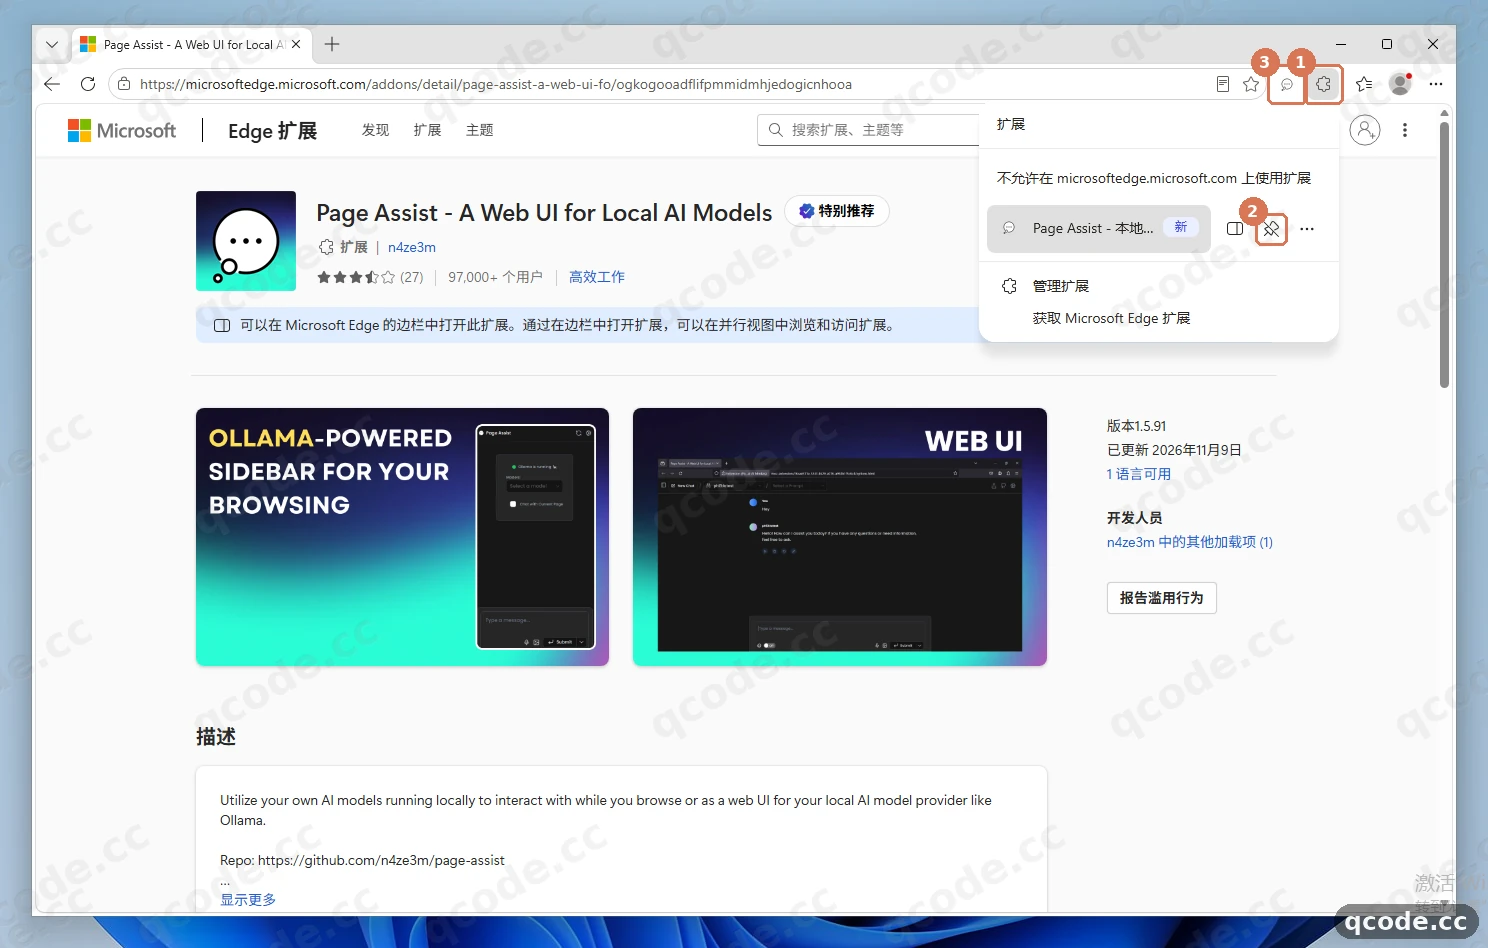
Done right you will see: the Page Assist icon stays on the toolbar to the right of the address bar, ready to open with a click.
Open the Web UI and go to settings
Click the Page Assist icon on the toolbar and the browser opens the Web UI in a new tab. The first launch shows an English interface with Unable to connect to Ollama (http://127.0.0.1:11434) in the middle of the page — with the QCode cloud API you need no local Ollama, so just ignore it. Click the gear icon at ① in the top right of the page to enter settings.
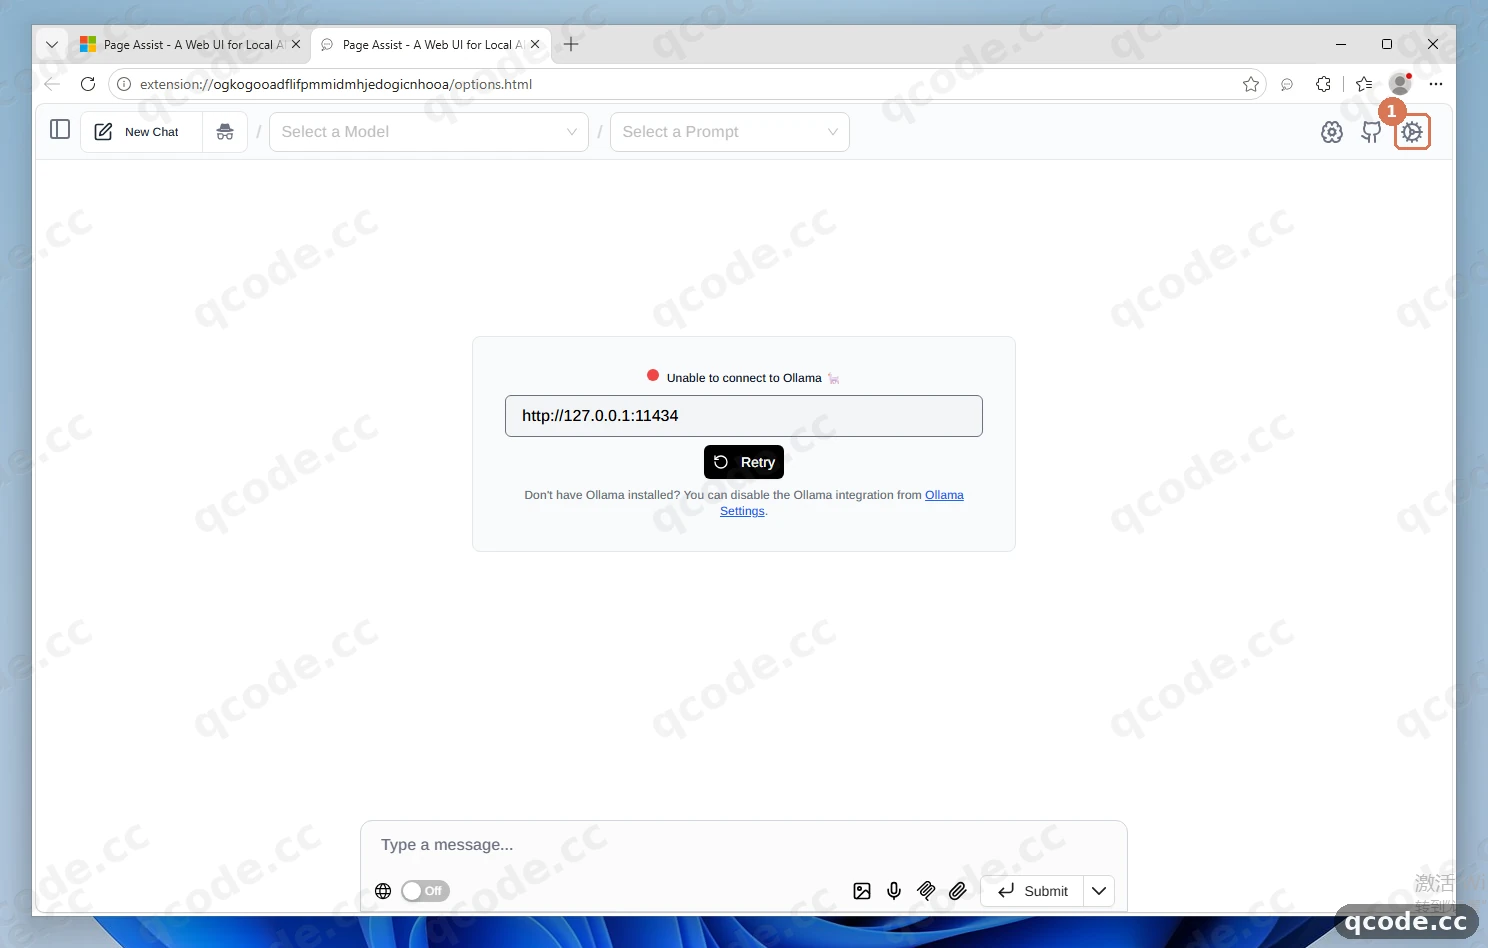
Done right you will see: the page enters the settings screen, with the settings navigation menu on the left and "General Settings" on the right.
Stuck? Clicking the toolbar icon does nothing, or the gear is missing
First make sure step 3 pinned Page Assist to the toolbar and that you clicked its icon. The gear icon sits in the top right of the new tab's content area (the rightmost icon); you can also click 「在边栏中打开」 (Open in sidebar) next to Page Assist in the Extensions menu and then the gear at the top of the sidebar, which opens the same settings page.
Switch to Simplified Chinese and open "OpenAI Compatible API"
Once in settings, click the Language drop-down at ① at the top (it shows English by default), search for and select 「简体中文」 (Chinese (Simplified)), and the whole interface switches to Chinese immediately. Then click 「OpenAI 兼容 API」 (OpenAI Compatible API) at ② in the left-hand menu.
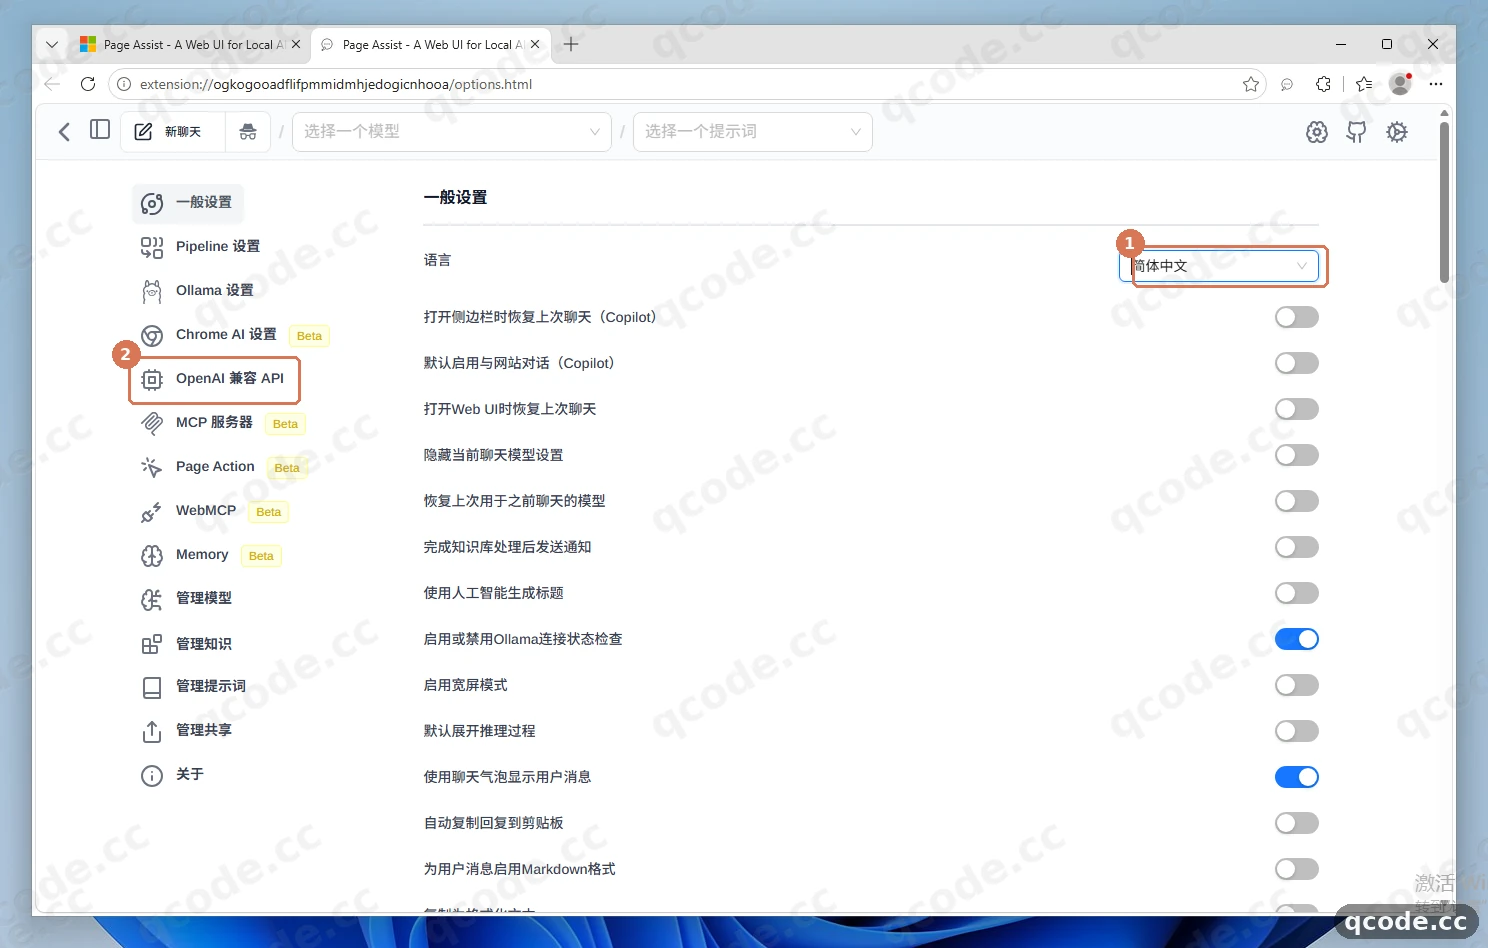
Done right you will see: the whole left menu is in Chinese (「一般设置」 (General Settings), 「OpenAI 兼容 API」 (OpenAI Compatible API), 「管理模型」 (Manage Models) and so on), and the right side shows the OpenAI-compatible service management page with an "Add provider" button.
Add the QCode provider and fill in the API key
Click "Add provider" on the page and the "Add new provider" window opens. Fill it in in this order:
- Keep the type drop-down at ① at its default 「Custom」;
- Set "Provider name" to
QCode; - Set "Base URL" at ② to
https://api.qcode.cc/openai/v1(stop at/v1, with no extra trailing slash or/chat/completions); - Paste the
cr_key you copied in the QCode Dashboard into "API key" (format likecr_xxxxxxxx); - Leave
Fix CORS issuesand "Custom headers" at their defaults, then click 「保存」 (Save) at ③ at the bottom.
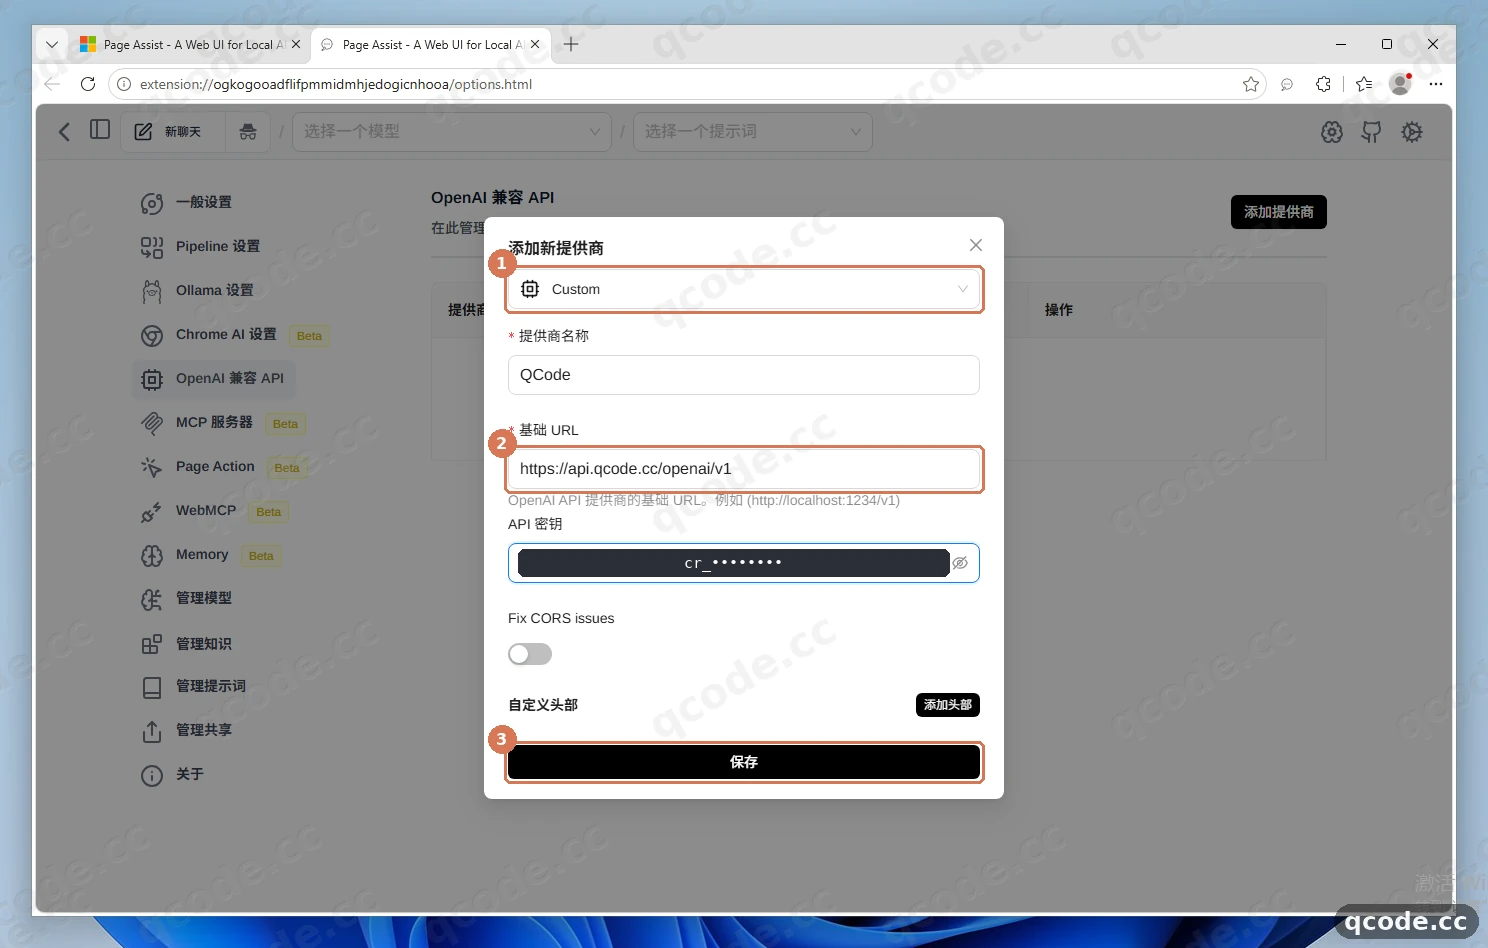
Done right you will see: the "Add new provider" window closes and the "Model list" window opens automatically right after, showing the QCode models that were fetched.
Need an API key?
If you do not have a QCode account yet, Sign up first. If you prefer to pay by usage, buy a Pay-as-you-go Pack first, then create the key in the Dashboard. Copy the whole string that starts with cr_ and paste it into the "API key" box above. You can pay by credit/debit card (Visa / Mastercard), Apple Pay / Google Pay, or cryptocurrency — see Payment methods.
Tick the recommended model in the model list
After saving the provider, Page Assist automatically uses the key to fetch the QCode OpenAI-compatible model list (20 models in total). Tick gpt-6.2-sol at ①; if you would also like a lightweight backup model, type deepseek-v4.1-flash in "Search models" at ② and tick it as well. Keep the bottom type set to "Chat model" and click 「保存」 (Save) at ③.
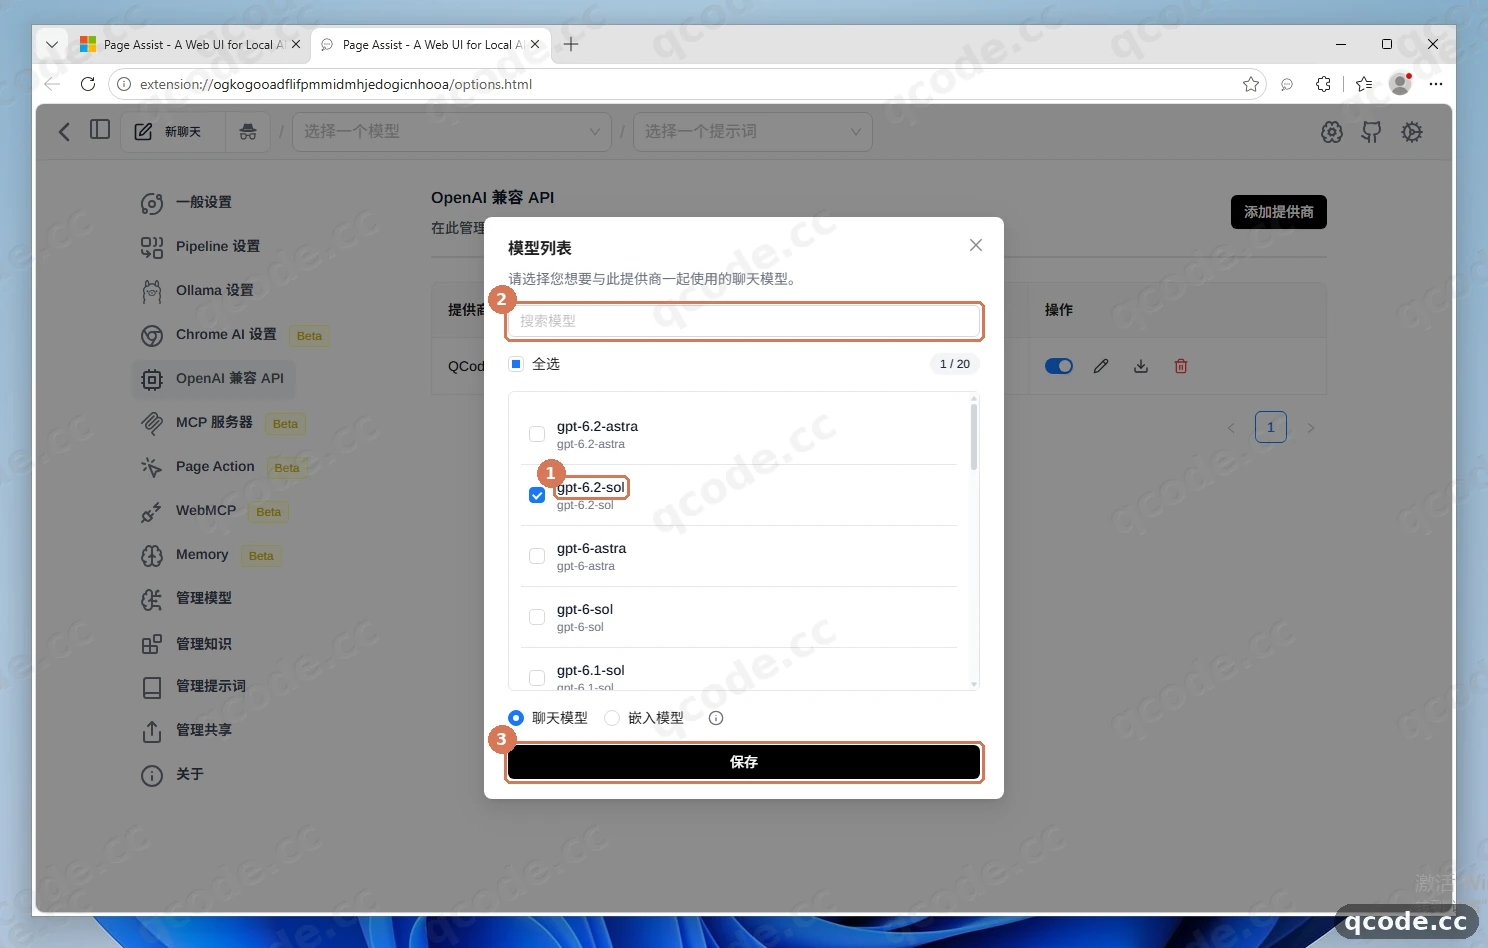
Done right you will see: a brief 「成功添加新模型。」 (New model added successfully.) message at the top of the page, then it returns to the "OpenAI Compatible API" list page.
Stuck? The model list is empty or fetching failed
First check that "Base URL" in the previous step is exactly https://api.qcode.cc/openai/v1, and that the key starts with cr_ with no stray spaces before or after it. If the list is still empty, close the dialog and go to 「管理模型」 (Manage Models) → 「自定义模型」 (Custom models) from step 9, click 「添加新模型」 (Add new model) and enter gpt-6.2-sol by hand.
Confirm the QCode provider is enabled
Back on the "OpenAI Compatible API" list page, check the newly added QCode row at ①: confirm that "Base URL" is https://api.qcode.cc/openai/v1 and that the enable switch on the far right is on (blue). The table never shows your API key in plain text; to change the key or re-sync the model list later, click the edit or download icon on the right of that row.
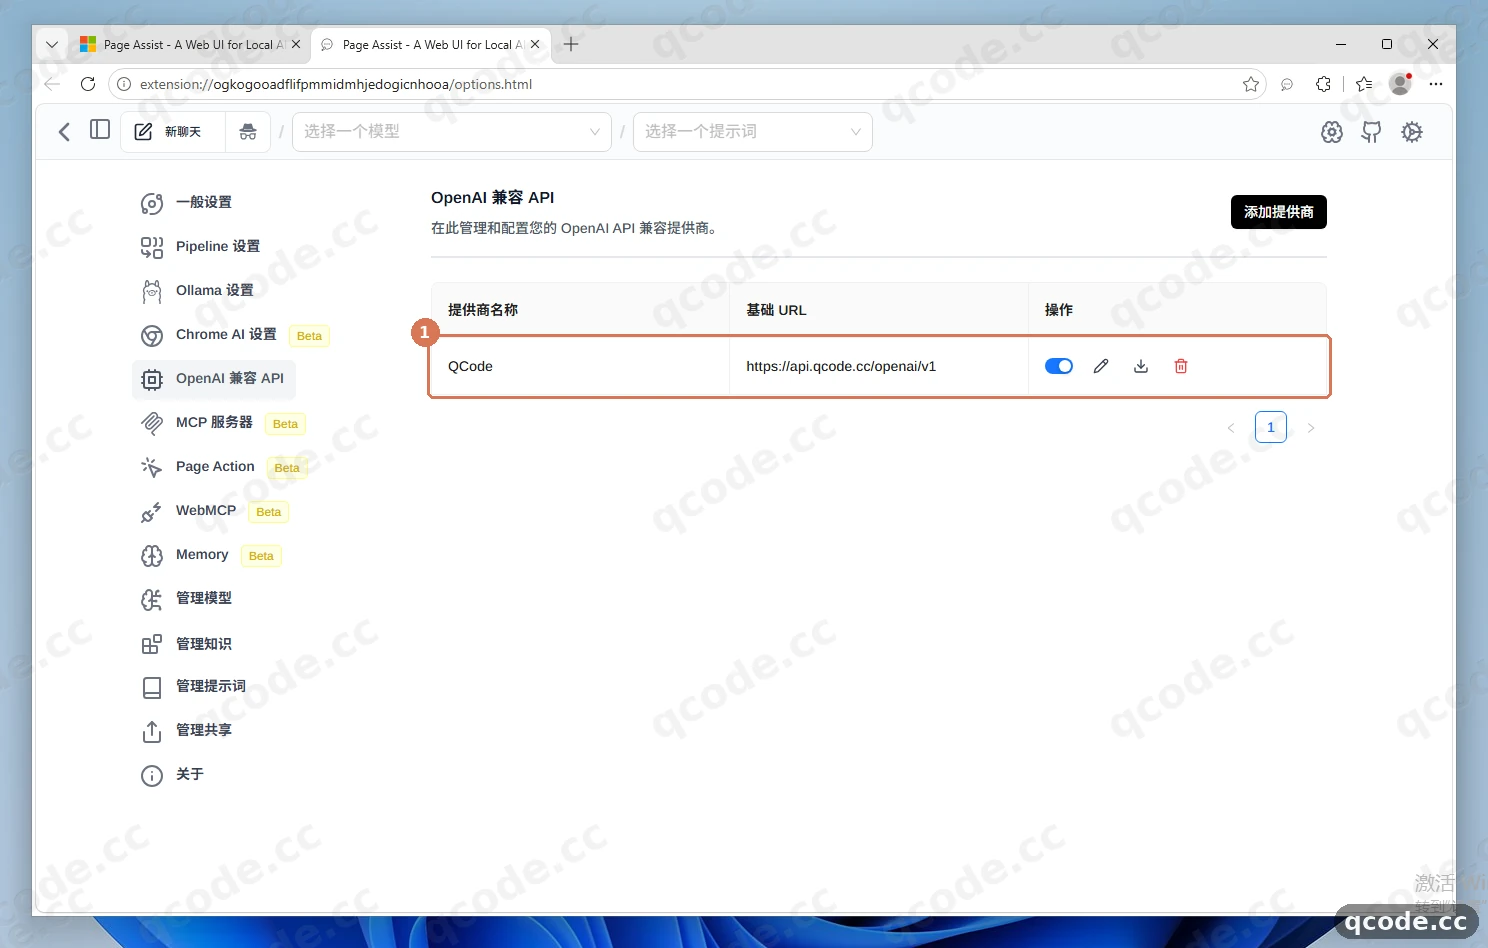
Done right you will see: a QCode row in the table, the correct base URL, and the switch on the far right on and blue.
Check the imported models under "Manage Models"
Click 「管理模型」 (Manage Models) in the left menu (it opens the 「Ollama 模型」 (Ollama models) tab by default), then click the 「自定义模型」 (Custom models) tab at ①. Confirm that gpt-6.2-sol (and deepseek-v4.1-flash, if you ticked it too) already appears in the list at ②. Whenever you need to add another model ID by hand later, click 「添加新模型」 (Add new model) at ③ in the top right.
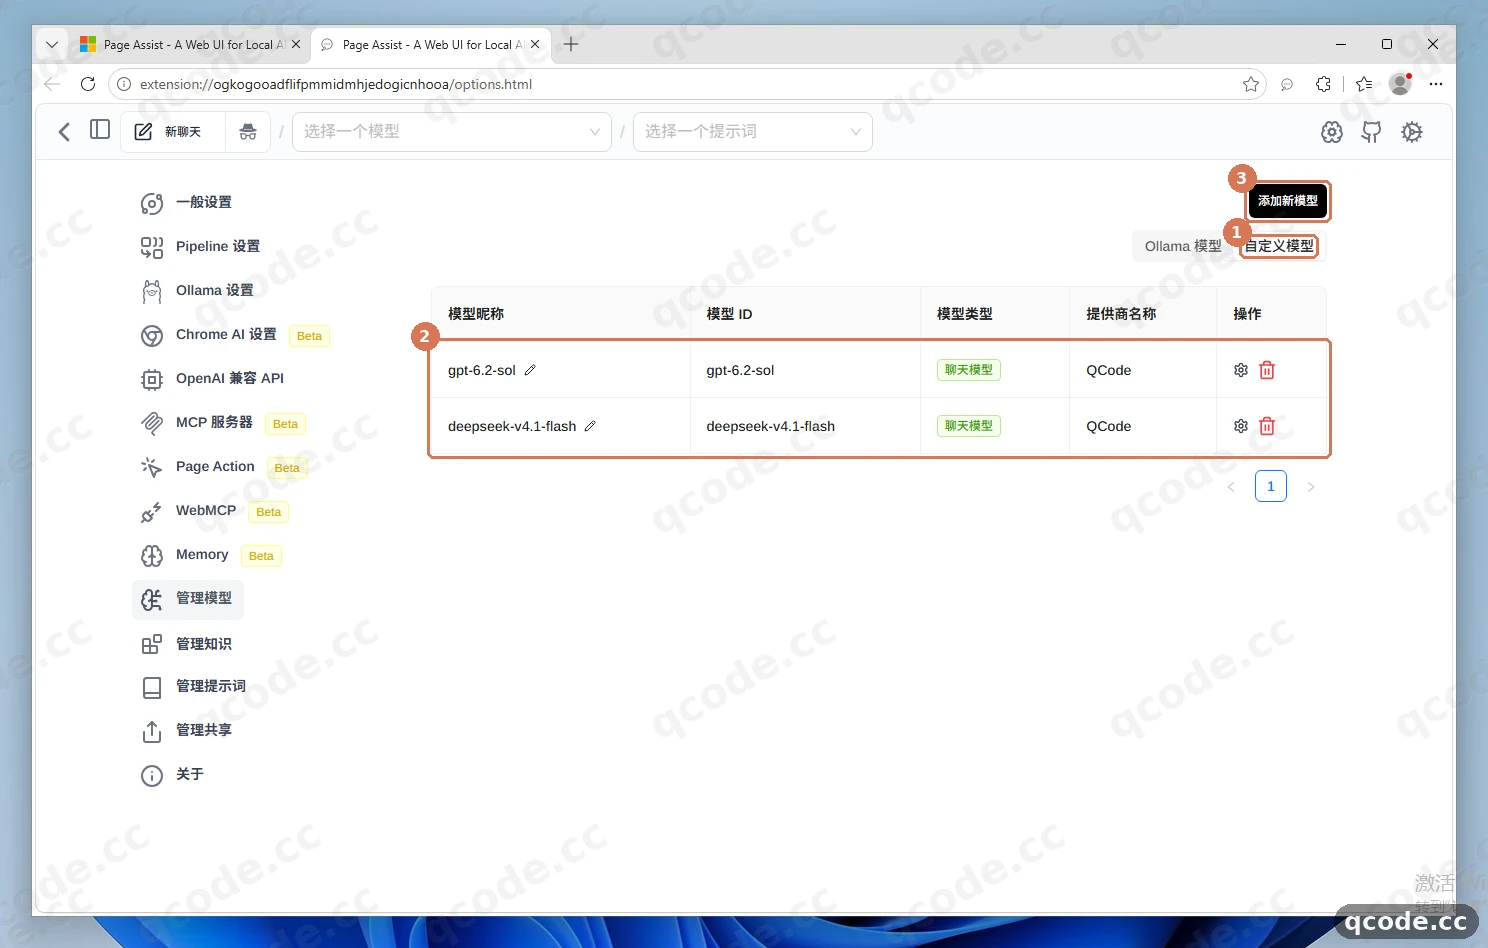
Done right you will see: the "Custom models" tab clearly lists gpt-6.2-sol with an available status.
Open a web page and pick the model in the sidebar
Open a new browser tab and load any page you want to read (an English technical doc, for example), then press Ctrl+Shift+Y to open the Page Assist sidebar on the right. Click the "Select a model" drop-down at ① at the top of the sidebar and choose gpt-6.2-sol at ② in the expanded list.
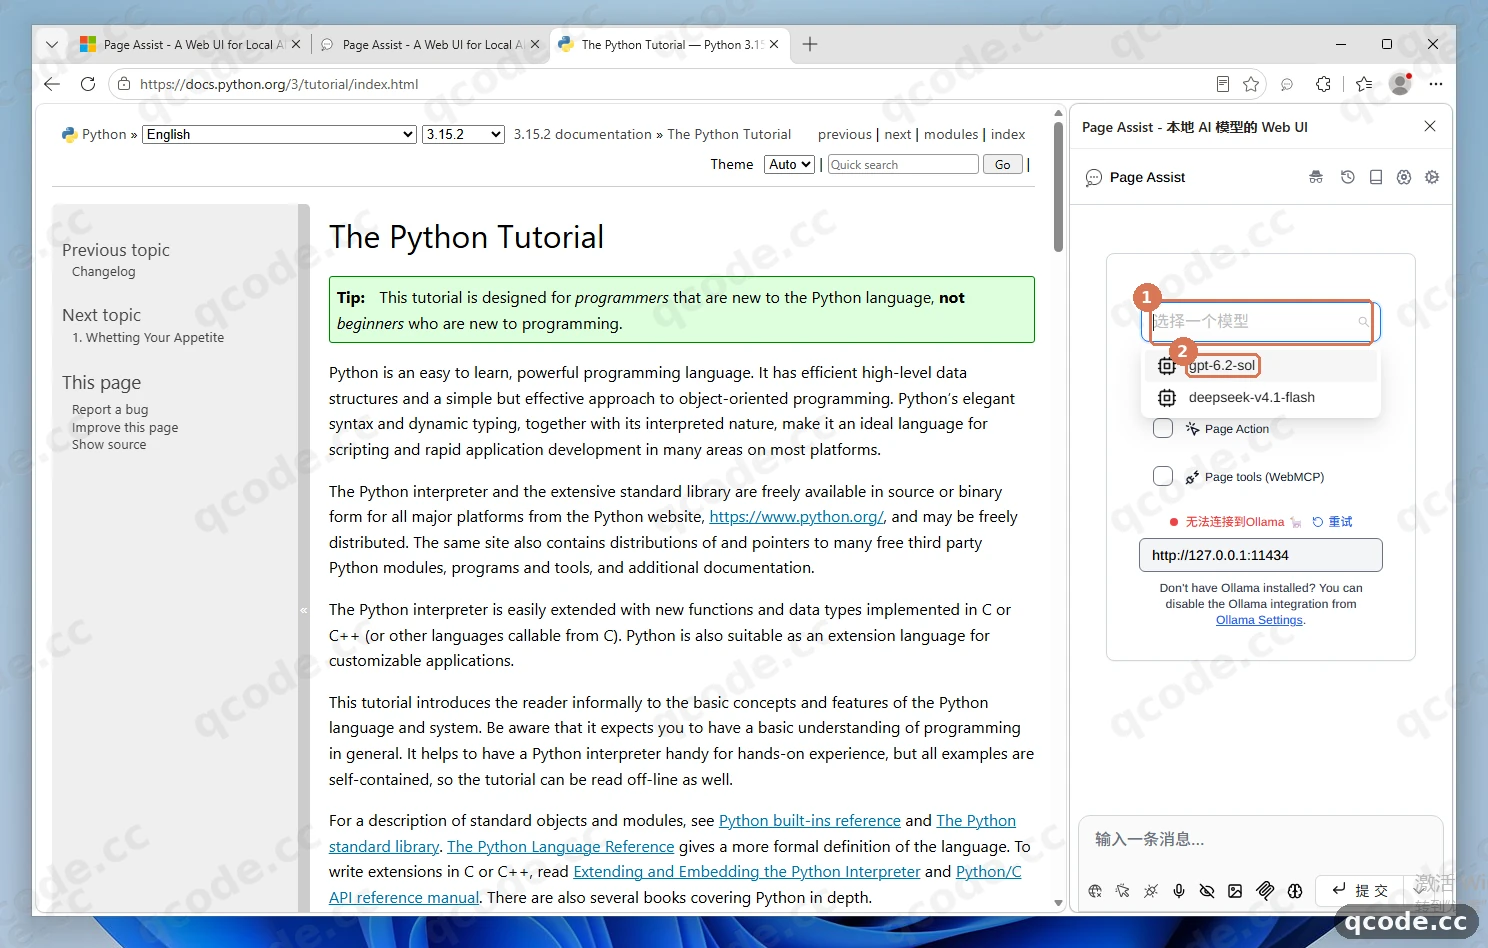
Done right you will see: the Page Assist sidebar opens on the right of the page, the model drop-down lists gpt-6.2-sol directly and it can be selected without refreshing the page.
Stuck? Nothing happens when you press Ctrl+Shift+Y
The shortcut may clash with another extension or application. Click the puzzle-piece 「扩展」 (Extensions) icon on the right of the address bar, find Page Assist and click the 「在边栏中打开」 (Open in sidebar) icon next to it — that opens the same sidebar.
Tick "Chat with current page" and send your question
Once the model is selected, first tick the "Chat with current page" checkbox directly below the model selector (it is unticked by default, and without it the model cannot read the page body). Then type 「用中文简要总结这个页面(三句话以内)」 ("Summarize this page briefly in Chinese, within three sentences") into the 「输入一条消息...」 (Type a message...) box at the bottom and click 「提交」 (Submit). After sending, ① shows your question, and within seconds gpt-6.2-sol at ② returns a Chinese summary that matches the current page content, with a clickable, expandable 「引用」 (Citations) source at ③ at the bottom of the reply.
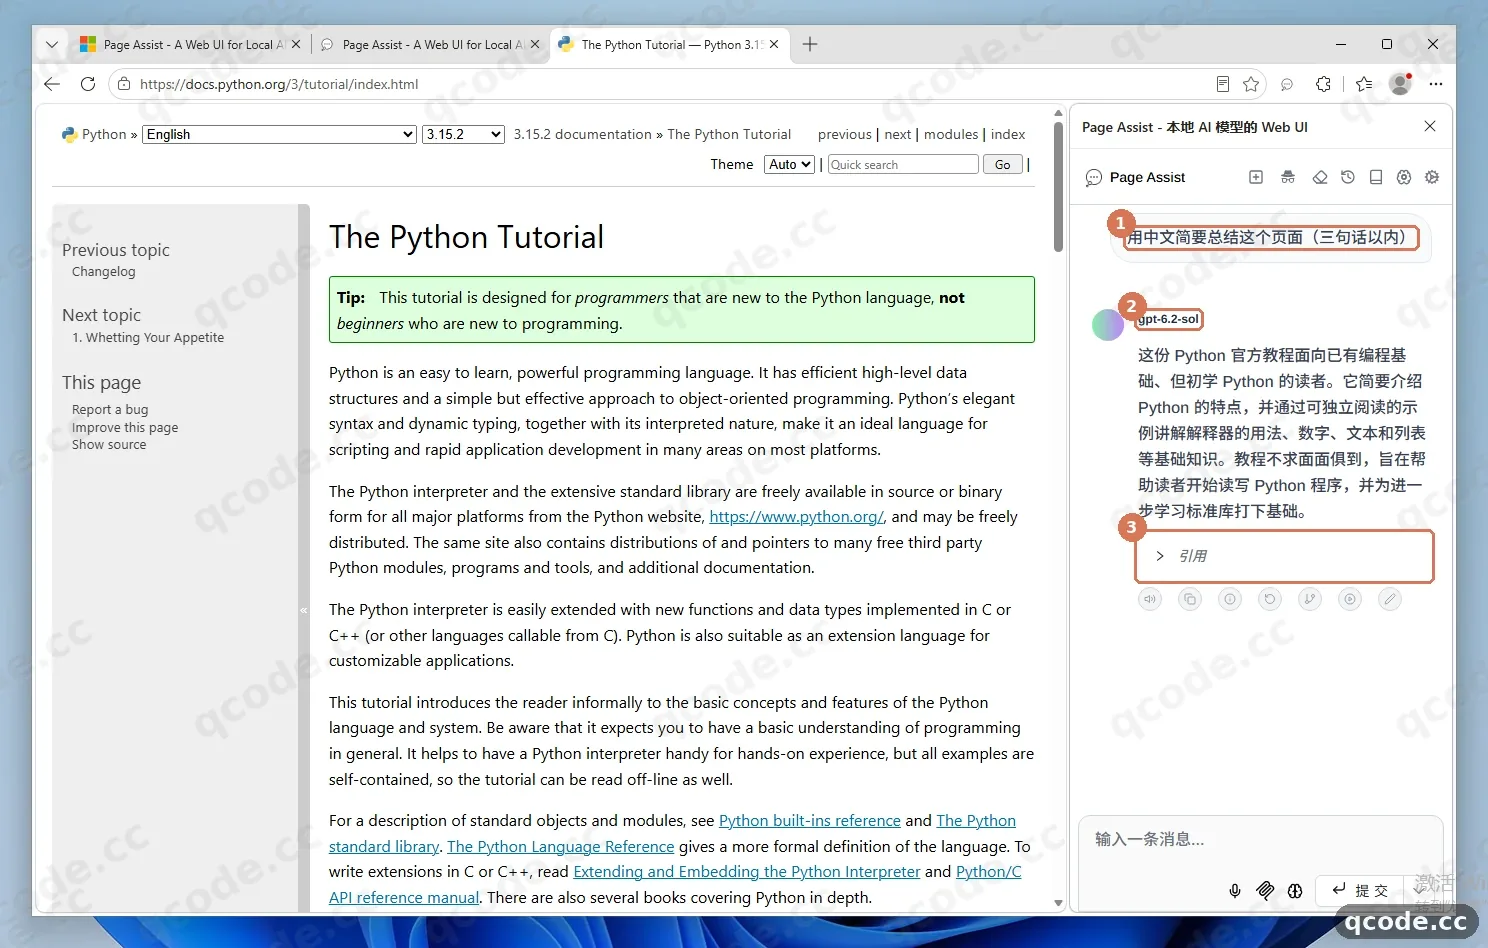
Done right you will see: the sidebar quickly outputs a Chinese summary based on the current page content, an expandable "Citations" button appears at the bottom, and there is no red error.
Stuck? The model says it cannot see the current page content
Make sure the "Chat with current page" checkbox in the sidebar is ticked. If you want the sidebar to read the page body by default every time you open it, go to Settings → 「一般设置」 (General Settings) and turn on 「默认启用与网站聊天」 (Enable website chat by default).
Verify it works
When all four of these line up, Page Assist is fully connected to QCode:
- In Settings → "OpenAI Compatible API" the table contains a
QCoderow, its "Base URL" ishttps://api.qcode.cc/openai/v1and the enable switch on the right is on (blue); - In Settings → 「管理模型」 (Manage Models) → 「自定义模型」 (Custom models) you can see
gpt-6.2-sol; - On any web page, press
Ctrl+Shift+Yto open the sidebar, selectgpt-6.2-sol, tick "Chat with current page" and send a summary request — you get a normal reply based on the page content; - Open probe.qcode.cc, enter the same
cr_key and query: you will see a request record whose time matches the question you just asked and whose status is normal.
All done
You have installed Page Assist in a Windows 11 browser and connected it to QCode. From now on, whenever you read English docs, long articles or web material, press Ctrl+Shift+Y to summarize and ask follow-up questions in the sidebar at any time. From here you can:
- Endpoints and API formats
- Model selection guide
- Chinese models
- Troubleshooting
- Next: compare the plans on the pricing page
- Go back to your Dashboard to check usage and balance
Common errors
| Error message | Why | What to do |
|---|---|---|
Unable to connect to Ollama (http://127.0.0.1:11434) |
Page Assist checks by default whether Ollama is running locally, so opening the Web UI without a local Ollama shows this notice | With the QCode cloud API just ignore it: click the gear icon in the top right, add an "OpenAI-compatible API" provider as described in this tutorial and select gpt-6.2-sol in the chat interface |
model_not_available_on_endpoint |
A Claude model (such as claude-opus-5-5) was entered under "OpenAI Compatible API"; the QCode OpenAI-compatible endpoint does not accept Claude models |
In Page Assist use GPT or Chinese models (recommended: gpt-6.2-sol, deepseek-v4.1-flash, glm-5.3 and so on); when you need Claude, switch to a client that supports the custom Anthropic endpoint https://api.qcode.cc/api |
404 |
The "Base URL" carries an extra path (for example https://api.qcode.cc/openai/v1/chat/completions), and Page Assist appends /chat/completions again, so the address is wrong |
Open "OpenAI Compatible API", edit the QCode provider, change "Base URL" to https://api.qcode.cc/openai/v1 (exactly ending at /v1, with no extra path or trailing slash) and save |
FAQ
What happens when my key expires?
Two cases:
- A personal plan key cannot be renewed after it expires — you have to open a plan again and use a new key;
- For a pay-as-you-go pack, buy another pack after the key expires and the same key starts working again automatically.
If you switched to a new key, open Page Assist settings → "OpenAI Compatible API", click the edit icon on the right of the QCode row, replace the "API key" and click 「保存」 (Save).
Why can't I use Claude models in Page Assist?
"Anthropic (Claude)" in Page Assist is only a fixed preset inside the OpenAI-compatible drop-down: its endpoint address is hard-coded to the official URL and there is no entry for a custom Anthropic Base URL. QCode's Claude models (such as claude-opus-5-5 and claude-haiku-5-5) are only served on the Anthropic protocol endpoint https://api.qcode.cc/api, and cannot go through the OpenAI-compatible endpoint. So connecting Page Assist to QCode supports GPT and Chinese models only; if you need Claude, pair it with a desktop or IDE client that supports a custom Anthropic endpoint.
The model list is empty after saving the provider — how do I add a model by hand?
If the model list did not pop up automatically when you added the provider, first check that "Base URL" is https://api.qcode.cc/openai/v1 and that the key is complete and valid; once that is confirmed, open 「管理模型」 (Manage Models) in the left menu → switch to the 「自定义模型」 (Custom models) tab → click 「添加新模型」 (Add new model) in the top right and enter the model ID (such as gpt-6.2-sol) by hand and save.
How do I make the sidebar read the current page by default instead of ticking the box every time?
In the sidebar "Chat with current page" is unticked by default. If you often summarize the current page, open Page Assist settings → 「一般设置」 (General Settings), find and turn on 「默认启用与网站聊天」 (Enable website chat by default); after that every time you bring up the sidebar it associates the page you have open automatically.
What if responses are slow or occasionally time out?
On mainland China networks, switch "Base URL" to the Asia node https://asia.qcode.cc/openai/v1; on networks in North America or Europe, use https://us.qcode.cc/openai/v1. If a particular web page triggers a browser cross-origin block, you can also edit the QCode provider under "OpenAI Compatible API" and try turning on the Fix CORS issues switch before saving.
Connection overview
| Item | Details |
|---|---|
| Form factor | Browser extension (Edge / Chrome / Firefox), with a standalone Web UI and a web page sidebar |
| Protocol and Base URL | OpenAI-compatible: https://api.qcode.cc/openai/v1 |
| API type | Custom |
| Available models | GPT ✅ (recommended gpt-6.2-sol) · Chinese models ✅ (such as deepseek-v4.1-flash, glm-5.3, kimi-k3) · Claude ❌ (the extension offers no custom Anthropic Base URL) |
| Sidebar shortcut | Ctrl+Shift+Y |
| Official repository | github.com/n4ze3m/page-assist |
Other ingress points
QCode offers three ingress points with the same capabilities and the same keys — only the network route differs. To switch, edit the "Base URL" of the QCode row under "OpenAI Compatible API":
| Node | OpenAI-compatible Base URL |
|---|---|
| Global (default) | https://api.qcode.cc/openai/v1 |
| Asia (first choice in mainland China) | https://asia.qcode.cc/openai/v1 |
| North America / Europe | https://us.qcode.cc/openai/v1 |
Available models
In the Page Assist "Model list" or "Add new model", you can pick the following OpenAI-compatible models by scenario:
| Model | Model ID | Recommended for |
|---|---|---|
| GPT 6.2 Sol | gpt-6.2-sol |
Default recommendation, balanced workhorse for page summaries and everyday Q&A |
| GPT 6.2 Astra | gpt-6.2-astra |
Advanced complex reasoning and deep long-form analysis |
| DeepSeek V4.1 Flash | deepseek-v4.1-flash |
Fast responses, suited to frequent lightweight page Q&A |
| DeepSeek V4 Pro | deepseek-v4-pro |
Complex reasoning and technical document interpretation |
| GLM 5.3 | glm-5.3 |
Chinese workhorse, natural and fluent Chinese summaries |
| Kimi K3 | kimi-k3 |
Long-document reading and multi-turn page follow-ups |
More Chinese model IDs are in Chinese models; the live list of available models follows qcode.cc/models.
Related docs
- Endpoints and API formats — protocol and model family comparison table
- Model selection guide — how to pick the right model for different scenarios
- Chinese models — list of Chinese models available on the OpenAI-compatible endpoint
- Troubleshooting — common connection and authentication problems
- Page Assist official repository
Get started with QCode
One API key for Claude Code, Codex and more — billed per token, per-model prices on qcode.cc/models